To avoid these ads, REGISTER NOW!

40x60 backyard shop build

jawillis

Member
Joined
Feb 5, 2012
Messages
23
Location
Cedar Park, TX
Smash and Crash 40x60 shop build

Ever since visiting my grandpa's farm as a kid, I just took it for granted that grown-ups have big shops full of tools to build stuff and work on projects.
Thus far, adulthood has been a huge disappointment.

Until now.

I'm finally building my dream shop for automotive, woodworking, metalworking and general workshop usage.

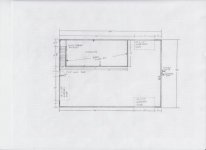
The shop will be a 60x40x16 Mueller steel building, 3/12 pitch roof, with a 16x40 mezzanine inside and a 24x60 lean-to.

Capture.jpg

I'm taking time-lapse videos of the whole building process. So far I'm 3 work-days in and the slab is ready to be poured.

Day 0 - Nothing much happening here. This was mainly a test of the timelapse camera stuff. Site inspection and equipment drop-off by the foundation crew.

Day 1 - Footers cut and concrete forms started. The driveway was in the wrong place, so they had to be moved.

Day 2 - More pad prep. 7 truckloads of fill dirt. I also added a camera using power from my neighbor's barn (yes, he's aware).

Day 3 - Lots going on here. More dirt, road base for a dirt road laid down. Vapor barrier and rebar in place. Power company planted a new pole to run a dedicated 200-amp service to the shop. Ready for inspection!


Day 4 - Inspection. Failed. Inspector wants a Ufer ground wire installed. I installed it myself per his instructions after work. In the dark, with a flashlight.

Day 5 - Inspection. Pass! We're ready to pour!

And that brings us all the way to the present. I'll keep you guys updated on the progress!
 

Attachments

  • Floorplan-scan.jpg
    Floorplan-scan.jpg
    8.6 KB · Views: 331
Last edited:
To avoid these ads, REGISTER NOW!
OP
J

jawillis

Member
Joined
Feb 5, 2012
Messages
23
Location
Cedar Park, TX
I realize the original post was a bit light on pictures, and you guys seem to enjoy pictures. I don't have a photobucket account to host from, so I'm trying from my google account. Let's see if this works...

Here's the state of the project right now.

The new gravel road from the gate to the shop. Maybe someday I'll give it a clean border, but for now, it's serviceable.
20160218_172226.jpg

I'm not sure what to do from the street to the gate, though... Maybe those lattice-like paving stones? I'm open to suggestions. I'll probably build a wooden gate in the future to close the gap in the shrubbery.
20160218_172241.jpg

Unfortunately, my irrigation system runs straight under the gravel road. I've marked the locations of the valves using limestone blocks a friend gave me. I also have a pretty detailed map of the sprinklers from the previous owner in case the blocks cannot be easily located. No sprinkler heads were covered by the road.
20160218_172306.jpg

The slab and apron before the pour. We're scheduled to pour in a week. I wish it was sooner, but there's not much I can do about that.
20160218_172427.jpg

The lean-to/carport/awning/whatever also got a layer of gravel. This area will be for trailer and project car storage. I do not intend to use the shop for vehicle storage; just vehicles that are actually being worked on. Okay, there might be a special one or two in there.
20160218_172539.jpg

They're not kidding around with the post footings. 3'x3'x1'. Seems a little overbuilt to me, but what do I know? Nothing. I know nothing.
20160218_172553.jpg

There's plenty of room to pull a vehicle/trailer around back. That beat-up chinaberry tree is going to go. I hate chinaberry trees. I've had way too many stuck in my skateboard wheels as a kid...
20160218_172814.jpg
 
Last edited:
OP
J

jawillis

Member
Joined
Feb 5, 2012
Messages
23
Location
Cedar Park, TX
I was afraid of that... Oh well.
I've edited the post with attachments instead of 3rd-party links.

Just a couple of the cars I'll be working on in the shop. The nicer stuff is either in the garage, or spread out at friends' houses.
20160218_172944.jpg

-Jason
 

Bib Overalls

Well-known member
Joined
Dec 4, 2006
Messages
3,318
Location
Jonesboro, Arkansas
I realize the original post was a bit light on pictures, and you guys seem to enjoy pictures. I don't have a photobucket account to host from, so I'm trying from my google account. Let's see if this works...

Forget Photobucket. Flickr is better all the way around. Easy to upload and easy to link. Free. Excellent resolution.
 
OP
J

jawillis

Member
Joined
Feb 5, 2012
Messages
23
Location
Cedar Park, TX
How about a little SketchUp-Fu to give you an idea of what I'm shooting for?
SketchUp is awesome for spending endless hours in a shop that doesn't actually exist, yet.

The chill-out room and main workshop area will be underneath the mezzanine. The far back overhead door will access the lift. The mezzanine area will be used for some storage, or possibly another light-duty work area like an upholstery/sewing station or woodworking area. Part of the railing will be removable and an electric hoist will be mounted for lifting heavy objects that can't be carried up stairs.
This image doesn't show the lean-to, which will be along the closest wall.
25135563986_2153b4e079_b.jpg


A closer look at the work area. Benches and cabinets (not shown) along the walls. I plan on metal-skinned plywood benchtops for dealing with oily parts.
The big welding table may not happen right away, but it's on the wish-list for sure.
Power tools and toolboxes were just thrown in there to represent some of the tools I have or plan to have.
25161905045_296fde0b70_b.jpg
 
OP
J

jawillis

Member
Joined
Feb 5, 2012
Messages
23
Location
Cedar Park, TX
The concrete was poured this morning. Like, really early this morning. Trucks started showing up before 6AM and worked undertruck headlights and halogen work lights.

Here's the time-lapse video of the day's work:

Early start! I owe my neighbors some beers, for sure.
20160226_060403 by Jason Willis, on Flickr


Here comes the sun, and they've already made tons of progress:
20160226_065714 by Jason Willis, on Flickr

Too many trucks were ordered, so we had to figure out what to do with the extra concrete. We settled on extending the apron across the entire front of the building. Unfortunately, the earth-moving equipment was already offsite, and no rebar. It's pretty darn thick, though.
20160226_075318 by Jason Willis, on Flickr

It might be a good place to wash a car or hose something off.
20160226_091005 by Jason Willis, on Flickr

The main line to the sprinklers broke after one or two concrete trucks drove over it. I was able to shut it off fairly quickly, but not before the ground got pretty soggy. Further traffic made a nice mess of the yard.
20160226_115517 by Jason Willis, on Flickr

Finished slab.
20160226_151938 by Jason Willis, on Flickr

The overhead door opening under the lean-to. I'm going to leave this big step to use as a low loading dock. It worked out to be a pretty good height for a lowboy trailer, I think.
20160226_152042 by Jason Willis, on Flickr

The 2-post lift will be inside this door. I'll have to figure out the transition. My first choice for the extra concrete was a driveway to this door, but not without moving some dirt around first.
20160226_152137 by Jason Willis, on Flickr

Luckily, the steel delivery arrived after the last of the concrete trucks left.
20160226_105826 by Jason Willis, on Flickr

This sidewinder forklift is a pretty awesome machine. He was able to grab a long load, and then wheel it sideways to the back yard. Too bad I didn't get a photo of it in action.
20160226_105828 by Jason Willis, on Flickr

All of those heavy trucks made a mess of my grass. These ruts aren't even the worst of it. Any thoughts on how to smooth it back out? I'm wavering between just filling the ruts with more dirt, or tilling over it all and re-seeding the grass. I'm leaning towards the latter.
20160226_151929 by Jason Willis, on Flickr


-Jason
 

matt_i

Well-known member
Joined
Mar 14, 2008
Messages
10,725
Location
SE Michigan
Looks like a good build. I wouldn't worry too much about the ruts for now, until everything is done. Filling is usually easier, if you go slow and fill it in small stages, the grass will keep growing up thru it, no need to replant :) But it of course takes longer.
 
OP
J

jawillis

Member
Joined
Feb 5, 2012
Messages
23
Location
Cedar Park, TX
Looks like a good build. I wouldn't worry too much about the ruts for now, until everything is done. Filling is usually easier, if you go slow and fill it in small stages, the grass will keep growing up thru it, no need to replant :) But it of course takes longer.
I fully agree about waiting until it's all done. The erector is going to leave his own mark on the yard before all is said and done.
I'm pretty sure filling is not going to be the best solution for some areas where the rutting is the worst. Those areas will probably be addressed with a borrowed tractor and box blade.

-Jason
 
Last edited:
To avoid these ads, REGISTER NOW!
OP
J

jawillis

Member
Joined
Feb 5, 2012
Messages
23
Location
Cedar Park, TX
Did you order the mezzanine at the same time as the building and from the same company?
Yes, I ordered it all at once. I knew I wanted it, and I also knew that it would never get done if I didn't do it right away before I start filling up the shop.
I'll have to provide the decking, stairs and guardrails. The decking and stairs will be wood. I'm not sure about how I'll do the guardrails.

-Jason
 

Bib Overalls

Well-known member
Joined
Dec 4, 2006
Messages
3,318
Location
Jonesboro, Arkansas
You will be surprised at how those compressed "rutts" will spring back over time. We live in the last house on a dead end road and very early one morning a lost trucker turned his semi around in our front yard. Fortunately a neighbor got the name of the company and we were able to hire a contractor to restore the lawn. He used sand and a roller. Turned out better than it was originally.

Will be down in your neighborhood in early April for the Lone Star Roundup. Always have a fun time in Austin. You are lucky to be living in the area. I envy you a bit.
 

wadegibson

Member
Joined
Dec 18, 2015
Messages
22
Location
Inavale, NE
I'm getting ready to start a 40x60x16 steel building this spring too. I plan to have a similar mezzanine but on the endwall for me. Definitely following this build!
 
OP
J

jawillis

Member
Joined
Feb 5, 2012
Messages
23
Location
Cedar Park, TX
Sorry for taking so long to update. The erector was scheduled to start construction last week, but we got rained out. Even when there was a lull in the weather, the ground was really soft. They finally got started on Tuesday...

I failed to spec out any windows when placing my order, so I had to pick up a couple of 3'x4' sliding windows from Lowe's. My builder says he should have enough metal to frame them in, but we'll probably have to order more trim. The windows will go in the office area under the mezzanine so that it doesn't feel like a cell.

Timelapse videos:
Day 5 -
- Basically got all the steel cut and a few brackets welded on.

Day 6 -
- More welding. Completing the truss fabrications.

Day 7 -
- Now it gets exciting! Standing everything up.

I only have a couple of pictures to share.

I think these are the roof truss pieces, ready to weld up.
20160315_193442 by Jason Willis, on Flickr

Action shot of putting one of the trusses in place.
20160317_121040 by Jason Willis, on Flickr

Not strictly construction-related, but pretty close; My neighbor hooked me up with the guy selling this used Challenger 2-post lift. I think it was decommissioned from a local Chevy dealership. American-made for half the cost of a new Chinese-made lift. Not bad!
20160312_170250 by Jason Willis, on Flickr

Stay tuned for more updates as construction progresses.

-Jason
 

Jon In Tucson

Well-known member
Joined
Jun 20, 2013
Messages
94
Location
Tucson, AZ
Not strictly construction-related, but pretty close; My neighbor hooked me up with the guy selling this used Challenger 2-post lift. I think it was decommissioned from a local Chevy dealership. American-made for half the cost of a new Chinese-made lift. Not bad!
20160312_170250 by Jason Willis, on Flickr

Stay tuned for more updates as construction progresses.

-Jason

Great Score! God bless.
Jon In Tucson
 
OP
J

jawillis

Member
Joined
Feb 5, 2012
Messages
23
Location
Cedar Park, TX
Wow... I got really behind with this thread. I'll try and get caught up soon, I promise.

Videos:

Day 8 -
- More framing
Day 9 -
- Mezzanine framing

Frame with a magic door. Yes, I walked through it to get in.
20160319_124239 by Jason Willis, on Flickr

View towards the front of the shop from the rear.
20160322_191634 by Jason Willis, on Flickr

Detail of the Mezzanine.
20160322_191613 by Jason Willis, on Flickr

The lift will go right here.
20160322_191604 by Jason Willis, on Flickr

I didn't really think the window placement through very well. That the mezzanine post.
20160322_192309 by Jason Willis, on Flickr

-Jason
 
OP
J

jawillis

Member
Joined
Feb 5, 2012
Messages
23
Location
Cedar Park, TX
Days 10-12

More videos:
Day 10 -
- Lean-to framing and painting the frame
Day 11 -
- Windows, Trim and a wall
Day 12 -
- Walls skinned.


And pictures!
Complete shop and lean-to framing.
20160324_115514 by Jason Willis, on Flickr

The window was moved to the other side of the post.
20160323_193321 by Jason Willis, on Flickr

It's starting to look like a shop!
20160325_154056 by Jason Willis, on Flickr

There was plenty of scrap left over to build a landing for the stairs.
20160325_154138 by Jason Willis, on Flickr

The lean-to is seriously tall. I didn't account for the rise of the slab when picturing it in my head. I'll probably have to skirt it a bit if rain becomes an issue.
20160325_154100 by Jason Willis, on Flickr

-Jason
 
OP
J

jawillis

Member
Joined
Feb 5, 2012
Messages
23
Location
Cedar Park, TX
The builders are done! Doors are ordered and should arrive in 2 weeks or so.

The builder is taking his scissor lift away in a week, so I'm hoping to install some ceiling lights in that time. I'm currently debating between T8 fluorescent and the Sam's 4' LED shop lights. The current plan is 4 rows of 6 or 9 4-foot fixtures attached directly to the roof purlins. I'm not expecting to perform surgery in the open space, but I certainly don't want a cave. Cheap(ish) and easy would be ideal now that I'm just about out of money and I'll be installing myself. Expert opinions and knee-jerk reactions are welcome.

I'd prefer to spray foam before running any conduit, but I doubt I have time for that before I need to give the lift back.

Final time lapse videos:
Foundation -
Erection -

20160330_132955 by Jason Willis, on Flickr

20160330_133110 by Jason Willis, on Flickr

20160330_133242 by Jason Willis, on Flickr

20160330_133327 by Jason Willis, on Flickr

20160330_155744 by Jason Willis, on Flickr

I was one sheet two short when I ordered the decking.
20160330_155708 by Jason Willis, on Flickr

Still have to build stairs to get up here.
20160330_155716 by Jason Willis, on Flickr

-Jason
 

BoomerangJ

New member
Joined
Mar 7, 2016
Messages
3
I'm subscribed to this build as well! Sure wish JAWillis would provide some updates! Interested subscribers are waiting!
 

tx_mike

Active member
Joined
Jul 13, 2014
Messages
39
Location
Richmond TX
Re: Smash and Crash 40x60 shop build

How was your experience dealing with Mueller? did you use one of thier recommended erectors? I am outside of Houston and have gottwn a quote from them but do not know anyone that has worked with them.

Sent from my SAMSUNG-SGH-I337 using Tapatalk
 
To avoid these ads, REGISTER NOW!
Top Bottom