To avoid these ads, REGISTER NOW!

40x60x17 Pole Barn Build

JessieAMorris

Active member
Joined
May 18, 2021
Messages
32
Location
Utah
Hey All,

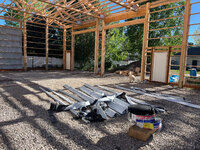
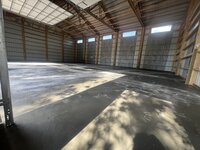
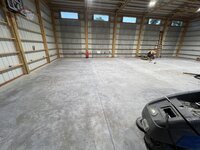
I finally started on the shop that I've so long dreamed for. I'm doing a 40'x60' pole barn with 17' clear height. I mainly do automotive hobby projects that I'll be ramping up as I get the space going but own a butcher shop and do a bit of medium duty truck maintenance and industrial maintenance. Eventually I'd like to get a mill and lathe, bandsaw, etc. to compliment the welders and other basic metal working tools I have. I also am planning on having some office space in the shop as well as my day job I work from home.

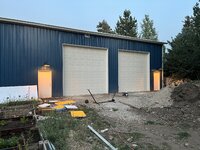
I went with two 14'x14' panel doors to allow for RV parking (not for me, but might be nice when if I sell the property) and to pull the medium duty truck in with. I'm debating the exact location of my lift, but am currently planning to place it 19' off the back wall. Lift will be a 10k lb lift and heaviest things I'd be lifting are 1 ton diesel pickups in the 7k lb range.

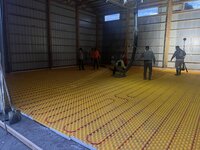
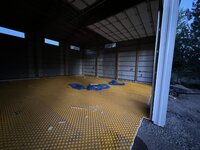
I will be insulating (walls and ceiling R19, floor R12) and installing the plumbing for radiant heat as well, though my budget doesn't let me finish the radiant install for another year or so. Very much looking forward to a nice warm workspace in the middle of winter.

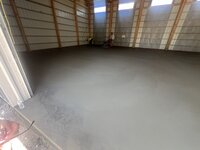
My contractors for the building have finished (a few bits of trim to do) the shell of the building. The garage doors get installed on Monday. I'm planning to rough in a bathroom, eventually put a loft or mezzanine in on the portion of the building without bay doors, run conduit for power and internet, and overall help alleviate some of the space constraints I have with my house (my wife loves to point out that the workshop is bigger in every measurable dimension than our house).

I'd love feedback, other things I should do before pouring the slab, etc.
 

Attachments

  • Screenshot 2024-06-08 004431.png
    Screenshot 2024-06-08 004431.png
    424.2 KB · Views: 235
  • 2024-06-05_17-49-27_435 - Copy.jpg
    2024-06-05_17-49-27_435 - Copy.jpg
    1.9 MB · Views: 203
  • 2024-06-07_15-10-42_665 - Copy.jpg
    2024-06-07_15-10-42_665 - Copy.jpg
    1.1 MB · Views: 182
  • 2024-06-07_15-11-44_325 - Copy.jpg
    2024-06-07_15-11-44_325 - Copy.jpg
    1.3 MB · Views: 208
To avoid these ads, REGISTER NOW!
OP
J

JessieAMorris

Active member
Joined
May 18, 2021
Messages
32
Location
Utah
Congrats!

Why only R19 in the ceiling? It should be 2x that
Good question and something I hadn’t thought of yet. I’ll ask the builder, but I am pretty well at budget for now so I may finish the ceiling at some point and do blown in. Good catch!
 
OP
J

JessieAMorris

Active member
Joined
May 18, 2021
Messages
32
Location
Utah
One other question I have, is 19' off the back wall for the lift too much? I'd love to be able to park a car behind the lift while it's got a car in the spot as well, but that's not the most important thing ever. I feel like if I moved it to 16' or something I might be okay but I don't want to be kicking myself over the not having enough space for a box or whatever.
 

kj_mustang

Well-known member
Joined
Feb 9, 2011
Messages
1,213
Location
Harrisonburg, VA
Draw it out on paper. Remember to allow for the loss of interior space on the walls if finished. Figure out if your want a work bench our toolboxes in front also and allow for space in front of the lift for pulling engines. I think you should have plenty of space if that 60' is the depth from the doors.
 
OP
J

JessieAMorris

Active member
Joined
May 18, 2021
Messages
32
Location
Utah
Draw it out on paper. Remember to allow for the loss of interior space on the walls if finished. Figure out if your want a work bench our toolboxes in front also and allow for space in front of the lift for pulling engines. I think you should have plenty of space if that 60' is the depth from the doors.
Drawing it up I have about 6 feet between a large pickup and my box as it stands. I could go a couple feet closer but even if I did I wouldn’t be getting enough space to get a second car back there in that scenario. I could plan to move the box to the side and stuff but even then a second car is a bit tight, or less room for an engine stand etc.

Unfortunately my bays are set up to be on the 40’ dimension for their length. I may end up with some car dollies and turn a few sideways to pack them in if needed 😂
 

kj_mustang

Well-known member
Joined
Feb 9, 2011
Messages
1,213
Location
Harrisonburg, VA
So if the building is 40' deep from the overhead door side, I don't think you could ever get a second vehicle in. My building is 32' deep with finished walls so I really only have about 30'. About a 30" deep workbench on back wall and workspace between it and the front of vehicle and I will only have a little space left with my supercrew F150 at 19' long.
 

MadScientist3019

Active member
Joined
Aug 1, 2023
Messages
27
Location
South Central Kansas
I really wish I would have seen this before to give a little bit of tips from my personal build. I did 40x60x13 (county required specific engineering if I went above 13 ft tall). One of the best things I did was bookshelf girts with R-19 in the walls and then 1" of continuous foam panels on the outside creating a thermal break and air seal (taped seams). I continued this down 2" thick underground to frost level which for me is 24". Yesterday was 110 here and 2x 1 ton minisplits kept the space at 70 degrees without straining. I also put 12" of blown cellulose in the ceiling as well.
 

Smoker

Well-known member
Joined
Sep 4, 2009
Messages
167
Location
San Antonio
I really wish I would have seen this before to give a little bit of tips from my personal build. I did 40x60x13 (county required specific engineering if I went above 13 ft tall). One of the best things I did was bookshelf girts with R-19 in the walls and then 1" of continuous foam panels on the outside creating a thermal break and air seal (taped seams). I continued this down 2" thick underground to frost level which for me is 24". Yesterday was 110 here and 2x 1 ton minisplits kept the space at 70 degrees without straining. I also put 12" of blown cellulose in the ceiling as well.
Im about ready to insulate my walls more - what type of insulation did you put in the walls and how did you secure/face it?
 

racecougar

Well-known member
Joined
Jan 26, 2021
Messages
5,048
Location
Missouri
Similar story here: bookshelf/commercial girts with R-19 in the walls and R-55 of blown fiberglass in the ceiling. It is amazing how efficient the building is.
 

MadScientist3019

Active member
Joined
Aug 1, 2023
Messages
27
Location
South Central Kansas
Im about ready to insulate my walls more - what type of insulation did you put in the walls and how did you secure/face it?
used foil faced foam panels and tape the seams. Attach with cap nails but you could do construction adhesive probably on the wood. if you have access to the inside run canned foam along all the wood to foam panel interfaces to further air seal it. Basically make the foam act like sheathing, just won't give any shear strength. I also ran a rain screen setup with furring strips vertical then to support my lap siding. Stays very dry and sealed. Also ran the girts 24" on center so rolled bats of fiberglass fit right in between running horizontal.
 

Shoester

Well-known member
Joined
Jan 9, 2014
Messages
318
Location
Kansas City
used foil faced foam panels and tape the seams. Attach with cap nails but you could do construction adhesive probably on the wood. if you have access to the inside run canned foam along all the wood to foam panel interfaces to further air seal it. Basically make the foam act like sheathing, just won't give any shear strength. I also ran a rain screen setup with furring strips vertical then to support my lap siding. Stays very dry and sealed. Also ran the girts 24" on center so rolled bats of fiberglass fit right in between running horizontal.

So from outside in, you went metal siding -> 1” foam -> girts…is that right? Getting ready to build my own post frame building.
 
OP
J

JessieAMorris

Active member
Joined
May 18, 2021
Messages
32
Location
Utah
I’ve got the bookshelf girts as well, curious about how exactly you did the foam. You went on the outside of the posts before the metal was put on?
 

kwb

Well-known member
Joined
May 1, 2009
Messages
1,771
Location
PNW
I am a all sorts of projects kind of guy, so I would put the lift in the corner with what most would say is not enough room on one side. Posts or other "monuments" will be in the way.

If you are mostly cars kind of guy then I would put it into the bay next to the man door and let the bay up against the wall be more of a cold storage area. With 14' doors and setup the way you are you should be able to put 4 cars there (parked tight)

BTW - Nice shop.
 
To avoid these ads, REGISTER NOW!
OP
J

JessieAMorris

Active member
Joined
May 18, 2021
Messages
32
Location
Utah
I am a all sorts of projects kind of guy, so I would put the lift in the corner with what most would say is not enough room on one side. Posts or other "monuments" will be in the way.

If you are mostly cars kind of guy then I would put it into the bay next to the man door and let the bay up against the wall be more of a cold storage area. With 14' doors and setup the way you are you should be able to put 4 cars there (parked tight)

BTW - Nice shop.
Both bays have man doors near them, but the access from my house makes the south (right looking at the front) much easier to access, so that is going to be the “main” bay door.

I do mainly car stuff, but hope to get into some metalworking in the future. For now that consists of welding when necessary.
 

kwb

Well-known member
Joined
May 1, 2009
Messages
1,771
Location
PNW
My go-to suggestion is to embed a I beam flush at grade into the concrete. You can weld fixtures, pull on things, cut them off, grind smooth and no problems sweeping the floor.
 

MadScientist3019

Active member
Joined
Aug 1, 2023
Messages
27
Location
South Central Kansas
So from outside in, you went metal siding -> 1” foam -> girts…is that right? Getting ready to build my own post frame building.
Outside in for me went: Lap siding -> Furring strips -> 1" foam -> Posts and girts (bookshelf so they go between the posts not outside of them) with fluffy insulation between the girts
I’ve got the bookshelf girts as well, curious about how exactly you did the foam. You went on the outside of the posts before the metal was put on?
That's correct, this gives a continuous thermal break as wood only has an R value of about 1 per inch. This is why you see frost lines on houses siding where the bay that's insulated has frost on it but the lines where the studs are have conducted heat out and no frost is present. It also gives a good rain screen that is breathable so any moisture that gets behind the siding can dry to the outside.
 
OP
J

JessieAMorris

Active member
Joined
May 18, 2021
Messages
32
Location
Utah
I’ve been a bit radio silent as I’ve been busting my buns to get everything ready for the slab. Concrete was poured today, the pump truck was out at 5AM and the first truck was here at 5:30. It was a pretty hot day today but luckily they started early and the slab was shaded all day. Basically no wind today either.

Radiant pex is still holding strong and has maintained pressure perfectly.

Went with a hard troweled finish and while it’s a bit early to know for sure with all the dust from the control joints on it, it looks like it’s going to turn out amazing.

I did manage to go get rebar in just the nick of time for the post holes. I had been meaning to do this it just kept getting pushed down the list of priorities until this morning.

With this all done, a lot of anxiety goes away. I had a lot of concerns about if my base was flat, compacted, level, even, etc enough and if I did everything for the radiant right. The 80 or so man hours and week rental of a skid steer paid off. I think I’m going to sleep good tonight.

Oh and a few guys on the crew mentioned they’d quoted out radiant for their builds. $10-15/sqft! I was $2.75/sqft for materials and rentals for under the slab work and will probably be another $6k for the boiler and manifolds when I do that, putting me at $4.50/sqft for the DIY. It wouldn’t have fit the budget had I paid someone, that’s for sure.
 

Attachments

  • IMG_5054.jpeg
    IMG_5054.jpeg
    795 KB · Views: 129
  • IMG_5053.jpeg
    IMG_5053.jpeg
    1,001 KB · Views: 126
  • IMG_5049.jpeg
    IMG_5049.jpeg
    824.2 KB · Views: 123
  • IMG_5048.jpeg
    IMG_5048.jpeg
    1.1 MB · Views: 118
  • IMG_5046.jpeg
    IMG_5046.jpeg
    505.9 KB · Views: 116
  • IMG_5044.jpeg
    IMG_5044.jpeg
    675.1 KB · Views: 117
  • IMG_5038.jpeg
    IMG_5038.jpeg
    829 KB · Views: 112
  • IMG_5054.jpeg
    IMG_5054.jpeg
    795 KB · Views: 111
  • IMG_5059.jpeg
    IMG_5059.jpeg
    606.4 KB · Views: 113
  • IMG_5061.jpeg
    IMG_5061.jpeg
    771.4 KB · Views: 138

zmotorsports

ALLIANCE MEMBER
Joined
Oct 20, 2009
Messages
21,381
Location
Northern Utah
One other question I have, is 19' off the back wall for the lift too much? I'd love to be able to park a car behind the lift while it's got a car in the spot as well, but that's not the most important thing ever. I feel like if I moved it to 16' or something I might be okay but I don't want to be kicking myself over the not having enough space for a box or whatever.

Personally, I think you'll struggle to part two deep with one on the lift and another parked behind it. Maybe if both are smaller vehicles/SUV's it may be possible but otherwise it may be a stretch.

I was fortunate as I knew what worked from my smaller previous shop but in my current shop I placed my lift columns @ 17' from the back wall. With 30" deep workbenches I still have 7' between the front face of the workbenches and the front of the vehicle on the lift. Granted this will vary slightly depending on the nose and length of the vehicle on the lift but it is enough to get an engine hoist in between the vehicle and the workbench easily for engine replacement projects.

With this scenario I can barely get another vehicle in the shop behind the one on the lift, and my shop is 50' deep. With a medium sized vehicle parked behind one on the lift, I barely have enough gap between them to walk but I wouldn't want to do much heavy work in that format with a vehicle on the lift to my back while leaning into an engine bay of the car behind it. With a smaller vehicle on the lift and a smaller vehicle pulled in behind I think you'd be fine, but anything upwards of about 18+ feet per vehicle and it will be a struggle to go end to end and have space to work with the columns pretty much in the middle of the depth of the shop.

I do have a picture of the scenario with my son and I replacing his engine in post # 10,570 of my Projects 2.0 Thread.

Also, just noticed that you are from Utah. Whereabouts in Utah are you located?
 
OP
J

JessieAMorris

Active member
Joined
May 18, 2021
Messages
32
Location
Utah
Personally, I think you'll struggle to part two deep with one on the lift and another parked behind it. Maybe if both are smaller vehicles/SUV's it may be possible but otherwise it may be a stretch.

I realized this and have accepted that my lift bay will just be a single car. I’m okay with that as I don’t have so much going on project wise that I really need two cars worth in that bay. I’ll just have a lot of room around it to work and have work bench and tool box space.

Also, just noticed that you are from Utah. Whereabouts in Utah are you located?

I’m in the Wasatch Back near Heber. I absolutely love it up here!
 
OP
J

JessieAMorris

Active member
Joined
May 18, 2021
Messages
32
Location
Utah
Got back from some vacation and started cleaning the floor. After doing a little mopping and realizing how much that ***** and that there’s some cruft on the top that will require some good scrubbing I started watching for some floor scrubbers. This will be dual purpose as I own a butcher shop as well and we’ve needed one there.

Imagine my luck when I found two of the same model for $900! Non working units but replaced the batteries on the one and a few hose clamps needed tightening and it’s singing along. Gonna try and get the second working tonight. I also ordered some new pads ranging from the black “stripping” pad to some less aggressive. It’s got worn out green pads at the moment.

The first pic is “before” with some mopping done on the left side. Middle is from last night after I had finished scrubbing but still a bit damp, and last pic is from this morning.

I also got most of the electrical done but I need to get the conduit run and my main feed pulled. I just am using an extension cord to run the lights for the time being.
 

Attachments

  • IMG_5118.jpeg
    IMG_5118.jpeg
    849.9 KB · Views: 92
  • IMG_5117.jpeg
    IMG_5117.jpeg
    934.9 KB · Views: 87
  • IMG_5115.jpeg
    IMG_5115.jpeg
    931.5 KB · Views: 94
OP
J

JessieAMorris

Active member
Joined
May 18, 2021
Messages
32
Location
Utah
Trenched my conduit out and ran some USE-2 4/0 aluminum to support a 200A feed eventually. Pretty overkill for now as I only have a 125A service to my house, but I want to be able to support my HVAC needs and being able to run my phase converter and eventual office/living space. I did the whole 4 wire feed and have separate grounds and neutrals and the whole deal. I do need to pound my ground rods in still, hoping to do that this weekend.

I got some external lighting up which helps make it look a bit less industrial.

Today marks 28 days since my concrete was poured, so I’m going to densify it tonight with PS103 and then seal in about a week.

Once I get it sealed I can finally start moving some stuff in. I picked up a fair bit of pallet racking (18’ tall, I’ll have to cut it down to 16’) for storage. I can’t wait to finally get my cars moved in and be able to actually start working on some stuff.
 
OP
J

JessieAMorris

Active member
Joined
May 18, 2021
Messages
32
Location
Utah
Yes, it’s dual rated USE-2 and RHH/RHW-2 rated per the manufacturers data sheet. Wire is marked with both as well.

There’s lots of tricky little things with this stuff, eh? I forgot to attach a few pics too.

I still have 4-5 inches of final grade gravel going on top of the conduit but I trenched to 24” depth which gives about 22” from the top of my conduit which gives me some headroom for variations on depth. With my final grade that should be around 26”.

I also ran the 1” for a fiber run eventually. Getting close to moving my home office out there now…
 

Attachments

  • IMG_5172.jpeg
    IMG_5172.jpeg
    1 MB · Views: 50
  • IMG_5143.jpeg
    IMG_5143.jpeg
    856.5 KB · Views: 53
  • IMG_5141.jpeg
    IMG_5141.jpeg
    1.5 MB · Views: 57
To avoid these ads, REGISTER NOW!
Top Bottom