To avoid these ads, REGISTER NOW!

5mall5nail5's Modest 2-car Clean-up and Setup

OP
5

5mall5nail5

Well-known member
Joined
May 23, 2010
Messages
1,174
Location
Bucks County, PA
So today was a great test for the heater - it was FREEZING outside. 26.6F outside as of 5:20 and it hovered between 26 - 30 degrees all day. Unfortunately I had to open the garage door up to remove some trash junk wood and such so it was down to like 38 in the garage which was tough to work in. Once I had it cleaned up though and the door closed, I turned the heater on and in not all that long it was up to 59 degrees:


Cold outside! by Jon Kensy, on Flickr

I used this guy today:


Remset stuff by Jon Kensy, on Flickr

To do this:


Remset sill plates by Jon Kensy, on Flickr

The sill plates have the foam underneath to isolate from the concrete. I cut the replacement plywood (pressure treated) and painted the backside of the plywood with DryLock/Lok to prevent any future moisture from coming through. That's drying now. Once that's done I will throw it up on the wall, cut the other wall piece, and then stud it, insulate, and drywall! Not too far away now!!!
 
To avoid these ads, REGISTER NOW!
OP
5

5mall5nail5

Well-known member
Joined
May 23, 2010
Messages
1,174
Location
Bucks County, PA
I know I sound like a broken record but the heater in my garage is amazing. Come home from a long and frustrating day at work, make some dinner with wife with the heater warming up, and then after dinner go out and work on the garage. It's sort of therapeutic.

It ain't pretty, but I got the plywood up behind the larger section of the wall. I used my circular saw to cut out the bad wood and made a rectangle so it'd be easy(ier) to replace. This wasn't easy! Measured the replacement board, cut it down, and painted the backside with DryLok just to prevent future issue. I put the plywood up and used a 2x4 as a jack and pressed it back against the wall best I could, then inserted my studs. My studs are not 16" on center yet but will be except for the one left-most stud which is positioned mostly to hold the edge of the plywood down firm. I have one more stud to add along the long portion. The two right studs are 16" so I will end up with a small patch of non-16" but that's ok.


Wood up by Jon Kensy, on Flickr

To handle the seams you can see I used expanding foam. I cut the piece such that there was about 1/8 - 3/8" gap so I had to fill that. At the same time I don't feel like the foam alone is enough to support the seam (even though the studs do a good job...) so I used a piece of plywood cut to fit in the stud cavity over the seams. I used the expansion foam under the plywood and then screwed it all down - like I said, it ain't pretty but its surely sealed up thoroughly. I have to do the horizontal seam once I finish adding studs and cut plywood for that as well. All of my plywood is pressure treated BTW, so that will help with any future issues. Next up is cutting the plywood for the small cavity on the right, then studding it all, then filling and covering the sames, some electrical drilling, then insulation, then drywall! Almost there - looking much better than the rotted yucky **** that was there.
 
OP
5

5mall5nail5

Well-known member
Joined
May 23, 2010
Messages
1,174
Location
Bucks County, PA
Thanks I am usually more particular with the appearance of things - I am used to working with metal where I can really massage it how I want. This isn't too pretty but it should last.
 
OP
5

5mall5nail5

Well-known member
Joined
May 23, 2010
Messages
1,174
Location
Bucks County, PA
My wife went shopping with a friend today so I had like 5 hours or more to get some work done. Took my time and managed to get the entire wall finished up - I cut the piece for the small section that needed to be repaired and it worked out well. Finished putting the studs up and while I was at it I ran some 10/2 that I had left over from a project and put in another 240v (30A) circuit for a future lift/welder/etc. I also set up the wiring such that the left side and right side garage outlets are on their own 20A circuits since I freed up some positions by using tandems (found out I have a 30 position 40 circuit box).

After crawling through the attic running wire I hung the insulation - I did the typical split such that the wiring between the studs is between layers of insulation. I noticed shortly after getting about 3/4 of the insulation up that the heater wasn't cycling on as often even though it was getting later in the evening and about 29 degrees outside. The exposed brick wall (not by design!) really let in a good draft and you could feel cool air wafting in. Now with it all sealed up and insulated it's so much better!


Garage Wall Repaired and Insulated by Jon Kensy, on Flickr

So now, with all the outlets set up all I need to do is throw up drywall and then mud this wall and the opposite wall and various spots across the front. Not too bad! Glad to have made significant progress!
 

Lord Vader

Well-known member
Joined
Nov 26, 2013
Messages
54
Location
Calgary, AB
I read all 5 pages, and while im quite impressed, I only saw one picture of the E34! I also saw "turbo'd BMW" mentioned but no follow up with pictures! Disapointing.... :D
 

Aquaticbob

Well-known member
Joined
Dec 3, 2013
Messages
488
Location
Seattle
I read all 5 pages, and while im quite impressed, I only saw one picture of the E34! I also saw "turbo'd BMW" mentioned but no follow up with pictures! Disapointing.... :D

I too read all 5 pages and came to the same conclusion :D

Would love to hear more about the BMWs or if you might just so happen to have a BF.c build thread that would be awesome :3gears:
 
OP
5

5mall5nail5

Well-known member
Joined
May 23, 2010
Messages
1,174
Location
Bucks County, PA
Sorry guys I am very active over on Bimmerforums and I mention my car and forget that people here might not know it.

My one big project is/was a 1992 525i that I've owned as my first car at age 18 (am now 28). A few years ago I decided to turn it into a sort of street/strip car. More street than strip, though yet. In a nut shell I took the stock 2.5L M50 non vanos engine out and replaced it with another M50NV that I put a M52 crankshaft (2.8L) in, Eagle forged rods, and wiseco pistons 0.020" over w/ 8.5:1 CR. I put 1/2" head studs in the block and head and put a Precision PT76 turbo on it (T4, 76mm, good for 1150 bhp).

I run the car on an aftermarket computer (DTA S80 Pro) and wired, installed, and fabricated everything myself - as well as the tuning. The only thing I didn't do is weld the charge pipes up myself as I did not have an AC TIG at the time. That said, the car made 685 rwhp on a rich and conservative base tune running 93 octane pump gas and water/methanol injection (though it was under-jetted at the time). I tried to introduce more timing while on the dyno but the clutch that was in at the time (ClutchNet 6 puck 228mm) was not up for the task and slipped completely at 4000 RPM or so on the dyno and smacked right up to the rev limiter. So, I had to settle for 685 on a base tune which is ok overall. It should put out about another 200 - 300 hp. Also it's worth mentioning that the cylinder head, other than having been opened up for the 1/2" head studs (stock is 10mm), is 100% stock. That's stock M50NV cams, valves, springs, shims, etc. Nothing was done to the head other than cleaning the valves and lapping them in.

I have another block, bigger pistons (85mm vs 84.5mm in there now), a longer stroke crank (S52 3.2L crank), K1 rods, Supertech valve springs, inconel exhaust valves, nitrided stainless intake valves, and a VANOS head along with M3 S52 camshafts. That should give me a 3.05L engine with 8.5:1 compression, variable intake valve timing, hotter cams, lighter but more durable valves, etc. My current engine is fine but the addition of VANOS and the valvetrain will make for a wider (and taller) powerband.

It now runs direct port methanol injection with proper jetting sizes and I'll be re-introducing nitrous oxide to the motor soon.

Here are some images of that car:


bay3 by Jon Kensy, on Flickr


1680_1050_2 by Jon Kensy, on Flickr


1680_1050_3 by Jon Kensy, on Flickr

I recently rebuilt the front end with all new spherical stuff (E31 front arms, etc.) all Lemfeorder OE arms and aftermarket bushings:


Steering plate assembled by Jon Kensy, on Flickr

Got a UUC Ferrametallic twin-disc clutch in that should prevent the slip on the dyno again:


IMG_2588.jpg by Jon Kensy, on Flickr


enginebayoverhead1 by Jon Kensy, on Flickr

The other car I've been working on is an '87 325E for my mother. She got it as a commuter with 270k on the 2.7L Eta M20. It worked fine for a long while but had some rod knock when cold and developed an issue starting and driving (it was insanely hard to start hot and while driving hot or cold it might spontaneously dump a ton of fuel into the chamber stalling or bucking wildly). I replaced all of the fuel system and ignition system and then said to heck with it and put an M50TU into the car for her. But, because I do my own powder coating and fabrication I couldn't just swap a turd in there.

Did a nice setup for her:

e301.jpg


IMG_4603.jpg


IMG_4605.jpg


IMG_4691-Edit.jpg


IMG_4924.jpg


IMG_0597.jpg


E30 Exhaust by Jon Kensy, on Flickr


E30 calipers rebuilt by Jon Kensy, on Flickr

And so on :)

The exhaust is tucked up super high and has a turn down and its QUIET. You can't tell anything has been done to the car. My mother loves it and so do I!

So, those are some of my projects. I also have a 1995 525i that is my daily driver. It has some work done to it but not too crazy - Bilstein strust and H&R springs, euro projector headlights with HID, smoked front lenses, smoked rear lenses (just like my turbo E34), stock basketweaves, but I went and put a built 40% LSD in the car in place of the stock open diff. Retained the stock ratio (3.23). My turbo car has a built 60% LSD 3.23, so having a 40% in the daily and a 60% in the turbo car, I appreciate the difference in the two. The '95 has traction control and LSD now (not a combination available from the factory) and it's UNSTOPPABLE in bad weather. Unless I cannot physically roll over an obstacle, I can get through it. Pretty awesome. Of course I had to do that differential project to my ordinary high caliber:


E34 work done by Jon Kensy, on Flickr


Diff Waiting by Jon Kensy, on Flickr


Putting the 40% 3.23LSD in by Jon Kensy, on Flickr

Oh yeah, that car also has Euro M5 Touring N'Ring package sway bars - what a difference those made, the car tracks so flat on off and on ramps. Even on 205's its very fun.
 
Last edited:

thetastelingers

Well-known member
Joined
Mar 12, 2007
Messages
718
Location
Soddy Daisy
I am a fan of the BMW builds. That 525 is very nice!
I've had two M3s and aim for an E90 in the next couple of years.

When is the next dyno session planned?
 
OP
5

5mall5nail5

Well-known member
Joined
May 23, 2010
Messages
1,174
Location
Bucks County, PA
Not sure just yet - between the rest of our house and the garage projects, holidays, etc., it could be some time lol. Though I am kind of anxious... we'll see
 

xSoFx

Banned
Joined
Nov 30, 2013
Messages
32
Garage is looking good. Good to know that heater works, I recently got that same one for free which was used infrequently. My garage is currently heated by my anger and frustrations so I'm sure this heater will be a great. :p
 

tjmonsen5

Well-known member
Joined
Oct 14, 2009
Messages
1,341
Location
Crystal Lake IL
This is awesome, keep up the good work. This gives me hope for my own garage one day! Looks like i have A LOT to learn about wiring.
Sweet BMWs, i own an E30 and an E46xi. Just put the snow tires on, thing is also unstoppable.
 

BellyUpFish

Well-known member
Joined
Jun 24, 2012
Messages
2,942
Location
Alabama
How do you like the heater? I almost pulled the trigger on the same unit yesterday, but I haven't insulated my garage yet - may just be whizzing in the wind - so I didn't..
 
To avoid these ads, REGISTER NOW!
OP
5

5mall5nail5

Well-known member
Joined
May 23, 2010
Messages
1,174
Location
Bucks County, PA
Thanks all for the kind words!

How do you like the heater? I almost pulled the trigger on the same unit yesterday, but I haven't insulated my garage yet - may just be whizzing in the wind - so I didn't..

Love, love, love the heater. Didn't make my electric bill skyrocket, but yeah its higher. That said, I would probably not invest in the heater until insulated. It's just too expensive to run any heater without insulation IMHO.
 
OP
5

5mall5nail5

Well-known member
Joined
May 23, 2010
Messages
1,174
Location
Bucks County, PA
Had a great Christmas with friends and family. Real quick update - my father in law picked up the remaining sq ft needed to finish my race deck floor. So nice! This place was a DUMP for the last few weeks. I trimmed and cut our Christmas tree in there, drywall dust and saw dust... ugh. Relatively clean on the one side. I will spend more time tomorrow but for now, this is the floor setup on 50% of the garage. Only a little more to put down behind me from where I shot the picture.


Almost done (again) by Jon Kensy, on Flickr
 
OP
5

5mall5nail5

Well-known member
Joined
May 23, 2010
Messages
1,174
Location
Bucks County, PA
Man, I keep waffling on Race Deck, just can't decide if I want to go that route or not..

Yeah how many sq ft do you need? I only have one complaint and that's regarding welding over it. I now have a welding table and TIG but I migged an exhaust over it and left a couple small holes in a couple tiles. Other than that it's nice to stand and walk on and isolates you from the cold hard cement if you sit on the ground. I don't regret it and as others mentioned to me when I complained before... I was able to take it with me when I moved.

Sent from my SCH-I535 using Tapatalk
 

MotecM

Well-known member
Joined
Feb 3, 2010
Messages
79
Do you have any issues with the Race Deck holding moisture in the garage? - For instance, parking a wet or snowy car on it.
 

BellyUpFish

Well-known member
Joined
Jun 24, 2012
Messages
2,942
Location
Alabama
Yeah how many sq ft do you need? I only have one complaint and that's regarding welding over it. I now have a welding table and TIG but I migged an exhaust over it and left a couple small holes in a couple tiles. Other than that it's nice to stand and walk on and isolates you from the cold hard cement if you sit on the ground. I don't regret it and as others mentioned to me when I complained before... I was able to take it with me when I moved.

Sent from my SCH-I535 using Tapatalk

Well fortunately in this department, I only have a 24x24 shop, so 576 sq feet..

Welding gives me a bad feeling about it.. LOL.. I like being able to just throw down a weld without grabbing blankets and other gear..
 
OP
5

5mall5nail5

Well-known member
Joined
May 23, 2010
Messages
1,174
Location
Bucks County, PA
Well fortunately in this department, I only have a 24x24 shop, so 576 sq feet..

Welding gives me a bad feeling about it.. LOL.. I like being able to just throw down a weld without grabbing blankets and other gear..

Well, I mean, its easier to weld at a welding bench than on your back. That's the only time I had issue was when I had a car on jackstands and was building an exhaust for it... so welding on-car only like 18" above the tile. Other than that it's been great.

Just read entire thread, very impressive work.

Love the turbo'd BMW too.

Thanks man
 

Highlux

Well-known member
Joined
Dec 5, 2013
Messages
298
Location
Ofallon, MO.
Love the garage so far. The heater was a great find. I have natural gas...but ow Im considering this one you have. Garage is close to the same size. Is the thermostat on the unit or remotely located?

Thanks.
 
OP
5

5mall5nail5

Well-known member
Joined
May 23, 2010
Messages
1,174
Location
Bucks County, PA
Love the garage so far. The heater was a great find. I have natural gas...but ow Im considering this one you have. Garage is close to the same size. Is the thermostat on the unit or remotely located?

Thanks.

Cool glad you find it interesting. The thermostat is on the unit but people remote mount it or another one.
 

Kevin54

MEMBER EMERITUS
Joined
Jan 12, 2005
Messages
29,341
Location
Urbana, Ohio
Nice job on the garage and the BMW!!!

How did you repair the outside of the garage where the gutter is? It looks like it needs caulked and some new flashing. Also, if I may make a suggestion, do away with the straight down pipe that goes into the gutter. If you get a hard rain, the water will go to the right into the corner as much as to the left. Get rid of the straight pipe and put an elbow in to get the water headed towards the down on your main gutter and away from that corner completely.

To be truthful, that is the first time I ever saw a gutter that had brick and mortar around it. Not a good thing. Especially if it overflows. Also if you cont have flashing going into the gutter from behind, water can wick behind it depending on the setup.
 
OP
5

5mall5nail5

Well-known member
Joined
May 23, 2010
Messages
1,174
Location
Bucks County, PA
Nice job on the garage and the BMW!!!

How did you repair the outside of the garage where the gutter is? It looks like it needs caulked and some new flashing. Also, if I may make a suggestion, do away with the straight down pipe that goes into the gutter. If you get a hard rain, the water will go to the right into the corner as much as to the left. Get rid of the straight pipe and put an elbow in to get the water headed towards the down on your main gutter and away from that corner completely.

To be truthful, that is the first time I ever saw a gutter that had brick and mortar around it. Not a good thing. Especially if it overflows. Also if you cont have flashing going into the gutter from behind, water can wick behind it depending on the setup.

Thanks! I need to redo the flashing outside. But, so far, its all dry. I like the idea of putting an elbow into that gutter, that makes sense.

I spent some time today taping and sanding.


Taping by Jon Kensy, on Flickr

also finished cutting the floor and laying it to the footer. This is the footer nearest the inside of the house, so that's why I have it so close. On the other wallks its about 3/8" gap for expansion.


Wall to wall by Jon Kensy, on Flickr

I had to remove the door there on the closet and cut off about 1/16" - 1/8" so it would clear the tile. Now I need a nap lol.
 
OP
5

5mall5nail5

Well-known member
Joined
May 23, 2010
Messages
1,174
Location
Bucks County, PA
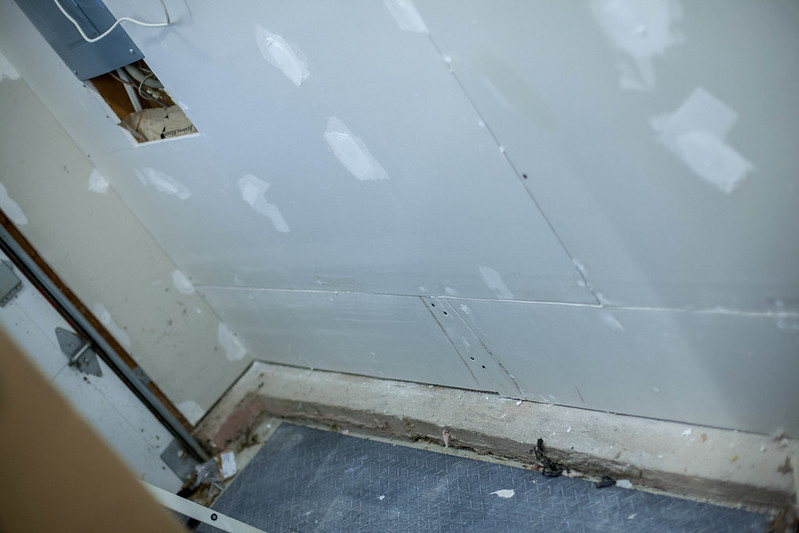
Got a little further today. Spackled some more screw holes. Also got the 12.5" high drywall up on the one wall along the footer. That's all good to go.


Drywall at footer by Jon Kensy, on Flickr

And worked on cleaning up the Verizon boxes. Verizon had the wiring draped all over. Being an IT guy I am comfortable with re-punching down the power cabling and such.


FIOS boxes mounted by Jon Kensy, on Flickr

The only thing I need to figure out how is a way to keep the above and below area around the panel accessible without looking stupid. You can see I made a drywall panel... just not sure i want to permanently fix it in there in case I want to add/remove circuits again later.


Drywall panel by Jon Kensy, on Flickr

Thoughts? Need something similar for above as well.
 
OP
5

5mall5nail5

Well-known member
Joined
May 23, 2010
Messages
1,174
Location
Bucks County, PA
Its not that easy as the area above I need to access not only the panel but the horizontal 2x4's to be able to drill for wires. So I need a huge honkin panel.
 

WhiteLightning

Well-known member
Joined
May 23, 2012
Messages
117
Location
Philadelphia, PA
Its not that easy as the area above I need to access not only the panel but the horizontal 2x4's to be able to drill for wires. So I need a huge honkin panel.

You only need access to drill the top plate to run wiring in the attic, and get into the top of the panel for connectors. If you are trying to go horizontally across studs, then why drywall already?
 
OP
5

5mall5nail5

Well-known member
Joined
May 23, 2010
Messages
1,174
Location
Bucks County, PA
Huh? I would never have hung drywall if I were running working horizontal. I said horizontal 2x4,aka the plate at top. You can't access, easily, both the top plate and top of box with a 14x14 panel hence my issue.

Sent from my SCH-I535 using Tapatalk
 

WhiteLightning

Well-known member
Joined
May 23, 2012
Messages
117
Location
Philadelphia, PA
Huh? I would never have hung drywall if I were running working horizontal. I said horizontal 2x4,aka the plate at top. You can't access, easily, both the top plate and top of box with a 14x14 panel hence my issue.

I typically drill the top plate from the attic. The access panel is merely for you grab the wire/fish from above, and snap/screw in a connector into the top of the panel backer box, then land the wires.
 
To avoid these ads, REGISTER NOW!
Top Bottom