kerrynzl
Well-known member
Interesting idea ... trailer number two maybe
Not too late on your trailer if you haven't glued it together with the MIG,
Just chop off the corners with a drop-saw

Interesting idea ... trailer number two maybe
Not too late on your trailer if you haven't glued it together with the MIG,
Just chop off the corners with a drop-saw
For those of you that have built a small trailer like the OP is building, did you miter, cope or **** the corners. I'd assume the latter would have only been done with squat tubing frame.
Been thinking about this ... I'd need some 1.5"x1.5" x 3/16" square tubing, about 20" long for each corner. Not a big cost, but what about strength?
I could add a gusset on the bottom, to tie the two c-channel pieces together in each corner. Already have some 3/16" plate for that.
Sure would look nice ... a little more custom.
FYI - Trailer seems over built, but the idea is to upgrade the axle to a #5200 one in the far future.
Thanks! Sometimes the simplest little ideas, make all the difference in the world. I had to haul some 20' pieces of steel this past week, and came up with another cool little idea I'm going to incorporate into it in a couple weeks.I like the trailer jack mounting points.
BMX: looking good.

if it's possible, use a jack that allows you to drop the tailgate of your truck while still hitched.
in your first post, #1 and #2 couplers have that space for a jack mounted in that hole... but any jack there (that I've seen) prevents a tailgate from being lowered all the way.
our pup up & travel trailer are like that and can be annoying.
ute trailer I have I used a jack mounted further back and also swing up out of the way when not in use.
good friend made me aware of that issue after he loaned his truck/trailer to a buddy and it came back with a dent in the tailgate when the guy let it drop.

3 days too late for meThe cleanest and easiest, therefore the best way I have found is to weld the rails to an upright piece of receiver tube. This allows you to drop in a piece of 2x2'' square tubing for whatever you need it to do. There are all sorts of possibilities.

On a 5 x 10 trailer, I weld the front spring bracket 56" from the front of the trailer. That is measured from the front of the spring bracket to front of frame.
That bracket will be fine moved towards the center of the trailer for a 3600 pound capacity trailer. Put an extra cross m ember there if it bothers you. It keeps the frame from flexing inward when you overload the trailer.
On a 5 x 10 trailer, I weld the front spring bracket 56" from the front of the trailer. That is measured from the front of the spring bracket to front of frame.
That bracket will be fine moverd towards the center of the trailer for a 3600 pound capacity trailer. Put an extra cross m ember there if it bothers you. It keeps the frame from flexing inward when you overload the trailer.

You will make a mistake using generic information like that.
Learn to do the math and get it correct.
That trailer plan is 5'4" [64" ] at the outer edge ,if your trailer is exactly 5" you need to recalculate the numbers
I use 50 degree couplers all the time. They are 25 degrees each side of the centreline of the trailer.
If the trailer is 5' [60"] wide, it is 30" each side of the centreline
Now if you use 2x4 tube[or c channel] for the tongue, you need to deduct the width of this section [at 25 degrees] from the 30" because the tongue is joined together at the inside edge .but the outside edge of the frame is the furthest it can be mounted.
2" steel sitting at a 25 degree angle = 1.8"wide
So the 1/2 width at the centreline is 28.2"
use this online calculator
http://www.csgnetwork.com/righttricalc.html
Side a = 28.2"
Angle A = 25 degrees
So side c = 66.7" [this is the actual tongue measurement for a 60" wide trailer]
This online calculator is a handy tool for cutting symmetrical pie cuts


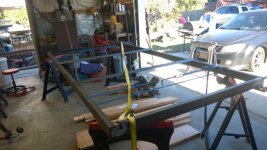
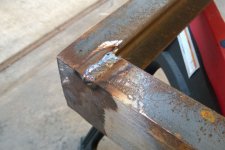
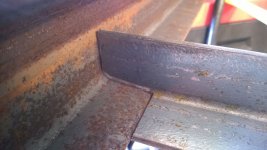
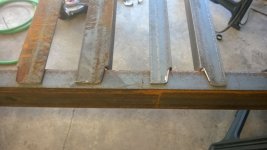
Arrg ... frustrating day. I did my pie cuts for the tongue, and was right on with the angle ... but, the angle is wrong.
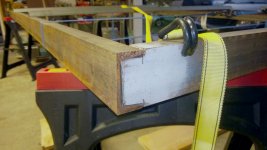
I redid the calculations and wanted to hit myself with a hammer, should have been 25 deg, not 22.5 deg. when measuring from the outer edge. I'm off about 3 deg, which at +67" out is a lot. So to bring the coupler ends together, and to the right angle I need to rotate the short leg in, as shown in the second photo. Its flush on the end but .5" from the edge where the pie cut is. I don't really see this as an issue, actually maybe a stronger weld since I can get a nice fillet. But, I'd like some input first. Slicing and fixing the angle is not that big a deal ... besides time.
:
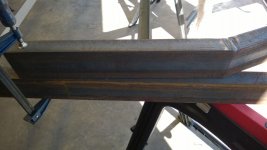
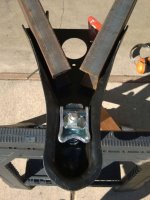
Got it done, but ran out of gas ... front of trailer to center line of ball is about 43".
Picked up the trailer box at HF for $89 and some change. Looking good ..