To avoid these ads, REGISTER NOW!

6 Car Garage??? Money Pit

OP
J

justbummin1

Well-known member
Joined
Sep 23, 2010
Messages
175
Location
North West Illinois (The West Coast)
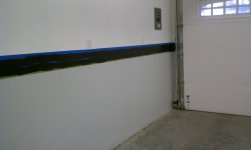
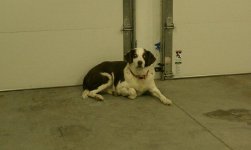
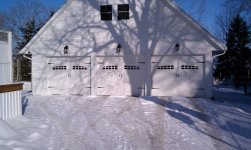
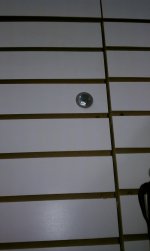
After The white & Gray where done it was time to paint the stripe at the transition 3/4" black 2" red and 3/4" black. I taped off the 3 and a half inch section/stripe and painted that red (took 3 coats to make it look right) then after that dried I masked off the center 2 inches and painted the black stripes (which took another 2 coats)along with the stripes we (my home security advisor/supervisor as seen in the 4th pic) painted the door and window trim black. OK here is where my frustration with painting now just flat out pisses me off! Time to peel off the tape. Because I used OSB vs drywall it really isn't a smooth surface so you can not really seal the tape to wall very good so there are bleeds all over!!! Stupid dog didnt tell me to consider this :headscrat so now after lets just say a few gray goose/lemonade's thinking about this I have 2 choices as far as I see it (any and all advice will be considered appreciated). 1) take a little brush and go around and touch it all up which doesn't sound like my idea of fun! or 2) cut a thin strip 1" wide and paint it black and use that to cover what is there. This sounds like the best to me but then it becomes a dust/gunk collector. Somebody HELP before I run out of Goose!
 

Attachments

  • IMAG0417.jpg
    IMAG0417.jpg
    163.8 KB · Views: 503
  • IMAG0421.jpg
    IMAG0421.jpg
    159.7 KB · Views: 480
  • IMAG0420.jpg
    IMAG0420.jpg
    140.4 KB · Views: 536
  • IMAG0422.jpg
    IMAG0422.jpg
    146.6 KB · Views: 498
  • IMAG0435.jpg
    IMAG0435.jpg
    147.9 KB · Views: 738
  • IMAG0436.jpg
    IMAG0436.jpg
    140.8 KB · Views: 626
  • IMAG0466.jpg
    IMAG0466.jpg
    165.8 KB · Views: 598
To avoid these ads, REGISTER NOW!

reinhardt

Well-known member
Joined
Jun 2, 2010
Messages
384
i vote for quit looking at it! no one else is going to notice/ care as much as you. if they do notice, kick em out.
 

cowboy73

Well-known member
Joined
Feb 13, 2010
Messages
2,609
Location
southern Indiana
You could cut strips of 1/4" plywood large enough to cover of up the stripe. Then take a small roundover bit in a router and dress the edges of the plywood so the dust wouldn't have much a ledge to land on. A little wood filler, some sanding and a coat of black paint and nobody is the wiser!
 

Detroit Rag Ace

New member
Joined
Dec 9, 2010
Messages
1
Well I used to be a professional painting contractor and if it was MY garage (VERY NICE BTW), here's what I'd do.

Make the stripe just a little thicker than the original one. Prime the area with a good bonding primer, then put on your finish. Next, go buy a few roles of the best blue 3M tape that you can get (I call it the orange, cause the inside of the roll is orange).

Tape off your stripe, knife it down and then take some shellac on a chip brush and run it along where the tape meets the wall. This'll seal the tape to the wall so it doesn't bleed.

Lastly, when you're all finished and start pulling the tape, pull AWAY from the stripe. Start in a less conspicuous area and see how it's coming off. If for some reason it's still tearing the paint off with it, use a razor blade and lightly score where the tape meets the wall.

Sorry for the novel here, but your garage looks great and I know that would annoy me if it were my garage.
 
OP
J

justbummin1

Well-known member
Joined
Sep 23, 2010
Messages
175
Location
North West Illinois (The West Coast)
Thanks for the advice Ace, I am going to have to try your suggestion because this is bugging the **** out of me! So do you think because of the roughness of the OSB the shellac will bleed out under the tape and if so will it show? BTW I did use 3M tape that was one of the things that hacked me off so bad is that I didn't go cheap.

Thanks, Rob
 
OP
J

justbummin1

Well-known member
Joined
Sep 23, 2010
Messages
175
Location
North West Illinois (The West Coast)
Here is the front of the garage now that the lights are up and I also ran a pinstripe down the center of the door to help make it look like it is supposed to open that way. I know stupid but it was bugging me so now I am happy(er).

Also I attached a couple of pics of the hinge access for getting upstairs. I made a couple of brackets that are mounted to the stationary part of the wall with a 1/2" nut welded on so when you swing the access wall shut you can tighten up a bolt through the wall so everything stays nice and tight. Then for that couple of times a year when you need access take out the 3 bolts swing it open and your good (so far anyway)
 

Attachments

  • IMAG0463.jpg
    IMAG0463.jpg
    142.9 KB · Views: 261
  • IMAG0440.jpg
    IMAG0440.jpg
    148.2 KB · Views: 303
  • IMAG0441.jpg
    IMAG0441.jpg
    137 KB · Views: 261
  • IMAG0465.jpg
    IMAG0465.jpg
    139.7 KB · Views: 266
  • IMAG0457.jpg
    IMAG0457.jpg
    144.7 KB · Views: 306
  • IMAG0464.jpg
    IMAG0464.jpg
    145.2 KB · Views: 285
OP
J

justbummin1

Well-known member
Joined
Sep 23, 2010
Messages
175
Location
North West Illinois (The West Coast)
A few more pics of the inside. The cabinets on the wall I got from a clothing store that my wife works for. They built a new store and sold me all the cabinets from the old store for a hundred bucks:thumbup: 
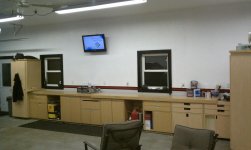
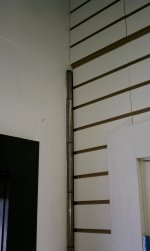
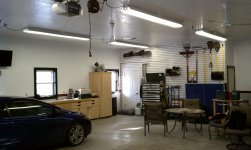
There is actually 4 more sitting up stairs also. Right now they are just sitting in place and are not fastened to the wall so I could get a feel for how I wanted it to look. I am going to take out the 2 on the right hand end and put them upstairs with the others, center the rest so that either tall cabinet ends up on the outside of each window. Then the are going to get painted to match the color scheme of the garage. I forgot to paint the trim on the doorway in the slat wall so I will have to do that along with painting the doors white since they are just primed currently. My daughter comes home from school tomorrow so that sounds like a good job for her:bounce:
 

Attachments

  • IMAG0449.jpg
    IMAG0449.jpg
    142.9 KB · Views: 841
  • IMAG0448.jpg
    IMAG0448.jpg
    149.7 KB · Views: 557
  • IMAG0447.jpg
    IMAG0447.jpg
    141 KB · Views: 579
  • IMAG0450.jpg
    IMAG0450.jpg
    145.5 KB · Views: 614

thomask

Well-known member
Joined
May 28, 2009
Messages
354
Location
Sunshine State
What a DEAL on those nice cabinets. :)

They sure keep you organized and the price was right.:thumbup:

My wife found ours in a office being remodeled. We just had to remove them. :bounce:
 

#1garagebuilder

New member
Joined
Dec 27, 2010
Messages
1
the "GARAGEMAHAL" Looks great!
Ur brother-in-law did an awesome job, he must have a great crew!
As a builder it's great to work for someone that knows what they want and appreciates the work that was done.

Thanks! for the nice words! :beer:
 

48flatbed

Active member
Joined
Mar 8, 2007
Messages
44
Location
Hills of Arkansas
Great Job!! I like the OSB for interior walls also. As for the stripe painting, Aces' way is correct but another way that has worked well for me is to lay down your tape and then paint the edge with the same paint you covered with tape,(ie if under the tape is white - paint the edge white) that way the edge is sealed and any bleed under is the same color as what is under the tape. let this dry and then paint the stripe color.
Jon
 

mad57

Well-known member
Joined
Jan 30, 2009
Messages
1,698
As far as the garage its awesome!!!!!! the stripes are bleeding i didnt do as many on mine and i have sheet rock but....... try the tape again and use a brush to apply the paint and dont push to hard or in the direction of the tape line brush up into the color that ur painting and less paint on the brush is better. good luck have fun great job.
 
OP
J

justbummin1

Well-known member
Joined
Sep 23, 2010
Messages
175
Location
North West Illinois (The West Coast)
Thanks guys for all the positive support and plumcrazy you are correct.

#1Garagebuilder you are correct that they are the best!!! and it was nice to be able to give a general description of what I wanted and to come home from work and it was done! I guess sometimes it is best to trust and leave it in the hands of professionals!

As far as more progress stay tuned things have slowed a bit my son thought it was time to use the garage vs work on the garage so he found a donor truck to cannibalize to rebuild his old Toyota.

Rob
 

Nighttrain

Well-known member
Joined
Aug 6, 2009
Messages
2,682
Location
Dripping Springs, Tx
Real nice work on the garage. Also I have used latex caulking to help control the bleed through of paint on ruff texture. When I do a stripe on textured sheet rock I will lay down blue tape then run a light coat of latex caulk with my thumb on the tape edge this will seal those voids. Paint over it like the other guys mention (away from the tape) and then remove. I never let the tape sit for to long. Once the paint has set I pull the tape. Your best bet would be to expand the stripe like Detroit mention. Fix it now because you will look at that stripe forever and it will bother you. Enjoy your time with the kids while there home from school.
 

5lima30

Well-known member
Joined
Nov 11, 2010
Messages
2,442
Location
Mountains of Western NC
Great looking garage with a lot of character! As for the transition you could take a 1x4 or 1x6 paint or stain it and put up over the transition. As a bonus it could act as a "bumper" to keep toolboxes and equipment from from damaging the wall. YMMV:)
 

LWW

Well-known member
Joined
Feb 8, 2008
Messages
322
Location
SF Bay
Also I attached a couple of pics of the hinge access for getting upstairs. I made a couple of brackets that are mounted to the stationary part of the wall with a 1/2" nut welded on so when you swing the access wall shut you can tighten up a bolt through the wall so everything stays nice and tight. Then for that couple of times a year when you need access take out the 3 bolts swing it open and your good (so far anyway)

If it's not too much trouble, if you could get pics of the stair access swung open, that would be great.

I'm dealing with a similar issue and am interested in how you solved the problem.

Cheers,
LWW
 

lpigg

Well-known member
Joined
Sep 28, 2009
Messages
108
Location
Central Illinois
Great Job!! I like the OSB for interior walls also. As for the stripe painting, Aces' way is correct but another way that has worked well for me is to lay down your tape and then paint the edge with the same paint you covered with tape,(ie if under the tape is white - paint the edge white) that way the edge is sealed and any bleed under is the same color as what is under the tape. let this dry and then paint the stripe color.
Jon

Thats the way I did mine and was surprised how easy and great it worked out.
 
To avoid these ads, REGISTER NOW!

GN4WHLN

Well-known member
Joined
May 8, 2009
Messages
2,073
Location
Alta Loma, CA
I like your house and garage style. What style is that? Craftsman, cottage, etc?

MPH

....have I seean that house in a scary movie before?:eek::lol:

I think, in general, the house and the garage would be considered Dutch Colonial architecture. That type of roof structure is called Gramble.

Fantastic garage, the kind that would make me stop and take a look if I were going by. :thumbup:
 

jeffj78

Well-known member
Joined
Sep 28, 2007
Messages
107
Location
TX
justbummin1, what kind of ceiling fans are those and where did you pick them up?
 

2chipped

Well-known member
Joined
Aug 14, 2009
Messages
641
Location
Jesup Ga USA
That is quite a garage!! Is there a "girl cave" in there? :)
Would this ^be your wife hinting?:lol_hitti
Very nice job matching the house.....and the access door.:beer:
I install fencing for a living and always encourage the customer to have as many gates as possible for easy access ,many times they didn't want to spend the money initially and payed us to remove and reinstall after pools etc....which cost more then a gate would've at the start.

Everytime you need to move something large thru the big door you may pay yourself in Grey goose.:lol_hitti:lol_hitti
 
OP
J

justbummin1

Well-known member
Joined
Sep 23, 2010
Messages
175
Location
North West Illinois (The West Coast)
jeffj78 - They where from Menards "industrial" 3 blade fan. They where cheap I think 50 bucks a piece

2chipped - Thanks that was my mom's way of asking if her or my wife where allowed in the garage after it was done. told her as long as she brought food or booze anybody is.

thanks guys for the intrest
Rob
 

cranker

Member
Joined
Oct 1, 2005
Messages
21
Location
IOWA
Great garage space!!! Goose and lemonade is my choice also, I have found that it makes a lot of things better!!

Crank
 
OP
J

justbummin1

Well-known member
Joined
Sep 23, 2010
Messages
175
Location
North West Illinois (The West Coast)
Thanks guys! I appreciate the feed back.

yamaharacing21
Re: 6 Car Garage??? Money Pit
Garage looks great!!! How's the heat work? What do you do for A/C?

The heat works great, just keep the thermostat set at 65 and even though it has been about zero here lately the boiler doesn't really run that much and my gas bills this year have only been about 10-15% higher then last year so from what I had before I can live with that. 10 blow last night and I was work on my snow blower in a tee shirt:thumbup: As far as A/C goes if its to hot I guess then it is time to drink instead since its all for fun anyway!

Crank - Thanks any you are VERY right
 

Motofixxer

Well-known member
Joined
Oct 10, 2009
Messages
681
For A/C just get a decent sized window unit and mount it through the wall. Or if you check around there are mini splits available for minimal cash. It definitely makes the space comfortable. It doesn't take much to remove the humidity and make it comfortable. Or just turn the fan on and sit back and chill. Otherwise...it's a beautiful space. I'm a little envious, thinking I should have gotten the permit to build bigger. But the way my lot is, it would really look out of place.
 

SiGmA_X

Well-known member
Joined
Aug 13, 2005
Messages
1,111
Location
Portland, OR
Right now is a prime time to find AC units that are nearly new on Craigslist. I was finding them for 30-50% off last week. Now to find a unit I actually want (quietish, reliable..)
 
OP
J

justbummin1

Well-known member
Joined
Sep 23, 2010
Messages
175
Location
North West Illinois (The West Coast)
Domel - Unfortunately I didn't find this site until I was in the middle of construction so with the heat tubes in the floor I can not anchor a lift. If I would have found this site previous to the start I would have known to plan ahead for such things.

Rob
 

JKagermeister

Member
Joined
Aug 1, 2011
Messages
8
Domel - Unfortunately I didn't find this site until I was in the middle of construction so with the heat tubes in the floor I can not anchor a lift. If I would have found this site previous to the start I would have known to plan ahead for such things.

Rob

4-post lifts do not need to be anchored. :thumbup:

It may not be your first choice, but its an option.
 
OP
J

justbummin1

Well-known member
Joined
Sep 23, 2010
Messages
175
Location
North West Illinois (The West Coast)
Well I have been laying low or laying around depends on who you talk to I guess for a while trying to recover financially from this build and enjoy other hobbies, work family etc you all know the drill.

Well it was time to get to work on landscaping or at least try to get the retaining wall done this fall. I have 130 feet of retaining wall to build most of which is 3 to 4 feet high to make a better transition from the garage floor/driveway height to the yard level. I started by removing the dirt that we had filled around the garage after the initial build and piled it up in the corner of the yard to use for back filling later between the wall and foundation. Next was digging a tench and filling with chips/crushed rock and compacting to create a base and started my base course.

Rob
 

Attachments

  • Retaining wall 1.jpg
    Retaining wall 1.jpg
    150.9 KB · Views: 93
  • Retaining wall 2.jpg
    Retaining wall 2.jpg
    150.8 KB · Views: 96
  • Retaining wall 3.jpg
    Retaining wall 3.jpg
    152 KB · Views: 93
  • Retaining wall 4.jpg
    Retaining wall 4.jpg
    151.8 KB · Views: 101
  • Retaining wall 5.jpg
    Retaining wall 5.jpg
    145.1 KB · Views: 98
OP
J

justbummin1

Well-known member
Joined
Sep 23, 2010
Messages
175
Location
North West Illinois (The West Coast)
I wanted to build steps by the man door to go from the driveway or garage down to the yard so the design changed several times to make it to where you are not seeing the backside or end of any of the blocks. Of course the type I bought about 400 of they do not make finished end blocks for so this is creating a bit of a challenge that I will have to tweak some more I am sure.

In the last pic you can see that what I came up with or what I am going to try is to more or less make a half circle that steps back 1 block every layer to create a landing.

Rob
 
OP
J

justbummin1

Well-known member
Joined
Sep 23, 2010
Messages
175
Location
North West Illinois (The West Coast)
oops pictures didn't attach.
 

Attachments

  • Retaining wall 6B .jpg
    Retaining wall 6B .jpg
    155.2 KB · Views: 115
  • Retaining wall 7.jpg
    Retaining wall 7.jpg
    152.5 KB · Views: 117
  • Retaining wall 8.jpg
    Retaining wall 8.jpg
    152.6 KB · Views: 117
  • Retaining wall 9.jpg
    Retaining wall 9.jpg
    150 KB · Views: 124
  • Retaining wall 10.jpg
    Retaining wall 10.jpg
    151.8 KB · Views: 131
  • Retaining wall 11.jpg
    Retaining wall 11.jpg
    154.4 KB · Views: 150

ODIS

Well-known member
Joined
Apr 30, 2012
Messages
2,110
Location
Pacific Northwest
Making nice progress on the landscaping. A great time of the year to do these projects. Garage and your surroundings look terrific.

Ody.
 
To avoid these ads, REGISTER NOW!
Top Bottom