
You are using an out of date browser. It may not display this or other websites correctly.
You should upgrade or use an alternative browser.
You should upgrade or use an alternative browser.
62 Corvette rebuild
- Thread starter don long
- Start date
Having the car back on the frame, It's time to start aligning the panels
So I started with the hood. After locating the hinges and bead blasting them I mounted the hood.
I found some 1967 V.W. hood pins and catches and sent them out to be chromed and they came back very pretty.
I bored a hole in the cowl and mounted a catch only to find out that the pin is 1/2 " short of latching the hood
Last edited:
johno
Well-known member
Nice build.
I thought the track on the later Corvettes was much wider, was everything narrowed or am I just wrong?
Are you going to hook up the reverse lock out on the T56? It is apparently easy hit R instead of 5th.
I found a guy who made a custom wound spring that solved the problem with no electrics, which I liked.
Nice build.
I thought the track on the later Corvettes was much wider, was everything narrowed or am I just wrong?
Are you going to hook up the reverse lock out on the T56? It is apparently easy hit R instead of 5th.
I found a guy who made a custom wound spring that solved the problem with no electrics, which I liked.
Hi johno
The new front x member was not modified just the frame horns on the 62
The rear of the frame was not widened but mounts were added for the later rear end and suspension
I haven't addressed the trans yet I will need help with all the mechanical issues
Thanks for pointing that out to me
Don
Yesterday I got the hood to latch down with the new system. Looking at the front of the car with the hood on I didn't like the look behind the grille
So I built a panel to sit inside to smooth out the area where the bumper guards used to go.


Today it's time to organize all the parts that have been shoved into crates
and spread them all out on the shelves to find the parts that need to go to the chrome shop
So I built a panel to sit inside to smooth out the area where the bumper guards used to go.
Today it's time to organize all the parts that have been shoved into crates
and spread them all out on the shelves to find the parts that need to go to the chrome shop
Last edited:
NASTYZEN
Well-known member
Looking just splendid indeed Don.
May I suggest you list,tag,photograph the **** out of every part you send to the platers to avoid the grief if they misplace a part or two...
May I suggest you list,tag,photograph the **** out of every part you send to the platers to avoid the grief if they misplace a part or two...
Kevin54
MEMBER EMERITUS
Don......Check your PM's
zmotorsports
ALLIANCE MEMBER
Beautiful looking build Don.
Mike.
Mike.
Looking just splendid indeed Don.
May I suggest you list,tag,photograph the **** out of every part you send to the platers to avoid the grief if they misplace a part or two...
Thanks NASTYZEN
I've been down that road before and lost a small part for a gas pump
Even after I took a picture of the parts laid out and sent it with the parts (he also lost the picture)
Don......Check your PM's
Thanks Kevin
Got it
Beautiful looking build Don.
Mike.
Thanks Mike
I'm getting anxious to see paint on the beast but I still need to block and reprime the body one more time
Today after sorting through the parts I rounded up the bumpers and brackets again with the idea of fitting the bumpers to the fenders to be sure to have perfect gaps.
While looking at the bumpers, I realized that with the front of the frame cut off and the later model front section grafted on, The bumpers would not bolt up any longer.
I had to make a bracket that bolted to the frame and also to the existing brackets after they were cut back from the frame


Now I have to modify the nose to fit the bumper after I have moved them closer to the car

While looking at the bumpers, I realized that with the front of the frame cut off and the later model front section grafted on, The bumpers would not bolt up any longer.
I had to make a bracket that bolted to the frame and also to the existing brackets after they were cut back from the frame
Now I have to modify the nose to fit the bumper after I have moved them closer to the car
Last edited:
Hey Don,it's really coming together nicely.I can't wait to see it in color. Are you having the interior done by someone or are you going to put us all to shame by doing it in house? You are really inspiring me to get going on my 56 Chevy p/u build.
Keep rolling,buddy.
Mike
Keep rolling,buddy.
Mike
56vette461
Well-known member
Looking good Don,
I like the insert you made for inside to cover the area behind the grill. Thanks to your efforts I'm figuring out how to make the changes to the 56. My two mentors are convinced I'm crazy for doing the "little" things to clean up old joints and repairs. But spending time watching your progress has convinced me it will be well worth the effort.
I fab'd some aluminum angle caps to fit over the repairs of the thin and cracked fiberglass at the frame attachment points. Once I sprayed the lizard skin over the repairs it really made for a clean look. Keep the photos coming, I like the possibilities.
RiverRider
Well-known member
Can't wait to see this project roll down your driveway!
You might consider taking a new full-time job for a year or so as a way to wind down from such an undertaking. J/K!
Mmmm...well, on second thought, maybe a Route 66 cruise in the car would be an appropriate way to celebrate completion. Your buddy who's helping oughta be your wingman. You guys could be Tom and Buzz.
Hey Don,it's really coming together nicely.I can't wait to see it in color. Are you having the interior done by someone or are you going to put us all to shame by doing it in house? You are really inspiring me to get going on my 56 Chevy p/u build.
Keep rolling,buddy.
Mike
Hi Mike and thanks.
I knew a guy from Iowa in the collision business his name was Bob Jones we called him jonesy.
I am getting closer to color on the car. I am thinking of painting the bottom of the car with a charcoal color to off set the red frame and pollished suspension.
I met with a good friend today concerning the interior. His name is Ron Magnus from magnus hotrod interiors he is well known for high design interiors on the big dollar cars. He is going to help me in that department.
Looking good Don,
I like the insert you made for inside to cover the area behind the grill. Thanks to your efforts I'm figuring out how to make the changes to the 56. My two mentors are convinced I'm crazy for doing the "little" things to clean up old joints and repairs. But spending time watching your progress has convinced me it will be well worth the effort.
I fab'd some aluminum angle caps to fit over the repairs of the thin and cracked fiberglass at the frame attachment points. Once I sprayed the lizard skin over the repairs it really made for a clean look. Keep the photos coming, I like the possibilities.
AJ
I'm glad that you are enjoying my blood sweat and tears.
It's good to hear that you are making progress on your vette.
Can't wait to see this project roll down your driveway!
You might consider taking a new full-time job for a year or so as a way to wind down from such an undertaking. J/K!
Mmmm...well, on second thought, maybe a Route 66 cruise in the car would be an appropriate way to celebrate completion. Your buddy who's helping oughta be your wingman. You guys could be Tom and Buzz.
Thanks RiverRider
The road trip is a definate for sure, and that thought keeps my buddy Paul coming over every day.
If I weren't working on the Vette the truck in the background would be a lot further along so no time off for me.
Last edited:
Today's progress
I finished up the hood latches and also finished up the 2nd round of block sanding the body.


And this afternoon I started fitting the rear bumpers to the car and decided to rework the brackets to fit the bumpers closer to the car.
Tomorrow I will mount the right one that has been modified to the car and also mount the left one to get an idea of the difference it might make


I finished up the hood latches and also finished up the 2nd round of block sanding the body.
And this afternoon I started fitting the rear bumpers to the car and decided to rework the brackets to fit the bumpers closer to the car.
Tomorrow I will mount the right one that has been modified to the car and also mount the left one to get an idea of the difference it might make
Last edited:
akdiesel
Well-known member
don
Aahh, that motor looks so good in there. Nice work.
Aahh, that motor looks so good in there. Nice work.
vintagespeed1956
Well-known member
Thanks buddy
I'm just a bit proud of it myself
Now to hide the ac and heater lines
she's looking sweet! SS hard lines and a shitload of bending!?
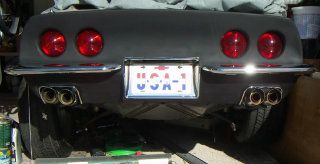
Well today was the day of truth
I finished cutting the last bracket on the right rear bumper end and rewelded it back minus about 1/4 inch of metal

I hung both the left and right bumpers on the car. the right one has been altered to mount about 1/4 inch closer to the body
What do you think
The original mount (left side)

The altered one (right side)

I finished cutting the last bracket on the right rear bumper end and rewelded it back minus about 1/4 inch of metal
I hung both the left and right bumpers on the car. the right one has been altered to mount about 1/4 inch closer to the body
What do you think
The original mount (left side)
The altered one (right side)
Last edited:
PugetDude
ALLIANCE MEMBER
I hung both the left and right bumpers on the car. the right one has been altered to mount about 1/4 inch closer to the body.
What do you think
Wow- what a difference that 1/4"makes- tightens it right up and makes it look like it grew there. Nice work- the mark of a true perfectionist!
Bob Heine
ALLIANCE MEMBER
Don, I really like everything you're doing to the 62 and I think the mods to the bumpers is like icing on a cake.
When I modified the rear bumpers on my '72 Corvette 30 years ago it never occurred to me to tighten them up but boy what a difference. All I was interested in was getting them to look like the 61-62 rear bumpers.
From this:

To this:
When I modified the rear bumpers on my '72 Corvette 30 years ago it never occurred to me to tighten them up but boy what a difference. All I was interested in was getting them to look like the 61-62 rear bumpers.
From this:
To this:
IGO2XS
Well-known member
Looks great Don. You are really making a serious commitment in updating your C1. I look at your project and see the hours of painstaking labor to get it right. This is really going to be a nice car when its finished.
I've seen Ron's work before and it's first rate. He once had a 37 Ford slant back sedan that was aqua and cream,I fell in love with 37 Fords the minute I saw it.
Mike
Mike
You are sooo right. Ron does very nice work and I'm proud to call him my friend
Wow- what a difference that 1/4"makes- tightens it right up and makes it look like it grew there. Nice work- the mark of a true perfectionist!
PugetDude
I'm pretty happy with the way they are starting to look!!
Thanks for stoppin by and sharing your thoughts
Don, I really like everything you're doing to the 62 and I think the mods to the bumpers is like icing on a cake.
When I modified the rear bumpers on my '72 Corvette 30 years ago it never occurred to me to tighten them up but boy what a difference. All I was interested in was getting them to look like the 61-62 rear bumpers.
Thanks Bob
Coming from you (the corvette guy) thats a real compliment. Thanks
It looks like you cut the tail off the donkey so to speak. I'll bet that made a huge difference on the looks to your ride!
Thanks for the visit
Looks great Don. You are really making a serious commitment in updating your C1. I look at your project and see the hours of painstaking labor to get it right. This is really going to be a nice car when its finished.
Hi Mark
Painstaking? are you talking about the masking tape bandage on my finger??
(that hurt when the grinder got loose)
Yes I am committed to this project thanks to my buddy Paul who keeps me focused and motivated we will see this to the finish line and I agree with you
It will be a nice car to have finished.
Took the day off today and went down to the Good Guys car show in Del Mar
Big mistake!! got more ideas for the vette. I may never be finished with this car
Door handles;; Do I keep um or loose um??
Gas door;; fill it in and move the gas tank ?? Or not
Radio antenna;; French it ? loose it ? or leave it stock
Fender moldings;; Chrome ? painted ? or loose them ??
And on and on
56vette461
Well-known member
Took the day off today and went down to the Good Guys car show in Del Mar
Big mistake!! got more ideas for the vette. I may never be finished with this car
Door handles;; Do I keep um or loose um??
Gas door;; fill it in and move the gas tank ?? Or not
Radio antenna;; French it ? loose it ? or leave it stock
Fender moldings;; Chrome ? painted ? or loose them ??
****
Don, you are driving my bride crazy. She reads this and all I get is "what is that and can we do that to the 56. You're killing me here buddy. But I like it.
Two coats of PPG primer down, sanding the fingers raw and liking the results. thanks for all your support.
Bob Heine
ALLIANCE MEMBER
Not to mention center outlet exhaust....

Don, you are driving my bride crazy. She reads this and all I get is "what is that and can we do that to the 56. You're killing me here buddy. But I like it.
Two coats of PPG primer down, sanding the fingers raw and liking the results. thanks for all your support.
Glad to hear that you are making progress on your vette
Lots of sanding on these beasts.
Post up a shot or 2 when you can
Are you going to put up a build thread for your project??
Thanks for the visit and continued support.
Not to mention center outlet exhaust....
Oh Man Bob I haven't thought about exhaust yet. Your looks pretty good.
My first thought is to run mine out the side in front of the rear tire.
Thanks for your help
Don


I did the same thing to my front bumpers on my '62. I also got rid of the license plate chrome. I think it makes the car much cleaner.
In the back, I went with stock bumpers but eliminated the chrome around the license plate area & built it in fiberglass molded in.
Not sure if this pic will show in the link, but here was my '62 at the Oakland Roadster show in 1972. I got a got a Gold Medal award & runner up for best paint in the show.
http://jameshandyphotography.zenfolio.com/p394012690/h3995b8de#h3995b8de
Custom to the max- a real candy apple red paint job, polished Halibrands & the uhpolsterer that did the car made the top out of pearl white naugahyde with padding around the windows & a headliner- looks like it wouldn't fold, but it did.
The more you take off the better they look- rocker & cove trim etc.
Had this lowered with dropped spindle suports in the front & blocks in the back- wish I had the car now........
Good luck with your build -it's WAY nicer than mine was!!!
Also, be sure to fit your doors- at the back bottom edge they all stick out- must have been a factory problem. Also at the the top of the arch on the front wheel wells re inforce them where the bonding strip ends- they stress crack there.
Last edited:
Bob Heine
ALLIANCE MEMBER
Don, when I was in my 20s I had Thrush mufflers on my 68 GTO and a Cherry Bomb header muffler on my 71 Vega GT. I terminated the exhaust on both cars right in front of the rear wheel and enjoyed the sound. Neither car had A/C so summer driving meant open windows and more than enough noise to keep me awake on long trips. Now that I'm in my 70s, I still enjoy the sound but not quite so much in my face.Oh Man Bob I haven't thought about exhaust yet. Your looks pretty good.
My first thought is to run mine out the side in front of the rear tire.
Here's a couple of 62's that have both locations (gotta say, I like the red one):


RickP
Well-known member
How about using chrome glass packs and straight pipes below the doors instead of mufflers? A friend of mine has a '69 vette with that setup and it looks really good. And it sounds awesome!
theglassman
Member
- Joined
- Jan 11, 2015
- Messages
- 5
Brother, I am getting tired just looking at the pictures of oaa the work you are doing. The hood latches turned out nice. All the details you are doing are going to look sooooo clean. Beautiful car.
vintagespeed1956
Well-known member
i say keep the door handles, they're what makes the side of the car from a distance. trim is trim. (edit: loose the door locks if anything, like the red one.)
the shaved handle thing is over. i hope..
center exhaust looks good on the grey one above but those side exits on the red one are the shiznit!
edit2:
if i'd shave anything it would be that gawdaweful rear deck lid emblem! holy **** that's huge! (sorry vette guys if i offend..)
the shaved handle thing is over. i hope..
center exhaust looks good on the grey one above but those side exits on the red one are the shiznit!
edit2:
if i'd shave anything it would be that gawdaweful rear deck lid emblem! holy **** that's huge! (sorry vette guys if i offend..)
Last edited:
Will tightening up those bumpers allow them to rub the body when flexing through a corner?
There was more than a bit of body flex going on in the 61 I had.
My bumpers banged a bit on the front fenders. I don't know of the rears.
Sorry I missed your post ducksface
My front bumpers are bolted hard to the front fenders with thick rubber spacers I assume to absorb the movement we will just have to wait and see.
Thanks for joining in
Don
jdsac
That's a fine ride there Too bad they left the proof thru the shot.
Did you tub it or just move the tires out under the wheel flares?
I agree that less is best on these cars. I have filled in the lower valance where the lic. mount bolted up and my rocker panel moldings are definitely not going back on the car
I like the spears from the 61 fenders not the 62 louvers so that will change to a custom built something along with the top of the fender molding to get rid of the poor fit to the headlite doors
And the list just keeps growing
The doors are next to be fitted (This week I hope)
Thanks for sharing your ride with me
Don
Mine used tail light bezels, upside down, on the lower valance for the exhaust.
Hi ducksface
The 65-67 vettes have the exaust coming out of the rear valance with a 2.5 " pipe wrapped with a chrome bezel that may work for me if I choose to bring it out the rear. Tail lite bezels may be too small for a good sound.
How about using chrome glass packs and straight pipes below the doors instead of mufflers? A friend of mine has a '69 vette with that setup and it looks really good. And it sounds awesome!
Hi Rick
My 65 roadster has a set of those side pipes and yes they sound bitchin.
I'll have to look and see if there is room for them on the 62
Thanks for the thought
Brother, I am getting tired just looking at the pictures of oaa the work you are doing. The hood latches turned out nice. All the details you are doing are going to look sooooo clean. Beautiful car.
Thanks glass man
Just between you and me, I'm getting tire of doing the work that you are looking at but just for you I will continue until we can go for a ride together in it lol
Proud to have your first post on my thread
i say keep the door handles, they're what makes the side of the car from a distance. trim is trim. (edit: loose the door locks if anything, like the red one.)
the shaved handle thing is over. i hope..
center exhaust looks good on the grey one above but those side exits on the red one are the shiznit!
edit2:
if i'd shave anything it would be that gawdaweful rear deck lid emblem! holy **** that's huge! (sorry vette guys if i offend..)
Hi vintagespeed
Now there's a thought. I agree that big hole in the decklid is a bit overbearing, I'll look at that this next week too.
Hi- thanks for the compliment, it wasn't too bad in 1972, but yours will be nicer- better technology. Mine still had the buckboard suspension. I started it when I was 20 ,made less than $4.00/ hr (good old days),car was a front end total, thought it was an easy fix (NO!) so mostly a do it yourself project. Took a couple of years.
RE: rear fenders- no tubs- don't think anyone did that that long ago, just sliced & diced with the saber saw& loosely copied what a rear fender on a 1970 Corvette looked like. Used a sheet fiberglass product called "FILON" to form them & then lots of glass & grinding - mostly all solid glass, only filler was for low areas.
The wheels were off a friends sprint car & I sent them to Halibrand to be drilled for a Chevy pattern.
Something to think about that I wanted to do & didn't was to take molds off the headlite doors, make some out of fiberglass & glass them on- put the headlites in from the rear "FRENCHED HEADLITES" would really clean up the front. Then just build up some glass & shape the fender moldings on the top of the fenders (no stainless that way) & no fit issues. Totally seamless front end that way.
There was a modified Corvette that ran at Bonneville & they had cut the rockers & rolled them under- made the car look like it was sectioned- I'll try to dig up a pic.
I'm going to follow your build- it's going to be a great car-
Last edited:
Hi- thanks for the compliment, it wasn't too bad in 1972, but yours will be nicer- better technology. Mine still had the buckboard suspension.
Something to think about that I wanted to do & didn't was to take molds off the headlite doors, make some out of fiberglass & glass them on- put the headlites in from the rear "FRENCHED HEADLITES" would really clean up the front. Then just build up some glass & shape the fender moldings (no stainless that way) & no fit issues. Totally seamless front end that way.
I'm going to follow your build- it's going to be a great car-
Hi jdsac
I drove my vette over 100,000 miles during its original life so I understand your "buckboard comment
On post 18 and 19 page one you can see that the headlites are frenched in and I just ground off the molding nub from the headlite doors the other day after finding a guy that makes moldings for any hotrod so I have solved the poor molding fit problem on top of the fenders.
Last edited: