To avoid these ads, REGISTER NOW!

62 Corvette rebuild

jdsac

Well-known member
Joined
Mar 2, 2011
Messages
565
Nice! 100,000 miles- you qualify for some sort of disability, your back must be shot. They were worst riding, best looking cars.
I sold mine to buy a DeTomaso Mangusta project car. Later sold- big mistake wish I had either car back now.

Great thread, glad I found it! Best wishes.....
 
To avoid these ads, REGISTER NOW!

NUTTSGT

Super Moderator
Staff member
Joined
Sep 14, 2009
Messages
50,882
Location
Northern Central Ohio
As I'm reading through your thread Don, I have a quick question. What do you use the PVC and copper "pipes" looking things for ?
 

Attachments

  • donlong1.jpg
    donlong1.jpg
    88.5 KB · Views: 357
OP
D

don long

Well-known member
Joined
Mar 31, 2012
Messages
8,842
Location
southern california
As I'm reading through your thread Don, I have a quick question. What do you use the PVC and copper "pipes" looking things for ?

Hi Eric
Those pieces you see in that picture were used for mock up on the A/C.
Had to think about it for a few we attached them to the unit so we could determine where to cut the holes into the firewall for the lines

Thanks for the visit

Don
 
Last edited:
OP
D

don long

Well-known member
Joined
Mar 31, 2012
Messages
8,842
Location
southern california
Also, be sure to fit your doors- at the back bottom edge they all stick out- must have been a factory problem. Also at the the top of the arch on the front wheel wells re inforce them where the bonding strip ends- they stress crack there.

Well after reading your post concerning the door fit, I started worrying about my doors, So first thing this morning I grabbed Paul and we went after the doors to find out what problems we would be facing!!
 
OP
D

don long

Well-known member
Joined
Mar 31, 2012
Messages
8,842
Location
southern california
They went on the car just fine and with a little fine tuning they look pretty good
Just the left door gap at the top rear needs to be played with

Left door
2015-04-20 14.03.25.jpg
Right door


2015-04-20 16.53.36.jpg
Right door lower rear


2015-04-20 16.54.28.jpg
 
Last edited:

jdsac

Well-known member
Joined
Mar 2, 2011
Messages
565
Wow, how did that happen? Nice fit! Do you have a door rubber that you can put on? If I recall, when I got new door rubbers, the fit in that area was bad. If the rubber doesn't change your fit, it's perfect!

Continuing to follow your most excellent build...
 

IGO2XS

Well-known member
Joined
Apr 24, 2012
Messages
1,415
Location
Sarasota, FL
Wow, how did that happen? Nice fit! Do you have a door rubber that you can put on? If I recall, when I got new door rubbers, the fit in that area was bad. If the rubber doesn't change your fit, it's perfect!

Continuing to follow your most excellent build...

Agree with jdsac. I have found mocking up doors with door seals taped on is a good idea.

I saw some talk earlier about door handles and I would definitely keep them on. I think its a great idea on leaving the center section out of the front bumpers. Do you plan on putting any kind of screen or something in the open area so the radiator is hidden a little? I can tell some of these guys know how much work it takes to put one of these cars together. LOTS of work!
 
OP
D

don long

Well-known member
Joined
Mar 31, 2012
Messages
8,842
Location
southern california
For an early Vette, those door gaps are about as nice as you'll see.. :thumbup:

MP&C
I agree. I was pleasantly surprised how well the doors went on the car

Wow, how did that happen? Nice fit! Do you have a door rubber that you can put on? If I recall, when I got new door rubbers, the fit in that area was bad. If the rubber doesn't change your fit, it's perfect!

jdsac

Are you saying that new rubber is different from the old seals??
Looking at the pictures of the car before I tore it apart the doors look like they fit pretty well (looking at the pic.s in post#10)

Agree with jdsac.

I saw some talk earlier about door handles and I would definitely keep them on. I think its a great idea on leaving the center section out of the front bumpers. Do you plan on putting any kind of screen or something in the open area so the radiator is hidden a little? I can tell some of these guys know how much work it takes to put one of these cars together. LOTS of work!

I agree the door handles have a place on my car but the door locks might just go away!!

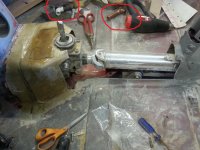
I will be putting the original grille back on the car , and the inner space behind the grille is all dressed out and will be painted and finished like the top surfaces and the same color I will be putting an aluminum radiator in the car so if it looks out of place I may consider a screen behind the grille.

And Yes It Is A Lot Of Work but I am really enjoying this build

Thanks so much guys for all of your input.
I am finding it to be very helpful and enjoyable.
 
Last edited:

jdsac

Well-known member
Joined
Mar 2, 2011
Messages
565
If you have new door seals they will take some time to compress to the size of the old ones. Lots of time with the doors closed & hot & cold weather made the old ones smaller than a new one (usually).

Possible the door might be out a little with new seals, but can be re adjusted as the new seals take a set.
 

hpw

Well-known member
Joined
Oct 7, 2007
Messages
989
They went on the car just fine and with a little fine tuning they look pretty good
Just the left door gap at the top rear needs to be played with

This might be out of line with the corvette......I had a 66 ghia convertible and in the body manual they showed adjusting the door gaps by placing shims at the rear of body/frame attachment points.

I guess this was to adjust for body flexing since a convertible usually does with age.

before
doorgap006.jpg


after using body/frame shims, not much difference and still not perfect but you get the idea

doorgap001-1.jpg
 
OP
D

don long

Well-known member
Joined
Mar 31, 2012
Messages
8,842
Location
southern california
thanks hpw

Thats what I had in mind to look at first!!
Yesterday the door locks went away and I made a couple of covers to replace the hood latch plates. We are getting closer and closer to paint. I can't wait
 
OP
D

don long

Well-known member
Joined
Mar 31, 2012
Messages
8,842
Location
southern california
I've been working on the vette with not much to report.

Today I made the filler pan for the right side of the car and started blocking the primer

2015-04-30 15.15.54.jpg

2015-04-30 15.15.49.jpg

door locks are gone
2015-04-23 16.30.15.jpg
 
Last edited:

RickP

Well-known member
Joined
Jan 15, 2013
Messages
1,548
Location
Annapolis, MD
Looks good Don. I think that rotisserie is really earning its keep with all your work on the underside.
 
OP
D

don long

Well-known member
Joined
Mar 31, 2012
Messages
8,842
Location
southern california
Well we are getting closer to the finish line.
I do believe that all the mods to the car have been done.
The engine compartment redesigned.
A/C added.
The console rebuilt to accommodate a 6 speed trany.
The door locks removed and filled in.
The headlamps frenched in.
The bumper center bar removed and the end bumpers modified
The license plate mount and bumper guards removed and holes filled in
The chassis modified to except C4 suspension and an LT1 motor
And the biggest job was removing the undercoat from the bottom of the car and smoothing out all the gouges caused by the grinders, chisels, and putty knives.
 
Last edited:
OP
D

don long

Well-known member
Joined
Mar 31, 2012
Messages
8,842
Location
southern california
Today the car went into the booth for a coat of sealer to the body and to put paint on the bottom of the car

(Can't seem to post pictures tonite)

So here is the new plan
We will start putting the car together while it is in primer/sealer
When it is running I will send the car over to a good friend to make the fender top moldings and give the car to the upholstery shop for a custom interior, then drive the car for a couple hundred miles to work out all the bugs before putting it back in the shop, take it completely apart and paint it.

So next week the fun begins
 

Kevin54

MEMBER EMERITUS
Joined
Jan 12, 2005
Messages
29,341
Location
Urbana, Ohio
Dang Don....where do you buy your ambition, because I need a few bottles. :spit: Every time I pop onto your thread, you are here, you are there, doing this, doing that. I find it a struggle to get one thing done sometimes let alone 20 things like you work on at once.

BTW....you taking care of my phone booth :lol: You can't neglect that.
 
To avoid these ads, REGISTER NOW!

BBChevro

Well-known member
Joined
Jan 24, 2014
Messages
2,235
Location
Brisbane, Qld., Australia
Today the car went into the booth for a coat of sealer to the body and to put paint on the bottom of the car

(Can't seem to post pictures tonite)

So here is the new plan
We will start putting the car together while it is in primer/sealer
When it is running I will send the car over to a good friend to make the fender top moldings and give the car to the upholstery shop for a custom interior, then drive the car for a couple hundred miles to work out all the bugs before putting it back in the shop, take it completely apart and paint it.

So next week the fun begins

I know that it is a lot more work, but I totally agree with your plan to put it to the test before painting it.

But when has work ever bothered you anyway Don. :lol:
 
OP
D

don long

Well-known member
Joined
Mar 31, 2012
Messages
8,842
Location
southern california
Dang Don....where do you buy your ambition, because I need a few bottles. :spit: Every time I pop onto your thread, you are here, you are there, doing this, doing that. I find it a struggle to get one thing done sometimes let alone 20 things like you work on at once.

BTW....you taking care of my phone booth :lol: You can't neglect that.

Well Kevin

It's not ambition it desperation
Too many projects and so little time
I have this problem, I can,t pass up a good project or a good deal. If I think I can fix it, it comes home with me. Then the pressure is on.

Now that phone booth is still on the list and my scale projects keep comin.

I know that it is a lot more work, but I totally agree with your plan to put it to the test before painting it.

But when has work ever bothered you anyway Don. :lol:

Thanks BB

I just know how unhappy I get when something should have been fixed but didn't when a project is finished and it's much easier to fix before paint

Thanks for the visits and comments guys
They do keep me focused

Don
 
OP
D

don long

Well-known member
Joined
Mar 31, 2012
Messages
8,842
Location
southern california
Had a pretty good day today
I wrapped the corvette getting it ready to paint the bottom before noon

2.jpg

And after lunch I did get color on it

5.jpg

The color is a steel grey metallic

7.jpg

this evening I unwrapped the engine compartment and tomorrow I will paint it red (viper red)

1.jpg
 
Last edited:

TimeWarpF100

Well-known member
Joined
Aug 21, 2010
Messages
6,784
Location
not here
Had a pretty good day today
I wrapped the corvette getting it ready to paint the bottom before noon

2j0b1fr.jpg


And after lunch I did get color on it

160poiu.jpg


The color is a steel grey metallic

286ybub.jpg


this evening I unwrapped the engine compartment and tomorrow I will paint it red (viper red)

1z19utz.jpg

Looks very nice Don!

Looking forward to see it all together.
 
OP
D

don long

Well-known member
Joined
Mar 31, 2012
Messages
8,842
Location
southern california
Thanks guys
The car is still sitting in the paint booth waiting to come out and start the reassembly.

I have been busy with other things like a road trip to Arkansas and kentucky to pick up a few ebay items as well as the engine hoist shown on a thread here last year

But I'm back at it today. We tore into the trans to try and figure out what it will take to put a hydraulic clutch mechanism on the car. I want to install a hydraulic throw out bearing onto the clutch plate so tonight the chassis looks like this

14khz48.jpg
 
Last edited:

IGO2XS

Well-known member
Joined
Apr 24, 2012
Messages
1,415
Location
Sarasota, FL
Don, your c1 is looking awesome. I just dont see how you keep up with all the projects you have going on. When I grow up I want to be like you because I know I could make a full time project out of life. Have you decided what brand of throwout bearing you are going to use? I am putting one of my c2 project. I cut out a nice 3/16" aluminum plate and bonded it to the inside of the firewall. This added the necessary strength to the firewall to adequately support the clutch master cylinder. I have a picture if you would want to see it.
 
OP
D

don long

Well-known member
Joined
Mar 31, 2012
Messages
8,842
Location
southern california
Don, your c1 is looking awesome. I just dont see how you keep up with all the projects you have going on. When I grow up I want to be like you because I know I could make a full time project out of life. Have you decided what brand of throwout bearing you are going to use? I am putting one of my c2 project. I cut out a nice 3/16" aluminum plate and bonded it to the inside of the firewall. This added the necessary strength to the firewall to adequately support the clutch master cylinder. I have a picture if you would want to see it.

Thanks Mark
I am well over my pay grade on this one.
My moto is I make um look good and let others make them run.
Problem is haven't found others yet so I can use all the help that I can get.

Keeping up with the projects is not so hard when you have A.D.D.
I'm also pretty good at playing Tom Sawyer and convincing others to help me paint the fence. Today there were 4 guys that dropped by to play in the garage So while I cut and welded on the display rack one guy was sandblasting and 2 were pulling the trans off the chassis and one guy swept the floor and chased nuts and bolts for me

We broke the trans away from the motor to help decide what we need for the throwout bearing so no decisions have been made on what to use so I'm wide open for suggestions

Thanks for the visit and the offer to help
It is very much appreciated

Don
 

56vette461

Well-known member
Joined
Jan 13, 2013
Messages
492
Location
Northern California
I'm beginning to see Don as the legendary Pied Piper, only a real life version.

He doesn't induce people to help or offer extravagant promises. He just shows you the great enjoyment and feeling of accomplishment he experiences with his projects It is like a virus you catch when you see the big party garage and this corvette for yourself. You get to be part of one of his projects and experience the magic of that garage and his collections.

Keep it coming Don, and please tell your lovely bride hello from us.

aj
 

IGO2XS

Well-known member
Joined
Apr 24, 2012
Messages
1,415
Location
Sarasota, FL
Thanks Mark


Keeping up with the projects is not so hard when you have A.D.D.

We broke the trans away from the motor to help decide what we need for the throwout bearing so no decisions have been made on what to use so I'm wide open for suggestions

Thanks for the visit and the offer to help
It is very much appreciated

Don

Funny, I have A.D.D. too and I work all the time!! I hope this isnt taking up to much space on your thread here. An aluminum plate is bonded to the inside of the firewall for clutch master cylinder support. Guys who havnt done this have experience cracked fiberglass because of the stress. I got my hydraulic clutch from American Powertrain.


johno

Well-known member
Joined
Oct 16, 2009
Messages
2,418
Location
Southern Ont.
You realise that clutch operates in reverse right?

That sensor/ switch whatever it is about mid point on the trans, Tick performance makes a nice block off plug for it fyi.
 
OP
D

don long

Well-known member
Joined
Mar 31, 2012
Messages
8,842
Location
southern california
Thanks Mark
Those pictures help quite a bit You are always welcome to post anything on my thread!

I took the pressure plate to a clutch co. today (McLeods Racing clutch)
only to find out that I can't use a hydraulic throwout bearing because my trans has a pulling bearing instead of a pushing one, so I have to go back to the stock slave cylinder that bolts to the bell housing.

Now I'm looking for the master cylinder with a remote reservoir for the clutch pedal, and because I built the left engine apron all the way to the cowl I will have to offset the master cylinder.


johno
Thanks for the visit and input
But I don't know what you are pointing out.
Could you please clarify for me

Thanks
Don
 
Last edited:
OP
D

don long

Well-known member
Joined
Mar 31, 2012
Messages
8,842
Location
southern california
I'm beginning to see Don as the legendary Pied Piper, only a real life version.

He doesn't induce people to help or offer extravagant promises. He just shows you the great enjoyment and feeling of accomplishment he experiences with his projects It is like a virus you catch when you see the big party garage and this corvette for yourself. You get to be part of one of his projects and experience the magic of that garage and his collections.

Keep it coming Don, and please tell your lovely bride hello from us.

aj

AJ
Thank you for all that flattery.
Some of what you say may be true, however I believe they just want to get out of the house and hang out somewhere.

I did tell Ann that you and your wife send greetings

Its always fun to see you have dropped in

Don
 

johno

Well-known member
Joined
Oct 16, 2009
Messages
2,418
Location
Southern Ont.
Don, post 228, just behind the strap laying over the on the trans, is a cylindrical gizmo, with white end on it.
I seem to recall something to do with CAGS.
I doubt you're using it, it can be removed and a plug from Ticks goes in.
 
To avoid these ads, REGISTER NOW!
Top Bottom