To avoid these ads, REGISTER NOW!

66 F100 Rustomod

bdbecker

ALLIANCE MEMBER
Joined
Nov 18, 2015
Messages
5,547
Location
Iowa
...I’ve owned my F100 for 8 going on 9 years now. Life has taken priority so it has sat for awhile...

Totally hear you... coming up on 12 years with my '64 long bed (same color as yours). In my defense, I've gone through a lot of life changes in that time (moved states, changed jobs, married, bought house, had kids, etc.). Our youngest (more than likely last) is now 3.5 years old and I'm starting to get a little more flexibility with how I spend my time.

I'm looking forward to following along with your project and hopefully picking up a few things along the way!
 
To avoid these ads, REGISTER NOW!
OP
O

Ohmthis

Well-known member
Joined
Jan 20, 2013
Messages
3,002
Location
Outside of Louisville KY
Totally hear you... coming up on 12 years with my '64 long bed (same color as yours). In my defense, I've gone through a lot of life changes in that time (moved states, changed jobs, married, bought house, had kids, etc.). Our youngest (more than likely last) is now 3.5 years old and I'm starting to get a little more flexibility with how I spend my time.

I'm looking forward to following along with your project and hopefully picking up a few things along the way!
BD, boy that story is very familiar. The things that have happened since buying this truck boggles my mind. We have moved twice, had a major fire in the last house, rebuilt it, my wife went back to school, I went to and got my pilot’s license, we’ve raised 3 children (should have said raising……Ours are 14, 12,, and 10), and that’s just the Major event! I hope I do you right on these trucks. I’m still learning as it is with them. If there is anything you want/need to see just ask and I’ll do my best. I’d like to see your truck, I love the color of ours. Thanks for looking!
 

bdbecker

ALLIANCE MEMBER
Joined
Nov 18, 2015
Messages
5,547
Location
Iowa
...I hope I do you right on these trucks. I’m still learning as it is with them. If there is anything you want/need to see just ask and I’ll do my best. I’d like to see your truck, I love the color of ours...

No pressure at all. It'll be my first vehicle revival... I'm sure I'll make plenty of mistakes along the way.

Pics of the truck are not so easy to get at the moment as I've got it tucked away in a shed on my Dad's farm about 2 hours away. He's been taking care of it for me though... drops a little oil in the cylinders and manually spins the engine from time to time to keep it from getting stuck. We're hoping to get it pulled out and start working on it once he finishes up his Jeep ('83 CJ5), hopefully within the next year or so. Current plan is to avoid scope-creep as much as possible and just focus on getting her yard worthy (able to drive around the yard and loaded on the trailer). Known issues are kingpins, brakes, fuel tank, and starter, but I'm sure we'll find more problems once we dig in. Once that happens, I'll bring her home and start tackling the rest (floor pan, bed, seat, etc). For now, I just want to get her back on the road. Long term I have some ideas floating around, but that very well could change.
 
OP
O

Ohmthis

Well-known member
Joined
Jan 20, 2013
Messages
3,002
Location
Outside of Louisville KY
No pressure at all. It'll be my first vehicle revival... I'm sure I'll make plenty of mistakes along the way.

Pics of the truck are not so easy to get at the moment as I've got it tucked away in a shed on my Dad's farm about 2 hours away. He's been taking care of it for me though... drops a little oil in the cylinders and manually spins the engine from time to time to keep it from getting stuck. We're hoping to get it pulled out and start working on it once he finishes up his Jeep ('83 CJ5), hopefully within the next year or so. Current plan is to avoid scope-creep as much as possible and just focus on getting her yard worthy (able to drive around the yard and loaded on the trailer). Known issues are kingpins, brakes, fuel tank, and starter, but I'm sure we'll find more problems once we dig in. Once that happens, I'll bring her home and start tackling the rest (floor pan, bed, seat, etc). For now, I just want to get her back on the road. Long term I have some ideas floating around, but that very well could change.
What engine do you have? I might have some free parts I can send you.
 

emeraldcoupe

Well-known member
Joined
Jan 4, 2010
Messages
3,425
Location
spring hill, florida
Ohhhh, do show the 71. I really like the bumpsides!
It's a work in progress. i'm taking all the beltline trim off, just leaving the lower trim on. 302/4r70w, a '79 tilt column, '92 bench seat, and a f5/600 gauge cluster. i've had it for quite a while, but i'm quite the procrastinator (lazy) at times. IMG_20230914_183756033_HDR.jpg
 
Last edited:

wrenchr

Super Moderator
Staff member
Joined
Jul 29, 2007
Messages
11,603
Location
Michigan
It's a work in progress. i'm taking all the beltline trim off, just leaving the lower trim on. 302/4r70w, a '79 tilt column, '92 bench seat, and a f5/600 gauge cluster. i've had it for quite a while, but i'm quite the procrastinator (lazy) at times. IMG_20230914_183756033_HDR.jpg
I searched for a 79 tilt column and gave up and ended up buying an IDIDIT tilt column. Was that 2nd gas tank added? Looks like the fuel door in the bed was spliced in. Looks very solid.
 

emeraldcoupe

Well-known member
Joined
Jan 4, 2010
Messages
3,425
Location
spring hill, florida
I searched for a 79 tilt column and gave up and ended up buying an IDIDIT tilt column. Was that 2nd gas tank added? Looks like the fuel door in the bed was spliced in. Looks very solid.

i bought the column cheap a few years ago. i took the tank out of the cab, just need to fill the hole. i put a 23 gallon bronco 2 tank under the bed and used a ranger fuel door. the truck is pretty solid overall, but the bed needs work. when i pulled the trim off, found a dime size hole, the rest is just surface rust.
 

captain14

Well-known member
Joined
Dec 19, 2012
Messages
7,021
Location
Near College Park Maryland 20740
i bought the column cheap a few years ago. i took the tank out of the cab, just need to fill the hole. i put a 23 gallon bronco 2 tank under the bed and used a ranger fuel door. the truck is pretty solid overall, but the bed needs work. when i pulled the trim off, found a dime size hole, the rest is just surface rust.
Where’s you truck been living all these years? Around your area or did it migrate there at some point?
 
OP
O

Ohmthis

Well-known member
Joined
Jan 20, 2013
Messages
3,002
Location
Outside of Louisville KY
i bought the column cheap a few years ago. i took the tank out of the cab, just need to fill the hole. i put a 23 gallon bronco 2 tank under the bed and used a ranger fuel door. the truck is pretty solid overall, but the bed needs work. when i pulled the trim off, found a dime size hole, the rest is just surface rust.
If you can find columns around here they want a bunch for them and it probably will have to be rebuilt. $450-$500 is what I’ve seen OEM columns in that time period. Seems crazy to me, but what do I know.
 

emeraldcoupe

Well-known member
Joined
Jan 4, 2010
Messages
3,425
Location
spring hill, florida
If you can find columns around here they want a bunch for them and it probably will have to be rebuilt. $450-$500 is what I’ve seen OEM columns in that time period. Seems crazy to me, but what do I know.

i got lucky finding this one, i paid $125 for it. they pop up from time to time here, but for about the same price you see.
 

wrenchr

Super Moderator
Staff member
Joined
Jul 29, 2007
Messages
11,603
Location
Michigan
If you can find columns around here they want a bunch for them and it probably will have to be rebuilt. $450-$500 is what I’ve seen OEM columns in that time period. Seems crazy to me, but what do I know.
i got lucky finding this one, i paid $125 for it. they pop up from time to time here, but for about the same price you see.
Wow, that was a crazy deal on the factory column. All in with all the bits and pieces, bells and whistles I have over 1K into my aftermarket one, not even counting the wrong one I bought before covid struck and I took my time painting and then installing to find out the error of my ways.
 

emeraldcoupe

Well-known member
Joined
Jan 4, 2010
Messages
3,425
Location
spring hill, florida
Wow, that was a crazy deal on the factory column. All in with all the bits and pieces, bells and whistles I have over 1K into my aftermarket one, not even counting the wrong one I bought before covid struck and I took my time painting and then installing to find out the error of my ways.

yeah, it was a rare find for sure. right place at the right time.
 

ChefRex

Well-known member
Joined
Jun 1, 2020
Messages
3,696
Location
NJ
Early 80's I was working in an insurance yard I bought a WT F150 recovered theft, of course it needed a column, somehow it was an upgrade.
 

willy3486

Well-known member
Joined
Jan 14, 2010
Messages
1,592
Location
Middle Tennessee
The dash pad
I have a 66 with a dash like that. I wanted to keep it but it was cracked. I wound up using it and recovering it. I took pictures and it was published in a Ford truck magazine, True Blue I think. I am not sure of when it was in there other than the first year of publication. It wasn't hard to do, I mainly pulled it off, put quilting backing on the dash then covered it with a black vinyl piece. I sprayed headliner glue spray on it,then laid down the quilting, then sprayed again and laid the vinyl on it. Seems like I laid the vinyl out in the sun before I laid it down to get it more flexible. It turned out really good. and a lot better looking than what I started out with.

As far as the ride quality goes some of the roughness is suppose to be from how the twin I beam works. There was a article in Truckin magazine back in the 80s that showed how to add another set of shocks to the front. I did it and it really helped the best I remember. If I remember the frame part that holds the shock and spring already has a hole for it so you can add a second shock to each side. It took only about an hour to do.
 
OP
O

Ohmthis

Well-known member
Joined
Jan 20, 2013
Messages
3,002
Location
Outside of Louisville KY
I have a 66 with a dash like that. I wanted to keep it but it was cracked. I wound up using it and recovering it. I took pictures and it was published in a Ford truck magazine, True Blue I think. I am not sure of when it was in there other than the first year of publication. It wasn't hard to do, I mainly pulled it off, put quilting backing on the dash then covered it with a black vinyl piece. I sprayed headliner glue spray on it,then laid down the quilting, then sprayed again and laid the vinyl on it. Seems like I laid the vinyl out in the sun before I laid it down to get it more flexible. It turned out really good. and a lot better looking than what I started out with.

As far as the ride quality goes some of the roughness is suppose to be from how the twin I beam works. There was a article in Truckin magazine back in the 80s that showed how to add another set of shocks to the front. I did it and it really helped the best I remember. If I remember the frame part that holds the shock and spring already has a hole for it so you can add a second shock to each side. It took only about an hour to do.
Thanks for the info. I destroyed the dash pad taking it out. I’m really leaning towards painting the dash. As far as the front suspension, I’m removing all of the factory parts and doing the Crown Vic front subframe swap. It gives you independent front suspension, big disc brakes, rack and pinion steering, and a fat anti roll bar. It also will drop the front several inches. I’m going to be starting that Thursday. Thanks for looking.
 

emeraldcoupe

Well-known member
Joined
Jan 4, 2010
Messages
3,425
Location
spring hill, florida
Thanks for the info. I destroyed the dash pad taking it out. I’m really leaning towards painting the dash.
i don't remember what the top of my '65 dash looked like, but if it's similar to the bumpside, there are a bunch of slotted holes you'll have to weld up to get the dash smooth.
 
To avoid these ads, REGISTER NOW!
OP
O

Ohmthis

Well-known member
Joined
Jan 20, 2013
Messages
3,002
Location
Outside of Louisville KY
Ok, the Mrs. and I went on a little trip sans kids to celebrate 15 years married. We had a good time and we try and keep “dating” as we both feel that’s important. After a few days away I’m ready to get back on the truck. I started by unbolting the steering box and removing that from the suspension. I took the control arms fasteners out and cut the rusted hardware for the springs. Once getting the trailing arms loosened I was able to set the old suspension on the floor.
 

Attachments

  • IMG_4335.jpeg
    IMG_4335.jpeg
    637.5 KB · Views: 89
OP
O

Ohmthis

Well-known member
Joined
Jan 20, 2013
Messages
3,002
Location
Outside of Louisville KY
I went at the rivets with a cutoff wheel and then chiseled them off. MY GOD, these things are on there good. I can’t drive them out with my air hammer. I completely ground the heads smooth and have even tried grinding the two layers down deep to try and release the rivets…..No luck yet, but it’s time to stop and I’ve got 4 more days to “play”. I didn’t want to grind too far and grind into the frame. It won’t be seen, but I’d know it’s there. Thanks for looking ya’ll
 

Attachments

  • IMG_4336.jpeg
    IMG_4336.jpeg
    502 KB · Views: 71
  • IMG_4337.jpeg
    IMG_4337.jpeg
    549.2 KB · Views: 67
OP
O

Ohmthis

Well-known member
Joined
Jan 20, 2013
Messages
3,002
Location
Outside of Louisville KY
Ok, I’m back at it today Woo Hoo!!!! I went back at those rivets and cut multiple cross cuts in the heads. Once I chiseled the heads off with an air chisel, I wedged a large hand chisel in between the pieces being held together. The pressure pulled the shank through. Here’s all of the old twin I beam suspension removed.
 

Attachments

  • IMG_4340.jpeg
    IMG_4340.jpeg
    1,002.3 KB · Views: 52
  • IMG_4339.jpeg
    IMG_4339.jpeg
    1.3 MB · Views: 53
OP
O

Ohmthis

Well-known member
Joined
Jan 20, 2013
Messages
3,002
Location
Outside of Louisville KY
I fired up the plasma and gouged the main cross member apart. I had to stop and troubleshoot my compressor. Pressure switch crapped out. No worries I walked around the house and pulled up my back up that’s in “The Cave” shop. Here’s the main cross member laying on the floor.
 

Attachments

  • IMG_4344.jpeg
    IMG_4344.jpeg
    922.6 KB · Views: 50
  • IMG_4343.jpeg
    IMG_4343.jpeg
    1.1 MB · Views: 34
  • IMG_4342.jpeg
    IMG_4342.jpeg
    878.6 KB · Views: 33
  • IMG_4341.jpeg
    IMG_4341.jpeg
    753.4 KB · Views: 38
OP
O

Ohmthis

Well-known member
Joined
Jan 20, 2013
Messages
3,002
Location
Outside of Louisville KY
I took the plasma cutter and cleaned out as much of the left over parts that I could. These are welded to the frame. Once the big pieces were out of my way, I ground out the welds and pulled the rest out.
 

Attachments

  • IMG_4345.jpeg
    IMG_4345.jpeg
    739.9 KB · Views: 36
  • 71830561904__234336C1-9E0A-4E12-BBEC-6C5D68B6F8EE.jpeg
    71830561904__234336C1-9E0A-4E12-BBEC-6C5D68B6F8EE.jpeg
    1.1 MB · Views: 35
  • 71830562773__FD1EAA49-3EAC-4FB6-BCA6-70C1C595121B.jpeg
    71830562773__FD1EAA49-3EAC-4FB6-BCA6-70C1C595121B.jpeg
    998.5 KB · Views: 40
OP
O

Ohmthis

Well-known member
Joined
Jan 20, 2013
Messages
3,002
Location
Outside of Louisville KY
before removing anything I measured and marked the front wheel center line on the top of the frame. Once everything was removed I went back and using a string and nuts marked that line around the frame. Once I was happy and square, I sat the subframe under and made more measurements.
 

Attachments

  • 71831500871__81ABFC9C-94AB-4053-9127-4047C9279F5D.jpeg
    71831500871__81ABFC9C-94AB-4053-9127-4047C9279F5D.jpeg
    1 MB · Views: 40
  • 71831501802__5748409C-8FEC-4FE0-B7FC-0CE0BD3883B4.jpeg
    71831501802__5748409C-8FEC-4FE0-B7FC-0CE0BD3883B4.jpeg
    1.1 MB · Views: 52
OP
O

Ohmthis

Well-known member
Joined
Jan 20, 2013
Messages
3,002
Location
Outside of Louisville KY
From my research, there was a hole that might work for the locating dolls on the subframe. I’m feeling pretty lucky right now! The dowels lined up, but needed to be opened up some. I used a carbide burr and slowly opened the hole. I had to go back a few times to open up and the measure things before I was happy.
 

Attachments

  • IMG_4351.jpeg
    IMG_4351.jpeg
    1,009.6 KB · Views: 47
  • IMG_4350.jpeg
    IMG_4350.jpeg
    1,001.7 KB · Views: 70
OP
O

Ohmthis

Well-known member
Joined
Jan 20, 2013
Messages
3,002
Location
Outside of Louisville KY
Back at it today!!! I’m very excited to get to work on her. I don’t know about some of you, but man I feel so good being creative and letting it flow through my mind to my hands! Meanwhile back at the ranch. Today I got the boxing plates fitted and Everything in its place. I have raised and dropped the subframe 12 or a dozen times! After measuring again to make sure things square I drilled and bolted the subframe in place. Sorry, I got distracted and didn’t take any pictures.
 
OP
O

Ohmthis

Well-known member
Joined
Jan 20, 2013
Messages
3,002
Location
Outside of Louisville KY
After drilling and again putting things in its place, I bolted it and welded the boxing plates in. Here’s some prerequisite welding pictures. I ground down one side only to see if I liked that look better, what do you guys think?
 

Attachments

  • IMG_4354.jpeg
    IMG_4354.jpeg
    735.7 KB · Views: 57
  • IMG_4355.jpeg
    IMG_4355.jpeg
    808.5 KB · Views: 55
  • IMG_4356.jpeg
    IMG_4356.jpeg
    995 KB · Views: 56
  • IMG_4357.jpeg
    IMG_4357.jpeg
    1 MB · Views: 67
OP
O

Ohmthis

Well-known member
Joined
Jan 20, 2013
Messages
3,002
Location
Outside of Louisville KY
And here she is sitting on the ground with her shoes, everything is still square and measured out just about perfect! My tape measure reads to the 1/16 and it perfect to that. Thanks for looking!
 

Attachments

  • 71840584568__A69BF61D-1FA7-4EA8-9DF2-CC406709F14D.jpeg
    71840584568__A69BF61D-1FA7-4EA8-9DF2-CC406709F14D.jpeg
    1.2 MB · Views: 66
  • 71840823617__E6C34254-8B13-4499-A682-9228A87E7EE3.jpeg
    71840823617__E6C34254-8B13-4499-A682-9228A87E7EE3.jpeg
    1.1 MB · Views: 71
OP
O

Ohmthis

Well-known member
Joined
Jan 20, 2013
Messages
3,002
Location
Outside of Louisville KY
Well the weekend was definitely productive. I finished up by attaching the steering and then a good clean up. I used a Ford “Triangle” to 3/4” DD universal adapter on the rack side. I also used a 3/4” 36 spline to 3/4” DD universal on the truck side. I used a section on 3/4” DD shaft to tie them together. The steering is smooth with no slop. I am leaning towards an aftermarket steering column to get rid of the “3 on the tree” shifter and the section at the bottom of the factory column that has the linkage pivots. Thanks for looking everyone!
 

Attachments

  • IMG_4362.jpeg
    IMG_4362.jpeg
    771.1 KB · Views: 66
OP
O

Ohmthis

Well-known member
Joined
Jan 20, 2013
Messages
3,002
Location
Outside of Louisville KY
No progress to report. I’ve received most of the parts I “think” I need to test fit the drivetrain and prepare for the fab work on the motor and transmission mounts. I say think because I have a Frankenstein of parts here. I have a 08 Crown Victoria IFS on a 66 F100, with a 91 5.0 HO (out of the mustang GT) engine, and a 94 5 speed transmission (out of the F150) for the 4.9, 5.0, and 5.8. The engine and transmission are of the same vintage with balance and number of teeth on the flywheel. Obviously the 5.0 HO did not come coupled to the M5OD-R2 transmission. I ordered the flywheel, clutch kit, clutch master and slave cylinder, pilot bearing, and starter for the 94 F150 thinking that the transmission was the more important match. There was a tamer version of the 5.0 in the truck. I have researched this to death, but still have anxiety……..Am I over thinking this??? Thanks for checking in everyone. Here’s my engine and hoard of parts with the 5speed on the floor.
 

Attachments

  • IMG_4421.jpeg
    IMG_4421.jpeg
    1 MB · Views: 47
  • IMG_4385.jpeg
    IMG_4385.jpeg
    851.9 KB · Views: 41
  • IMG_4386.jpeg
    IMG_4386.jpeg
    729.6 KB · Views: 41

ctandc72

Well-known member
Joined
Sep 19, 2020
Messages
1,086
Location
VA
No progress to report. I’ve received most of the parts I “think” I need to test fit the drivetrain and prepare for the fab work on the motor and transmission mounts. I say think because I have a Frankenstein of parts here. I have a 08 Crown Victoria IFS on a 66 F100, with a 91 5.0 HO (out of the mustang GT) engine, and a 94 5 speed transmission (out of the F150) for the 4.9, 5.0, and 5.8. The engine and transmission are of the same vintage with balance and number of teeth on the flywheel. Obviously the 5.0 HO did not come coupled to the M5OD-R2 transmission. I ordered the flywheel, clutch kit, clutch master and slave cylinder, pilot bearing, and starter for the 94 F150 thinking that the transmission was the more important match. There was a tamer version of the 5.0 in the truck. I have researched this to death, but still have anxiety……..Am I over thinking this??? Thanks for checking in everyone. Here’s my engine and hoard of parts with the 5speed on the floor.
No difference from this perspective from a late Full size Bronco with the 5.0 (same roller block / balancer / flywheel as the Mustang 5.0) and the M5OD 5 speed. '94 F150 5.0 5 speed should be the same parts as 5 speed manual Bronco.
 
OP
O

Ohmthis

Well-known member
Joined
Jan 20, 2013
Messages
3,002
Location
Outside of Louisville KY
No difference from this perspective from a late Full size Bronco with the 5.0 (same roller block / balancer / flywheel as the Mustang 5.0) and the M5OD 5 speed. '94 F150 5.0 5 speed should be the same parts as 5 speed manual Bronco.
I know, I know, but too much thinking has got me over thinking 😩
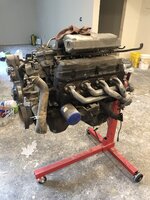
. Architecturally, the engines are identical, just some different parts. Where I went off track was the clutch sizes…..the Mustang is a 10.5, the F150 is 11”. The flywheel while they will bolt on to the HO vs 5.0 (in the truck), the clutch won’t be able to interchange. There are different part numbers for the flywheels for the different transmission/clutch combinations. Too many variables and I went stupid😂! Thanks for the reply and a boost in my confidence.
 

ctandc72

Well-known member
Joined
Sep 19, 2020
Messages
1,086
Location
VA
You only do it because NOT doing it has cost you time and money before in the past.
Ask me how I know.
 
To avoid these ads, REGISTER NOW!
Top Bottom