To avoid these ads, REGISTER NOW!

72 Harbor Freight Toolbox Hutch Ideas, Need some advice please

Do you think this is a good plan?

  • Do you think this is a SAFE plan? Supported well & won't fall?

    Votes: 0 0.0%
  • Do you think I need more/additional support for the top box? Unsafe???

    Votes: 0 0.0%

  • Total voters
    3

Jennifur

Member
Joined
Mar 16, 2021
Messages
11
Location
New Jersey
Hi All,
I am new, and thought this would be a great place to get some advice.

Read quite a few "home made" or "Custom Fabricated" Hutch Ideas for various toolboxes.
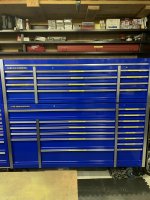
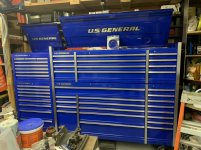
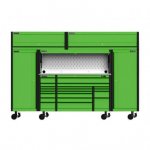
I just bought the Bright Lime time Green 72 inch Harbor Freight Top and bottom toolboxes because my old Harbor Freight 44 inch Top, Bottom and side + 44 inch Husky boxes I have currently, I outgrew the day after I got them home. So not wanting to EVER have to revisit this Tool Box investment again in my life, I wanted to just do it and get it over with. I see since I used to be a professional auto and offshore marine mechanic back in the 90s, I had the typical Snap on second hand boxes. Since then, these hutches came about to hold computer laptops, screens, lights, place to write service orders etc. We did not have this type of thing back when............

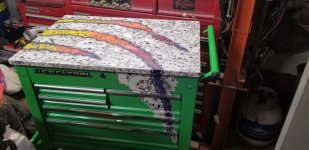
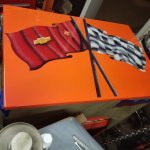
So I did some thinking, I am waiting for my 72" top and bottom cabinet to show up (1 to 2 weeks they said until it gets delivered to the store so I can pick it up) I am going to buy a 2nd Harbor Freight tool Car with the 5 drawers. I bought 2 of them already, one for my business partner and one for myself and I airbrushed them to jazz em up for our shop and a conversation piece for anyone that comes to buy corvettes, or need corvette parts *(That's what we do, 60s and 70s corvettes.)

Anyway, While I am pretty short at 5 foot 6, I will need a step stool for any box I get pretty much and at my home garage, I will need to go up vs. out due to only having a 1 1/2 bay garage. So While I MIGHT be able to fit a hang on the side cabinet for the 72" roller cabinet, I decided to take a 5 drawer tool cart, and not put it together as they suggest, I wanted to take the 5 drawer cabinet, place it on the left side of the roller cabinet and then use the angle iron / steel they provide for the bottom shelf, and it surrounds and supports the 5 drawer cabinet itself. I will take apart the safety lock latch system that the lid closes pushes down on 2 plastic rectangular push rods to lock the drawers. Take that apart so the lid closed, will NOT lock the drawers and basically the lock will be present but not work anymore which is fine, I live alone, so no one is going to steal anything.
After I set the cabinet in place, I was going to use some either custom made or pre-made steel/iron pipe supports and hide them in the angle iron/steel powder coated supports that hold the 4 outer corners of the tool cart together and bolt to the actual 5 drawer cabinet that sets down into the cart. I would use a cut piece of peg board in the back, and use the bottom shelf that is powder coated on the right side and cut it to fit as the side part and bolt that to the angle iron corner supports (again supported by the pipes and flanges at RF corner, RR Corner, Center rear and maybe if I feel its needed put supports on the LR & LF corners??? But the top box will just sit on top of the 5 drawer cabinet and I was thinking of putting a 3/4 piece of plywood cut to fit on top of the support structure and then put the 72 inch top box on top of that and use some stainless steel bolts and nuts and washers to hold the top box so it wont slide or move if bumped or jolted etc. Since I am pretty short, I wont need much more than about 18-19-20 inches tall hutch and don't want the top box so high that it may fall over, poor center of gravity and unstable. I also do not want the lid of the top box to hit the ceiling of the garage too.
8 foot ceiling height = 96 inches
Buffer of 2 inches
Want to stick to a max height of 90-92 inches with a + /- 2 inch buffer
So can go to these dimensions
Bottom HF Roller Cabinet = 72" Wide X 22" Depth X 44" Height
Top HF Tool Chest = 72" wide X 22" Depth X 22" Height
That's 88" +/- 1"
Hutch of 20" in height (unless you all think it should be taller or no?)
(Remember i am 5 foot 6 So the 2 boxes are already as tall as I am and would need a step stool to look at top drawers and the big storage area under the lid of the top box with the gas struts that hold it open
The tool cart I think is 31/33 inches wide with the angle iron outer 4 corners by 23-25 inches deep again with the angle iron corners?
So the height should be fine. My garage has a vaulted ceiling in the front and normal ceiling in the back. With the lid open I think that will probably add 15-20 inches in height? Give or take?
So I would prefer to put it in the front where the vaulted ceiling is so height is not a restriction other than my shortness and needing to have a step stool for reaching the upper spots which I would need anyway without adding a hutch space.

So what do you all suggest?
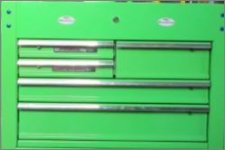
I have some attachments showing the ideas for the pipe supports (which will be hidden just behind the corner angle iron powder coated green pieces from the tool cart) and the tool carts I bought for myself (Mine is the green and my partners is the orange and yes I did the airbrushing of the Corvette Cross Flags and the Skulls and bear claw rips)

Do you all think I am on the right path? Any ideas or safety issues maybe? I know the pipe supports (that I will place supports not just up and down but I would either prefer X supports across the back and on the sides or H pipe at top and bottom so the twisting motion would not bring down the top box. I need to worry about it falling over and I CANNOT climb the front of this like I used to with my old snap on stuff back in the 90s I did not have a step stool so I would pull out the bottom drawers and climb up the front to get to the top box because I had a big middle box in that snap on setup. The Top drawers and box was easily 6 foot 6 inches tall and way out of my range of sight and feel for back part of top box under lid storage.
Any suggestions for this idea, Safety, Maybe something I am missing are welcome. Please chime in, Post photos of items you built, or if anyone had a similar thought etc.
I cannot find any 72" hutches that will fit the HF boxes due to the 22" depth measurement, the new HF ICON line is 73" so you cannot mix/match the boxes and you are stuck spending the more expensive dollar amount if you want the more robust items like a hutch or armored power cables and USB/power outlets built into the structures and such.

Also, if anyone is interested in the harbor freight and husky boxes I have for sale, Please let me know. Looking to get $500.00 for both 44" top boxes one Husky one HF, the 44" HF Bottom rolling cabinet, and the 19" side hanging HF box, all boxes are in great shape, and all blood red paint. I can always do some custom airbrushing graphics and such if you would like for free to make it your OWN. I am in Bucks County PA, about 45 or so minutes north of Philadelphia in the burbs / New Hope PA.

Thank you all, Appreciate any info, suggestions, help, directions you can provide based off of your own customization's and builds

Jennifur
 

Attachments

  • 71o9SUYxXgL._AC_UL160_.jpg
    71o9SUYxXgL._AC_UL160_.jpg
    3.1 KB · Views: 420
  • 20190401_151204.jpg
    20190401_151204.jpg
    143.9 KB · Views: 104
  • 20190401_151200.jpg
    20190401_151200.jpg
    147.4 KB · Views: 111
  • 20190401_151153.jpg
    20190401_151153.jpg
    141.2 KB · Views: 113
  • 20190209_184939.jpg
    20190209_184939.jpg
    78.2 KB · Views: 101
  • 20190209_184852.jpg
    20190209_184852.jpg
    96.3 KB · Views: 109
  • 71UHlVcfqOL._AC_UL160_.jpg
    71UHlVcfqOL._AC_UL160_.jpg
    3.3 KB · Views: 428
To avoid these ads, REGISTER NOW!

Renegade1LI

Well-known member
Joined
Mar 11, 2018
Messages
4,951
Location
long island ny
Sound a little like what I did, bought the 72" top and bottom than set up a 26" top and bottom. Instead of a hutch I made up some stepped shelves that follow the top box lid angle. Now I'm adding some toe kick drawers, I think the shelves above are a better fit than a hutch. Not sure if this is what you had in mind but maybe give you some ideas.
 

Attachments

  • 0916A365-C374-4C6C-889C-6A0D89882A22.jpg
    0916A365-C374-4C6C-889C-6A0D89882A22.jpg
    117.7 KB · Views: 188
  • 2C90662F-F31E-4EBB-A852-54ED7CF062AE.jpg
    2C90662F-F31E-4EBB-A852-54ED7CF062AE.jpg
    159.4 KB · Views: 184
  • 227FC04B-16E8-4290-86A9-FAC93FD27C35.jpg
    227FC04B-16E8-4290-86A9-FAC93FD27C35.jpg
    150.6 KB · Views: 167
OP
J

Jennifur

Member
Joined
Mar 16, 2021
Messages
11
Location
New Jersey
Very nice....how do you like the 72 inch boxes? Did you do the rivet modification to the drawer slides? I'm not sure if I want to mess with riveting each and every drawer slide to be honest. I never heard my current box squeak like they say on YouTube reviews but i guess we will see when i pick it up.
As far as your setup...basically take your shelves and put them on the left side inbetween the top and bottom boxes and gave open space on the right
I realize I will lose the use of the top of the tool cart cabinet but i will have use of all the drawers and it's a series 2 as well so it matches exactly so I'll pickup another tool Cart in green this weekend and although i doubt it maybe my 72 top and bottom will be at the store this weekend and can take it all home at 1 shot and get to work getting everything together and ill take photos of what I'm building so you can get an idea....
Thanks

Jenni
 
OP
J

Jennifur

Member
Joined
Mar 16, 2021
Messages
11
Location
New Jersey
Sound a little like what I did, bought the 72" top and bottom than set up a 26" top and bottom. Instead of a hutch I made up some stepped shelves that follow the top box lid angle. Now I'm adding some toe kick drawers, I think the shelves above are a better fit than a hutch. Not sure if this is what you had in mind but maybe give you some ideas.


How do you open the top box lid and get to the top storage with those shelves there? You pull the whole thing out from the wall to get to it and push it back when you're done?
 

Renegade1LI

Well-known member
Joined
Mar 11, 2018
Messages
4,951
Location
long island ny
How do you open the top box lid and get to the top storage with those shelves there? You pull the whole thing out from the wall to get to it and push it back when you're done?

I'll take some better pics but the shelves start at 10" wide top 8" wide middle & 6" wide bottom & are spaced to match the cover angle when open. So far I love them, the drawers are smooth with weight in them, I really don't mind the latches, 3/4" p touch labels fit perfect. I really don't see a down side of them, the cost was not an issue, I try to buy for value, for my needs they are perfect I'm sure you will like them. I bought the matching cart, just haven't set it up yet, still not quite sure I understand what you are doing, need a little more detail. It sounds like you want to create a hutch between the bottom & top box?
 
Last edited:

Ohmthis

Well-known member
Joined
Jan 20, 2013
Messages
3,011
Location
Outside of Louisville KY
Renegade, I like the shelf idea. I have been mulling over making a hutch for my box. I think this is a much better option and will be more useful in the long run. Thanks for posting.
 

Renegade1LI

Well-known member
Joined
Mar 11, 2018
Messages
4,951
Location
long island ny
Here's a better pic of the shelves, great for storing all that small handy stuff.
 

Attachments

  • BF3A26B0-5880-476A-88FF-8B5B707C2BB9.jpg
    BF3A26B0-5880-476A-88FF-8B5B707C2BB9.jpg
    156.7 KB · Views: 121
  • 4CBAA4C4-37C6-493B-B84E-366F3CD49F16.jpg
    4CBAA4C4-37C6-493B-B84E-366F3CD49F16.jpg
    92.5 KB · Views: 135
OP
J

Jennifur

Member
Joined
Mar 16, 2021
Messages
11
Location
New Jersey
Here's a better pic of the shelves, great for storing all that small handy stuff.

AHHHH NOW I see what you did.........
The original photos were from a straight on angle so it appeared you could not open the top box lid due to the shelves being in the way but smart, making various depth shelves with the lid open at an angle you can not bump them and get to your stuff okay got it. The new side photo says it all. Good job< I like it, but since I am super short, There is no way Id be able to reach up that high so that is out for me.

As far as your assumption of building a hutch in-between the top and bottom boxes, YES that's EXACTLY what I am going to do. Was at Home Depot last night and looked at 1 inch schedule 40 pipes in various lengths and various T connectors, Flanges etc. which will be a touch pricey but its more safe than anything else I can think of, so the plan is this
Place the 72 inch bottom box against the wall, have a cabinet grade 3/4 inch plywood base cut and put it on top of the bottom box to protect it. Then erect the 1 inch pipe design and bolt it down through the plywood drilling into the top of the bottom cabinet and through bolting it so it will NOT move under any circumstances. Then erect the pipes with T fittings and all the height of the tool carts 5 drawer cabinet. (The HF Tool Cart is a modular design and when you build one, You build the shelf at bottom, and install the casters, then basically the 5 drawer cabinet is one piece that lowers into the frame of the cart and then bolts the angle corner pieces to the cabinet. I plan on just taking that 5 drawer cabinet and putting it on top of the plywood inside the 1 inch pipe frame I will build and then put a second 3/4 piece of cabinet plywood on TOP of those pipes with the flanges that will also through bolt up through the bottom of that second plywood piece and into the bottom of the 72 inch top box with washers and nuts etc. so the Top box wont EVER move just like the bottom. I will then cut the angle corner pieces of the tool cart to the exact height that the 1 inch pipes and flanges are which will be the same height as the 5 drawer cabinet since the top box will sit on top of the 5 drawer cabinet on the one side but still will be supported by the pipes in all 4 corners and 1 or 2 extras in the back and the T fittings will be at various heights so that a twisting motion will not occur and collapse the top because a 72 inch top box about 5 feet off the ground filled with things will raise the center of gravity very high. i will use my corvette body lift I have in my garage to lift the top box up high enough and slide the bottom and this pipe framed part under the top box and slowly lower it down and then drill the holes, use forged grade 8 hardware and ny-lock nuts and bolt it down so this way it will be the bottom box 72 inches wide, then the plywood on top, with the pipe frame bolted through the plywood and remove the top drawers to gain access to the bolts going through the top and bolt it down so it cant move and probably use some 1/4 inch plate on the inside of the bottom cabinet or box so its super strong. Do not think welding it will be necessary. then put the 5 drawer tool cart cabinet on the left side of the bottom box, and push it against the pipe supports and it will be the same height.Then the 2nd plywood piece will go on top of those pipe supports and then lower the top box onto the plywood, drill through the plywood into the bottom of the top box, and again if i feel it is needed, get more 1/4 inch plate to also drill through and bolt the pipe flanges to the bottom of the plywood through the bottom of the top box, and bolt it together with more ny-lock nuts and washers so it cant move or slide or twist etc.
all said and done the bottom cabinet is 44 inches tall, then the 5 drawer cabinet im guessing is about 20 inches give or take 1-2-3 inches and ill make sure the pipes are cut and threaded to fit which will give me a tiny bit of adjust-ability in height because they screw together so if I back out a pipe half a turn or a full turn I can probably get about 1/8th to 1/4 inch height adjustment without sacrificing safety and strength.
The 1 inch pipe schedule 40 black steel is some UBER STRONG stuff. Will be able to hold the weight of anything I put on top of it and the plywood and all with a pipe support in all 4 corners and 2 or 3 additional in the back along the back 72 inches so a pipe support about every 14.3 inches give or take and all will have T fittings to have horizontal connections to all the upright pipes on the sides and across the back to prevent twisting and really movement of any kind. The bottom shelf of the tool cart is powder coated as well so I will cut that to fit the right side of the hutch and bolt it to the angle iron corners of the cool cart that will also be cut to fit to cover the pipes and flanges and cross bars so you cant see the supporting structure and use either slat or peg board in the back to hook things and able to store goofy long items like really long breaker bars, 3 foot extensions or things that might not fit in drawers and such. Also giving me room for my laptop and put some LED Lights in there as well and a power strip to charge my batteries for my cordless tools and phone etc.
The best part is the tool cart with coupon can be had for 200 bucks. (I have 2 of them already from the photos I posted before that I airbrushed my business partners and mine before) So the cart has enough materials to place in/around the 5 drawer cabinet making it like the old snap on toolboxes had with a bottom, middle and top tool box (which these days middle boxes do not seem to be popular and really made anymore for expanding your setup, so its more like to expand you get the hang on the side cabinets or have to buy all new stuff bigger than you had before which I guess is what they really want you to do. More $ cha ching for them.
So does that better describe what I am attempting to do? I put a few photos in this post showing the pipe support system im going to custom build and they make kits for supporting desks and various other furniture items. I will be getting all of my stuff from home depot so I can make sure I have the correct pieces I need, and that its stupid strong and wont ever let anything move for any reason. Each flange that the pipes screw into are round but have 4 bolt holes in each, so to push the pipes outwards as far as I safely can, so the weight is sitting as close to on top of the upright and welded infrastructure of the bottom box I might trim the round flanges to have a corner in each bottom and top flange and the angle iron cart uprights will be able to cover them up so you cant see them unless you poke your head into the hutch part and look but that's the extent I will go to in order to hide them.

Attachments there are 3 photos of various pipe supports for anything like Desk tops, table tops, or whatever you are building, these pipes can hold tens of thousands of pounds when setup with the proper amount of uprights and cross bars to prevent any twisting or shifting under weight and even X bars for added strength.
The one shot is of the tool cart 5 drawer cabinet which is pre-built in one single piece which is what will be in-between the top and bottom 72 inch boxes on the left side. (and still have pipe supports on the corners so it will be slid in an inch or two from the side edge)
The last photo is of another company's 72 bottom box with a hutch on top with some basic storage above the hutch. So look at that last photo and instead of having those 2 empty storage bins on top of the hutch imagine the 72 inch HF top box there instead. Again it will all be through bolted together so that the top cant move, the bottom of the supports cant move, nothing will be able to move. Will be more than plenty strong and safe and usable.
I just hope I can get a green tool cart without any long periods of waiting time. I might just call and pay for it online and order it today so the time to wait is minimal and might be able to have it to the store by next Monday but we will just have to wait and see

Do you get what I am attempting to do now?
Hope so.....>
Thanks
Jennifur
 

Attachments

  • 1aca538f6422f5a6edfe304108859fdc.jpg
    1aca538f6422f5a6edfe304108859fdc.jpg
    17.1 KB · Views: 68
  • 1cart.JPG
    1cart.JPG
    14.4 KB · Views: 58
  • ee7e3af7-8f9a-459b-b625-2acbb866c54e._CR0,0,601,1201_PT0_SX150__.jpg
    ee7e3af7-8f9a-459b-b625-2acbb866c54e._CR0,0,601,1201_PT0_SX150__.jpg
    8.7 KB · Views: 57
  • 71UHlVcfqOL._AC_UL160_.jpg
    71UHlVcfqOL._AC_UL160_.jpg
    3.3 KB · Views: 233
  • 71o9SUYxXgL._AC_UL160_.jpg
    71o9SUYxXgL._AC_UL160_.jpg
    3.1 KB · Views: 251
To avoid these ads, REGISTER NOW!

Renegade1LI

Well-known member
Joined
Mar 11, 2018
Messages
4,951
Location
long island ny
Wow, you do have a plan, I think if I were doing that I would make a top and bottom frame from some angle and use steel tube in the corners. Would weld up on bench and then assemble on bottom box, bolt together and than place top box and bolt using 3/4 Baltic birch plywood top and bottom. The only other concern would be the height to width, could get a little tippy on the casters, might want to support the bottom box and you could always add a couple of tie backs to the wall.
 
OP
J

Jennifur

Member
Joined
Mar 16, 2021
Messages
11
Location
New Jersey
Wow, you do have a plan, I think if I were doing that I would make a top and bottom frame from some angle and use steel tube in the corners. Would weld up on bench and then assemble on bottom box, bolt together and than place top box and bolt using 3/4 Baltic birch plywood top and bottom. The only other concern would be the height to width, could get a little tippy on the casters, might want to support the bottom box and you could always add a couple of tie backs to the wall.


I had considered the wall anchoring as a possibility but i will see how solid it is once I finish building it and using chain hoists things to get the top box in place and all bolted together.... I saw that a company called

Extreme tools

Sells a 72x21 hutch in green powder coat (probably a different shade of green than Harbor Freights powder coat) but it looks close... however I would have to remove the front door as its a bi-fold door that opens upwards and would not be able to mount a toolbox on top of it with the door in its place and it would only have the edges to support the weight so im going to continue with my plan
Why do you suggest a birch wood for the top filler piece for the roller cabinet and the support piece on the underside of the top box above the hutch? Is it stronger than 3/4 cabinet grade plywood or something? I know cabinet grade plywood is very pricy in 3/4 thickness but i will be able to have home depot cut it for me in 22x72 size so i dont have to break out my circular saw and have a little jagged of an edge because they have that semi upright rig in the store that they can cut vertically and horizontally so as long as the operator goes slow and let's the blade do it's thing it should not be all splintered and messed up and I'll deal with sanding it before going together and I might even go as far as putting a layer of fiberglass resin over both of the plywood pieces to make the surface alot stronger and more durable and able to keep the wood from absorbing anything from a soda can sweating in the summer to anything else that might sit or spill on it over time...
Well I have a few errands to run but I'm heading to harbor freight with my
$199.00 coupon for the 5 drawer tool cart in an hour and maybe if I get lucky the tool boxes and tool cart will all be at the store next week or after Monday and I can pickup all 3 at the same time and save me a trip from going out there again.
Thank you again for all of your help and advice and taking the time to take photos and showing me your setup and providing me with additional ideas and build strategies...greatly appreciated and exactly the reason I posted ......... So thank you so very very much you're too sweet.

Jennifur
 

Renegade1LI

Well-known member
Joined
Mar 11, 2018
Messages
4,951
Location
long island ny
Jennifur, i suggest using Baltic birch because it’s a nice material and better made than the birch ply you find at hd. Real Baltic birch in 3/4” has 13 layers of solid birch making it much stronger. If you can find concrete form ply, made from Baltic birch with the resin coating it looks real nice. Good luck.
 
OP
J

Jennifur

Member
Joined
Mar 16, 2021
Messages
11
Location
New Jersey
Jennifur, i suggest using Baltic birch because it’s a nice material and better made than the birch ply you find at hd. Real Baltic birch in 3/4” has 13 layers of solid birch making it much stronger. If you can find concrete form ply, made from Baltic birch with the resin coating it looks real nice. Good luck.

Where would I Find this wood? And is it an insane cost? I am not cheap by any means but I don't want to buy a 250 dollar sheet of plywood
The pipes, flanges and T fittings and other items are going to be a somewhat substantial chunk of coin as it is. The contingency plan is to buy a 2nd tool cart and put both tool cart cabinets under the top box and have a foot or so open space in-between them under the top box and have all them sandwiched together as an option. The Cart is $200 dollars, If the pipes, flanges, T fittings etc. all come out to $300-$400 then it will limit my space underneath the top box to about a foot, but would be way more cost effective to go that route and install the side shelf in Green I purchased a few weeks ago for my laptop and writing things down, documentation I can keep my 3 ring binders in that middle section and some oversized tool storage cases so I will get to Home Depot tonight if possible and price out everything I need and make a judgement call on if its cost effective to do this hutch idea, or to just $hlt can the idea and get a 2nd tool cart from the store and then have the biggest harbor freight Cool Tool Box setup ever seen to mankind. LOLOL I know I am being totally silly. So we will see, I did not realize those black steel pipes were so crazy expensive.
We shall see

Jennifur
 

Renegade1LI

Well-known member
Joined
Mar 11, 2018
Messages
4,951
Location
long island ny
Jennifur i think right now whatever material you choose is going to be ridiculous in price, metal and wood prices are crazy right now. Baltic birch actually is somewhat reasonable in price right now, 60$ for 3/4” 4 x 8 13 ply, but if you decide on another cart there is a coupon for 199$.
 
OP
J

Jennifur

Member
Joined
Mar 16, 2021
Messages
11
Location
New Jersey
Yes, I got the 3 carts I have purchased so far all for $199.00 each so I would do it again if I go that route. I have not got to Home Depot yet but I looked online and birch cabinet grade 3/4 plywood is 58 dollars and change. So Ill have them cut it for me on that rack thing they have so I dont have to mess with that with a circular saw at home clamping 2x4s down and changing blades and all that for 50 cents per cut (you get 1 cut free I think with the purchase of a plywood sheet. So for an extra 50 cents is no biggie.)
Thanks for the help

Jennifur
 

PugetDude

ALLIANCE MEMBER
Joined
Mar 13, 2013
Messages
22,383
Location
Superstition Mountains, AZ
Those Kee fittings are nice to wotk with, but I wouldn't rely on the setscrews alone if you're putting any significant weight on a cross tee. Your pipe design will wotk well if all the loads are properly distributed to the vertical pipe legs.

BTW, Zoro sells their house brand fittings (Kee knockoffs) for a lot less than what you're going to spend on Kee. Hollaender is another brand that is a bit more finished looking.

https://www.zoro.com/modular-pipe-and-rail-fittings/c/5624/
 
OP
J

Jennifur

Member
Joined
Mar 16, 2021
Messages
11
Location
New Jersey
As it turns out, After I picked up the bottom and then a week later the top showed up and I went and got that hauled home from the store, and put them together temporarily and realized how tall these actually were, and since I am short (I am 5 foot 6 on my best day stretching) and the Tool Cart sitting on the top of the top box is 82" inches tall, I realized if I put the top box up 20-22 inches and put the tool cart cabinet UNDER the top box or rather put the cart cabinet in-between like originally planned, It would have made the whole thing way too tall and probably unusable, and I would have been forced to put items way up high that would rarely get used, making a lot of cubic feet of this entire cabinet basically useless.
So I looked into step stools and such because I don't want to climb the front of the box like monkey bars to get to the top and potentially have the whole thing tip over and did not want to go the distance of anchoring it all to the studs in the back wall behind it with chains and cables, that seems like a lot of extra work that if common sense steps in you can prevent a cabinet from falling over and crushing you and your cars so I went this route and put the cabinet for the tool cart in the top section, I had to hand fabricate 2 extension brackets that allow the top box lid to open to a 90 Degree position vs the standard 45* or 50* degree angle that the lid opens to from the factory. So now the top box lid will open and close and the gas struts work properly no interference. (Photos Uploaded of final toolbox configuration in my garage on the back wall, See what you think)
Since I am not a full time professional "Wrencher/Mechanic", and I do this 20-30-40 hours a week at home restoring antique corvettes and fixing my own cars, boats, trucks and some neighbors in need and family members, I decided to rethink the whole plan and at least if I need more space going forward, I can always purchase the 2 end cabinets for each side of the bottom roller cabinet to expand, and at that point, Purchase another bottom roller if needed. However I do not see that happening any time soon, I think I have more than enough space for the moment and once I purchase and flip the house across the street so I can have enough down money to buy a nice BIG house with 10-12 + garage bays and a lift or two THEN i can worry about additional tool box space.
So I wanted to thank everyone who responded and provided advice and information for me with this project. I greatly appreciated the input and time you all spent with your suggestions and engineering advice.
I hope everyone has a fantastic weekend.
I just purchased a 1971 Chevrolet Chevelle/Malibu to redo as either a flip or potentially keep it if I fall in love with it and make it my daily driver with a Big Block 427 CID and Muncie 4 Speed..........So I know I will have a fantastic weekend. Thank you all again for all of your help!!!!!

Jennifur
 

Attachments

  • 20210604_111510.jpg
    20210604_111510.jpg
    335.2 KB · Views: 48
  • 20210604_111613.jpg
    20210604_111613.jpg
    324.5 KB · Views: 50
  • 20210604_111639.jpg
    20210604_111639.jpg
    345.3 KB · Views: 41
  • 20210604_111742.jpg
    20210604_111742.jpg
    339.5 KB · Views: 36
To avoid these ads, REGISTER NOW!
Top Bottom