To avoid these ads, REGISTER NOW!

Above 1200 Sq/FT 86's 20HP shop

Wokspaces above 1200 squarefeet.

bimmer1980

Well-known member
Joined
Feb 5, 2009
Messages
2,104
Location
York, PA
Good progress. I went back and looked at your 3D model cutaway.

So the door knob fits inside the chamber that you welded up and contains the oil drip and recovery off the door knob?

And the oil mist blows out one end and into the burner chamber?

It appears you have some adjustability built into it as well?

Happy New year!
 
To avoid these ads, REGISTER NOW!
OP
8

86turbodsl

Well-known member
Joined
Jul 1, 2005
Messages
6,556
Location
Michigan
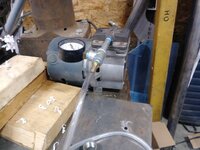
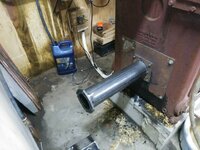
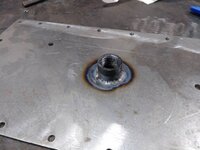
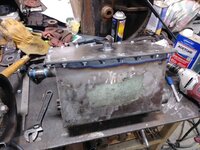
Thanks. Bimmer, you are correct on all counts. I decided not to pull the oil tank today because i am getting ready to head out of town for a funeral, and won't be back in town to burn the boiler until very late tomorrow. so i decided to setup and make a functional test burn. I setup to test the oil flowing over the ball first, and the welds i made are leakproof. Thats a nice feature of TIG, i don't always get leakfree bungs with mig. Also, i confirmed the spark will jump the gap from the electrodes.

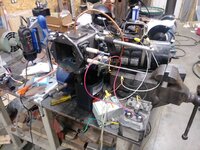
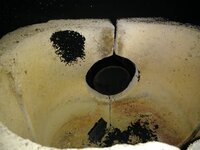
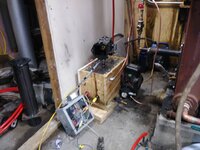
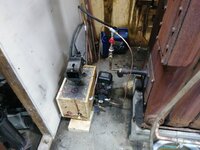
With these two completed and out of the way, i applied the air pressure to the ball and got a nice flame about 2 to 2.5 foot long out of the burner with automatic startup. I did find it was blowing a pretty large plume of oil on the floor though. It made a nice mess. This says the oil was not fully atomizing.

I ran a second test with 100psi air pressure and got about a 4 foot flame, with much better atomization.

The flame is too long though. I also found that the little compressor i was using won't keep up at that flow rate. I need to reduce the air pressure to reduce consumption to a reasonable level.

I need to improve atomization a bunch to run lower pressures. Two things control atomization rate:
Fluid temperature and air pressure. If i need lower air pressures, the temp has to go up.

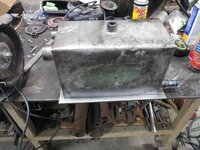
I do think that i lost quite a bit of temperature as i was NOT using a preheat tank supply for the test, i was using oil i'd pulled out of the preheat tank and put in a small plastic cup. The oil pump and lines removed quite a bit of heat from it, as well as flowing over the ball, which is supplied with cold air.

I think a constant preheat source will help a bunch. I also plan to burn into a steel tube with a stainless steel inner preheat tube, which should pretty much glow red and help vaporize the stream as it blows through. Hopefully without plugging with soot.

I took several videos of this testing which i will upload to youtube when i get a minute. I've got about 2 hours or so before we leave for the funeral, so i'm not likely to get it done before late tonight.

HAPPY NEW YEAR!!!!
 
OP
8

86turbodsl

Well-known member
Joined
Jul 1, 2005
Messages
6,556
Location
Michigan
So some photos and vids to share.

4ec6405972256f7220c7806fd71d3617.jpg

Clamped the burner to my welding vise.

6d01080535a3c9f4deb458da47b3fa5f.jpg

Put some hot oil into a can.

c135686312971bd6f0795a1e68368bce.jpg

Hooked up the oil transformer.
05495aaedcc3700fb828ea033fbb285d.jpg

And the small air compressor in the first test.
2aa7b18a4f8cebdd8263c2134a5dabc7.jpg
 

Attachments

  • c135686312971bd6f0795a1e68368bce.jpg
    c135686312971bd6f0795a1e68368bce.jpg
    108.3 KB · Views: 1
  • 05495aaedcc3700fb828ea033fbb285d.jpg
    05495aaedcc3700fb828ea033fbb285d.jpg
    94.6 KB · Views: 1
  • 2aa7b18a4f8cebdd8263c2134a5dabc7.jpg
    2aa7b18a4f8cebdd8263c2134a5dabc7.jpg
    75.3 KB · Views: 1
  • 6d01080535a3c9f4deb458da47b3fa5f.jpg
    6d01080535a3c9f4deb458da47b3fa5f.jpg
    98.9 KB · Views: 1
  • 4ec6405972256f7220c7806fd71d3617.jpg
    4ec6405972256f7220c7806fd71d3617.jpg
    125.3 KB · Views: 1
Last edited:
OP
8

86turbodsl

Well-known member
Joined
Jul 1, 2005
Messages
6,556
Location
Michigan
Three vids of the first test.

And then increase the pressure to 100psi.

Sent from my LG-TP450 using Tapatalk
 
Last edited:

bimmer1980

Well-known member
Joined
Feb 5, 2009
Messages
2,104
Location
York, PA
Thanks for posting the videos! It all makes sense now.

I wonder if the burner tube would help burn off any residual oil....

Regardless, that is progress to be able to light the fire!
 
OP
8

86turbodsl

Well-known member
Joined
Jul 1, 2005
Messages
6,556
Location
Michigan
Thanks! I am going to add the burner tube next. Still thinking about where to bring in the combustion air.

Sent from my LG-TP450 using Tapatalk
 

bimmer1980

Well-known member
Joined
Feb 5, 2009
Messages
2,104
Location
York, PA
Do you need more air for combustion besides the air that is blowing and atomizing the oil?

If you need more air, I would think the inward facing louver-style holes would allow the spray of oil and fire to draw the air in as much as it needs... If the opening are facing away from the oil spray, it should not allow oil residue to escape..... (Hopefully...)
 
OP
8

86turbodsl

Well-known member
Joined
Jul 1, 2005
Messages
6,556
Location
Michigan
I would imagine I need some auxiliary air. I'm thinking an away port to draw air but not oil like you mentioned

Sent from my LG-TP450 using Tapatalk
 
OP
8

86turbodsl

Well-known member
Joined
Jul 1, 2005
Messages
6,556
Location
Michigan
TIG welders are frikken awesome. I just tacked tiny little bits of stainless and steel nuts together to make extensions for the oil burner transformer electrodes. Gets rid of the springs and makes a nice solid connection for the wiring.

I'm super pumped all my tig welds were leak free and solid. i'm kinda amazed how well it's been going on that front.

Also picked up a new hydraulic pump for making into another oil transfer pump and 3 275 gallon totes to hold oil and cleanup the yard a little as i fill them.

Tomorrow i'm hoping to clean the shop a bit, and work on the burner a bit. the 2 weeks of warm weather we forecast are moderated a bit to lower temps. i'm a little nervous on future temps as i take the old burner down.
 

Perrorojo

Well-known member
Joined
Jun 8, 2012
Messages
1,766
Location
Northern IN
TIG welders are frikken awesome. I just tacked tiny little bits of stainless and steel nuts together to make extensions for the oil burner transformer electrodes. Gets rid of the springs and makes a nice solid connection for the wiring.

I'm super pumped all my tig welds were leak free and solid. i'm kinda amazed how well it's been going on that front.

Also picked up a new hydraulic pump for making into another oil transfer pump and 3 275 gallon totes to hold oil and cleanup the yard a little as i fill them.

Tomorrow i'm hoping to clean the shop a bit, and work on the burner a bit. the 2 weeks of warm weather we forecast are moderated a bit to lower temps. i'm a little nervous on future temps as i take the old burner down.

So far, the only thing I'm proficient at is resharpening tungsten electrodes after dipping them in the filler rod.
 
OP
8

86turbodsl

Well-known member
Joined
Jul 1, 2005
Messages
6,556
Location
Michigan
I was having that trouble too. What really helped was the 2.0 cheaters that go in my helmet. That and my bifocals and I can see clearly now and keep the tungsten out of the puddle most of the time.

Sent from my LG-TP450 using Tapatalk
 

Strouty

Well-known member
Joined
Mar 21, 2010
Messages
38,215
Location
Southern Maine
I got a tig welder a few weeks back, haven't touched it yet, I know I need a grinder for the tungsten. Will be interesting to see how it works.
 
OP
8

86turbodsl

Well-known member
Joined
Jul 1, 2005
Messages
6,556
Location
Michigan
I just use a 6in grinding wheel and a portable drill to spin the tungsten. Works well.

Sent from my LG-TP450 using Tapatalk
 
OP
8

86turbodsl

Well-known member
Joined
Jul 1, 2005
Messages
6,556
Location
Michigan
Freshly tacked up burner tube assy. 1c252ba4922a76f62053b3b591b4e3b9.jpg

Sent from my LG-TP450 using Tapatalk
 

Attachments

  • 1c252ba4922a76f62053b3b591b4e3b9.jpg
    1c252ba4922a76f62053b3b591b4e3b9.jpg
    128.5 KB · Views: 1

Strouty

Well-known member
Joined
Mar 21, 2010
Messages
38,215
Location
Southern Maine
Then you have a path to follow. LOL

I need to get started using mine, will be interesting, I learned how to weld using oxy acetylene when I was a teenager. I used to weld floors into cars and trucks a lot. Used to take an old hood and use the sheet metal from it. It was a bit thin, but it was cheaper than buying sheets of steel.
 
OP
8

86turbodsl

Well-known member
Joined
Jul 1, 2005
Messages
6,556
Location
Michigan
If you have gas welding down, you're 90 pct there already. Give it a shot!

Sent from my LG-TP450 using Tapatalk
 

Perrorojo

Well-known member
Joined
Jun 8, 2012
Messages
1,766
Location
Northern IN
I was having that trouble too. What really helped was the 2.0 cheaters that go in my helmet. That and my bifocals and I can see clearly now and keep the tungsten out of the puddle most of the time.

Sent from my LG-TP450 using Tapatalk

I've been taking my glasses off. I need some cheaters.
 
To avoid these ads, REGISTER NOW!
OP
8

86turbodsl

Well-known member
Joined
Jul 1, 2005
Messages
6,556
Location
Michigan
Cheaters weren't enough for me. Needed bifocals and cheaters both. Then the puddle got clear enough to stop dipping tungsten

Sent from my LG-TP450 using Tapatalk
 
OP
8

86turbodsl

Well-known member
Joined
Jul 1, 2005
Messages
6,556
Location
Michigan
I shut the boiler down at dinner and that gave me an opportunity to install the new one and take a look.

The burner tube was tacked to push into the chamber just far enough to drip inside if needed.

Room to the bathroom to spare although I think getting the oil vaporized in 2ft will be a trick.4d9782efd079c93d1a186ea4c184ad47.jpgae9ce1953689aea7413626edbeef3545.jpg37ce0ecd78e0cf438877fd2cfae4780e.jpg

Sent from my LG-TP450 using Tapatalk
 

Attachments

  • 37ce0ecd78e0cf438877fd2cfae4780e.jpg
    37ce0ecd78e0cf438877fd2cfae4780e.jpg
    91.4 KB · Views: 1
  • ae9ce1953689aea7413626edbeef3545.jpg
    ae9ce1953689aea7413626edbeef3545.jpg
    91.2 KB · Views: 0
  • 4d9782efd079c93d1a186ea4c184ad47.jpg
    4d9782efd079c93d1a186ea4c184ad47.jpg
    75.2 KB · Views: 0
OP
8

86turbodsl

Well-known member
Joined
Jul 1, 2005
Messages
6,556
Location
Michigan
Complete teardown of the preheat tank today. Cleaned, sanded, and acetoned for the flanges i need to weld on it.

Pics here
7ad56d9028c5f277ef15ff5c068b4564.jpg40b8dcc56249931ef5956c0f26979276.jpgfa36737a8e8c27cc1c4e4a490ae6035b.jpgcb150c9c97c06a3305d33084534157fc.jpga486d5fb7f6cc1704093b665b5516fd6.jpg
 

Attachments

  • 7ad56d9028c5f277ef15ff5c068b4564.jpg
    7ad56d9028c5f277ef15ff5c068b4564.jpg
    107.4 KB · Views: 0
  • 40b8dcc56249931ef5956c0f26979276.jpg
    40b8dcc56249931ef5956c0f26979276.jpg
    78.4 KB · Views: 0
  • fa36737a8e8c27cc1c4e4a490ae6035b.jpg
    fa36737a8e8c27cc1c4e4a490ae6035b.jpg
    105.8 KB · Views: 0
  • cb150c9c97c06a3305d33084534157fc.jpg
    cb150c9c97c06a3305d33084534157fc.jpg
    78.1 KB · Views: 0
  • a486d5fb7f6cc1704093b665b5516fd6.jpg
    a486d5fb7f6cc1704093b665b5516fd6.jpg
    74.3 KB · Views: 0
Last edited:
OP
8

86turbodsl

Well-known member
Joined
Jul 1, 2005
Messages
6,556
Location
Michigan
And the nearly completed Tig welded tank.
7f359df0e5bf9d659ee1babf9b201975.jpg815a38bbfcbce63383b2c8f0ede149b1.jpg0e7e5e407a2e4a465bd303c4eb09cf0b.jpg

Sent from my LG-TP450 using Tapatalk
 

Attachments

  • 7f359df0e5bf9d659ee1babf9b201975.jpg
    7f359df0e5bf9d659ee1babf9b201975.jpg
    76.3 KB · Views: 0
  • 815a38bbfcbce63383b2c8f0ede149b1.jpg
    815a38bbfcbce63383b2c8f0ede149b1.jpg
    85.6 KB · Views: 0
  • 0e7e5e407a2e4a465bd303c4eb09cf0b.jpg
    0e7e5e407a2e4a465bd303c4eb09cf0b.jpg
    117.8 KB · Views: 1
OP
8

86turbodsl

Well-known member
Joined
Jul 1, 2005
Messages
6,556
Location
Michigan
Thank you. You know I thought it would be a lot harder. Im really enjoying it. Burned a half a 330cu ft tank already!

Sent from my LG-TP450 using Tapatalk
 

Strouty

Well-known member
Joined
Mar 21, 2010
Messages
38,215
Location
Southern Maine
That is a lot of gas!

Are you running straight argon or some blend of argon helium? I saw that the blend allows for a hotter weld, just curios, I stock argon for my aluminum welding with the spool gun.
 
Last edited:
OP
8

86turbodsl

Well-known member
Joined
Jul 1, 2005
Messages
6,556
Location
Michigan
Straight argon. Helium is handy when you have a bit less welder than you really need, or you have massively big weldments in aluminum or magnesium that has a high coefficient of heat transfer. Since i have massively big welding power supplies, 300+ amps @ high duty cycle, i don't expect to have to ever use helium. Which is good, because there's a helium shortage and it's SUPER expensive.
 
OP
8

86turbodsl

Well-known member
Joined
Jul 1, 2005
Messages
6,556
Location
Michigan
So I've been working on assembling the revised preheat tank. The dilemma I have has been how to support burner 2.0 testing while still making heat without a huge tearup to get setup to test and then return to the old system quickly. I decided an interim step was required. The tank will move to the permanent location under the burner. The new oil pump will feed either the old burner needle valve with an overflow tee or the new babington ball depending on what tubes are installed. One set for each configuration. So a few bolts pulled and lines installed and I can switch between systems without moving the tank. The heating and fill systems will not change. Just need to be able to move them a bit. Once the burner is operating properly, I will finalize everything.2ef381aed33a5470d6c22d29c91e0664.jpg22e2cfc4d2a35acc10bb653efd84603a.jpg

Sent from my LG-TP450 using Tapatalk
 

Attachments

  • 2ef381aed33a5470d6c22d29c91e0664.jpg
    2ef381aed33a5470d6c22d29c91e0664.jpg
    119.6 KB · Views: 0
  • 22e2cfc4d2a35acc10bb653efd84603a.jpg
    22e2cfc4d2a35acc10bb653efd84603a.jpg
    77.7 KB · Views: 0
OP
8

86turbodsl

Well-known member
Joined
Jul 1, 2005
Messages
6,556
Location
Michigan
An update on the crazy boss situation:

I came to work today, boss came in a couple hours later, said "Hey". I didn't say anything much and went back to work. About an hour later, he corners me and tells me he understands why i was upset, and that he didn't do anything wrong. Well, i expected that, so he swept it under the rug. I'm going to refer to him as the ball-less wonder boy from now on. :wtf:
 

Strouty

Well-known member
Joined
Mar 21, 2010
Messages
38,215
Location
Southern Maine
Typical ball-less guy.......

Thanks for the info on the helium, makes sense for sure.

The tank looks great, fingers crossed there are no issues like last time. :(
 
OP
8

86turbodsl

Well-known member
Joined
Jul 1, 2005
Messages
6,556
Location
Michigan
The cold weather is rolling in. I am trying to finish up the preheat tank, think i have all the welding done, and now i need to build a wooden box to go around it to contain the insulation. Moving to rockwool since the foam melts around the temp where i run the tank.

Welded legs on the tank so it can't compress the rockwool.

Cut and welded a pipe ****** to correct the slope angle for the tank/burner so it can set straight.

Lots of lines to run and mount the pump/motor assy.

I might have to take the morning off tomorrow, which co-incides nicely with the bosses' wed morning meeting where he mainly likes to hear himself talk. Every time i get out of that meeting, my coworkers in the group congratulate me with envy on my "power move". Lol.

After all, i can't let the pipes freeze right??? [emoji38]_hitti
1fe27ab8e3c8b8c44f09331a673b255f.jpg9b12d9b0528fe043bd01fa6ffb568909.jpg5b0a409baeb544b861c225d648385efa.jpg
 

Attachments

  • 5b0a409baeb544b861c225d648385efa.jpg
    5b0a409baeb544b861c225d648385efa.jpg
    78.1 KB · Views: 0
  • 9b12d9b0528fe043bd01fa6ffb568909.jpg
    9b12d9b0528fe043bd01fa6ffb568909.jpg
    101.5 KB · Views: 0
  • 1fe27ab8e3c8b8c44f09331a673b255f.jpg
    1fe27ab8e3c8b8c44f09331a673b255f.jpg
    94.7 KB · Views: 0
Last edited:
OP
8

86turbodsl

Well-known member
Joined
Jul 1, 2005
Messages
6,556
Location
Michigan
Looks like I can use most of the old wood box. c8ed6749cc25809e950feedcae173e60.jpg

Sent from my LG-TP450 using Tapatalk
 

Attachments

  • c8ed6749cc25809e950feedcae173e60.jpg
    c8ed6749cc25809e950feedcae173e60.jpg
    110.9 KB · Views: 0
OP
8

86turbodsl

Well-known member
Joined
Jul 1, 2005
Messages
6,556
Location
Michigan
Worked until 11pm last night on the box, and took the morning off this morning to get as far along as i could.

The cold weather has moved in, it was 22F and snowing this morning when i got up. It's supposed to get down to 18F tonight. I had to do something to get heat into the space.

c439e00602f18f66894b639bbe97ae83.jpg

Started with rockwool insulation on the box in a box. I mounted the oil pump and motor on the front of the box. My thought was it would slide around on the floor as needed to support the different burner assemblies. I will add legs to hold it high enough for the burner tube so there's no stress on it. I routed new lines from the box to the pump, and the pump to the burner, and back to the tank. There's a tee on the burner inlet, which theoretically should allow me to pull some through the needle valve and run the burner. I'll have to run the pump as long as i am running the burner, so really no difference than the babington setup.

2c9b7afffb7c4912286bffe5527a864f.jpg

Then i moved it over to the boiler area and got started plumbing it in. I ran a new pex line from the settling tank to the preheat tank valve and tied it in. Extended the lines for the power and set the box for control down on the floor. I'll permanent mount it later. I started filling the tank, but it was going pretty slow and i had to get to work, so rather than guess i made it all work correctly, i shut it off. I will continue tonight. I should be able to burn some tonight, as long as i don't take too long.

414e42b5540ae9076dc5200b5ce60621.jpg

It is a PITA to step over that mess to work in the corner though, i got to say. It was a lot easier to work on it before the tank had to move to the floor. But i didn't originally plan to have a long burner when i set the boiler there, so i'll have to just live with it.

Sent from my LG-TP450 using Tapatalk
 

Attachments

  • 414e42b5540ae9076dc5200b5ce60621.jpg
    414e42b5540ae9076dc5200b5ce60621.jpg
    79.8 KB · Views: 0
  • 2c9b7afffb7c4912286bffe5527a864f.jpg
    2c9b7afffb7c4912286bffe5527a864f.jpg
    94.8 KB · Views: 0
  • c439e00602f18f66894b639bbe97ae83.jpg
    c439e00602f18f66894b639bbe97ae83.jpg
    116.5 KB · Views: 1
Last edited:
OP
8

86turbodsl

Well-known member
Joined
Jul 1, 2005
Messages
6,556
Location
Michigan
Yeah, i want the pipe from the overflow for the ball to be very short so i am not dumping a lot of energy into heating oil. so it's pretty much gotta be right under the burner head.

I'll eventually not have to go in that back corner much so it's a non-issue really but ***** while i'm jumping back and forth over it.
 

Strouty

Well-known member
Joined
Mar 21, 2010
Messages
38,215
Location
Southern Maine
Could you elevate the boiler and for it under? I know you would have plumbing nightmares, but sometimes we do things that are crazy to fix something else that is driving us crazy.
 
OP
8

86turbodsl

Well-known member
Joined
Jul 1, 2005
Messages
6,556
Location
Michigan
The boiler weighs like 900lbs. And it stands over 5' tall now. My loader can lift about that much a maximum of 11'. So i could raise it some, but not enough to do any good, and i'd have a pretty substantial framework to hold it up that high too. Not worth it. It'll be fine once the new burner is final installed. The vertical section and tubing in the turk burner will be gone then.
 
To avoid these ads, REGISTER NOW!
Top Bottom