To avoid these ads, REGISTER NOW!

A Blank Canvas... What is the next step?

grinthock

Well-known member
Joined
Aug 1, 2015
Messages
55
Location
Southern Ontario, Canada
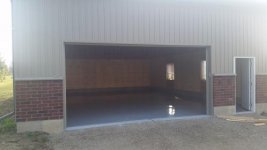
So here is my blank canvas, I am looking for your raw thoughts.

My intention is to use this for Auto work, some light fab, repair, I do a little bit of auto racing. I have tools, 1 box (need another) I want a portable service cart, I have a 40GAL Compressor that I will plumb to a hose reel somewhere.

I need to store larger tools, I need somewhere to store chemicals, paints, lubes.

I have not figured out lighting yet, the thought was 2 x 16FT (4 x 8 bulbs each) and chain hang them in two strips front to back

The building is 30 Wide, and 40 Deep, the door is 16FT. The walls are 13FT high, but the roofing trus are angled

The plan is to install a 2 Post 10K Hoist on the left side most of the way to the back - asymmetrically. Other than that, I have not figured out the plan yet.


Thoughts?
attachment.php

attachment.php
 

Attachments

  • Shop Outside.jpg
    Shop Outside.jpg
    14.8 KB · Views: 557
  • ShopOutside2.jpg
    ShopOutside2.jpg
    14 KB · Views: 810
Last edited:
To avoid these ads, REGISTER NOW!

homebuilt burner

Well-known member
Joined
Dec 8, 2014
Messages
1,763
Location
central Wisconsin
Think about where you will be putting certain tools and plan your electrical after that. Keep in mind that you will need more room around the hoist and other tools than you think.

It looks like a good structure and a nice size for what you are intending.
 

8man

Well-known member
Joined
Oct 16, 2013
Messages
630
Location
Bryan, Texas
I'm building mine now and I keep standing in areas thinking about where I want to do what in the shop. I have measurements for my tools, work benches, tool boxes, desk, files, storage and I then place them on a paper floor plan in pencil so I can move them around. I placed the lift in an area where I thought it would work and since then I've come up with a plan for where to put stuff - to start with until I'm actually working there and have a real idea of how stuff flows together.

I like the wheels idea a lot. Seen it on here a bunch and my Dad has started doing that in his shop. It makes any open area a work area if you have a project sitting where you wanted to work.
 

homebuilt burner

Well-known member
Joined
Dec 8, 2014
Messages
1,763
Location
central Wisconsin
I have wheels under all of my storage cabinets at my work. It does make it easy to clean.

But, one shop I work with even goes as far as putting their toolboxes on 4x4 blocks and removing the wheels. their reason is then the crooks can't just wheel your toolbox out. Make sense I guess.

just saying.
 

Dan in Pasadena

Well-known member
Joined
Feb 18, 2009
Messages
13,158
Location
Pasadena, CA
We'll assume you own the building so you can do anything you want(?)

Are you painting or otherwise finishing those plywood walls? Will you finish the open studs above the plywood or leave the framing exposed? Decide and do it before the next step:

Decide if you want to do anything to the floor? Pro level epoxy, tile, Racedeck, Polish, or nothing?

Design your air line layout. Consider getting a bigger compressor as you always end up doing more than you planned and need more volume. Do a search and READ threads about air line layouts and of course why NOT to use PVC.

Install your air line reel near the front of the garage so it can reach out into the driveway as well as to the rear of the inside of the garage. Install a storage cabinet or wall area immediately adjacent to the compressor - you don't want to walk to the other side of the shop every time you change tools.

As said above, put as many things as possible on wheels so you can rearrange them as needed.

Plan to install a mezzanine over the door on the front wall so long term storage is as out of the way as possible. Buy or build storage cabinets around the perimeter well above workbench height to utilize otherwise wasted space.

Best of luck and post lots of photos please!
 
Last edited:
OP
G

grinthock

Well-known member
Joined
Aug 1, 2015
Messages
55
Location
Southern Ontario, Canada
Painting ply.. Not sure yet. I am planning on finish insulating the entire thing, it's a $$ thing right now. My choice to go with vaulted instead of flush ceiling is making things difficult.

Airline: Need to figure out proper way to hardline run it around the room

Mezz over front door: That's a good idea, it's in a corner, the space over the door is kinda useless, I was planning storage mezzanine areas around the entire room.
 

mrodgers

Well-known member
Joined
Nov 15, 2007
Messages
20,163
Location
French fries on salad, PA
What I was doing, french cleats every 9 inches up every wall. I was going to build everything myself from shelves to cabinets to hangers. That way you can move and reorganize easily any time you want.

Using 3/4 inch plywood to make the french cleats, you could do every wall every 9 inches in height for the cost of hanging four 8 foot strips of rail of the commercial slat stuff like Gladiator.

I was going to build 2 workbenches and put them on wheels for in one back corner. Cabinets built and hung above the workbenches. A paint cabinet built and hung on one side of a workbench on the other side of the single window I have. Shelving in both corners beside the garage door and beside the man door. My garage was not a shop, just a homeowner's garage. Ladders and table saw accessories hung along the wall containing the man door. I was going to build all my cabinets 24 x 24 so I could line them up above the work bench and put a grouping of 4 or 6 together in the opposite corner. I have it all drawn out in Sketchup.

I said was because I am out of the garage (and house) with a soon to be divorce. Thus, I probably won't ever have a garage again.
 
Last edited:

bcoke

Well-known member
Joined
Mar 8, 2013
Messages
341
Location
Pawlet Vermont
About lighting, I have a 36x40 shop with 12 foot ceilings that I light with the 23 watt "curley" bulbs..... 4 strips of 9 light bulbs..... I use 3/4" plastic conduit, a round plastic junction box and a plastic bulb holder......... home depot $6 a fixture and @$25 in conduit. 2 side strips are 5 feet from the side walls seperate switches and center strips 10 foot from each side strip on 1 switch ......less than $250 and I have 3600 watts of light it is great.......only using 828 watts of power........cah-ching!!!! I have used this system in my basements, attics, utility rooms when people see all the curly they laugh but when they see the light and the meter they realize how efficient it is........oops just read about the divorce sorry do not give up on the garage you are divorcing her not your passion!
 
To avoid these ads, REGISTER NOW!
OP
G

grinthock

Well-known member
Joined
Aug 1, 2015
Messages
55
Location
Southern Ontario, Canada
About lighting, I have a 36x40 shop with 12 foot ceilings that I light with the 23 watt "curley" bulbs..... 4 strips of 9 light bulbs..... I use 3/4" plastic conduit, a round plastic junction box and a plastic bulb holder......... home depot $6 a fixture and @$25 in conduit. 2 side strips are 5 feet from the side walls seperate switches and center strips 10 foot from each side strip on 1 switch ......less than $250 and I have 3600 watts of light it is great.......only using 828 watts of power........cah-ching!!!! I have used this system in my basements, attics, utility rooms when people see all the curly they laugh but when they see the light and the meter they realize how efficient it is........oops just read about the divorce sorry do not give up on the garage you are divorcing her not your passion!


Ok... Please post a photo of that.
 

pmiranda

Well-known member
Joined
Jul 15, 2008
Messages
1,504
Location
Austin, TX
If you're going to do body work you want lots of light... both overhead and from the side.
I need to post it up but I got some pics of the detail bay at a good local body shop...
 
OP
G

grinthock

Well-known member
Joined
Aug 1, 2015
Messages
55
Location
Southern Ontario, Canada
Side lighting was planned simply because when i work on a car on the hoist - I want light from below, so I was planning both a protected light on the wall as well as some kind of flexible thing on an arm.

This is great information, really what I'm looking for is all the "Man I wish I had done **" type stuff.
 

Trey T

Well-known member
Joined
Aug 3, 2011
Messages
3,749
Location
Houston, TX
If you have the lift to the left-rear, then place your workbench and tool cabinets at the back wall where it's close to service your car.

If you're not in a rush to get your tools and supplies in, get all of your utilities in and installed. Do you know what type of cabinets will be in there?

Keep your fabrication table/area far away from your car lift, like at the rear right (back wall).
 
OP
G

grinthock

Well-known member
Joined
Aug 1, 2015
Messages
55
Location
Southern Ontario, Canada
Trey, that's the plan, back wall was for boxes/bench stuff. To the right of the car bay so I don't end up with space issues.

Utilities are a bit of a work in progress - but that's the current project is electrical and lighting (alternate thread on lighting)

As for cabinets.. I'm still working that out. I do not want to spend big $$ on something like gladiator. I need somewhere to store large tools, the myriad of chemicals, paints, lubes and product, as well store car parts and bits.

The "fab" table for mucking about was planned for the back right corner type deal.
 

Trey T

Well-known member
Joined
Aug 3, 2011
Messages
3,749
Location
Houston, TX
...

As for cabinets.. I'm still working that out. I do not want to spend big $$ on something like gladiator. I need somewhere to store large tools, the myriad of chemicals, paints, lubes and product, as well store car parts and bits.
....
I believe that's a big mistake. For storage cabinets, I highly recommend spending top dollars because that's the central component (your tools/equipment) of your shop.

I'm trying to change the mentality of the members here about storage solution because I made that mistake and became unproductive and unorganized on various projects.

I believe a good shop, assuming the primary reason why you start this thread, requires good organization. Good organization start with proper tool/equipment cabinets.

....something to think about. I wish I have a space like yours though, i got a standard 2-car garage but it has one Lista mobile cabinet and two large Vidmar cabinets which changes the way I look at garage setup.
 
OP
G

grinthock

Well-known member
Joined
Aug 1, 2015
Messages
55
Location
Southern Ontario, Canada
Trey.. So don't get me wrong, I would like to do that -- but it does become a cart before the horse conversation. Building a 30x40x18FT building wasn't cheap. I had to put the dollars in where they needed to be spent now. I have a list of things like completing wall finishing, insulation, getting heat, lights, running electrical -- all things that have to be done and unfortunately those things kill the budget for nice cabinets now.

I will get there, and I actually support your thoughts on cabinets and storage (because my existing 2 car garage is a DISASTER due to poor storage) but like I said, baby steps.
 

pmiranda

Well-known member
Joined
Jul 15, 2008
Messages
1,504
Location
Austin, TX
I don't know what I'm going to do myself, but in the first-things-first and wish-I'd-thought-of-that departments, any sort of chemical/epoxy floor coating is #1. You'll never have another chance to do something to a brand new slab. Of course, if you're planning race deck or tile, you can do that anytime, but it's way easier before you start filling it with stuff.
Then anything you want to put in the walls. I think electrical conduit and air lines are fine to delay, but any plumbing is probably best where it's protected.
Also, if you know there is some electric you will absolutely have, it's cheaper to run romex in the walls than alot of conduit later.
Then insulation, wall sheathing, and a bright, easy-to-clean paint.
 

Falcon67

Well-known member
Joined
Jun 11, 2009
Messages
18,371
Location
Merkel, TX
Do a floor plan, use some software or even cutouts on graph paper to try various arrangements. Do this for a while until you get it the way you think is right.

Then start cramming your stuff in there. You'll find out pretty quick what works and what doesn't, and everything will eventually find it's place in spite of your careful and diligent planning.

Been there, planned that :)
 

Falcon67

Well-known member
Joined
Jun 11, 2009
Messages
18,371
Location
Merkel, TX
A lot of people use black iron. That's what's in my shop. There are also Rapid Air type kits using aluminum tubing.
 
To avoid these ads, REGISTER NOW!
Top Bottom