
You are using an out of date browser. It may not display this or other websites correctly.
You should upgrade or use an alternative browser.
You should upgrade or use an alternative browser.
A dream come true
- Thread starter robolop
- Start date


The roofbuilder has almost done. Here and there a little job to do.
I also think I'm not the most easy person to work for, but they all knew that before they started.
The heating is also in place, so I know I won't have cold feet during the winter.

Last edited:
The works on my workshop advanced so fast, but once the buildingholiday started, things came to a hold.
I’ve got many respect now for people who are building or re-building a house.
I’m at the point now that the biggest assholes are gone.
Sure, there are people in the building business who know their shizzle, but there are other ones…
After waiting more than 18 weeks for my windows and doors, everything was wind-closed.
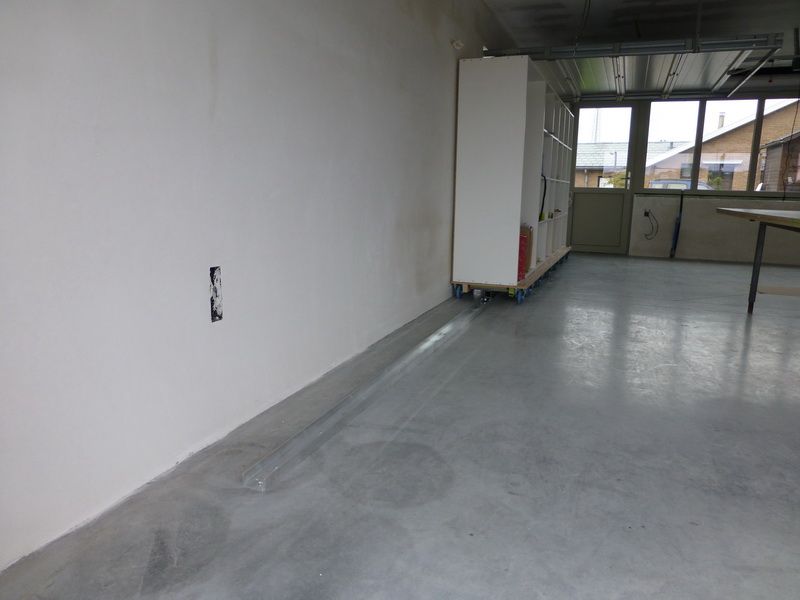
Then the walls need to be plastered. Try to find someone who can do this 100% straight and tight…Fortunately, I found one, and he did a fantastic job!
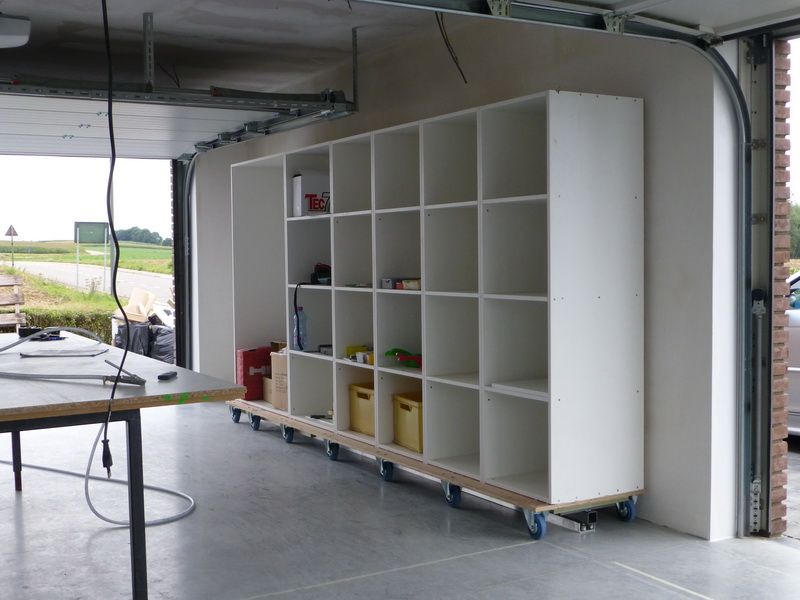
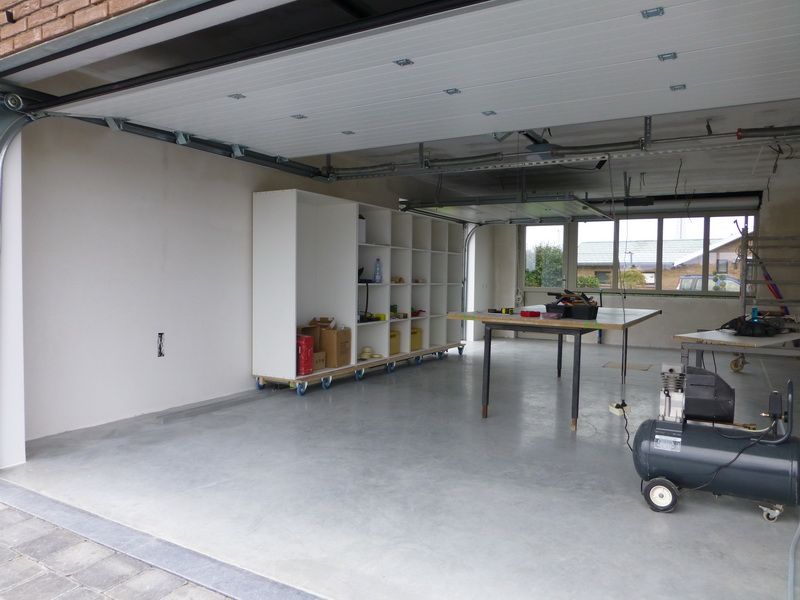
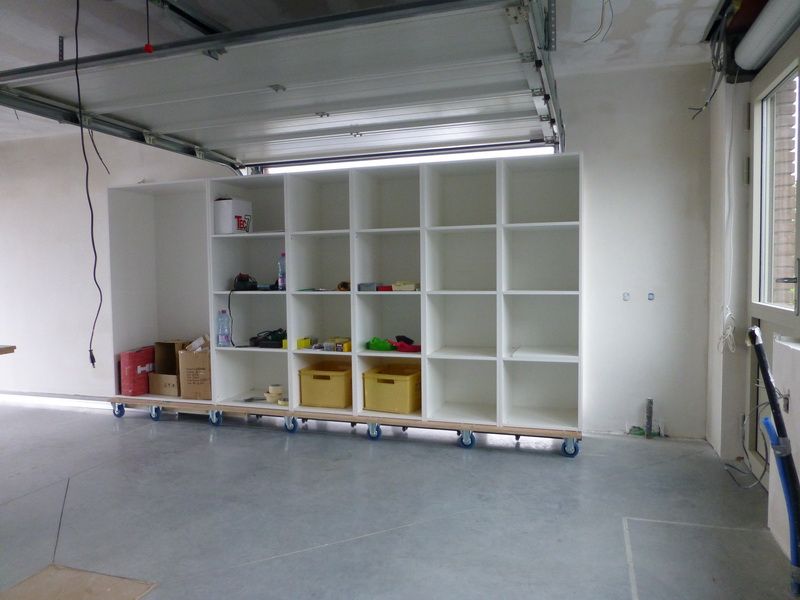
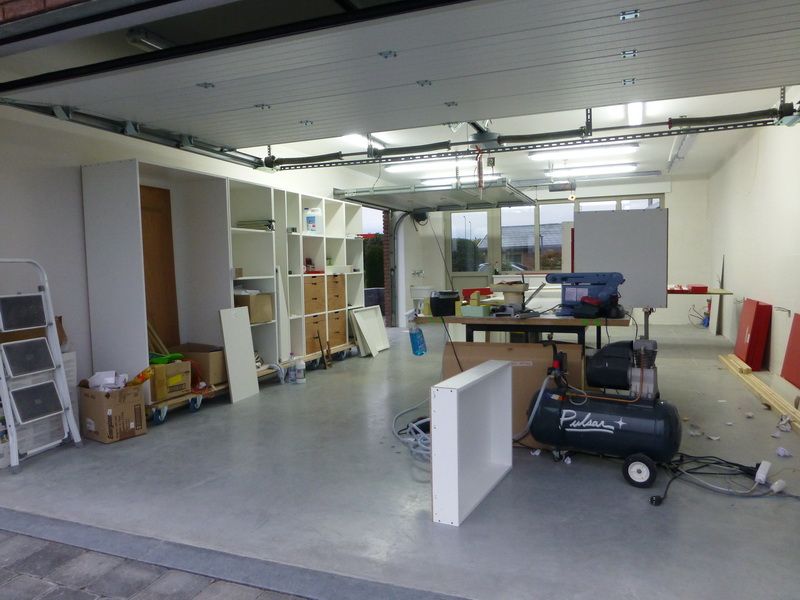
After he left, I could start thinking about the set-up of the rest of the garage. So I came into action!
The wood for the closets has been delivered, and will be sawn later on this month.
The company who will do this became nuts of my demands, but hey, I’m paying them big bucks for it!
I want to use every square inch of my workshop.
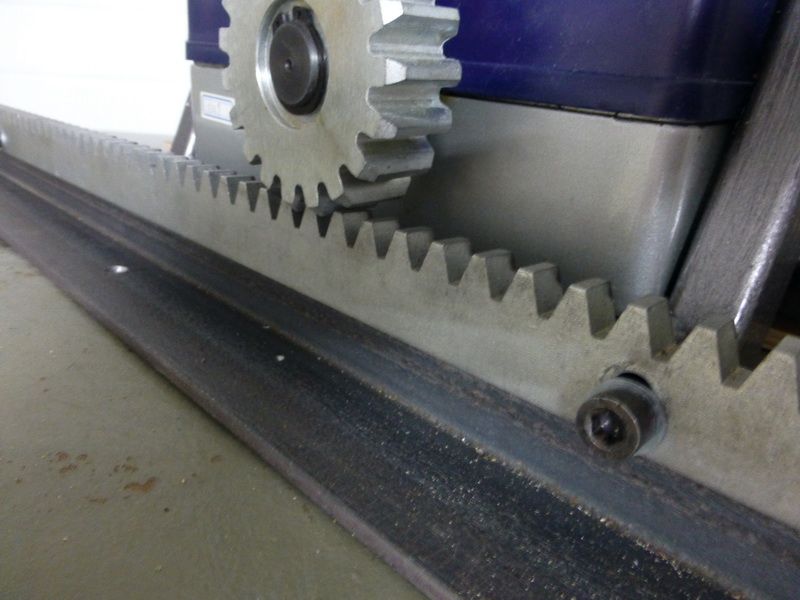
The first wardrobe I’m going to make is the hardest one. Because I couldn’t find a slider of 3m50, I made it myself.
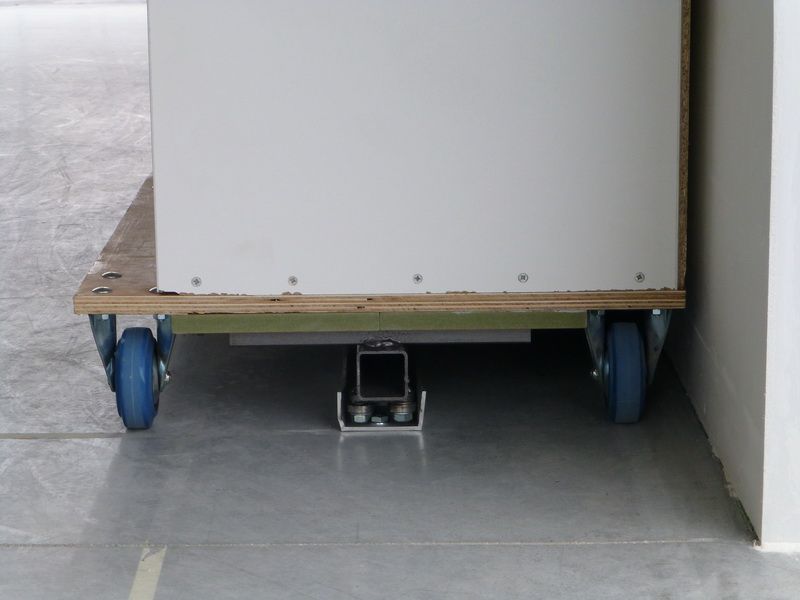
The slider runs on 16 wheels, and has to keep straight with 20 bearings which run into a U-profile on the floor. Well, that’s the thing I’m counting on. I put a lot of work into this, so I’m hoping it works.
In the meantime I’ve got a new friend, which keeps me company every day!
I’ve got many respect now for people who are building or re-building a house.
I’m at the point now that the biggest assholes are gone.
Sure, there are people in the building business who know their shizzle, but there are other ones…
After waiting more than 18 weeks for my windows and doors, everything was wind-closed.
Then the walls need to be plastered. Try to find someone who can do this 100% straight and tight…Fortunately, I found one, and he did a fantastic job!
After he left, I could start thinking about the set-up of the rest of the garage. So I came into action!
The wood for the closets has been delivered, and will be sawn later on this month.
The company who will do this became nuts of my demands, but hey, I’m paying them big bucks for it!
I want to use every square inch of my workshop.
The first wardrobe I’m going to make is the hardest one. Because I couldn’t find a slider of 3m50, I made it myself.
The slider runs on 16 wheels, and has to keep straight with 20 bearings which run into a U-profile on the floor. Well, that’s the thing I’m counting on. I put a lot of work into this, so I’m hoping it works.
In the meantime I’ve got a new friend, which keeps me company every day!
stoffels
Active member
Great project, subscribed.
Sent from my iPad using Tapatalk HD
Sent from my iPad using Tapatalk HD
sean Buick 76
Well-known member
Nice work! Where are you located and please post more pics of the slider setup!
Sunbimmer
Well-known member
Sure, there are people in the building business who know their shizzle, but there are other ones…
I hear ya....
")
1/2 Cup
Member Emeritus
Nice build, I really like what you have done with your storage solution. Thanks for posting.
I hear my name here on this forum. lol
http://www.garagejournal.com/forum/showthread.php?t=118151&highlight=robolop&page=2
Post #26
http://www.garagejournal.com/forum/showthread.php?t=118151&highlight=robolop&page=2
Post #26

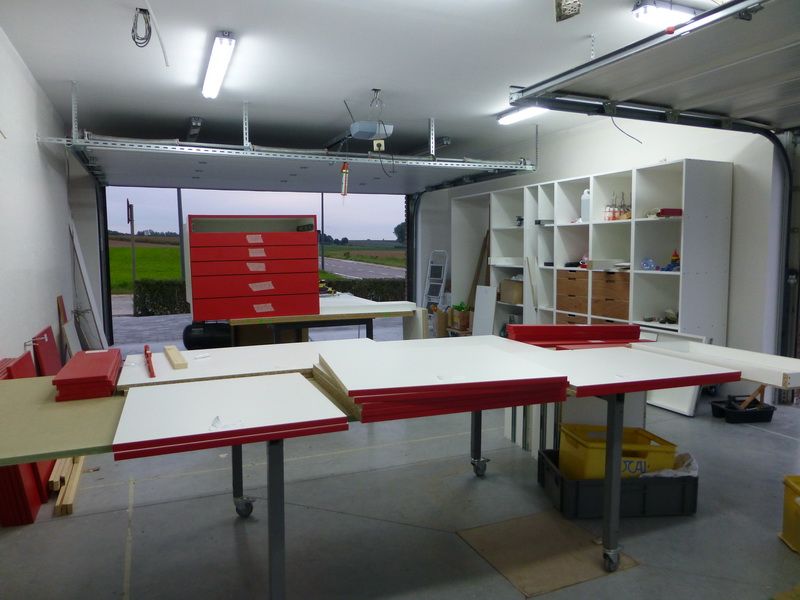
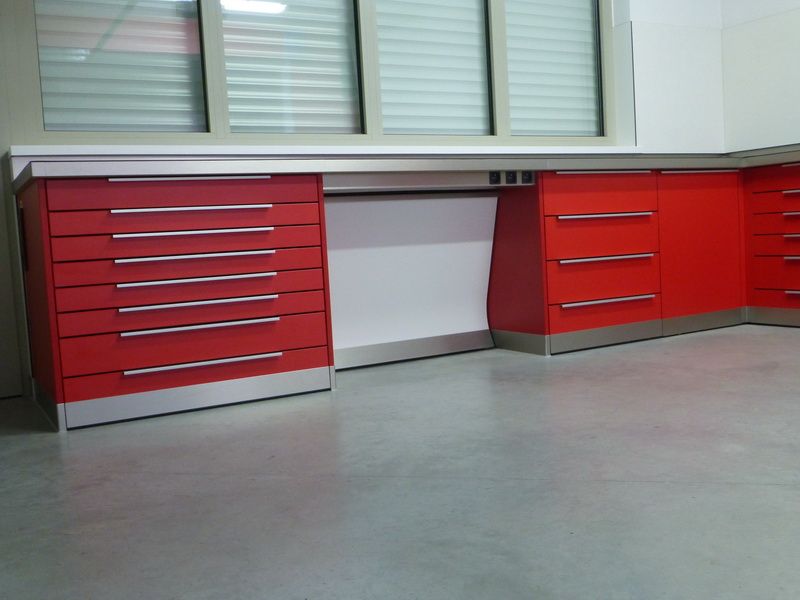
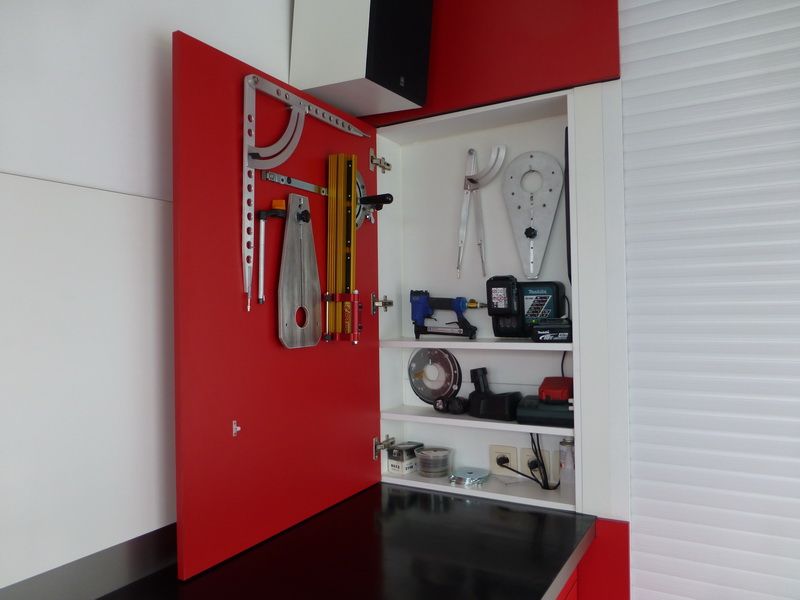
And here she is in the end of the working space.
When the architect started drawing he knew he had tot hink about this, so the door could open.
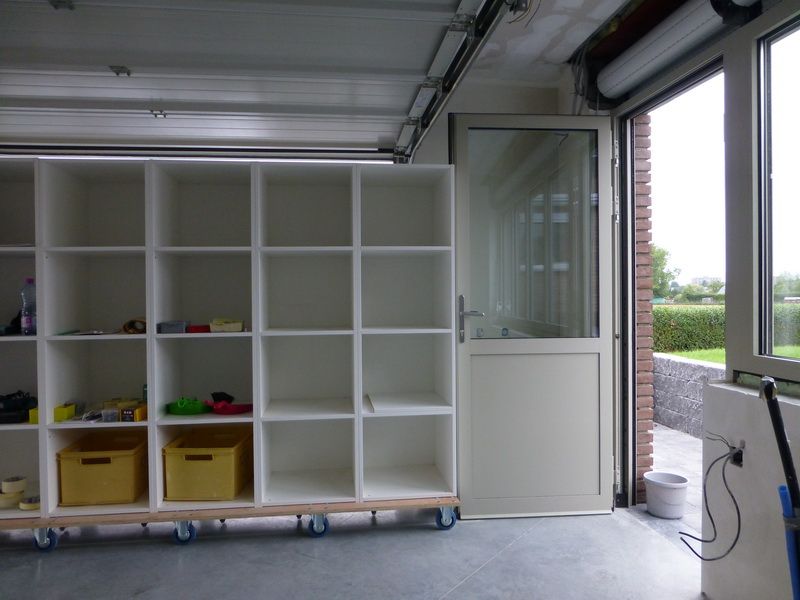
Here she’s fully pullied out, and you can see it at the back. I’m going to finish this of with a thin plate.

And here she’s again at her actual place in the garage part.
After looking for quite a wile, I managed to find some handles that fit my cupboards.
I had to do some millingwork to mount them in a descent way.
I turned off the all of the frontpanels.
I milled away the thickness of the aluminium, of the handles
So it'll rest nicely equal on the top, and on the inside of the drawer
The front
I had to do some millingwork to mount them in a descent way.
I turned off the all of the frontpanels.
I milled away the thickness of the aluminium, of the handles
So it'll rest nicely equal on the top, and on the inside of the drawer
The front

Scottishross
Well-known member
- Joined
- Apr 2, 2012
- Messages
- 621
Nice build mate
Can u get access from the house so when it rains u don't get wet
Can u get access from the house so when it rains u don't get wet
it’s still going pretty slow. I ordered some stuff, and I have to wait on it for a while.
In the meanwhile the cupboards and drawers are filled with my materials. I also spended a lot of time chosing the best place for each material.
I switched positions many times, but now, I’m starting to know where everything is.
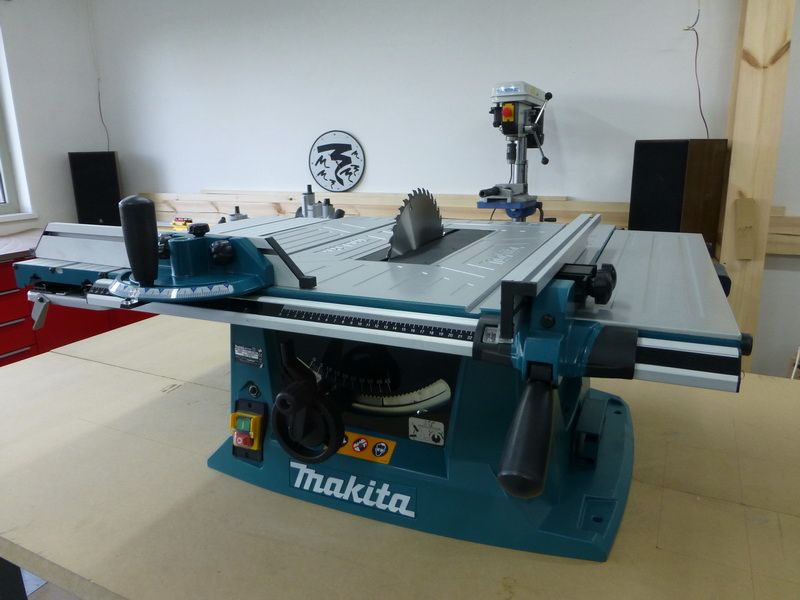
Also, I bought new toy!
The Makita mlt100
I snapped a picture how that thing came out of the box.
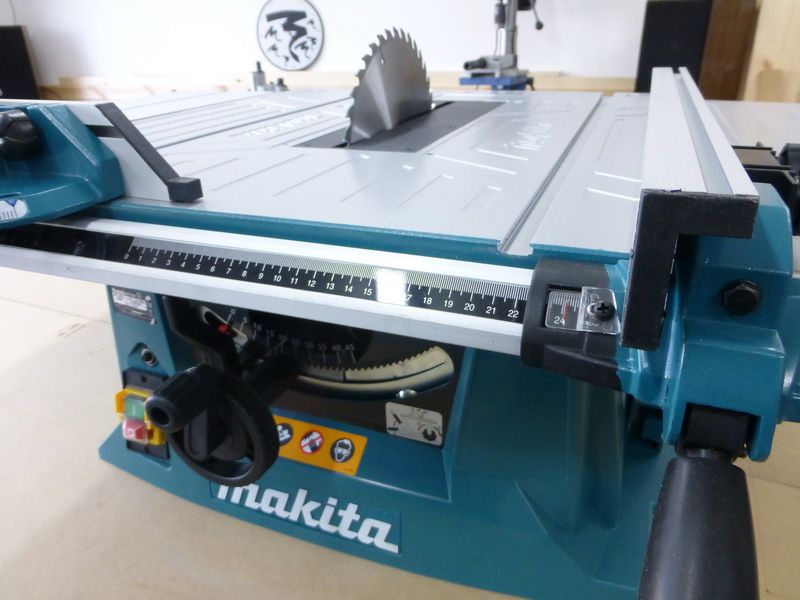
After looking and measuring, I turned this off.
Like I said, this is a quite a toy. When you wand to saw something 100% perfect, you don’t need to do it with a table-saw of 475€, unless a mm doesn’t matter.
The intention is that the saws 100% where I wanted it saw.
If it’ll work, I don’t know. It’s also the first time I do this, but I’m looking forward to it.
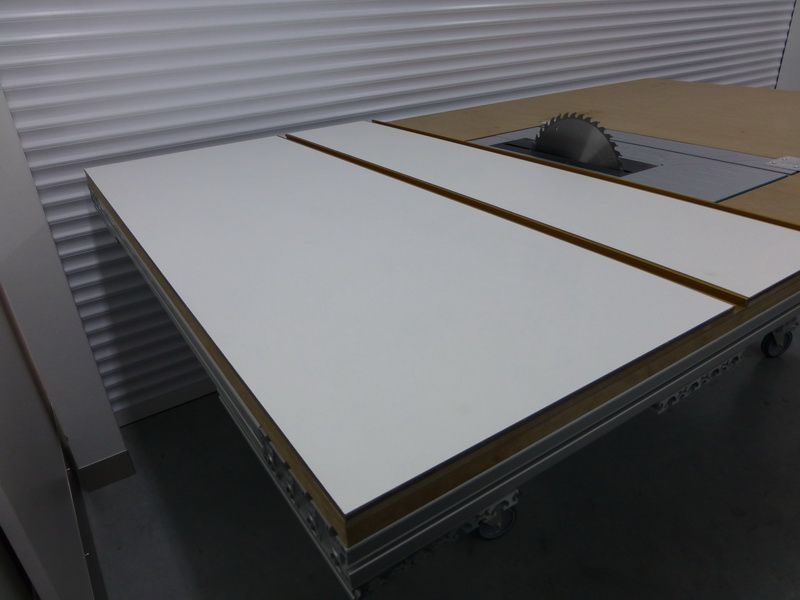
Now that I have this table-saw, I can also think more how I’m planning to make my worktable, and how big it should be.
Everything needs to be compact, and be at the exact right spot in my garage.
I’m going to blend the sa wand mill into my working table, and when I need them, I just have to remove a rubber math to use it.
In other words, I’m going to make a multifunctional table, which I’ve put a lot of thinking work in…
To have better view on what I’m making, I mounted some pieces of wood to see if the dimensions are correct.
At the bottom of the picture you can see the mill, a bit high the saw.
You can see that the new glider of INCAR which IS properly adjusted
This is only the beginning of the table. I’m going to think good now, before I’m ordering the rest of the wood and steel.
In the end, it’s the last working table I’ll ever make, so it has to be on point!
In the meanwhile the cupboards and drawers are filled with my materials. I also spended a lot of time chosing the best place for each material.
I switched positions many times, but now, I’m starting to know where everything is.
Also, I bought new toy!
The Makita mlt100
I snapped a picture how that thing came out of the box.
After looking and measuring, I turned this off.
Like I said, this is a quite a toy. When you wand to saw something 100% perfect, you don’t need to do it with a table-saw of 475€, unless a mm doesn’t matter.
The intention is that the saws 100% where I wanted it saw.
If it’ll work, I don’t know. It’s also the first time I do this, but I’m looking forward to it.
Now that I have this table-saw, I can also think more how I’m planning to make my worktable, and how big it should be.
Everything needs to be compact, and be at the exact right spot in my garage.
I’m going to blend the sa wand mill into my working table, and when I need them, I just have to remove a rubber math to use it.
In other words, I’m going to make a multifunctional table, which I’ve put a lot of thinking work in…
To have better view on what I’m making, I mounted some pieces of wood to see if the dimensions are correct.
At the bottom of the picture you can see the mill, a bit high the saw.
You can see that the new glider of INCAR which IS properly adjusted
This is only the beginning of the table. I’m going to think good now, before I’m ordering the rest of the wood and steel.
In the end, it’s the last working table I’ll ever make, so it has to be on point!
Last edited:
HOTFR8
Banned
I would like to see more of how you set up that door and made it work.
I would like to see more of how you set up that door and made it work.
Explain to me exactly what you want to know?

HOTFR8
Banned
Explain to me exactly what you want to know?
I would like to see more of that door and how you made it work. Do you have more photos ? It looks like it was not easy to set it up that way.
If the Architect had to think about it then it must be interesting.
Last edited:
I would like to see more of that door and how you made it work. Do you have more photos ? It looks like it was not easy to set it up that way.


About the working table, every day is a day full of progress in terms of the drafting of the mill and saw. Every day I’m working on that for a couple of hours. Once I’ve changed something, I call it a day, and work on it the next.
In the time in between, I’m trying to make some other things.
Here I made some iron little shackles which fit in the aluminium U.
Some pieces of iron, sawed at length.
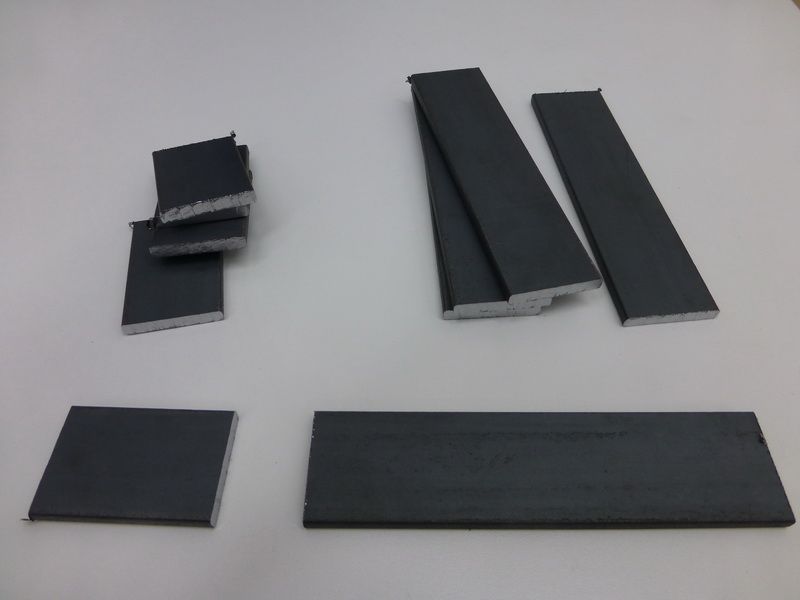
After that I disced it at the right size, and abraded it nicely straight on the sanding belt till it all fitted nicely in the little sloth.

Drilled the holes, and turned in the new M5 thread, and gave it a little paintjob.

This was the result after 6 hours. These things just eat time!
The meaning of these bars, is that you can clamp something with it.
Here an example.
I still need to buy or make the clamps…

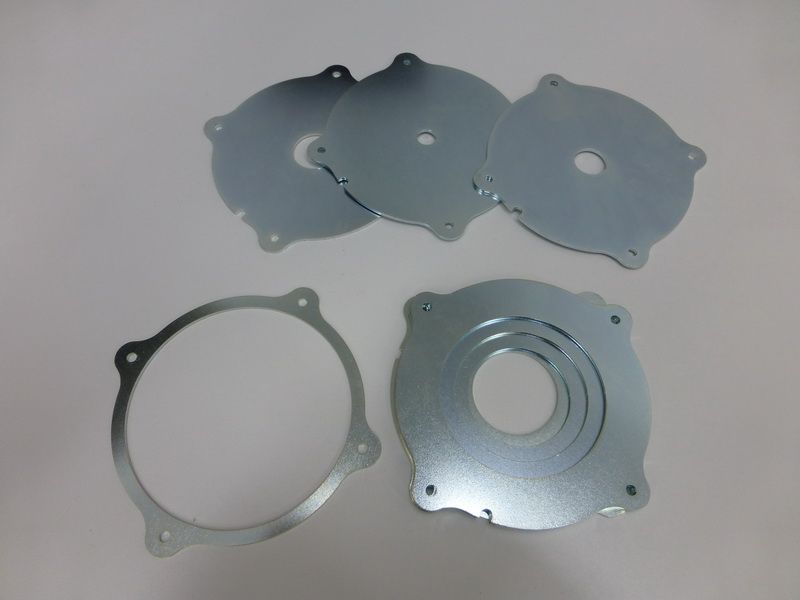
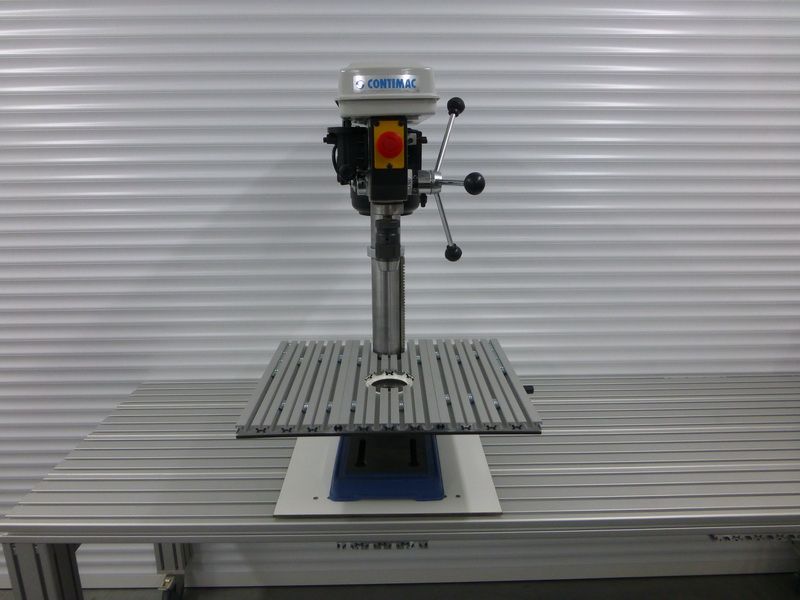
In the meantime , this aluminium plate has been delivered …. This will be placed on my pillar drill. I had planned to make this myself with my uppermill, but for the price I bought it, I couldn’t make it myself.
In the time in between, I’m trying to make some other things.
Here I made some iron little shackles which fit in the aluminium U.
Some pieces of iron, sawed at length.
After that I disced it at the right size, and abraded it nicely straight on the sanding belt till it all fitted nicely in the little sloth.
Drilled the holes, and turned in the new M5 thread, and gave it a little paintjob.
This was the result after 6 hours. These things just eat time!
The meaning of these bars, is that you can clamp something with it.
Here an example.
I still need to buy or make the clamps…
In the meantime , this aluminium plate has been delivered …. This will be placed on my pillar drill. I had planned to make this myself with my uppermill, but for the price I bought it, I couldn’t make it myself.
Last edited:
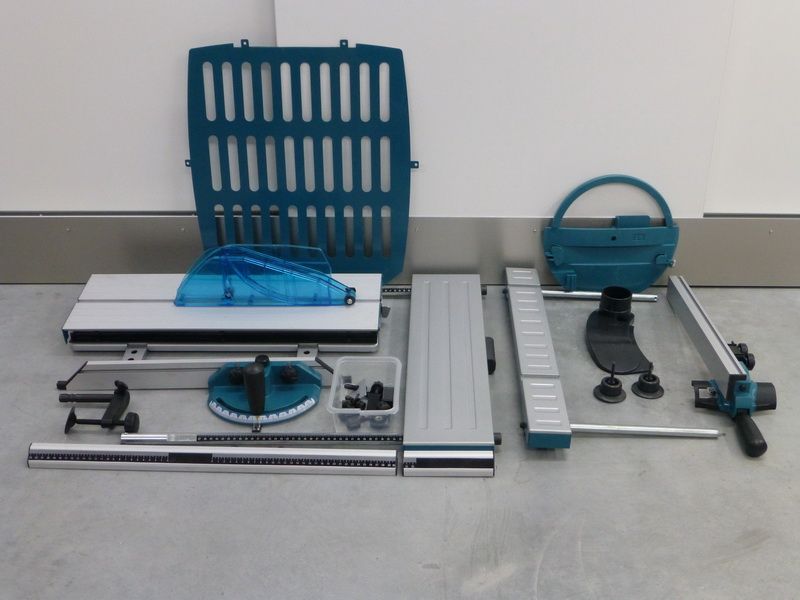
This was in the mail today
I must say that the Incra stuff isn’t that cheap, but the quality (for me) is on of the best!
These metal rings stay in place with little magnets.
I also bought every size available. Safety is priority here!
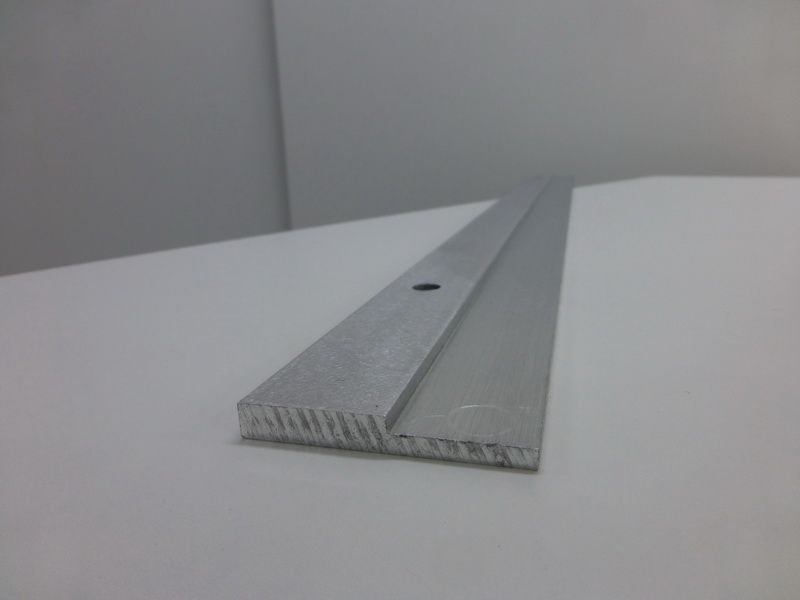
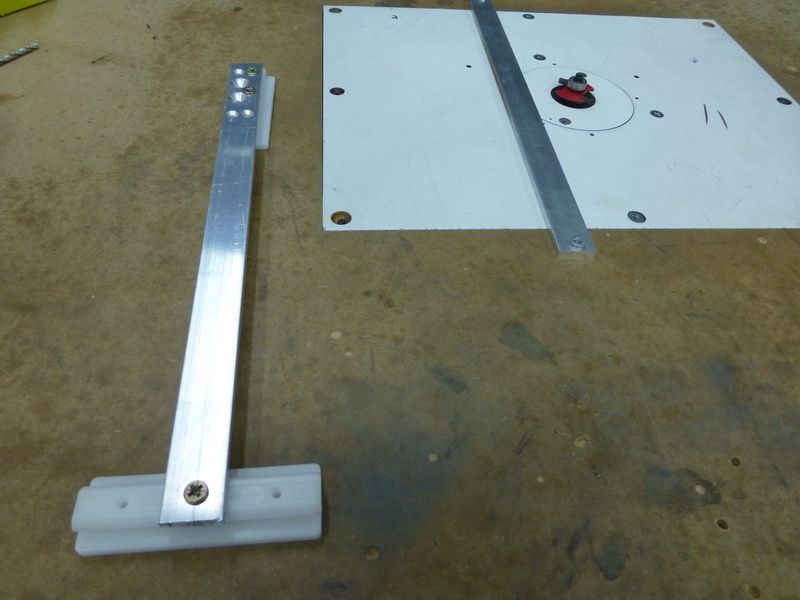
I searched for a good T-square for a while now, but I didn’t find what I was looking for.
So I made it myself.
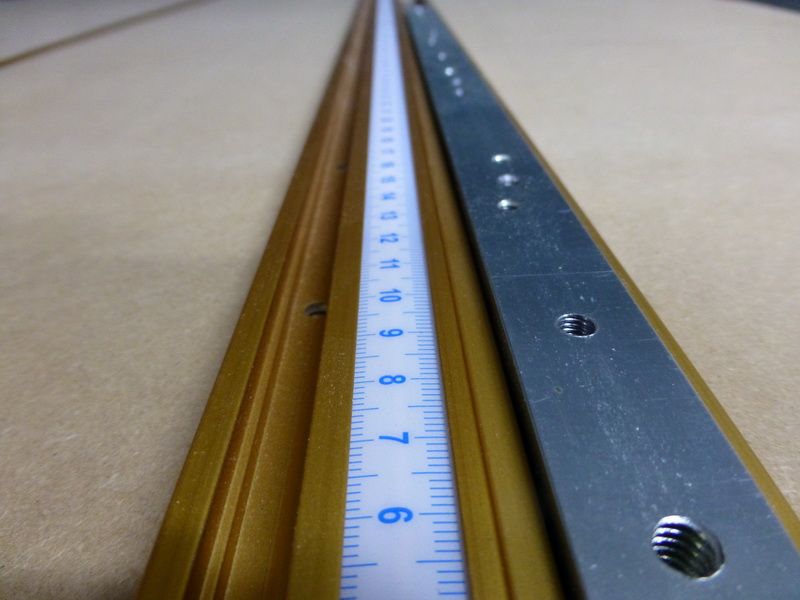
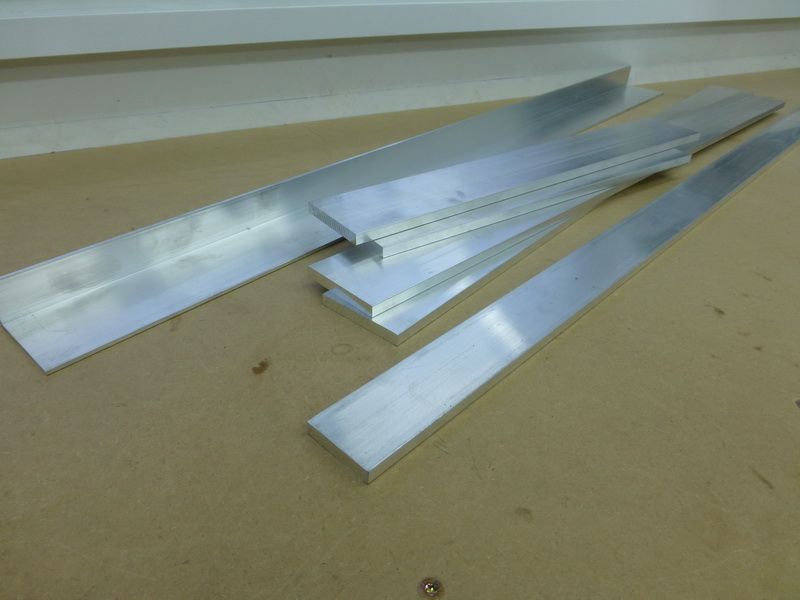
Here’s the aluminium I bought.
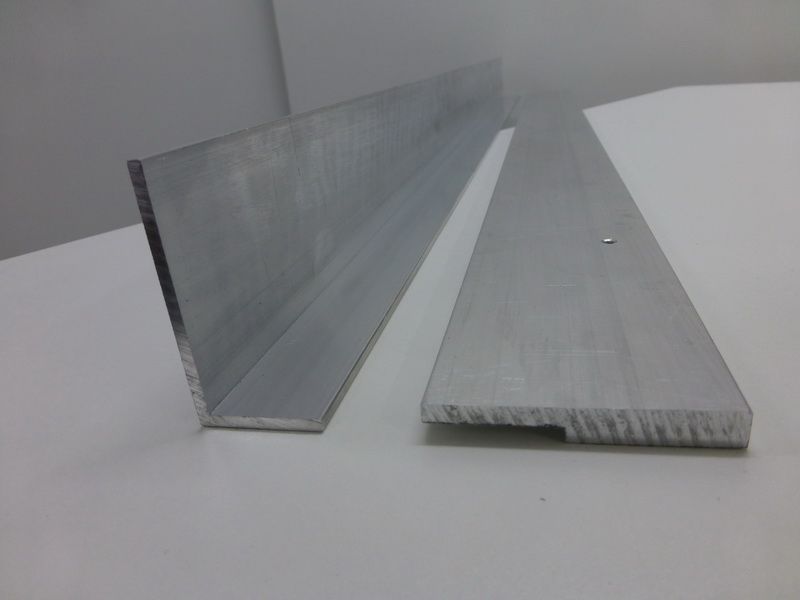
I tensed a pieces, and mille a sloth into it.
This is the result I was looking for.
I must say that the Incra stuff isn’t that cheap, but the quality (for me) is on of the best!
These metal rings stay in place with little magnets.
I also bought every size available. Safety is priority here!
I searched for a good T-square for a while now, but I didn’t find what I was looking for.
So I made it myself.
Here’s the aluminium I bought.
I tensed a pieces, and mille a sloth into it.
This is the result I was looking for.
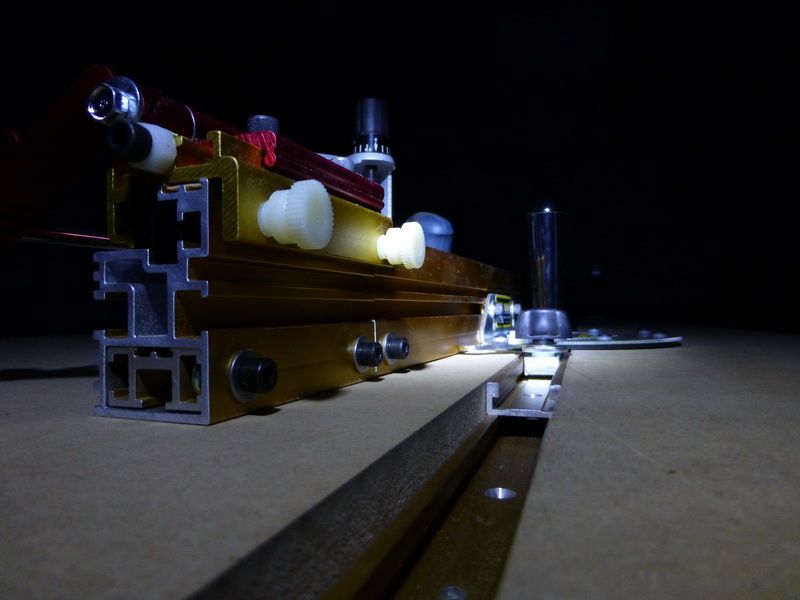
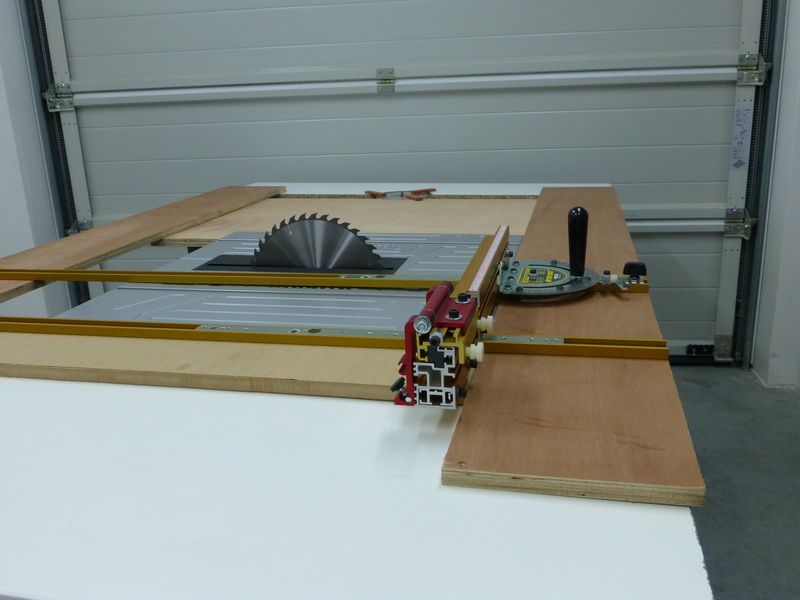
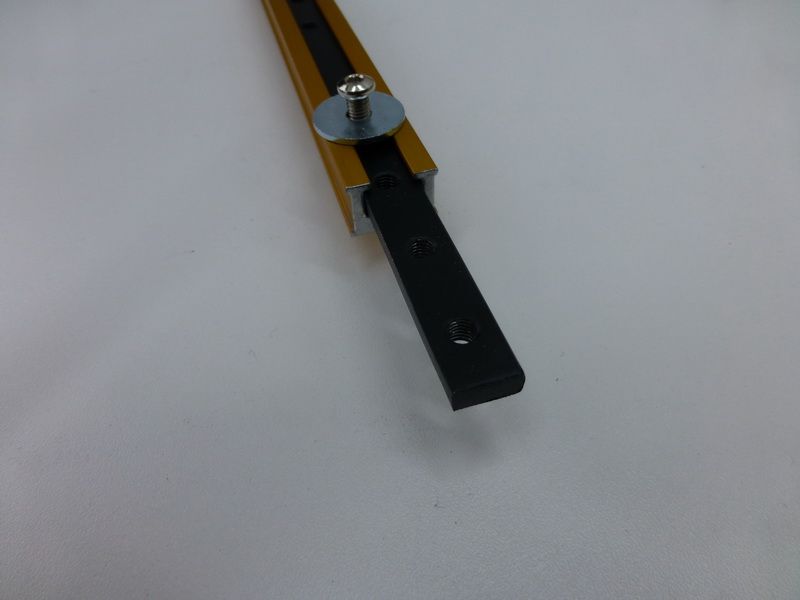
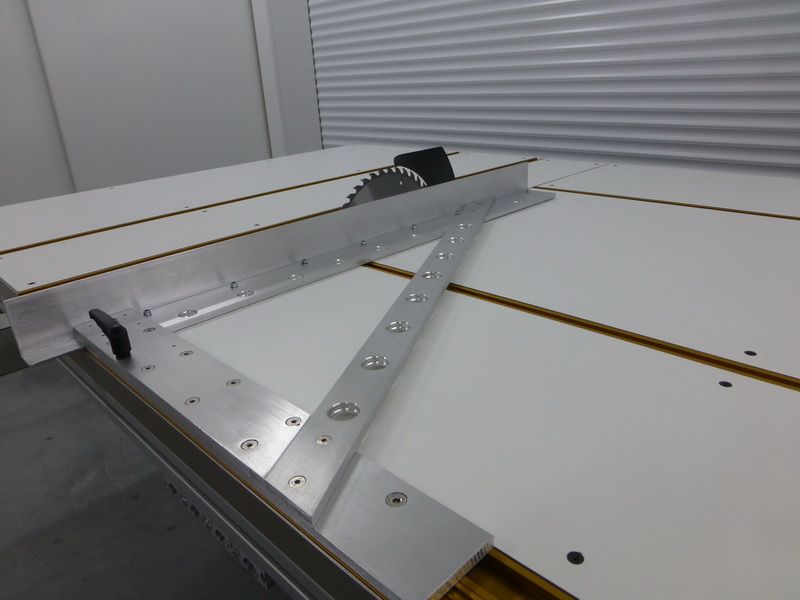
The “longslider” is ready.
Here some pictures of the big picture.
Final picture of the T-square. It looks heavy, but it’s not so bad.
I didn’t want to make it too light as well, it needed to be accurate and strong.

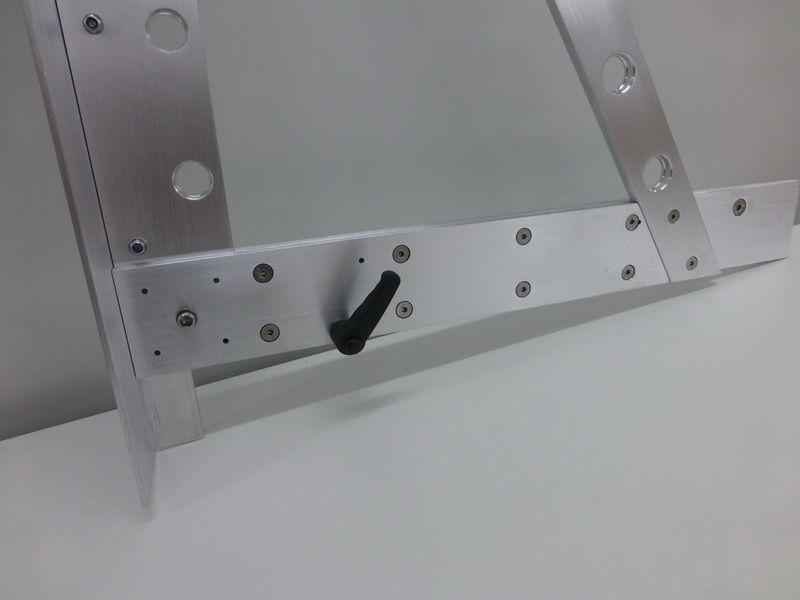
The black hinge is to tighten it.
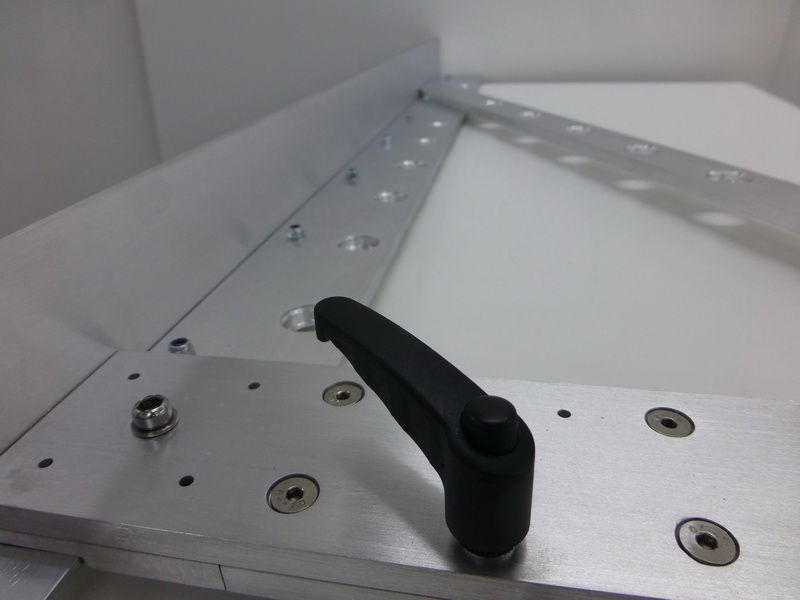
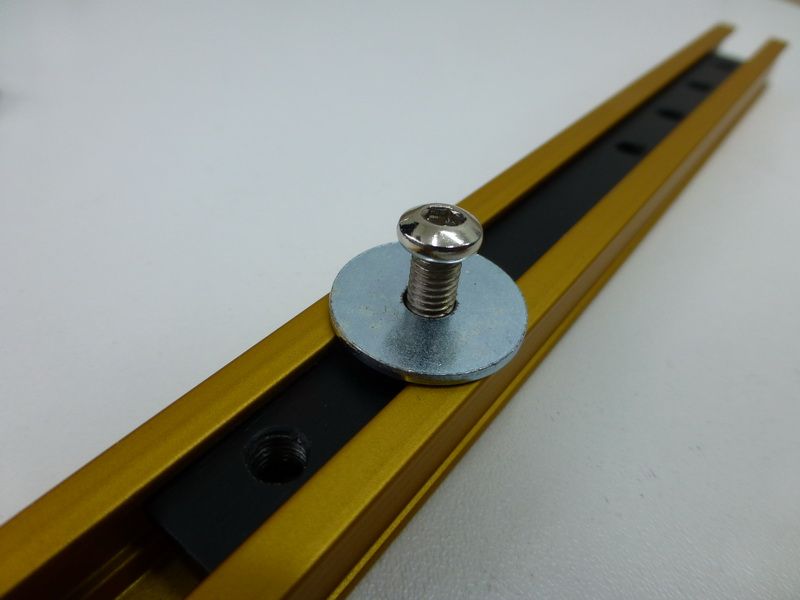
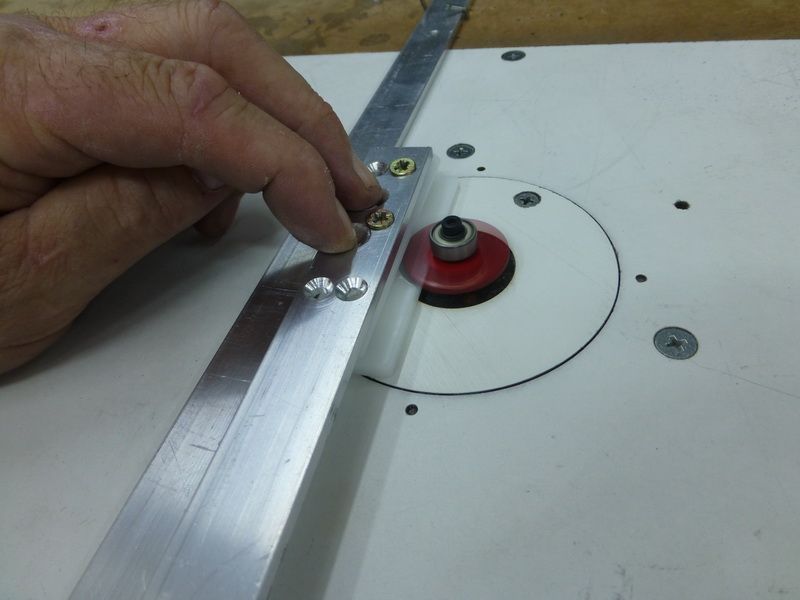
How it’s adjusted now, it should be exactly 90 degrees. I measured this with a big aluminium snag.
I a store nearby, they have special equipment, and soon, I’ll go there to let it measured with a digital meter.
I can also do minor corrections.
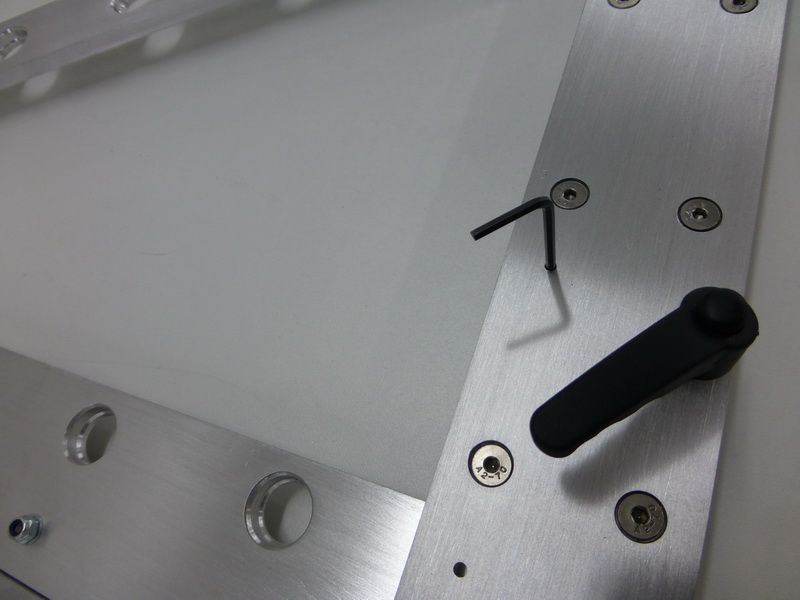
On the bottom left you can see one inbus-screw, with 4 little holes around it.
With this screw I can do minor corrections. Once it’s all 100% in every angle, I drill the holes a bit bigger and put 4 screw in it.
I also drilled 2 holes where I can insert a inbus-key.
By turning there, I can determine i fit all shifts nicely like I want it.
Do I tighten it more, I’ll have more friction of the Teflon on the aluminium slot.
Here it’s all mounted on the table.
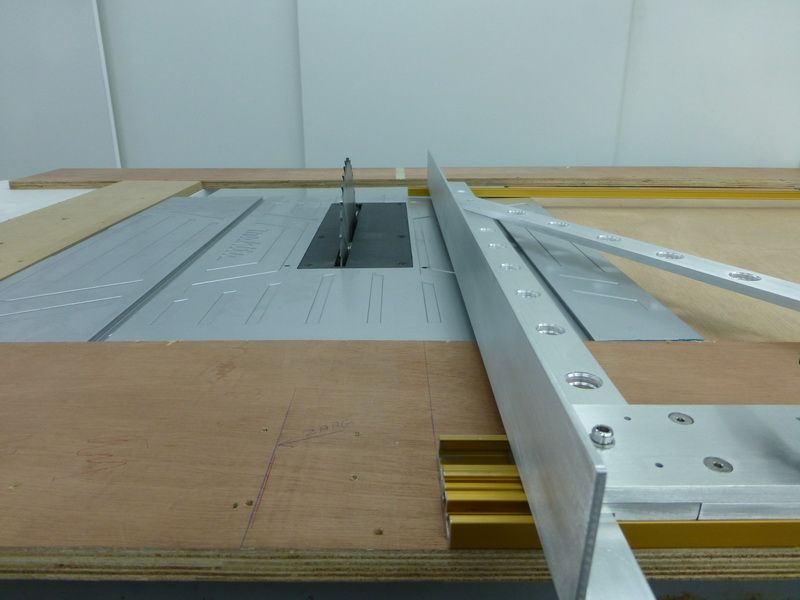
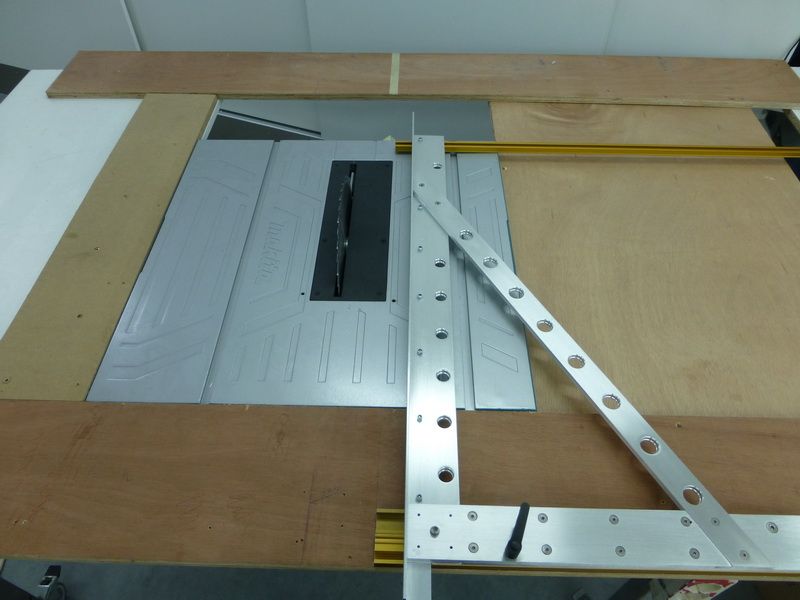
Of course, I have to see now if I can get this thing 100% tuned. But I already know it’s going to be 10 times better than the trash which was originally delivered.
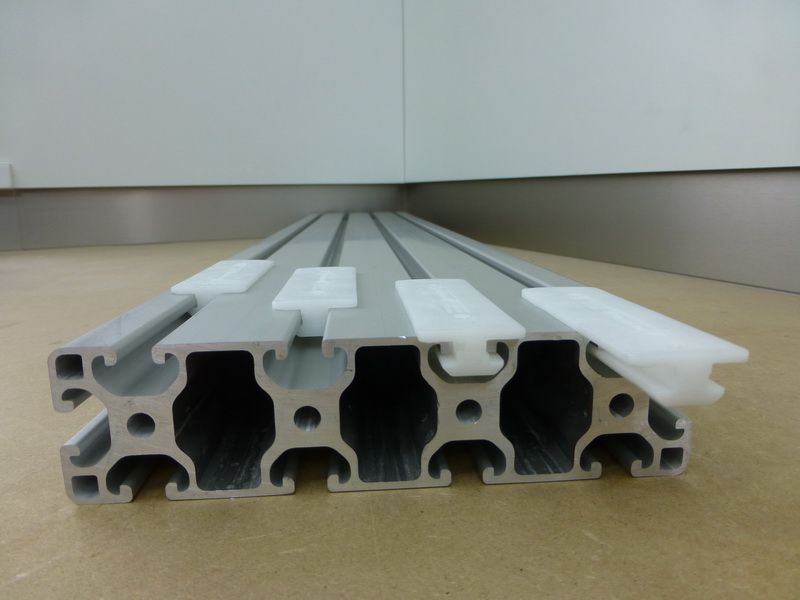
What the table itself is concerned, I’m going to makes these out of aluminium as well.
I’m measuring everything accurately to set an order.
I’m going to make the frame with the profile.
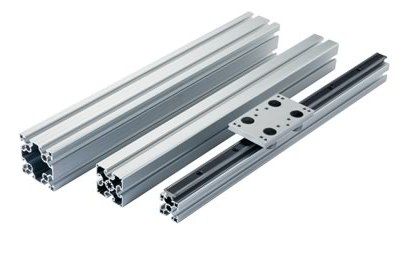
mcs-aluminium-profiel-modulair-construct
This profile is available in many sizes and is very strong.
I let everything being cut to get it as precise as possible. Cost factor is going up, but as I said earlier, it’s the last time I make something like this.
Here some pictures of the big picture.
Final picture of the T-square. It looks heavy, but it’s not so bad.
I didn’t want to make it too light as well, it needed to be accurate and strong.
The black hinge is to tighten it.
How it’s adjusted now, it should be exactly 90 degrees. I measured this with a big aluminium snag.
I a store nearby, they have special equipment, and soon, I’ll go there to let it measured with a digital meter.
I can also do minor corrections.
On the bottom left you can see one inbus-screw, with 4 little holes around it.
With this screw I can do minor corrections. Once it’s all 100% in every angle, I drill the holes a bit bigger and put 4 screw in it.
I also drilled 2 holes where I can insert a inbus-key.
By turning there, I can determine i fit all shifts nicely like I want it.
Do I tighten it more, I’ll have more friction of the Teflon on the aluminium slot.
Here it’s all mounted on the table.
Of course, I have to see now if I can get this thing 100% tuned. But I already know it’s going to be 10 times better than the trash which was originally delivered.
What the table itself is concerned, I’m going to makes these out of aluminium as well.
I’m measuring everything accurately to set an order.
I’m going to make the frame with the profile.
mcs-aluminium-profiel-modulair-construct
This profile is available in many sizes and is very strong.
I let everything being cut to get it as precise as possible. Cost factor is going up, but as I said earlier, it’s the last time I make something like this.
Last edited:
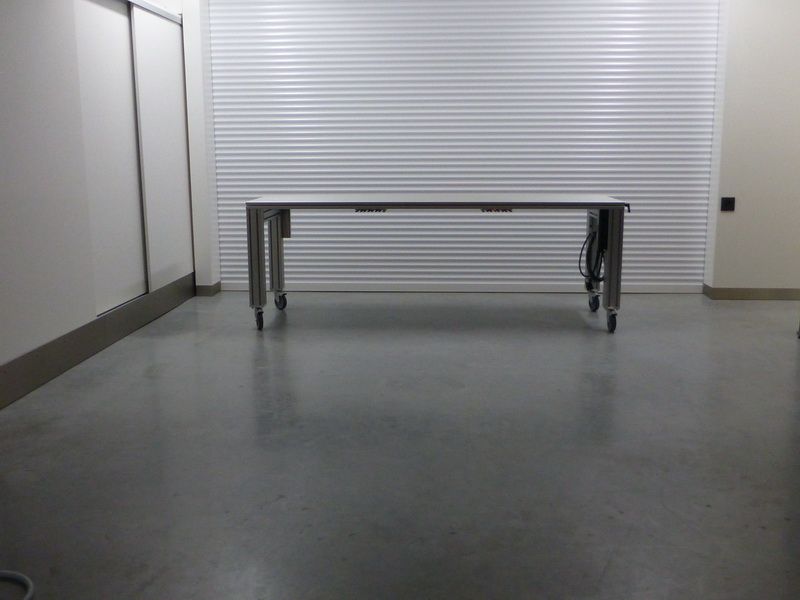
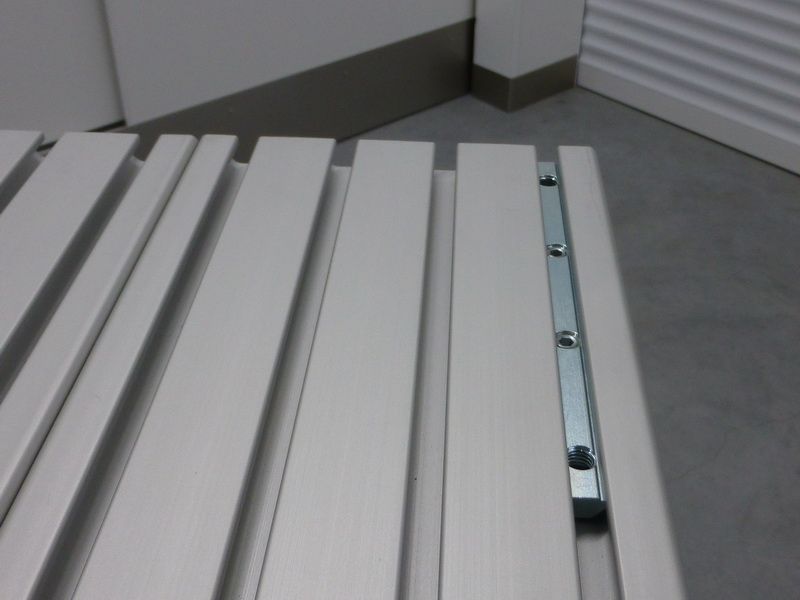
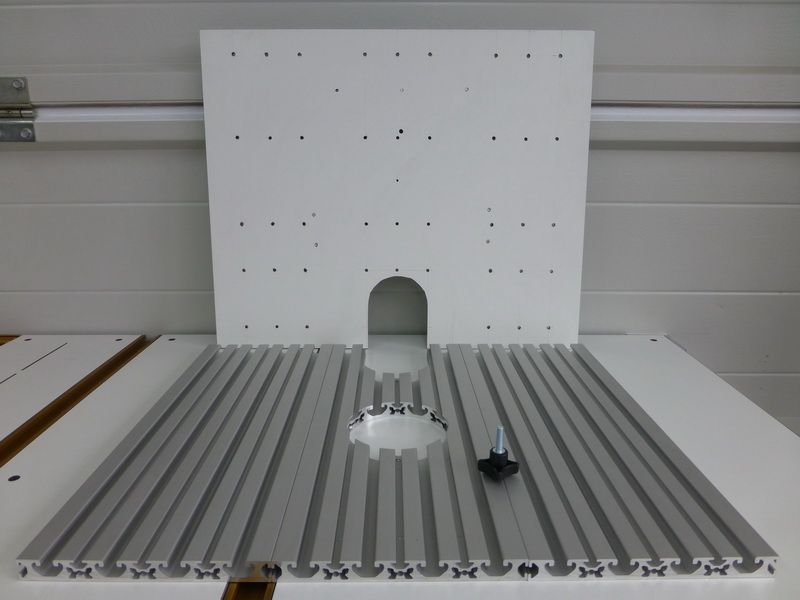
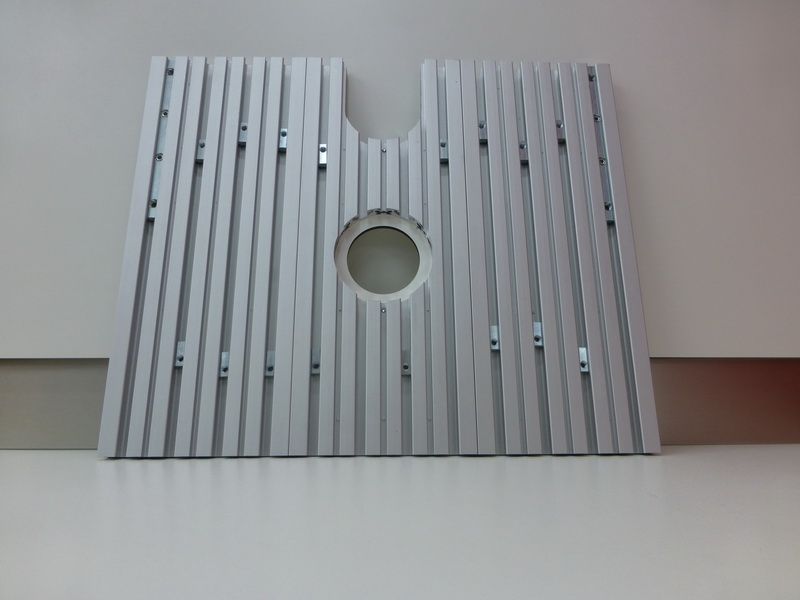
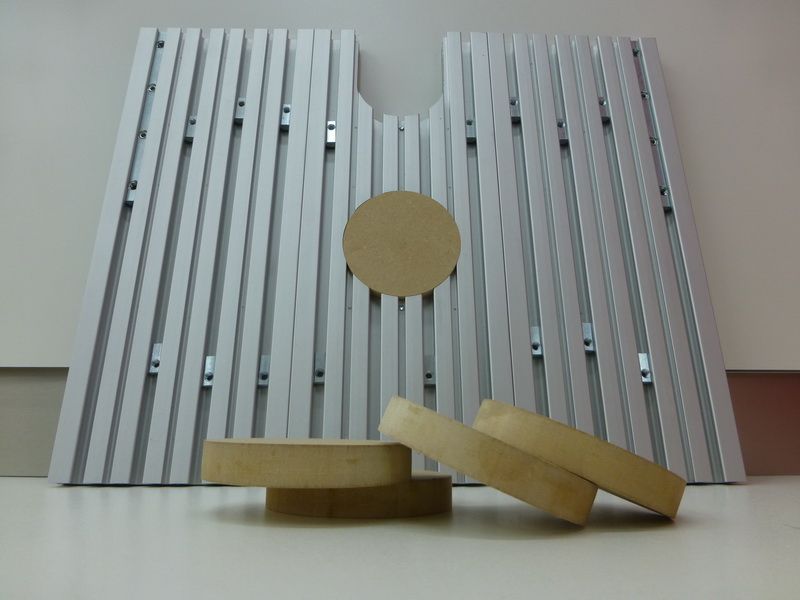
The biggest part of the aluminium profiles needed for my tables has been delivered.
I think to finish my first table at the end of this week. It’s quite a puzzle to put everything together, and to make no mistakes.
I’m planning 8 sockets fort his table.
And I’ve already modified them

Soon the first table will be ready, and I’ll need a forklift to set it straight.
Although it’s made of aluminium, it’ll still be heavy
About a month ago, I told you guys I was going to make my last table. Because not all parts had been delivered yet, I made a smaller one first.
The penultimate table This one is 200x64cm, and completely made out of aluminium.
What I’m going to use this for, I will tell you later. There’s still too much in my head of things that aren’t on point yet.
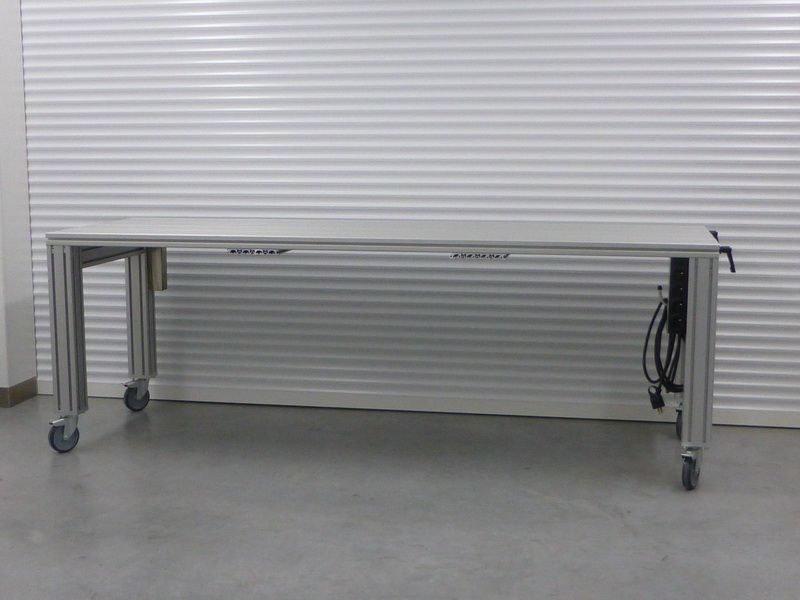
In the background you can also see that I divided the garage in 2 by descending the roller curtain.
We’ve managed to blend this in in a very nice way, and I’m very happy with the result.
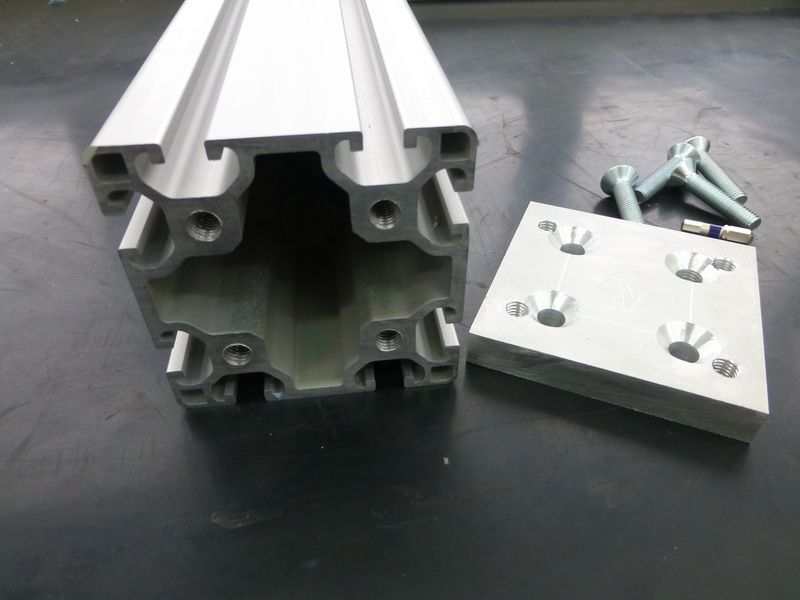
About the aluminium part, I immediately thought that I could screw this into each other quickly…forget it.
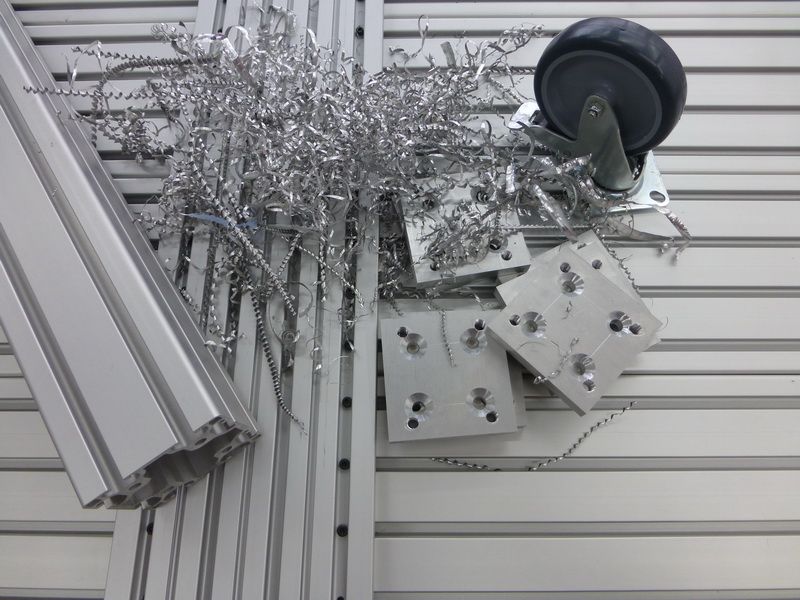
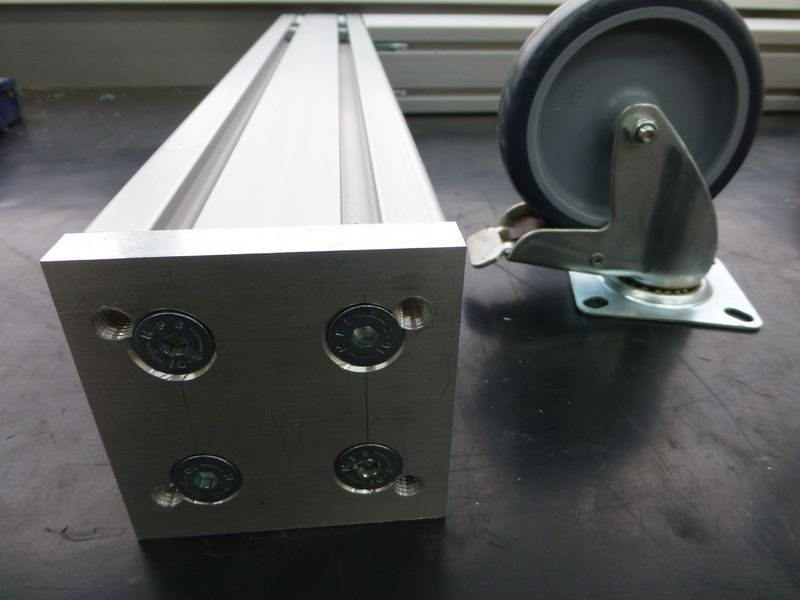
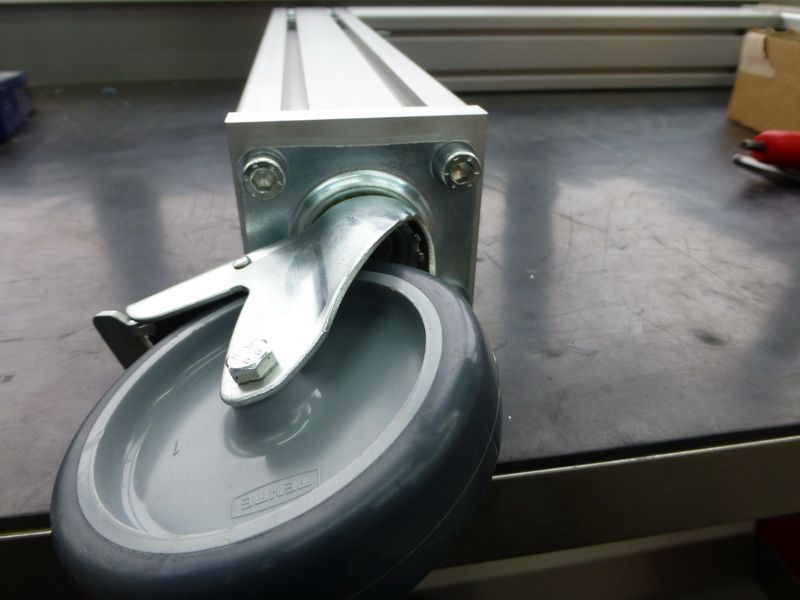
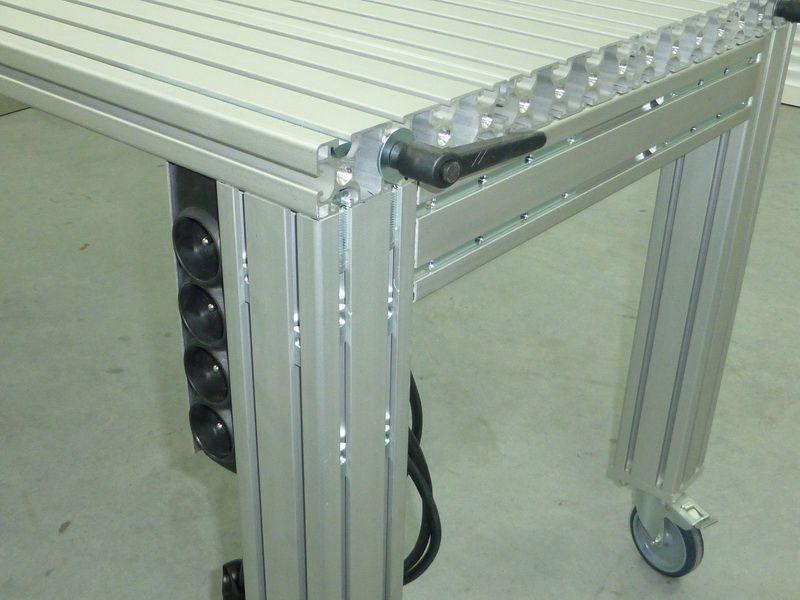
The first problem was that I could not mount the supplied wheel directly under the legs (8x8cm). So I makde 4 plates out of 12mm thick, and screwed these underneath.
I had to laugh at the wheels that they had supplied me. They Looked very shoddy, but once everything was finished, they turned out perfectly.
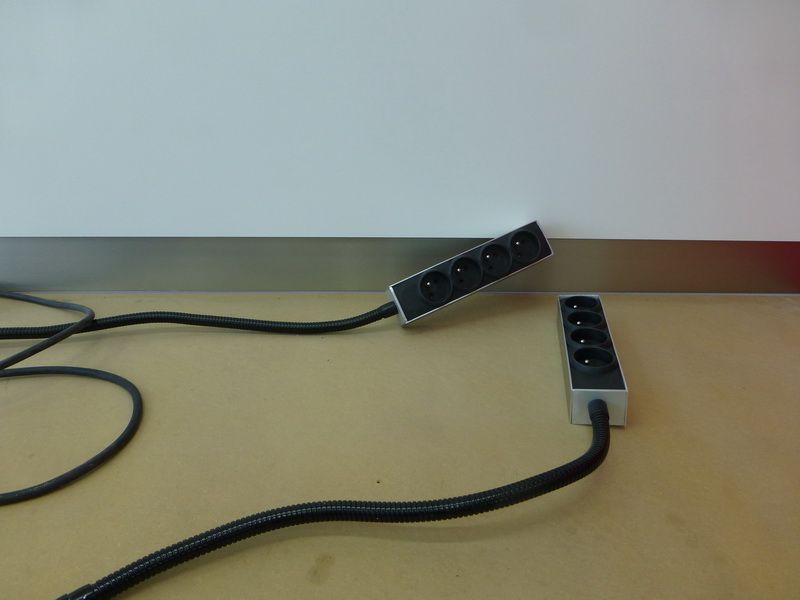
I provided the table with 2 boxes of 4 sockets.
Then I put the uppermill in it, to make some room for the cables.
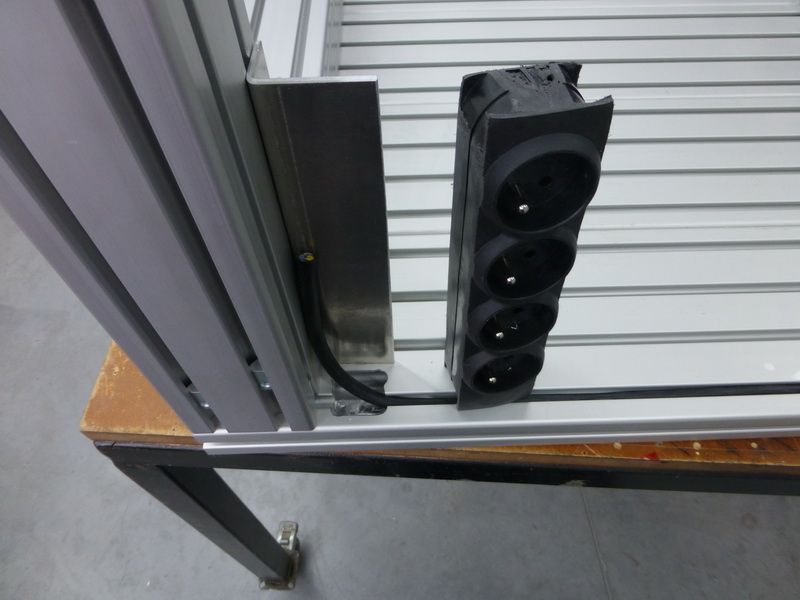
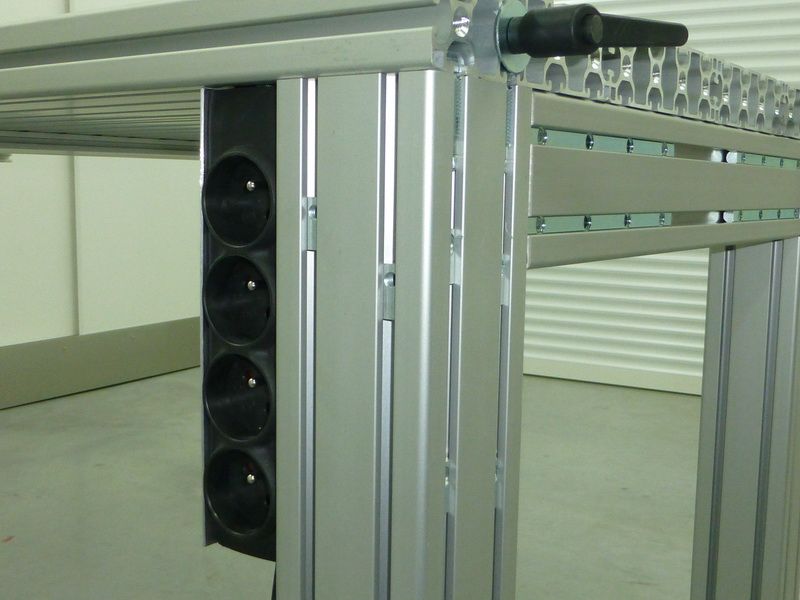
Because I'm right handed, I’ve also put the outlets on the right side
The advantage of this profile is that you can plug-in threaded screws (m4-5-6-8) everywhere you want, and move them anywhere you want.
On this side I added some more of those things.
On the other side I would like to mount a folding machine (pleating machine).
How I'm going to do this, and make this, I haven’t even thought about.
I also do not know the ins and outs of how to make a folding machine, but maybe my friend Goole will know…Or maybe there are people here who can give me some tips and tricks?
You can also see that I've tapped screwthread into the holes on the top plate. (m8)
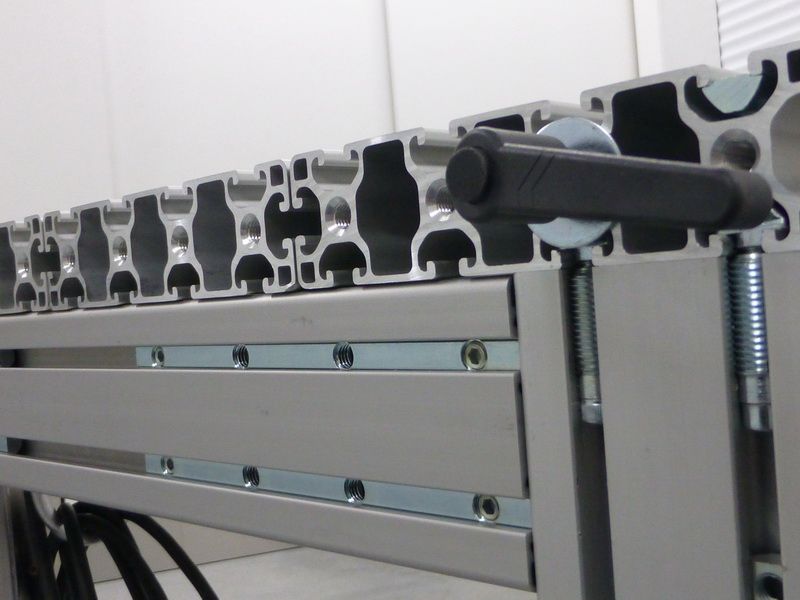
On the top, I can tighten whatever I want, where ever I want.
So far the table.
What's going on behind the curtain at the workshop, is not quite finished.
Not that much to do anymore, but when you want perfection, it just demands you put a lot of time in it.
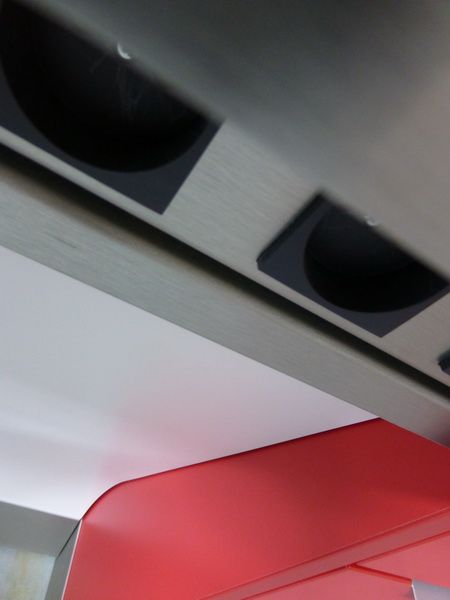
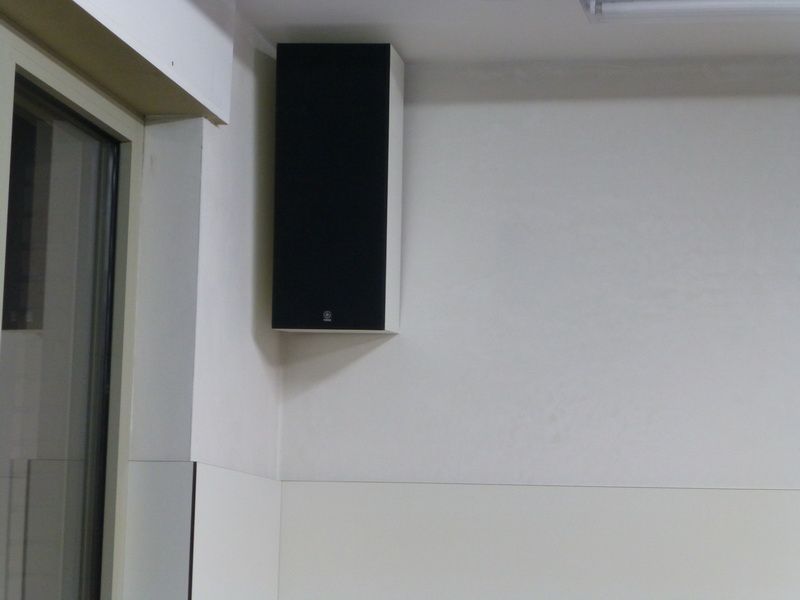
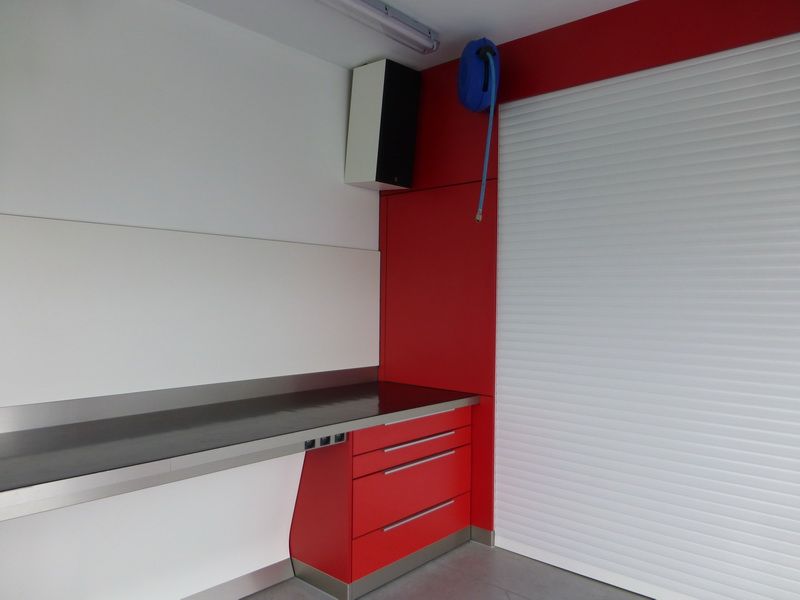
The YAMAHA speakers also heve been suspended from the ceiling.
Onto a certain height, I placed some Volkern (trespa- plates of 6mm thick.
I certainly wanted this material. It’s superstrong, and you can wash this quite easily.
Once I had the plates, I thought "I'm going to stick against the wall with tec 7 in a couple of minutes”
Forget it.
You should not glue this material directly against the wall.
If you do this right may warp over time.
Now, if you know what it costs, you should not take the risk.
So I first glued some 2cm strips against the wall.
Then I sprayed a loooooooooooot of cans Tec7 on the wall, mounted the Trespa, and then clamped it tight.

I think to finish my first table at the end of this week. It’s quite a puzzle to put everything together, and to make no mistakes.
I’m planning 8 sockets fort his table.
And I’ve already modified them
Soon the first table will be ready, and I’ll need a forklift to set it straight.
Although it’s made of aluminium, it’ll still be heavy
About a month ago, I told you guys I was going to make my last table. Because not all parts had been delivered yet, I made a smaller one first.
The penultimate table This one is 200x64cm, and completely made out of aluminium.
What I’m going to use this for, I will tell you later. There’s still too much in my head of things that aren’t on point yet.
In the background you can also see that I divided the garage in 2 by descending the roller curtain.
We’ve managed to blend this in in a very nice way, and I’m very happy with the result.
About the aluminium part, I immediately thought that I could screw this into each other quickly…forget it.
The first problem was that I could not mount the supplied wheel directly under the legs (8x8cm). So I makde 4 plates out of 12mm thick, and screwed these underneath.
I had to laugh at the wheels that they had supplied me. They Looked very shoddy, but once everything was finished, they turned out perfectly.
I provided the table with 2 boxes of 4 sockets.
Then I put the uppermill in it, to make some room for the cables.
Because I'm right handed, I’ve also put the outlets on the right side
The advantage of this profile is that you can plug-in threaded screws (m4-5-6-8) everywhere you want, and move them anywhere you want.
On this side I added some more of those things.
On the other side I would like to mount a folding machine (pleating machine).
How I'm going to do this, and make this, I haven’t even thought about.
I also do not know the ins and outs of how to make a folding machine, but maybe my friend Goole will know…Or maybe there are people here who can give me some tips and tricks?
You can also see that I've tapped screwthread into the holes on the top plate. (m8)
On the top, I can tighten whatever I want, where ever I want.
So far the table.
What's going on behind the curtain at the workshop, is not quite finished.
Not that much to do anymore, but when you want perfection, it just demands you put a lot of time in it.
The YAMAHA speakers also heve been suspended from the ceiling.
Onto a certain height, I placed some Volkern (trespa- plates of 6mm thick.
I certainly wanted this material. It’s superstrong, and you can wash this quite easily.
Once I had the plates, I thought "I'm going to stick against the wall with tec 7 in a couple of minutes”
Forget it.
You should not glue this material directly against the wall.
If you do this right may warp over time.
Now, if you know what it costs, you should not take the risk.
So I first glued some 2cm strips against the wall.
Then I sprayed a loooooooooooot of cans Tec7 on the wall, mounted the Trespa, and then clamped it tight.
BoostAddiction
Well-known member
Nice work- but I expected that, from seeing your other remarkable work on the Fiberglass Forums (RIP).
I see you still have the BMW fever as well?
I see you still have the BMW fever as well?


During the move, the compass I once made, died...
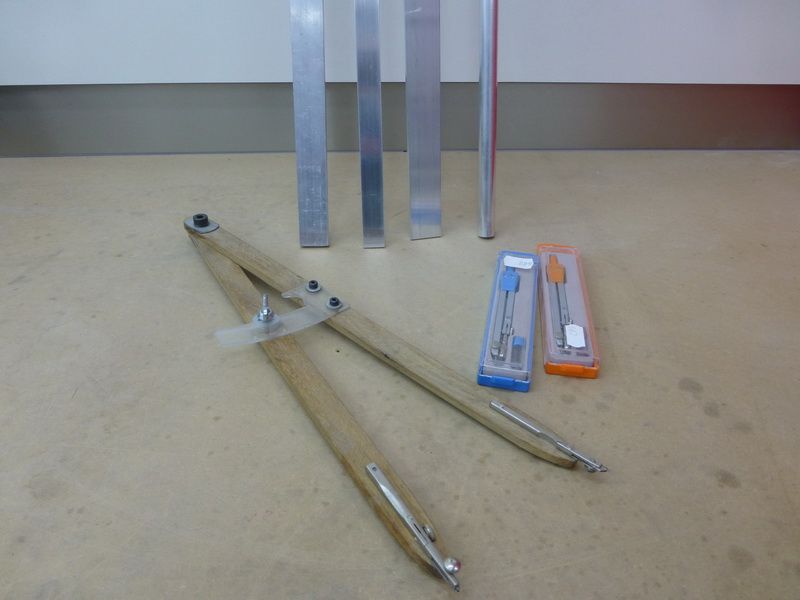
Because I'm still waiting on some things, I decided to make a few new ones This time, also in aluminium.
First I bought two pair of compasses for few euros. I needed them for the needle and pencil holder.
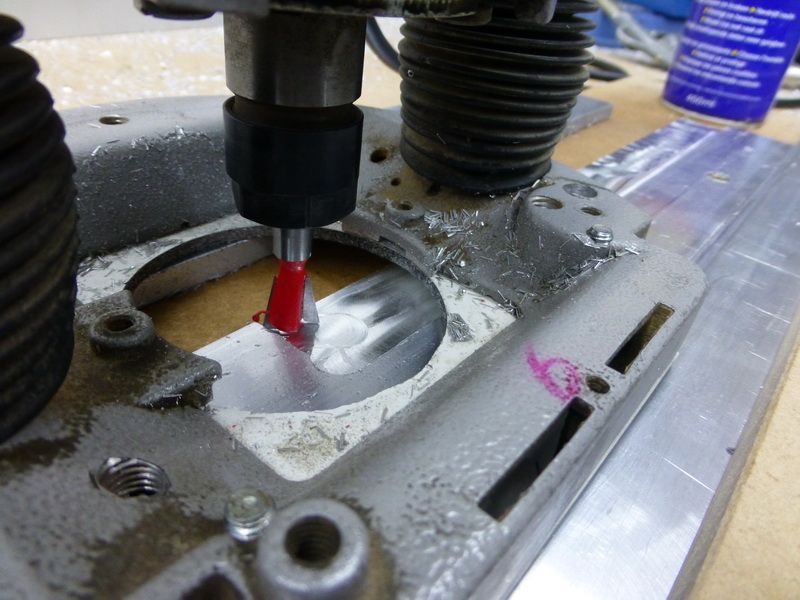
Then I measured the out and played with the copy router (copy mill).
Because these things are obviously much larger than a normal compass, I also had to make a reinforcement
This also serves as a way to secure it.
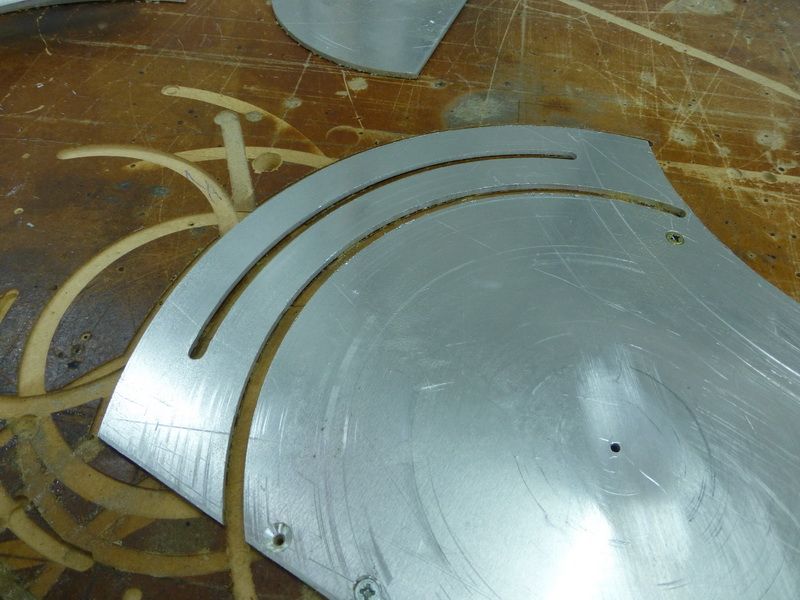
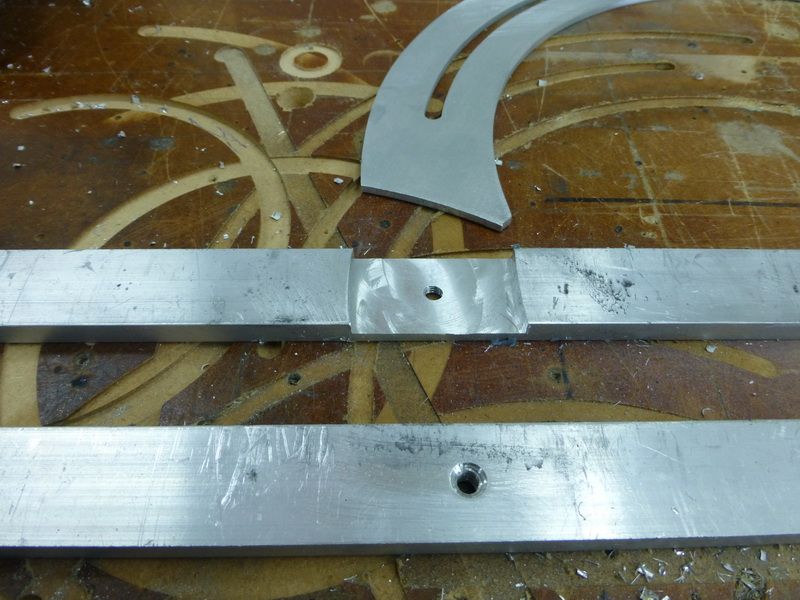
This is the result.
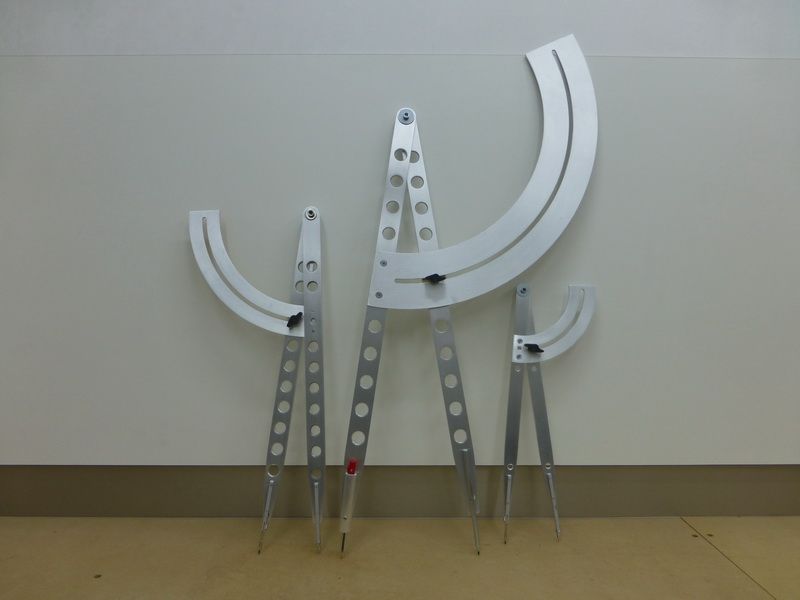
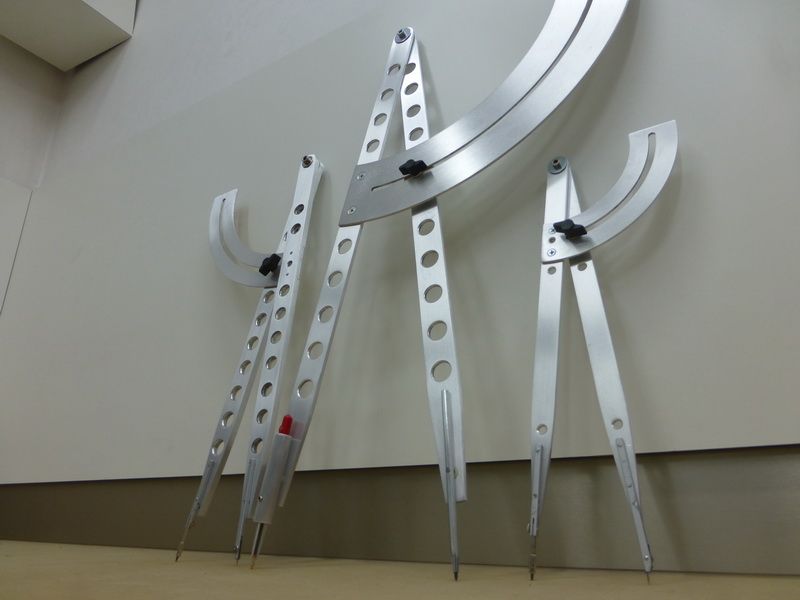
To let it all slide beautiful I've taped a kind of paper on the read, the one they make seals out of.
Where this was not possible, I use Teflon washers.
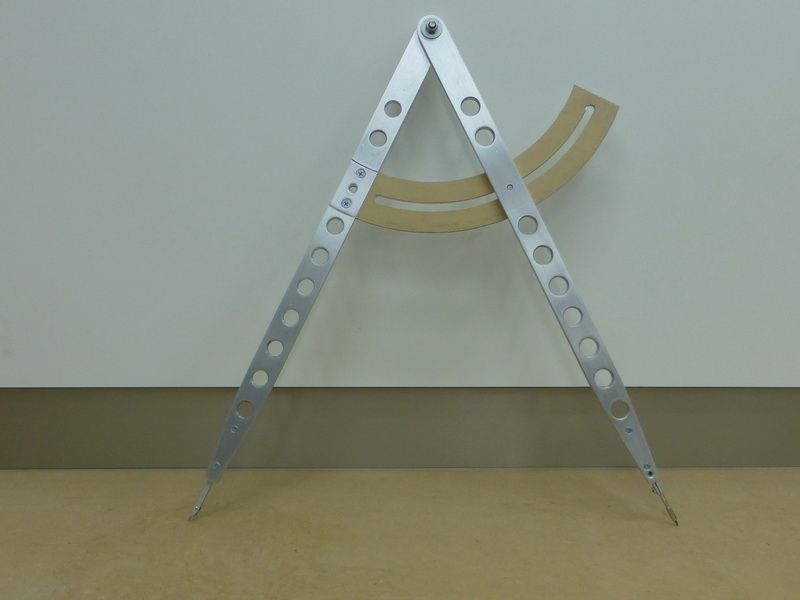
The biggest one I made with an aluminum tube where I can mount a pen in.
The point I made a out of a scriber.
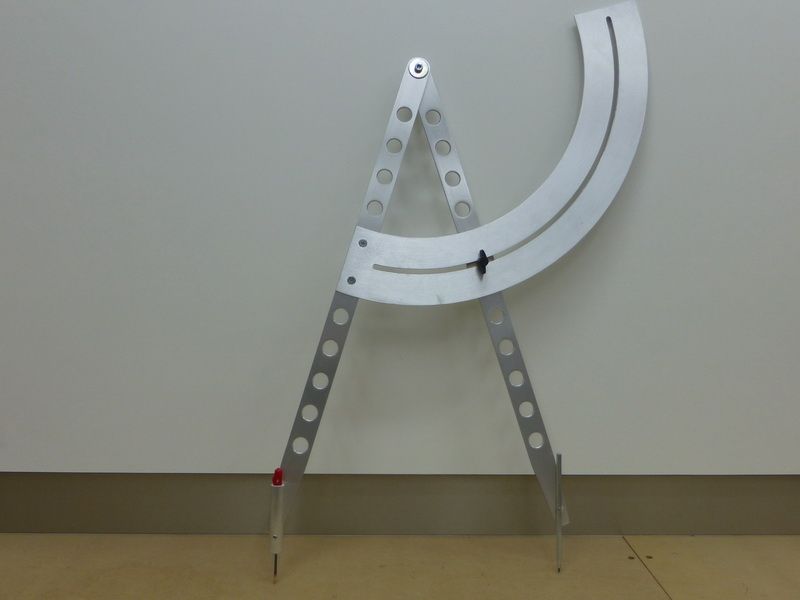
Because it is so big, you can see that I can straighten the pen, and point, if necessary.
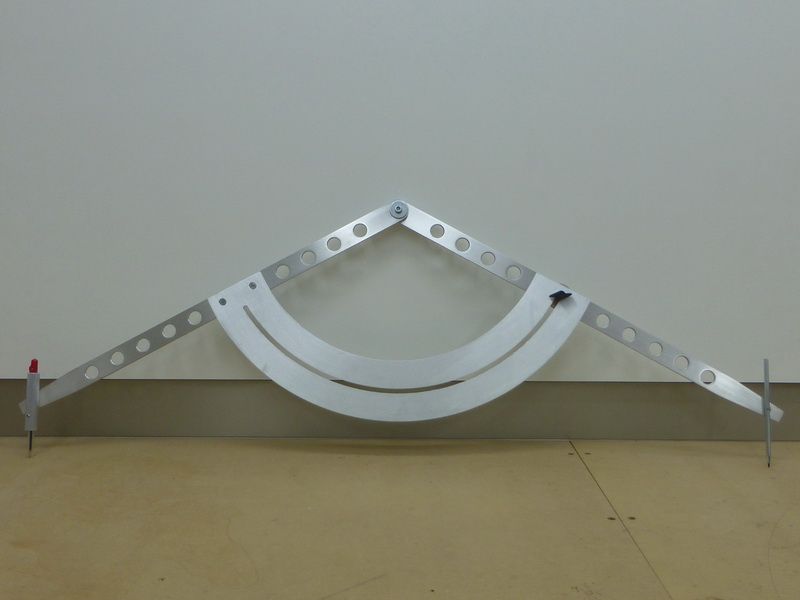
Yet, another work completed wich took a lot of time, but I'm sure of one thing though...
I'LL NEVER MAKE SOME COMPASSES AGAIN
Because I'm still waiting on some things, I decided to make a few new ones This time, also in aluminium.
First I bought two pair of compasses for few euros. I needed them for the needle and pencil holder.
Then I measured the out and played with the copy router (copy mill).
Because these things are obviously much larger than a normal compass, I also had to make a reinforcement
This also serves as a way to secure it.
This is the result.
To let it all slide beautiful I've taped a kind of paper on the read, the one they make seals out of.
Where this was not possible, I use Teflon washers.
The biggest one I made with an aluminum tube where I can mount a pen in.
The point I made a out of a scriber.
Because it is so big, you can see that I can straighten the pen, and point, if necessary.
Yet, another work completed wich took a lot of time, but I'm sure of one thing though...
I'LL NEVER MAKE SOME COMPASSES AGAIN
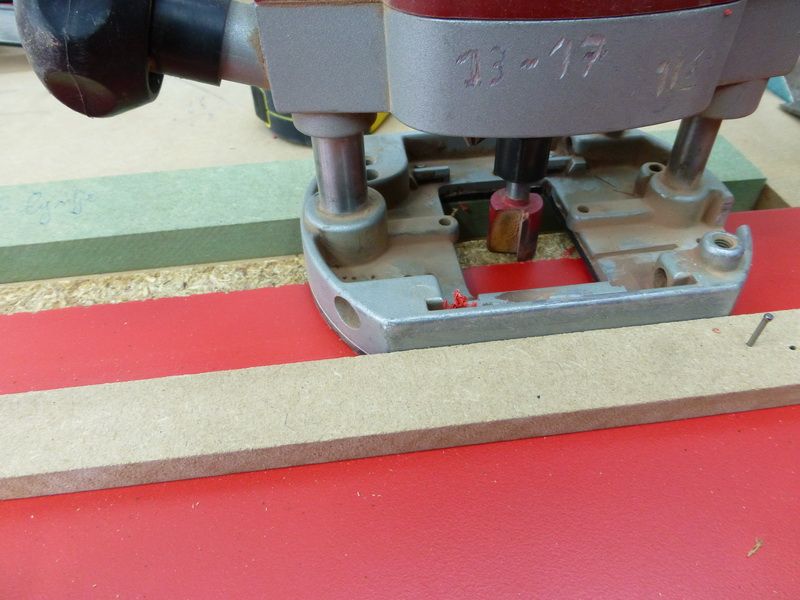
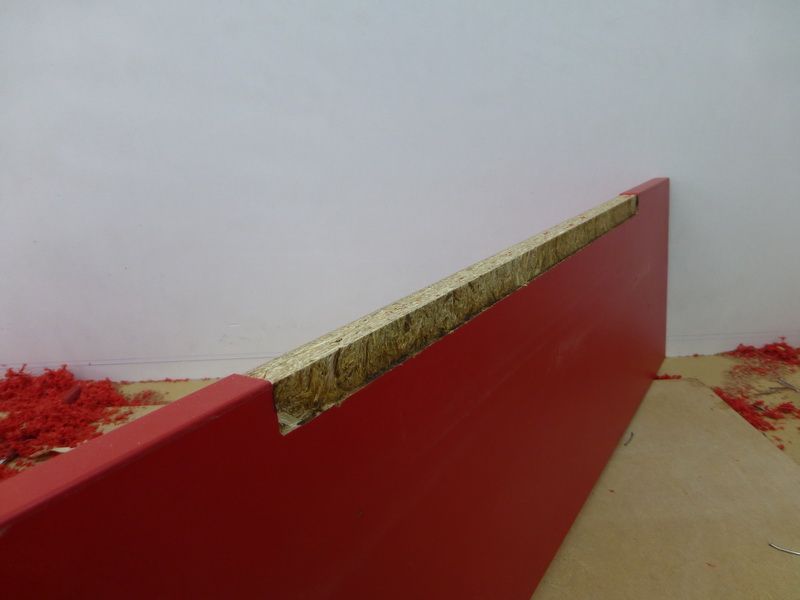
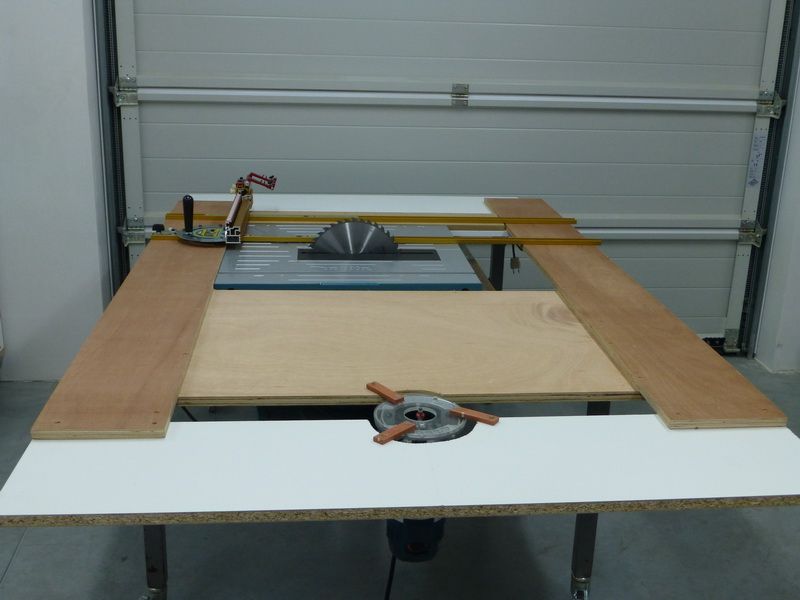
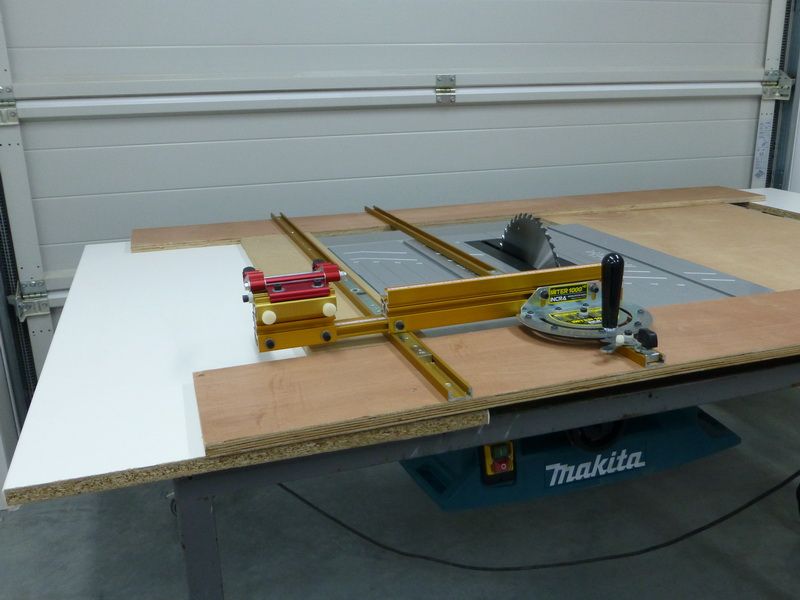
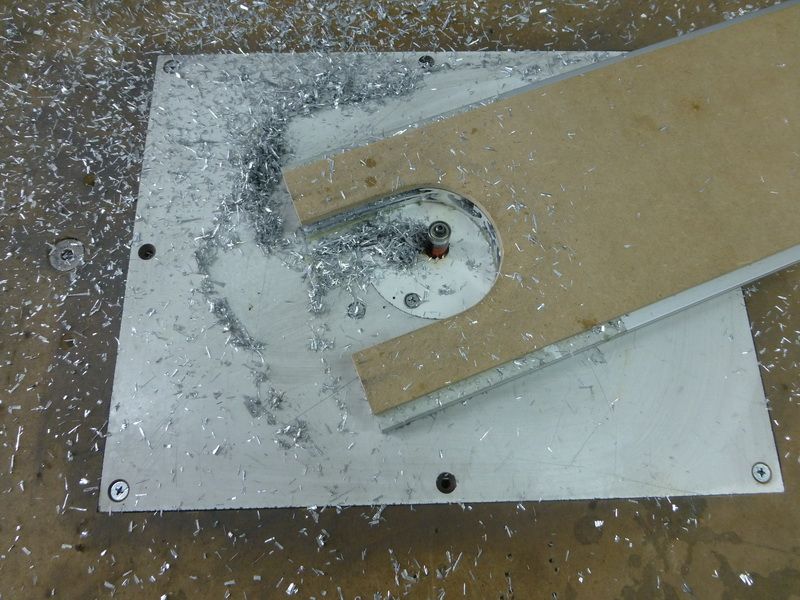
Just a few more little things, and my sawing table is almost done. For the moment I'm waiting on a new cutter/mill
The long narrow table is ready for use The purpose of this table is to put on my drill press, grinder and mill.
What I also wanted is that I could move these devices to where I wanted without them being loose on the table, so it's more easy to fall off.
When I ordered the aluminium I saw they sell Teflon gliders as well, so I bought some.
Of course, this didn't fit in the profile I needed, don't ask me why. The benefit was the fit was too small, and I could make this work with the uppermill.
On the left you can see I made the slot bigger.

This was an easy task, but you have to do it in a safe way
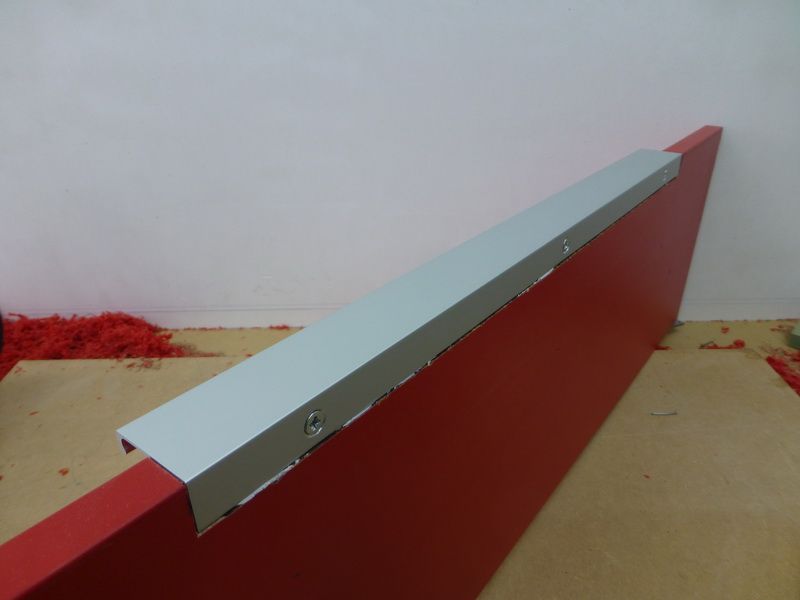
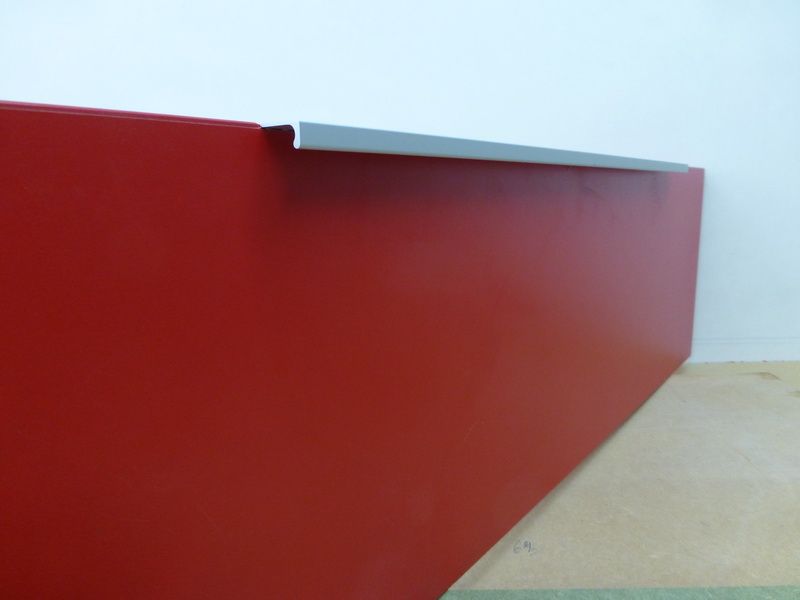
I mounted the teflon plate on a piece of aluminium.
So I could keep it all under control. The 2 large sunken holes you see, I made to fit my fingers, this way I have the most grip.
Here's the result
Then I cut slabs of solid core (volkern) where the units will be mounted.
I also tuned the drill a bit...
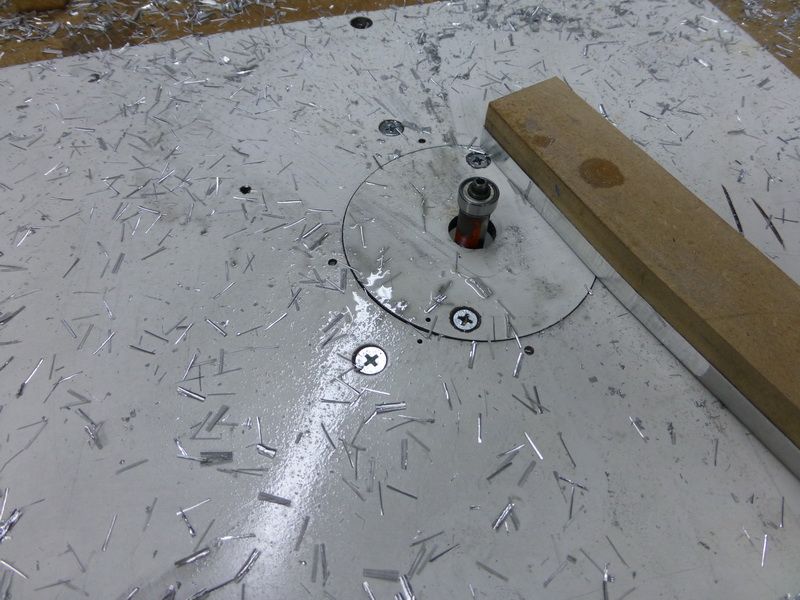
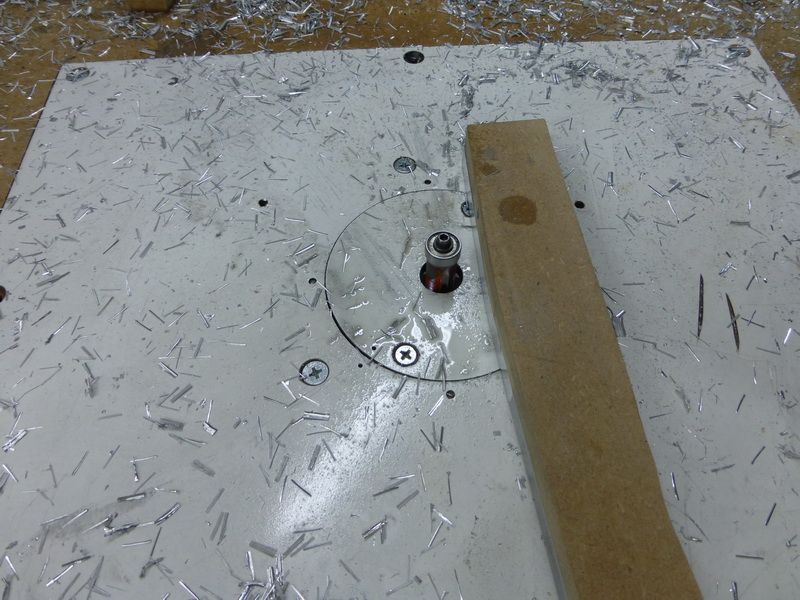
I wanted a big plate where I could clamp things on.
First I made a mold of MDF in the shape that I needed, and after that I had to mill everything with the copy-mill, simple.

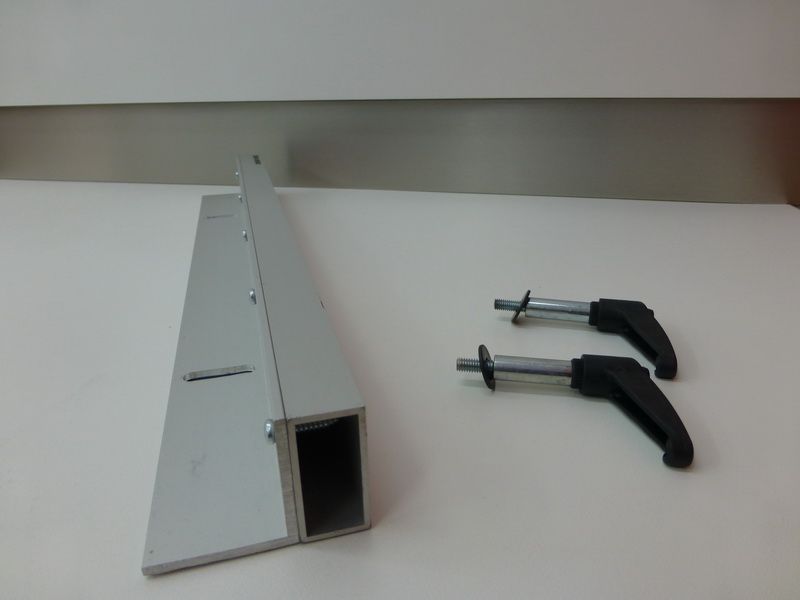
In the background you can see the volkern plateb where the aluminum comes will come to rise.
The black screw is to secure the plate onto the drill.
Here you can also see that, wherever I want, I can put threaded busses i, to mount things. Very handy if you ask me..
In the center there will rest a piece of 16 mm MDF...This I made pretty big (9cm), so I wouldn't drill into my aluminium. Once the block is wore out, I'll put in a new one. I made myself some stock ***61514;
Because I only wanted 1 screw to tighten the plate, I made this at the bottomside.
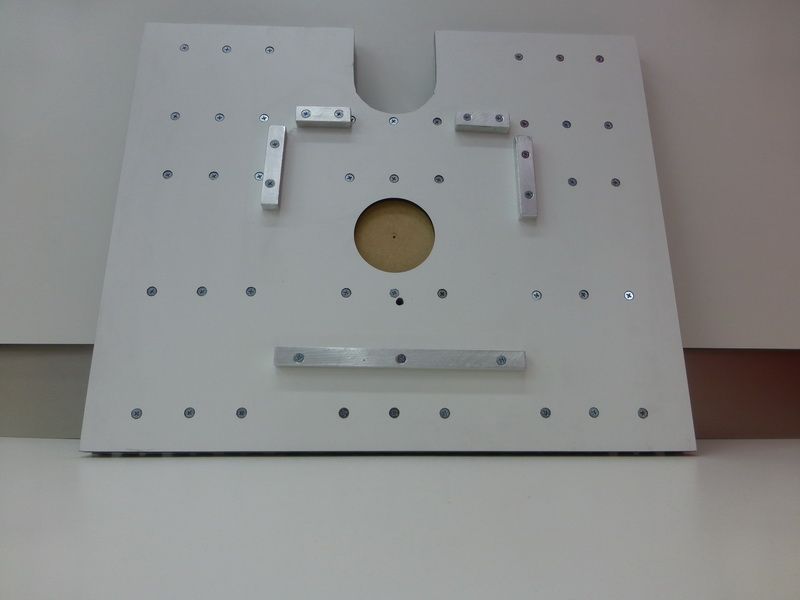
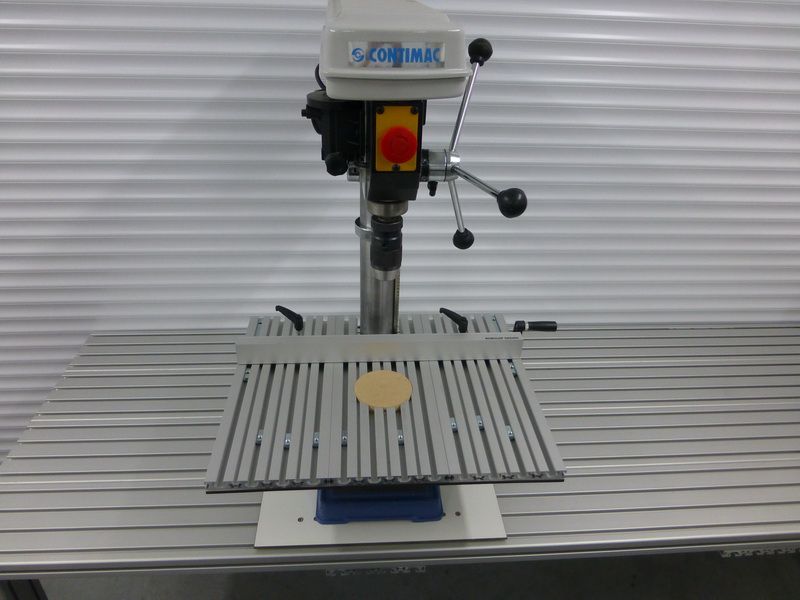
This fits perfectly onto the drillingtable.
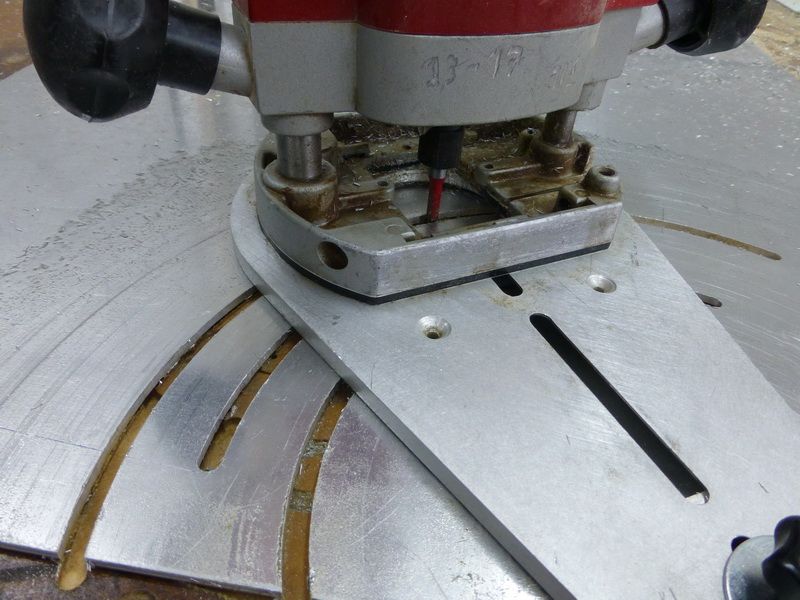
Since I now have a greater table on my drill, I couldn't operate the handle to lift or descend the table, anymore.
This came against my aluminium plate of course.
I was able to extend it with a piece of aluminium I had lying around here...
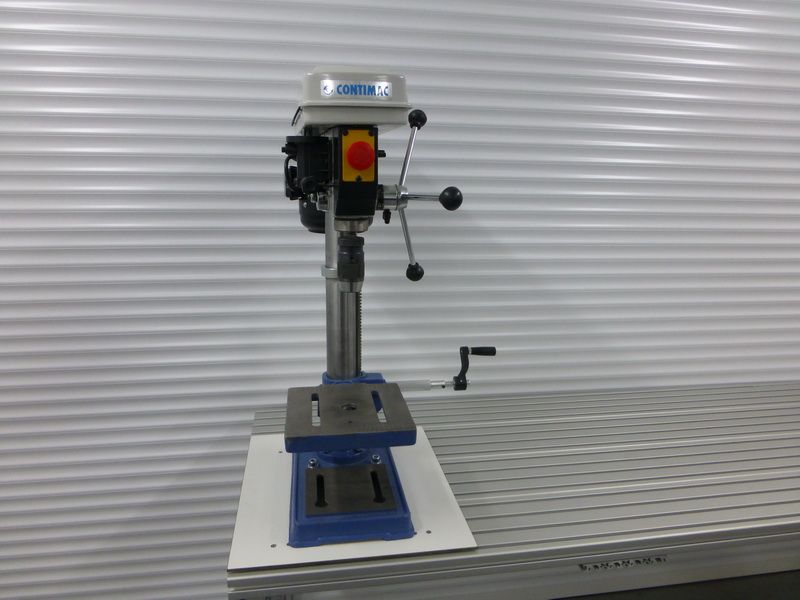
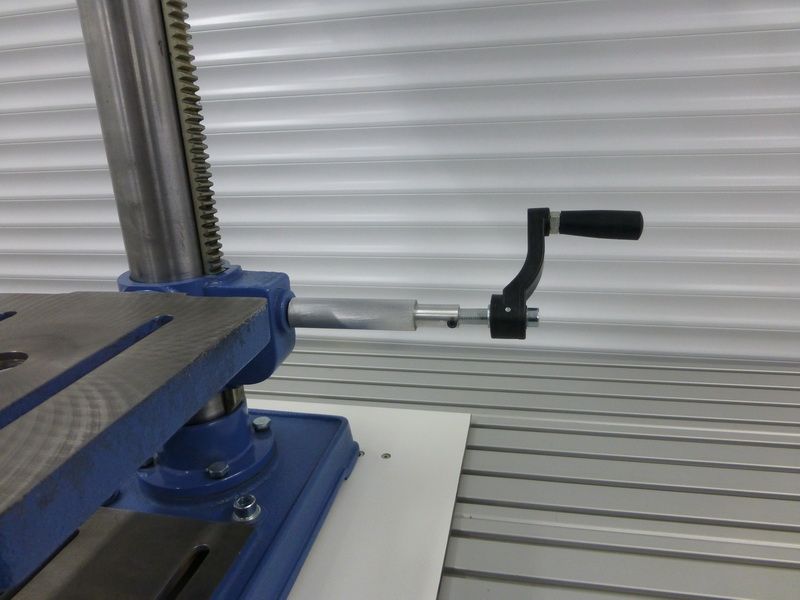
Note the black screw at the bottom.
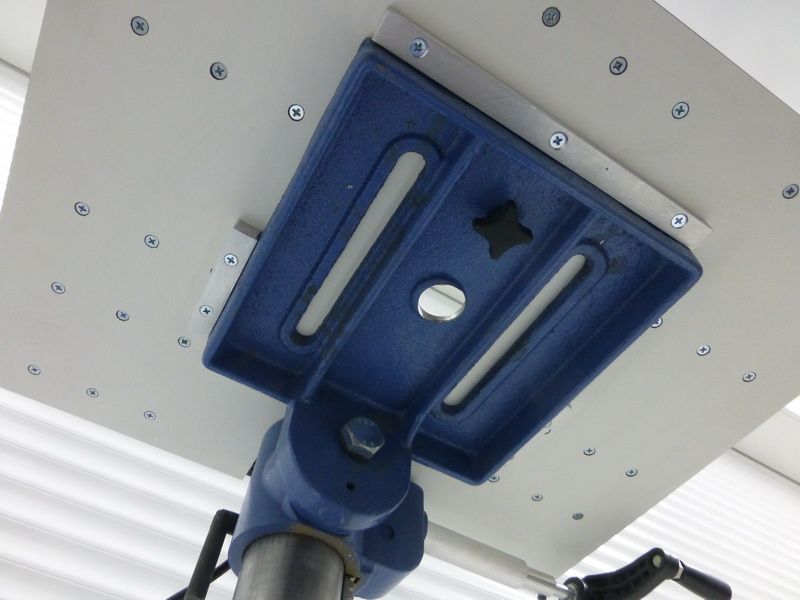
Here you can see the massive slab where the drill is on.
I also made a glider to put on the aluminum plate. Here I can do anything I want with it

I can also so tighten my drill-clamp where I want.
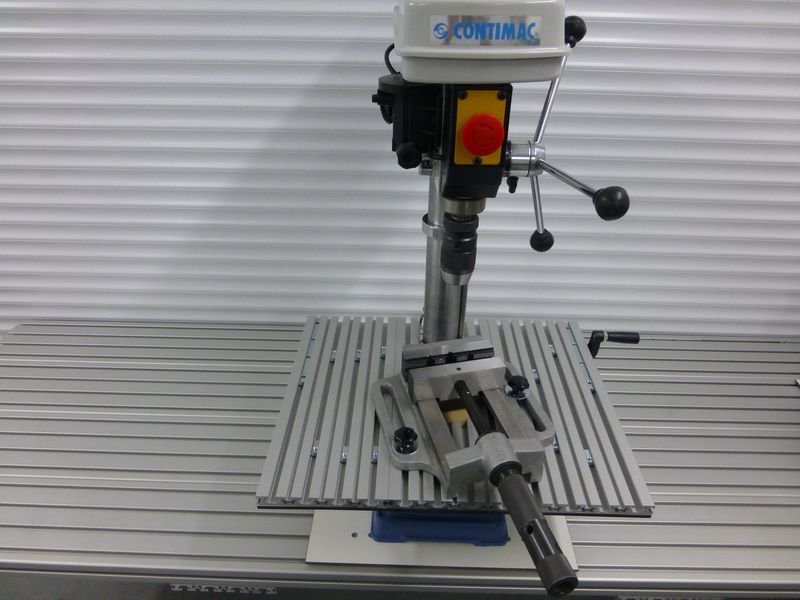
Here you can see what I mean with 'relocating the devices
The next step is too make a "cutting-board", I'm looking forward to it.
The long narrow table is ready for use The purpose of this table is to put on my drill press, grinder and mill.
What I also wanted is that I could move these devices to where I wanted without them being loose on the table, so it's more easy to fall off.
When I ordered the aluminium I saw they sell Teflon gliders as well, so I bought some.
Of course, this didn't fit in the profile I needed, don't ask me why. The benefit was the fit was too small, and I could make this work with the uppermill.
On the left you can see I made the slot bigger.
This was an easy task, but you have to do it in a safe way
I mounted the teflon plate on a piece of aluminium.
So I could keep it all under control. The 2 large sunken holes you see, I made to fit my fingers, this way I have the most grip.
Here's the result
Then I cut slabs of solid core (volkern) where the units will be mounted.
I also tuned the drill a bit...
I wanted a big plate where I could clamp things on.
First I made a mold of MDF in the shape that I needed, and after that I had to mill everything with the copy-mill, simple.
In the background you can see the volkern plateb where the aluminum comes will come to rise.
The black screw is to secure the plate onto the drill.
Here you can also see that, wherever I want, I can put threaded busses i, to mount things. Very handy if you ask me..
In the center there will rest a piece of 16 mm MDF...This I made pretty big (9cm), so I wouldn't drill into my aluminium. Once the block is wore out, I'll put in a new one. I made myself some stock ***61514;
Because I only wanted 1 screw to tighten the plate, I made this at the bottomside.
This fits perfectly onto the drillingtable.
Since I now have a greater table on my drill, I couldn't operate the handle to lift or descend the table, anymore.
This came against my aluminium plate of course.
I was able to extend it with a piece of aluminium I had lying around here...
Note the black screw at the bottom.
Here you can see the massive slab where the drill is on.
I also made a glider to put on the aluminum plate. Here I can do anything I want with it
I can also so tighten my drill-clamp where I want.
Here you can see what I mean with 'relocating the devices
The next step is too make a "cutting-board", I'm looking forward to it.
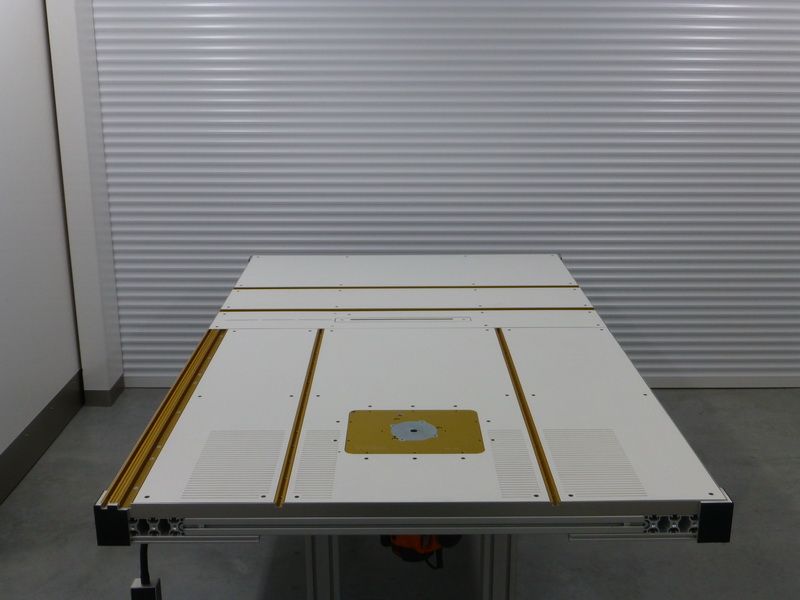
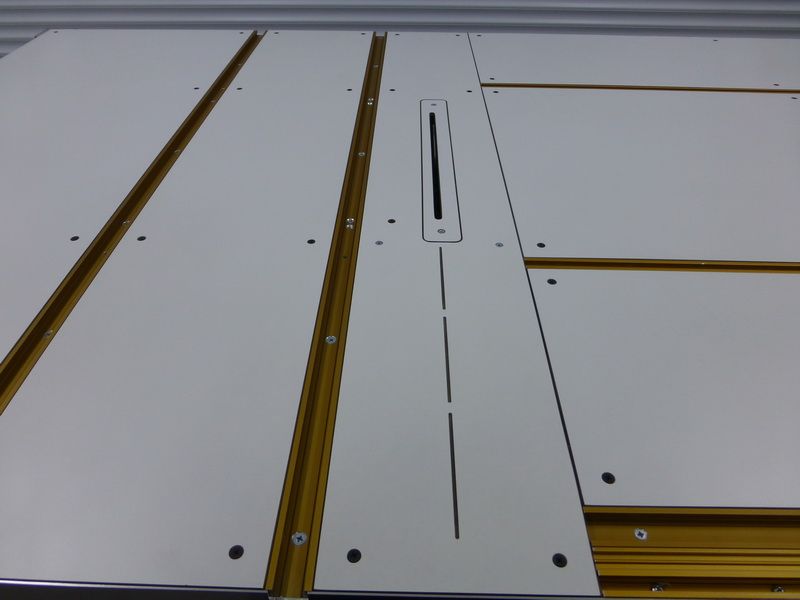
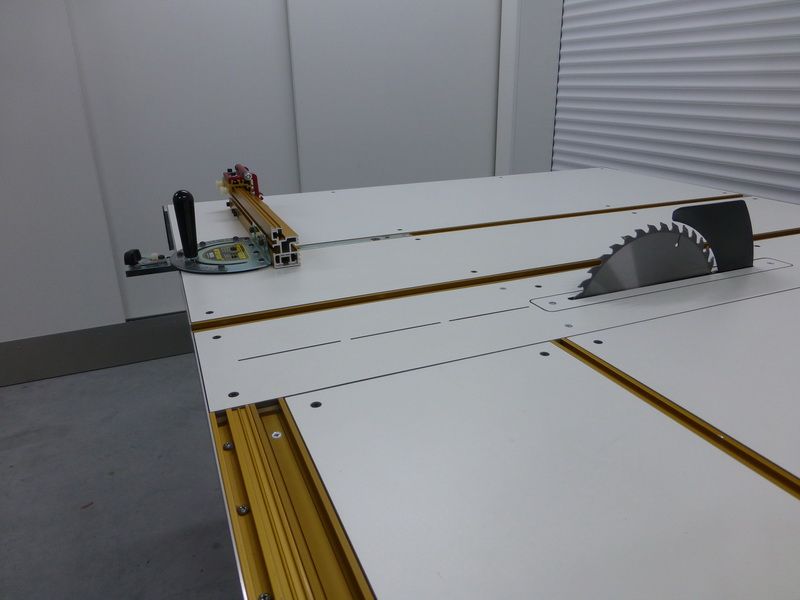
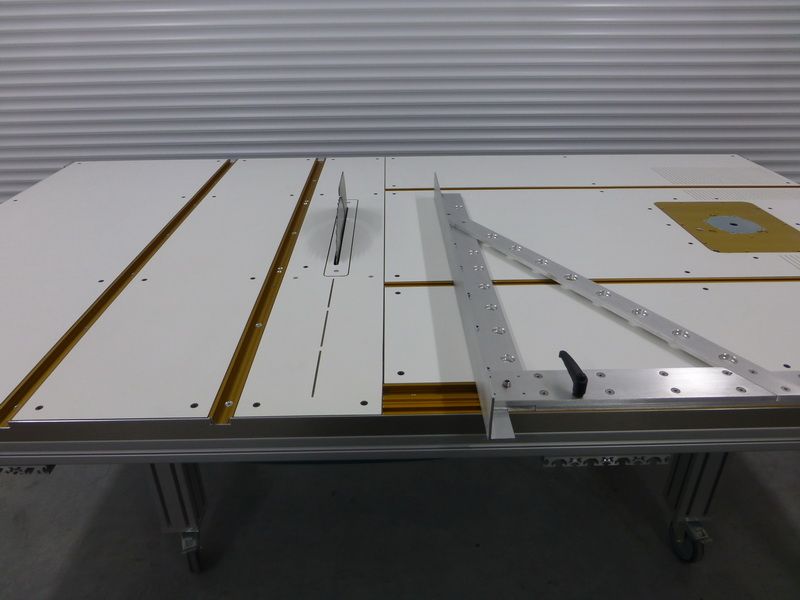
My multifunctional table is finally ready. I knew this wasn't an easy task, since I had no experience with this what so ever.
This is how it turned out.
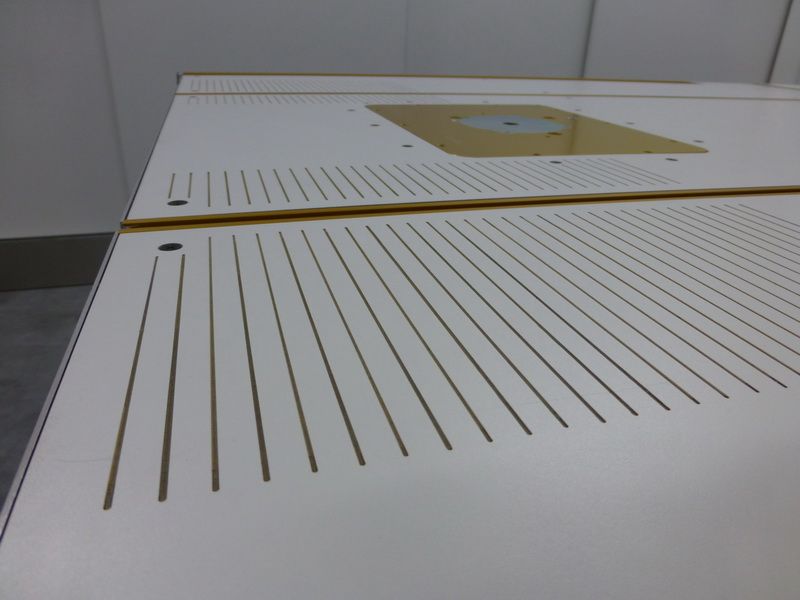
The milling-part
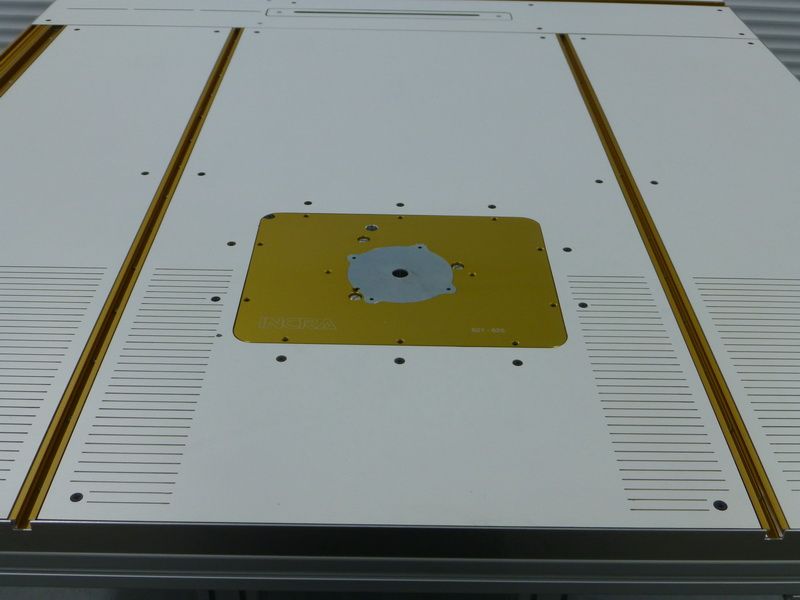
I also added a glider here.

The lines you see, are 1cm apart from each other, and the depth is cause of the white layer of volkern.
A looooooooooooot of work went into this.
In the T-Track you can also glide in some clamps.
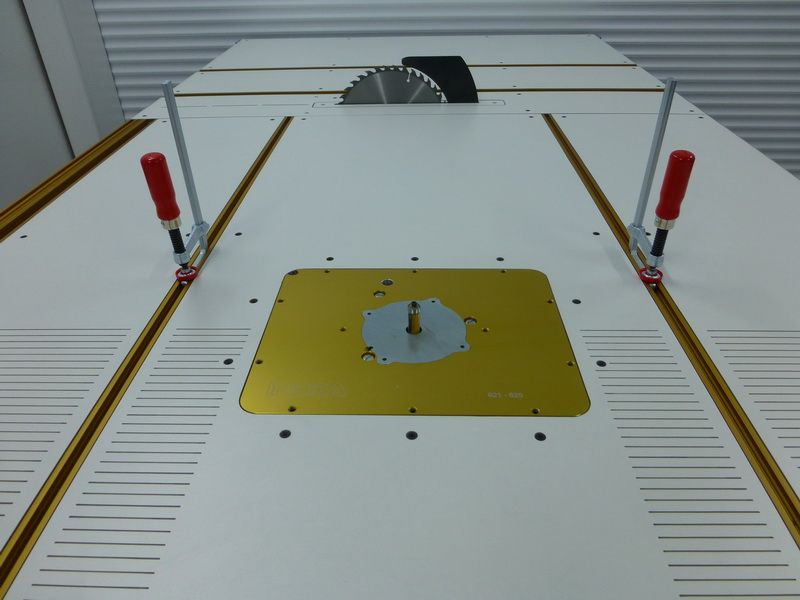
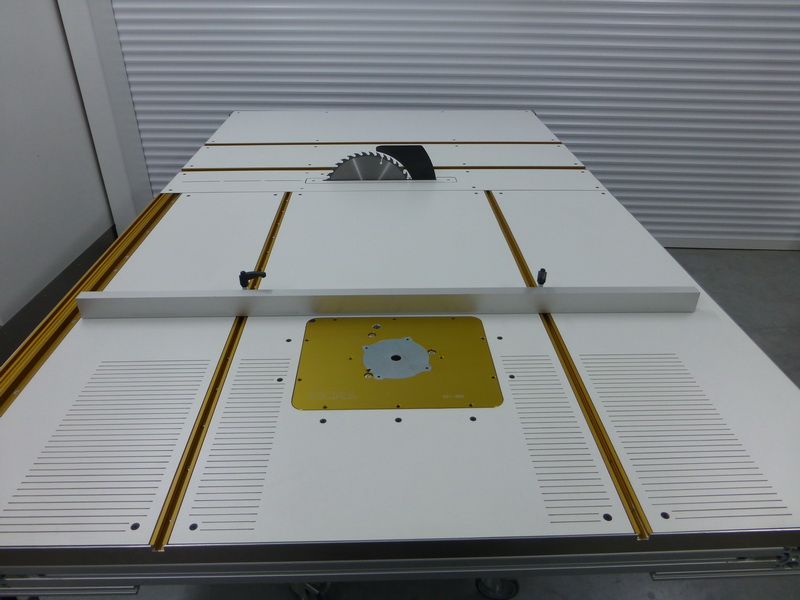
The sawing part.
I kept the space between the sawing blade, and the volkern as minimal as possible.
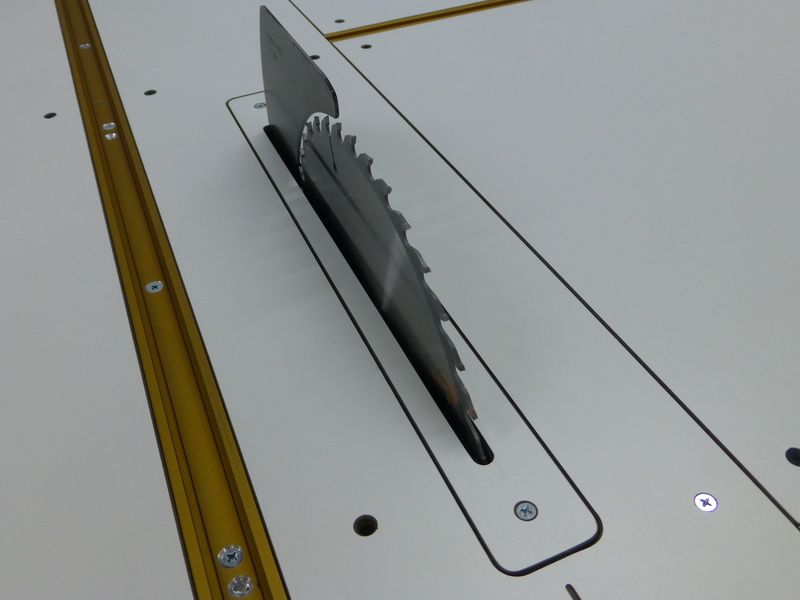
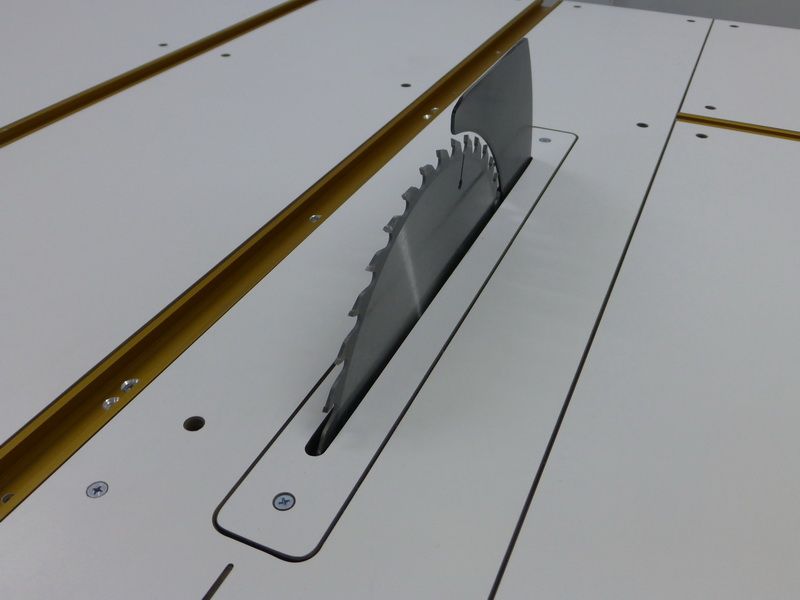
When I need to set the saw into a corner, I just need to remove the tiny plat around the blade. But I'm guessing this won't happen very often.

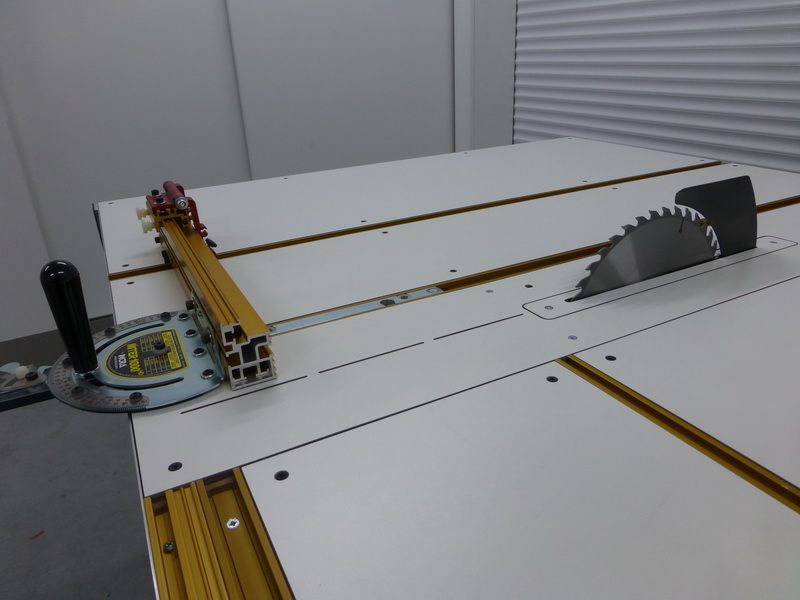
Here with the setting I made myself, and it worked perfectly.
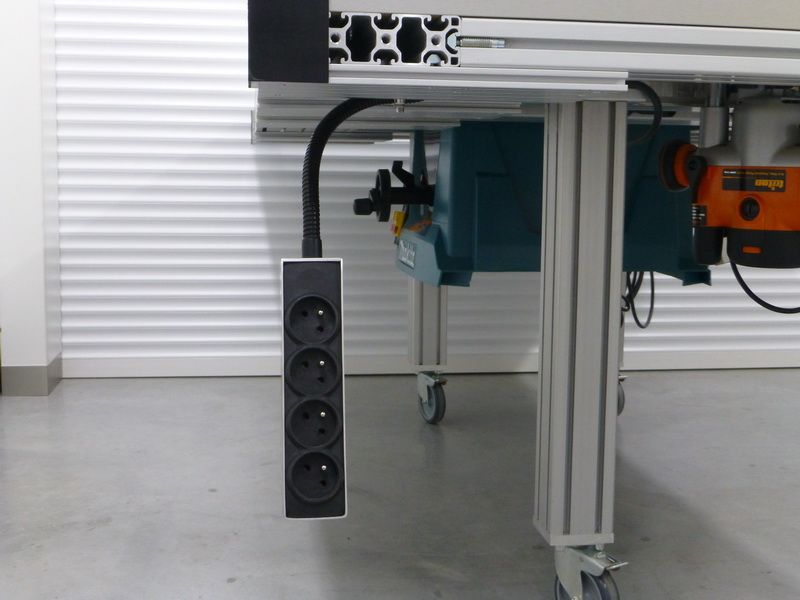
Since the legs of the table are not on the ends, I had some problem mounting my sockets.
But I've managed to solve this in a descent way (for me)
I've mounted everything on an iron flexible tube, and so I can put the outlets where and how I want.
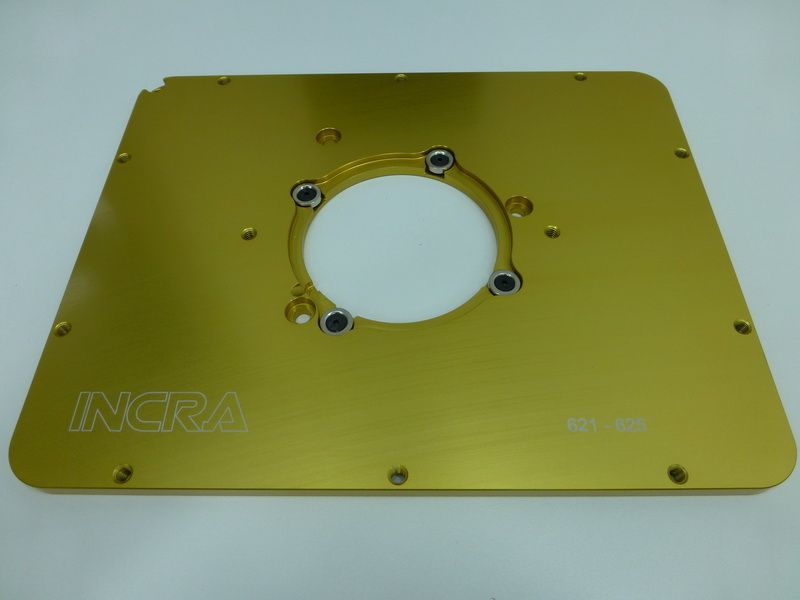
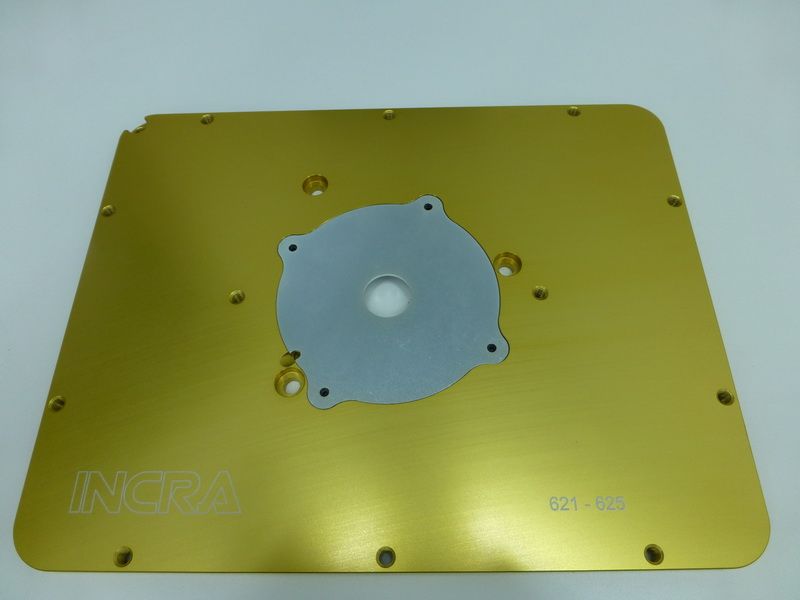
Here you see that the INCRA millingplate is on aluminum brackets.

The cutter I recently purchased.
This is a Triton 2400 watts.
I bought this specifically because I thought it could handle this easy from above.
This also doesn't come out under the table anymore too.
This table was one of the hardest things I've made in my new workshop.
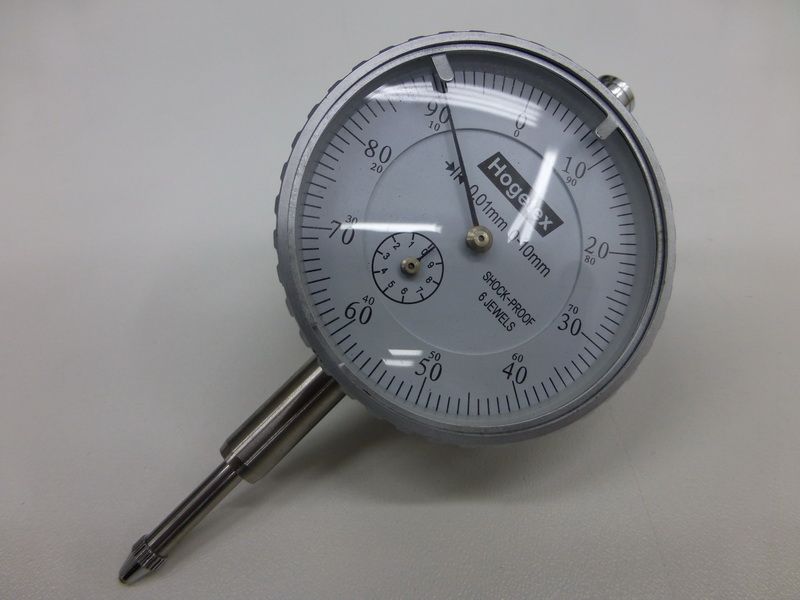
Finally, it all needed to be 100% correct (and it is). The micrometer has served well, and without this little device you're nowhere.
What rests now is to buy a rubber mat of 4mm thick to put on the table. It is after all a work table after all.
Now I just need to make some little stuff here and there's, and also need to do some painting. Once this is done I will post pictures of everything.
This is how it turned out.
The milling-part
I also added a glider here.
The lines you see, are 1cm apart from each other, and the depth is cause of the white layer of volkern.
A looooooooooooot of work went into this.
In the T-Track you can also glide in some clamps.
The sawing part.
I kept the space between the sawing blade, and the volkern as minimal as possible.
When I need to set the saw into a corner, I just need to remove the tiny plat around the blade. But I'm guessing this won't happen very often.
Here with the setting I made myself, and it worked perfectly.
Since the legs of the table are not on the ends, I had some problem mounting my sockets.
But I've managed to solve this in a descent way (for me)
I've mounted everything on an iron flexible tube, and so I can put the outlets where and how I want.
Here you see that the INCRA millingplate is on aluminum brackets.
The cutter I recently purchased.
This is a Triton 2400 watts.
I bought this specifically because I thought it could handle this easy from above.
This also doesn't come out under the table anymore too.
This table was one of the hardest things I've made in my new workshop.
Finally, it all needed to be 100% correct (and it is). The micrometer has served well, and without this little device you're nowhere.
What rests now is to buy a rubber mat of 4mm thick to put on the table. It is after all a work table after all.
Now I just need to make some little stuff here and there's, and also need to do some painting. Once this is done I will post pictures of everything.
Everything has an end...
11 months after the build of my new garage has started, it's finally finished.
I'm extremely proud and satisfied with the result, and I'm looking forward to spend the most of my time in it.
Here are some pictures of how it turned out.
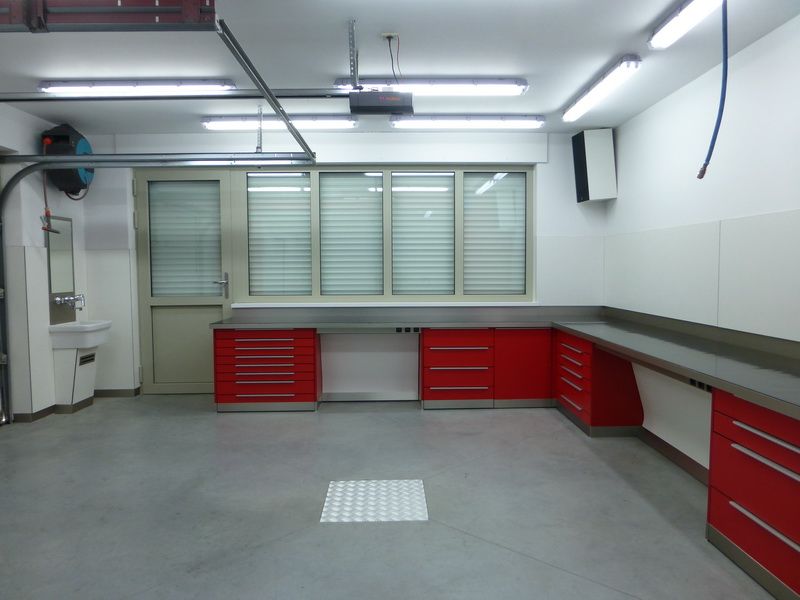
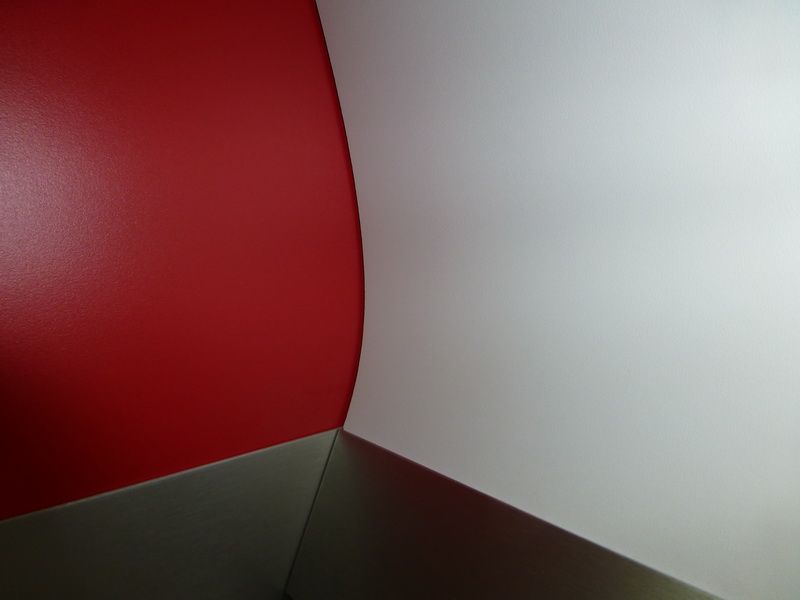
The red color, is just taste. IMO, when I would have used white, it would be too much "kitchen of hospital" sphere in there.
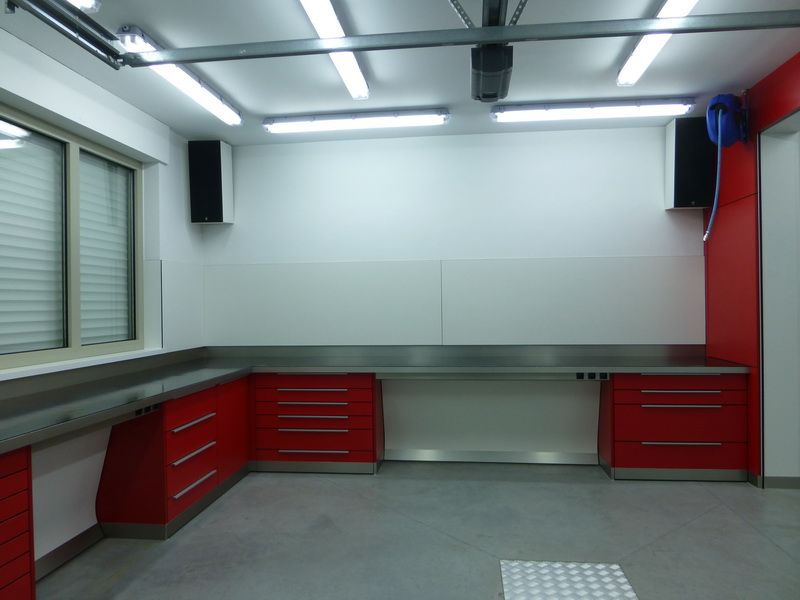
Here you can see that the rolling shutter that seperates the garage from the workshop is pulled down.
I'm really happy I did this.
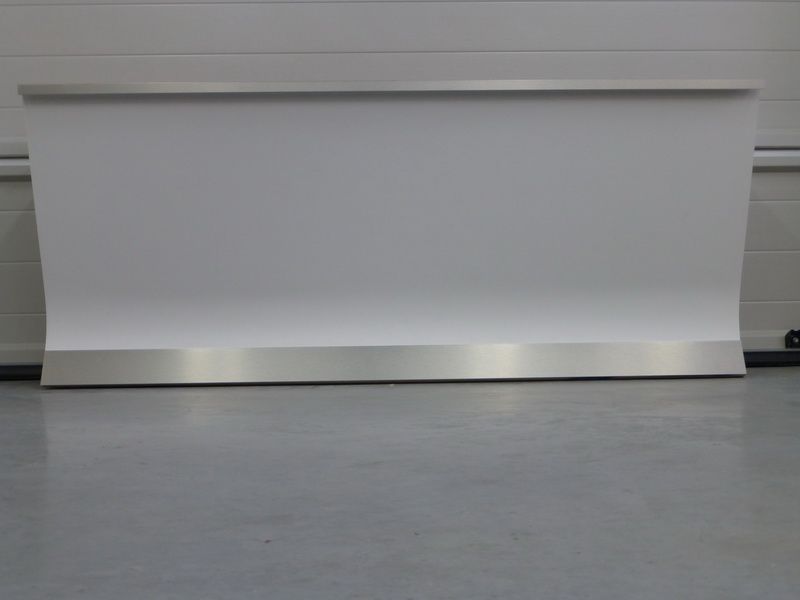
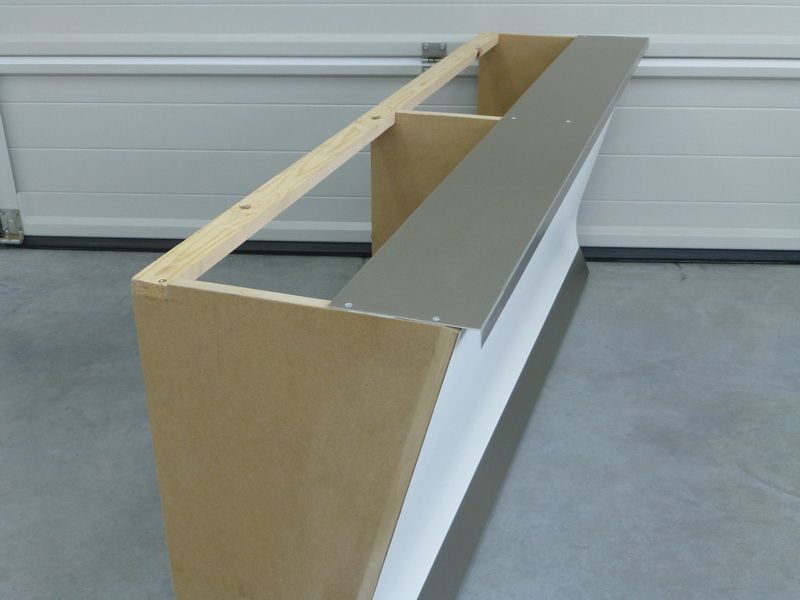
Because I wanted to use every inch of the place, I also made a small closet to put away some stuff.
The shutter is completely inserted into the room. The gliders aren't visible. And when it's up, you can only see a little slit in which it moves.

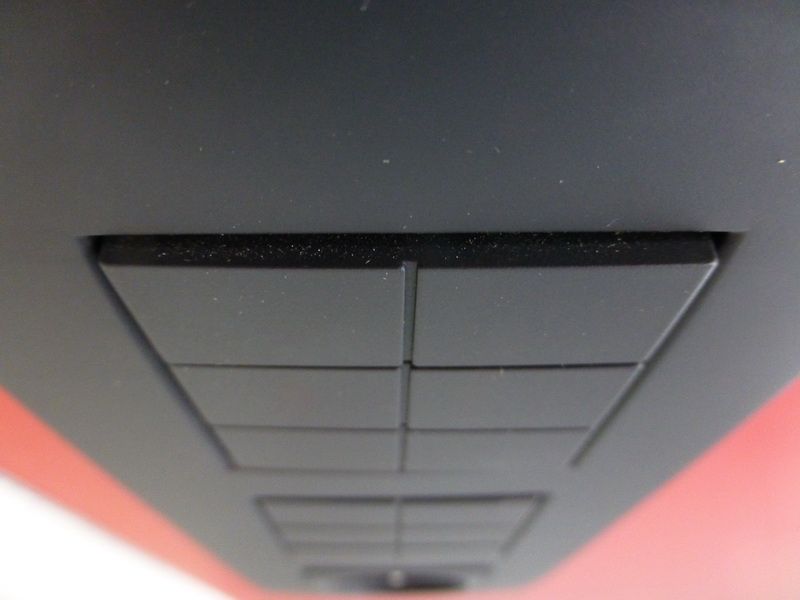
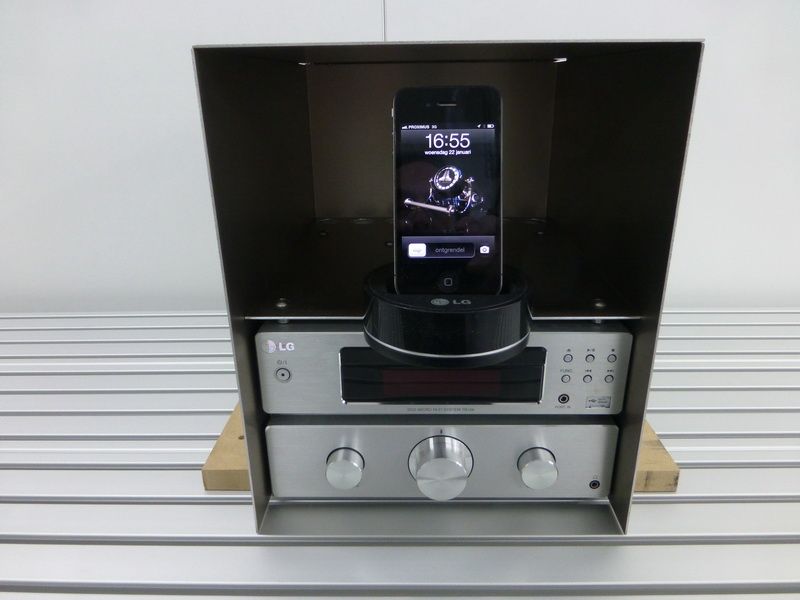
I managed to blend in the stereo on the front of the rollcloset.
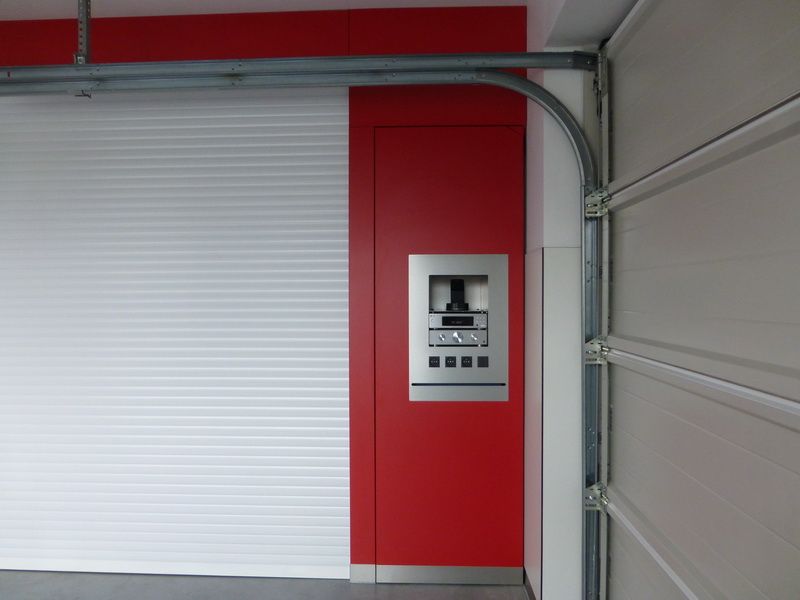
I added 3 sockets, and the remote of the closet.
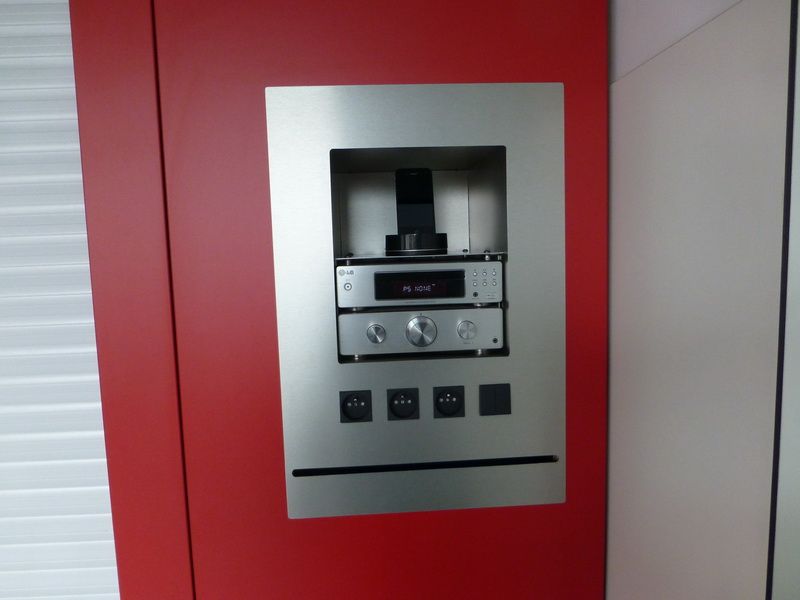
The long ditch underneath the sockets is there for a purpose as well.
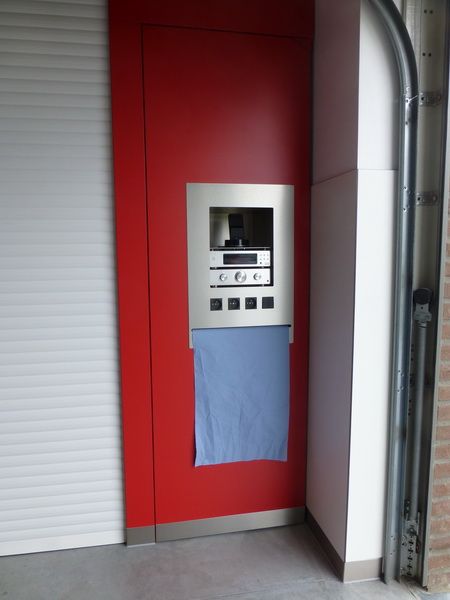
You don't want to now how much milling, grinding, sanding hours I've put into the front plate alone...
But it's the result that matters, so time is not important.
More pictures with explanation coming soon.
11 months after the build of my new garage has started, it's finally finished.
I'm extremely proud and satisfied with the result, and I'm looking forward to spend the most of my time in it.
Here are some pictures of how it turned out.
The red color, is just taste. IMO, when I would have used white, it would be too much "kitchen of hospital" sphere in there.
Here you can see that the rolling shutter that seperates the garage from the workshop is pulled down.
I'm really happy I did this.
Because I wanted to use every inch of the place, I also made a small closet to put away some stuff.
The shutter is completely inserted into the room. The gliders aren't visible. And when it's up, you can only see a little slit in which it moves.
I managed to blend in the stereo on the front of the rollcloset.
I added 3 sockets, and the remote of the closet.
The long ditch underneath the sockets is there for a purpose as well.
You don't want to now how much milling, grinding, sanding hours I've put into the front plate alone...
But it's the result that matters, so time is not important.
More pictures with explanation coming soon.
Notgrownup
Well-known member
That is some nice ....congrats..
Sunbimmer
Well-known member
Hot dayum...this is something else, perfection on the highest level