To avoid these ads, REGISTER NOW!

A large but simple workbench

Deude_Mann

Well-known member
Joined
Feb 7, 2020
Messages
113
Location
Laredo, TX
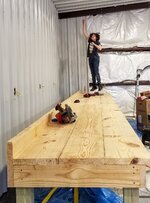
So I am finishing the interior work on a shop build and one of the essential ingredients is of course a work bench. This build is the result of considering several options, ending with a very large bench (19' x 3') that will have a set of Whelan shelves placed on top of it for storage over the work area. As a result, this bench was built to be beefy since it will need to support hundreds of lbs if not over a thousand lbs by the time the shelves are loaded with stuff. It is a free-standing bench but will be placed against a wall (the one on the left in the images below).

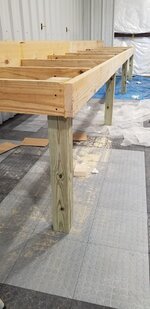
The construction material is all standard southern yellow pine dimensional lumber from the local hardware store. The perimeter frame is 2x6 boards on three sides and 2x12 on the back side. The cross braces (front to back) are 2x6, and the work surface is 2x12. The legs are pressure treated 4x4; pressure treated is not really necessary since this is an indoor bench, but none of the local stores had plain 4x4 lumber so I grabbed pressure treated. The total weight of the lumber, of which very little was left over as cut offs, is about 650 lbs. by my estimate. All joints are glued with Titebond II wood glue and screwed together with 3"x9 Grip-Rite exterior construction screws.

The finish is Watco Danish Oil in black walnut. I really like the rustic look of the finish and it will be easy to touch up later on as required. Just rub in a little more Danish Oil on a scratch or gouge and let it dry. The look will also help hide battle scars which will happen since this bench will be used for whatever: automotive work, ammo loading, beating on stuff with hammers, spilled fluids... It's going to have a hard life if my previous benches are any indication. I will be adding hardboard panels in some areas to toughen it up some more.

The series of photos shown here tells the tale of the construction for the most part but if anyone has any questions, please ask.
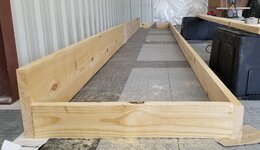
1 - frame.jpg2 - cross braces.jpg3 - legs.jpg4 - legs.jpg5 - work surface.jpg6 - sanded.jpg7 - finish.jpg8 - finish.jpg9 - finish.jpg
 
Last edited:
To avoid these ads, REGISTER NOW!
OP
D

Deude_Mann

Well-known member
Joined
Feb 7, 2020
Messages
113
Location
Laredo, TX
Some more details:
- The design is something I put together in 3D CAD, specifically Fusion 360.
- This was all done with basic woodworking tools. I used a tape measure, a speed square, and a pencil to make the measurements and cut marks. I also checked a few things with a level.
- The only power tools involved were a circular saw for the wood cuts, a drill to drive screws, a 6" orbital sander, and a palm sander.
- The Danish Oil was applied with a brush, and wiped off with an old t-shirt.
- The screws on the work surface were sunk below the surface and then filled with wood glue mixed with sawdust from the sanding. The fill was left to dry overnight and then sanded flush.
- I used 60 grit on the orbital sander to do the heavy sanding, and then finished with 120 grit. All of the edges and corners were rounded off with the sanders (no routing). I have a router and round-off bits but in keeping with the rustic look I elected to do it with the sanders instead.
- For scale, the distance from the red oxide beam on the left, to the back wall, is 20 feet. The bench is a little over 19 feet long. This is the largest one I have built so far.
- I usually use plywood for the work surface but plywood prices being what they are it was the same cost to use the 2x12 lumber for the surface, and of course it is heaver and stiffer than 3/4" plywood.
- To get the 19' length boards I bought 10' boards and then joined them with 45 deg 'scarf' joints. The scarf creates overlap and looks nicer than a **** joint IMO. A scarf is also stronger than a **** joint all else being equal.
 
Last edited:
OP
D

Deude_Mann

Well-known member
Joined
Feb 7, 2020
Messages
113
Location
Laredo, TX
Yes I will definitely be adding a vise. I'll either move over an existing one or get another one.

I usually use the area under my workbenches for floor level storage. However I already have a design for some large pull-out drawers I may add. The only thing stopping me are the current lumber prices; this bench has about $425 of lumber in it already which is insane.
 
Last edited:
OP
D

Deude_Mann

Well-known member
Joined
Feb 7, 2020
Messages
113
Location
Laredo, TX
Thanks, that is the idea. This is all about being a functional bench, and not a showcase piece; I can do it well enough, but woodworking is not my forte.
 
To avoid these ads, REGISTER NOW!

MongoTA

Well-known member
Joined
Mar 10, 2018
Messages
1,017
Location
CT
Nice!

May I offer a friendly idea without offending?

With the potential to hold well over a half-ton of dead-weight plus the loads of any live work, I'd consider notching the tops of the legs so the 2x6 apron is bearing on the post instead of only relying on the shear strength of the screws that hold the 2x6 to the posts. See the attached drawing. Even if you just let it in 3/4" to 1" instead of the full thickness of the 2-by apron, that'd be a big help with load transference.

With the bench in place you could remove one leg, modify it, replace it, and move on to the next leg.

With the legs being PT, the coated deck screws should play well with the PT lumber.

That bench will serve you well over the years. Congrats!
workbenchleg.jpg
 
OP
D

Deude_Mann

Well-known member
Joined
Feb 7, 2020
Messages
113
Location
Laredo, TX
No offense taken. That's a nice idea.
The legs are also glued to the 2x6 with Titebond II over the whole mating surface so the shear strength is considerable. Also the top of the legs are touching the undersides of the working surface 2x12 boards so in that area the load is transferred directly to the ground.
All that being said, I am planning on adding some through-bolted heavy carriage bolts to attach the legs to the front and rear frame boards as a backup. I'll do this before the shelves go on.
 
Last edited:

snickers muncher

Well-known member
Joined
Feb 19, 2018
Messages
944
Location
Northeast GA
The only thing I'd do differently is instead of using 4x4 posts for legs I would have laminated three 2x4 or 2x6 for the legs. The front lamination would be shorter so that the horizonal 2x6 would rest on it and transfer any force directly to the ground instead of stressing the joint.
 
OP
D

Deude_Mann

Well-known member
Joined
Feb 7, 2020
Messages
113
Location
Laredo, TX
Also a good idea. I considered laminating some 2x4 when I could not find plain 4x4 but did not want the look of the lamination on the legs.

That being said, it would still be possible with some very careful cuts to laminate some 2x4 to the existing 4x4 to create that transfer. But I think I'll just go with the aforementioned carriage bolts.
 
OP
D

Deude_Mann

Well-known member
Joined
Feb 7, 2020
Messages
113
Location
Laredo, TX
And here it is, in place with the shelves on top. The standard size paper towel roll is included for scale. The shelves are the Whelen industrial shelves sold at Costco; note this is two shelf units.
 

Attachments

  • Finished workbench.jpg
    Finished workbench.jpg
    196.2 KB · Views: 113
To avoid these ads, REGISTER NOW!
Top Bottom