To avoid these ads, REGISTER NOW!

A Masonry Estimator's Workshop

High Desert

Active member
Joined
Sep 17, 2012
Messages
43
Location
Rio Rancho, NM
Well,

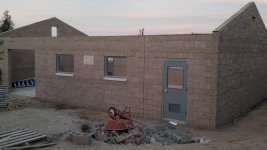
I was a masonry estimator for over four years before moving on, but have dreamed of my own workshop for over 20 years. Last year, I finally had saved enough to get started. Here is a picture of the current work-in-progress.
Wish I had found this forum during my planning stages, but I had been planning for a long time. I had already built this entire thing, block-by-block in sketchup, so it is nice to see it finally come together!
 

Attachments

  • 2012-09-17_06-49-55_181.jpg
    2012-09-17_06-49-55_181.jpg
    147 KB · Views: 707
To avoid these ads, REGISTER NOW!

NUTTSGT

Super Moderator
Staff member
Joined
Sep 14, 2009
Messages
50,891
Location
Northern Central Ohio
You have some serious A/C going on there. Welcome to GJ, keep up the build of your workshop.


Where abouts in the high desert are you ?
 

davo727

Well-known member
Joined
Jun 17, 2012
Messages
1,660
Nice! The sidewalls have control joints to prevent cracking? Can you explain spacing of joints and do the end walls also have any? Thanks, Dave
 
OP
H

High Desert

Active member
Joined
Sep 17, 2012
Messages
43
Location
Rio Rancho, NM
Thanks for the welcome! The AC issue should be solved soon. Windows show up this week, and expect framing around the end of next week. (Won't install windows until the very end though).

We live near Albuquerque.
 
OP
H

High Desert

Active member
Joined
Sep 17, 2012
Messages
43
Location
Rio Rancho, NM
The control joints do control cracks, and they are normally spaced around 20' apart, but I have seen some at 25'4". They also serve as re-set points for the masons, basically helping to ensure that window and door openings end up where you want them. Interior dimensions of the shop are 30' x 44'. Because of the locations of the windows and doors in the front wall, I have two. The back wall has one, and each of the end walls has one. The short end walls are a mirror of each-other.
 
OP
H

High Desert

Active member
Joined
Sep 17, 2012
Messages
43
Location
Rio Rancho, NM
LutzTD,

Your shop is pretty sweet! I would have traded size for looks, but had to design within the ordinance limits set by the local building department. (No more than 1/2 sf of main dwelling, not taller than main dwelling, and of similar appearance).
 

joes169

Well-known member
Joined
Sep 19, 2011
Messages
663
Location
WI
As a masonry contractor, I have to say, very nice!!!!:beer:

My shop is completely CMU as well, but I stopped at the gables, I give you credit for doing it the "hard way".........

I've spent far more time messing with different materials to get just the right look I wanted that I should have just carried the block up the gables in hind-sight. Nice to see hollow metal doors & frames as well, very stout decision........
 

brownbagg

Well-known member
Joined
Mar 20, 2006
Messages
5,208
the control joint are not needed on a bldg that small, your drive through door is too little, you should of went with a weld plate instead of wood, so you could have metal trusses and metal roof
 
OP
H

High Desert

Active member
Joined
Sep 17, 2012
Messages
43
Location
Rio Rancho, NM
the control joint are not needed on a bldg that small, your drive through door is too little, you should of went with a weld plate instead of wood, so you could have metal trusses and metal roof

Since I didn't want to use joint reinforcing wire every 16", the control joints are what my structural engineer specified to keep cracking under control. The door is 8x8. I considered making it wider, but that would have required a deeper lintel. Because of the building total height restriction and roof pitch requirement from the city, I did not have the option of increasing bearing height in that area. There were other options I could have pursued like powers steel lintels or a masonry-soaped I-beam to widen the door, but decided that 8' is fine. The workshop is mostly to be used for woodworking and metalworking. I won't be driving a car in and out daily.
I chose to use a wood still plate and trusses because I am performing much of the work myself and am familiar with that type of building material. The building code does not allow me to use metal roofing because it doesn't match the house.
I already considered all those options though. Thanks for the feedback!
 
Last edited:
OP
H

High Desert

Active member
Joined
Sep 17, 2012
Messages
43
Location
Rio Rancho, NM
Looks good to me. What does the stone between the windows say?

Thanks Pete! The stone says "DuLac 2012". It is an homage to my great-grandpa who built a movie-house in the early 1900s in a small town in KS. That movie house has a similar stone medallion with his name and year of construction. My grandfather and father both worked there as children. I went through much effort to source the limestone for that medallion and the four window sills from the same quarry in that small town.
 

NUTTSGT

Super Moderator
Staff member
Joined
Sep 14, 2009
Messages
50,891
Location
Northern Central Ohio
Thanks Pete! The stone says "DuLac 2012". It is an homage to my great-grandpa who built a movie-house in the early 1900s in a small town in KS. That movie house has a similar stone medallion with his name and year of construction. My grandfather and father both worked there as children. I went through much effort to source the limestone for that medallion and the four window sills from the same quarry in that small town.

That sir, is pure awesomeness. :thumbup:
 

NUTTSGT

Super Moderator
Staff member
Joined
Sep 14, 2009
Messages
50,891
Location
Northern Central Ohio
3/4" OSB ? Why such a heavy OSB ? I can't imagine you would get more snow than we do here in Ohio, 1/2" OSB 24" O.C. with clips is a standard practice around here.
 
OP
H

High Desert

Active member
Joined
Sep 17, 2012
Messages
43
Location
Rio Rancho, NM
3/4" OSB ? Why such a heavy OSB ? I can't imagine you would get more snow than we do here in Ohio, 1/2" OSB 24" O.C. with clips is a standard practice around here.

Ha! I doubt our snow-load is higher. Building code requires a "20 psf non-reduceable" snow design when I doubt we ever see 10 psf, but your are correct. I could use 1/2" osb with h-clips, but chose 3/4" t&g osb because I have in mind some future improvements that may add load to the deck. In the grand scheme, it doesn't add much cost considering what I have saved by self-contracting.
 
OP
H

High Desert

Active member
Joined
Sep 17, 2012
Messages
43
Location
Rio Rancho, NM
As a masonry contractor, I have to say, very nice!!!!:beer:

My shop is completely CMU as well, but I stopped at the gables, I give you credit for doing it the "hard way".........

I've spent far more time messing with different materials to get just the right look I wanted that I should have just carried the block up the gables in hind-sight. Nice to see hollow metal doors & frames as well, very stout decision........

Wow! Thanks! That means a lot to me from someone who knows the industry. My architect kept trying to get me to stucco the gabled portions, he then wanted me to use a 4" split-face veneer cavity wall above 10', but I didn't want that. I like the look of coming down 8" from the top, cutting all the block to match the pitch, then laying the top KOBB course to cap it off. My masons let me be "saw man". I was able to dimension each cut block from my sketchup model, then it was as simple as marking and cutting each block. I think there were only nine different shapes to cut total.

The hardest part was getting a grout pump on site for each lift. Nobody wants to rent them because everyone brings them back destroyed, so I had to cut some slightly under-the-table deals.

I have learned a lot of things during this project that would have been nice to know when I was estimating. "I didn't estimate a clogged grout pump", or "I estimated that all the hod-carriers would show up to work". Fun stuff..
 

NUTTSGT

Super Moderator
Staff member
Joined
Sep 14, 2009
Messages
50,891
Location
Northern Central Ohio
Ha! I doubt our snow-load is higher. Building code requires a "20 psf non-reduceable" snow design when I doubt we ever see 10 psf, but your are correct. I could use 1/2" osb with h-clips, but chose 3/4" t&g osb because I have in mind some future improvements that may add load to the deck. In the grand scheme, it doesn't add much cost considering what I have saved by self-contracting.

Pre-planning, smart move to think ahead.
 

LutzTD

Well-known member
Joined
Dec 31, 2011
Messages
3,673
Location
Lutz, Florida
Wow! Thanks! That means a lot to me from someone who knows the industry. My architect kept trying to get me to stucco the gabled portions, he then wanted me to use a 4" split-face veneer cavity wall above 10', but I didn't want that. I like the look of coming down 8" from the top, cutting all the block to match the pitch, then laying the top KOBB course to cap it off. My masons let me be "saw man". I was able to dimension each cut block from my sketchup model, then it was as simple as marking and cutting each block. I think there were only nine different shapes to cut total.

The hardest part was getting a grout pump on site for each lift. Nobody wants to rent them because everyone brings them back destroyed, so I had to cut some slightly under-the-table deals.

I have learned a lot of things during this project that would have been nice to know when I was estimating. "I didn't estimate a clogged grout pump", or "I estimated that all the hod-carriers would show up to work". Fun stuff..


my "masons" laid the block, snapped a chalk line and saw cut the whole thing. there was a little wobble to it having to hold a saw at a 90 and 18 degrees on top of scaffold. yours looks a lot nicer.
 
To avoid these ads, REGISTER NOW!
OP
H

High Desert

Active member
Joined
Sep 17, 2012
Messages
43
Location
Rio Rancho, NM
my "masons" laid the block, snapped a chalk line and saw cut the whole thing. there was a little wobble to it having to hold a saw at a 90 and 18 degrees on top of scaffold. yours looks a lot nicer.

I looked at the photo of yours, it looks pretty straight to me! I had one "mason" working on my shop. Luckily he only laid about 20 kobbs after the two skilled masons on the crew got called away because of cousins/nephews needing bail posted or something. After he left, I climbed the scaffolding to inspect and saw his mess. Before the mortar hardened, I pulled all 20 off the wall and made them re-do it the next time. No wonder that guy had been shoveling mud most of the time.

It looks like you have an 8' wide door on your shop. Ever had issues with it being too narrow?
 

Angelfire

Well-known member
Joined
Mar 22, 2012
Messages
1,367
Location
New Mexico and Ireland
Looking good and you've obviously put a lot of thought into it. I didn't realize Rio Rancho was so tight on their "aesthetic" requirements. I'm just a stone's throw away in Corrales and could have built anything I wanted (metal building, etc...) without too much commotion. I chose to match the house as well so it's framed/flat roof/stucco and came out pretty well I think. If worst comes to worst, I can always convert it to a casita! I too am acting as the general on it (and an addition to the house). Most of the inspectors have been great (we share elect/mech/plbg with Rio Rancho) but one of them..... :)
Cheers.
 
OP
H

High Desert

Active member
Joined
Sep 17, 2012
Messages
43
Location
Rio Rancho, NM
Looking good and you've obviously put a lot of thought into it. I didn't realize Rio Rancho was so tight on their "aesthetic" requirements. I'm just a stone's throw away in Corrales and could have built anything I wanted (metal building, etc...) without too much commotion. I chose to match the house as well so it's framed/flat roof/stucco and came out pretty well I think. If worst comes to worst, I can always convert it to a casita! I too am acting as the general on it (and an addition to the house). Most of the inspectors have been great (we share elect/mech/plbg with Rio Rancho) but one of them..... :)
Cheers.

Thanks! The aesthetic requirements are recent (maybe 2005), and are the result of busybody good intentions and lazy-wording. The governing body's intention was to prevent people from building something like a flaming red metal pole-barn that encompases most of the lot. With most members of the city council being ousted in the last election, I believe that this issue will be looked at and revised. I actually went to a planning and zoning meeting to argue that they are putting arbitrary restrictions on the size of secondary structures. Saying that a secondary structure cannot be larger than half the sf of the main structure is silly. Most of these are long half-acre lots, perfect for large backyard workshops. If you just want a little 1000 sf house, your workshop can't be larger than 500 sf? That leaves a lot of left-over land, that you technically own, but cannot do anything with!

I have met three different inspectors so far. The only one I had issues with was old enough to be retired for 10 years and wore a cowboy hat. He told me that I had to tie all of the vertical rebar to the horizontal rebar, even though I had significant laps and used positioners. Guess who spent the next day tieing rebar together?

Anyway, glad to hear someone else from the area building a shop! Did you put pictures on this forum?
 

Angelfire

Well-known member
Joined
Mar 22, 2012
Messages
1,367
Location
New Mexico and Ireland
Fortunately, my building inspector, from Corrales has been great. Strict but willing to help. I've actually had a few other inspectors tell me they will outright refuse to permit work for homeowner's even though it's the law. They just don't want to bother with "non-professionals".

Haven't posted any pics of my place yet. Running like a mad demon trying to keep up with working full time and getting the addition done before winter hits. Fortunately, I have my insulation inspection slated for Friday so drywall next week. Then I can have some heat in the place when it cools down. Went the summer without AC which was miserable but no heat, no that won't fly!
 
OP
H

High Desert

Active member
Joined
Sep 17, 2012
Messages
43
Location
Rio Rancho, NM
Okay, they are finishing the roofing today. I intend to paint the trim and install the new vinyl windows this weekend. However, I am unsure of the best way to attach the windows to the grouted hollow-metal frames. Self-drilling screws have been mentioned, but I tend to think that they would not work well once they encountered the grout. Anyone have any experience with this?
 

Attachments

  • 2012-10-05_13-37-45_642.jpg
    2012-10-05_13-37-45_642.jpg
    148.7 KB · Views: 152

JTH

Well-known member
Joined
May 4, 2012
Messages
167
Location
MO Ozarks
What city in KS was the theatre? My nephew and others restored one in Mankato KS a few years ago. love the look of your shop, should serve many more generations.
 

Zeke

Well-known member
Joined
Aug 13, 2009
Messages
17,176
Location
Long Beach CA, the sewer by the sea.
Okay, they are finishing the roofing today. I intend to paint the trim and install the new vinyl windows this weekend. However, I am unsure of the best way to attach the windows to the grouted hollow-metal frames. Self-drilling screws have been mentioned, but I tend to think that they would not work well once they encountered the grout. Anyone have any experience with this?
I think you were supposed to put a wooden buck in the openings. Hollow metal frames are supposed to be prepped for doors, etc.

What type of window do you have and how was the "net frame size" measured. I think using metal frames in the masonry, I would use block frame windows and screw them in from inside the jamb to directly into the frame.

But if you post pics in detail of your windows and the metal frames, I can advise. I have installed around 5000 windows since going into that business in 1985. Was a general contractor before that and a painter before that.

Speaking of painting, looks like the painter was called to post bail too. ;) :D
 
OP
H

High Desert

Active member
Joined
Sep 17, 2012
Messages
43
Location
Rio Rancho, NM
What city in KS was the theatre? My nephew and others restored one in Mankato KS a few years ago. love the look of your shop, should serve many more generations.

That is cool! The theatre was in Onaga, about 130 miles East of Mankato. I think it is a laundromat now. It is really sad to see the poor state of historic old buildings in small towns.
 

BFBOB

Well-known member
Joined
Sep 20, 2011
Messages
5,073
Looks good to me. What does the stone between the windows say?

When pix are too small to see well, you can enlarge them by holding Control and pressing the plus key on the numeric pad. Shrink by doing Control - minus key. (doesn't allways work, but mostly)
 
OP
H

High Desert

Active member
Joined
Sep 17, 2012
Messages
43
Location
Rio Rancho, NM
I think you were supposed to put a wooden buck in the openings. Hollow metal frames are supposed to be prepped for doors, etc.

What type of window do you have and how was the "net frame size" measured. I think using metal frames in the masonry, I would use block frame windows and screw them in from inside the jamb to directly into the frame.

But if you post pics in detail of your windows and the metal frames, I can advise. I have installed around 5000 windows since going into that business in 1985. Was a general contractor before that and a painter before that.

Speaking of painting, looks like the painter was called to post bail too. ;) :D

I had the windows made to 1/4" smaller than the smallest portion of the hm frame. The outside window dimensions are 42.5"x30.5". My intent was to screw them directly to the frames, but it makes sense that I should have put some wood in the hm frame channel prior to install. I did prep the door frames very well prior to install, but didn't know what I didn't know about the hm window frames. They are SOLID now.

It is too late to get a pic of the hm window frame, but this is one of the four identical vinyl windows. Any advice is appreciated.

As for the paint on the door.. I had them mix up a quart of the exact same paint color that was used on the house trim. I put some on the door to see if I liked it. Still not sure.
 

Attachments

  • 2012-10-05_20-10-16_555.jpg
    2012-10-05_20-10-16_555.jpg
    146.2 KB · Views: 41
OP
H

High Desert

Active member
Joined
Sep 17, 2012
Messages
43
Location
Rio Rancho, NM
It's coming along nicely. What's the bucket on the roof ?

Thanks! The roofers were one bundle short of finishing when I took that picture yesterday. They left the tar bucket on the roof for today when the returned to finish. Looks like the only thing they used it for was to seal 4 roofing nails on the final cap shingle!
 

Boomer343

Well-known member
Joined
Mar 19, 2012
Messages
519
If I was putting in your windows I would put a spacer under vinyl frame to center it top to bottom then use a couple of wedges left and right to hold it in place and center it as well.

I'd then use clear silicone and fill the top and bottom spaces. Let it dry then remove the side wedges and silicone them. Done. BTW I like to tape off to get nice crisp caulking lines...you can do as you please...VBG

If you need to paint I would use the paintable white GE Silicone to set the windows in place.
 

Zeke

Well-known member
Joined
Aug 13, 2009
Messages
17,176
Location
Long Beach CA, the sewer by the sea.
Boomer, the spacers are a good idea, but if used, they should be continuous and left in place.

Desert, looks like you have a "flush frame" unit there. Does the flange fit withing the rough opening up against the metal frame? If not, you can trim it down until it does. I assume the face of the frame is set back from the wall face, or 'recessed.'
 

RivennHewn

Well-known member
Joined
Jun 4, 2011
Messages
10,370
Location
PNW
How would you 'trim down' an extruded plastic frame?

Bigger question would be how to weather proof it.

I'm not a fan of relying on caulk to protect from water intrusion.
 
OP
H

High Desert

Active member
Joined
Sep 17, 2012
Messages
43
Location
Rio Rancho, NM
Boomer, the spacers are a good idea, but if used, they should be continuous and left in place.

Desert, looks like you have a "flush frame" unit there. Does the flange fit withing the rough opening up against the metal frame? If not, you can trim it down until it does. I assume the face of the frame is set back from the wall face, or 'recessed.'

I installed the windows today the hard way. I very carefully marked where I wanted the screws in both the vinyl window frame and the hm frame. I then drilled the holes in the vinyl. Drilled the holes through the metal shell of the hm frame and used my hammer drill to extend the holes three inches into the grout. I used some 2.5" long, 1/4" diameter tapcons that were left over from setting my truss hangers to secure the windows. Some slight shimming, then used expanding foam to fill the small gap around the inside. The outside will receive caulk. The windows came with a snap-in trim piece that also sheds water. I will install those after paint.
 

Boomer343

Well-known member
Joined
Mar 19, 2012
Messages
519
I have used caulking backer rod to float window inserts into existing frames.
http://www.amazon.com/dp/B001MXNGKU/?tag=atomicindus08-20
Comes in various sizes.
I have also used Low Expanding Insulating Foam to fill gaps, let cure then caulk over but the gaps would be small in this application.

OOps see you have found a way to install

RivennHewn you should check out how frameless glass aquariums are made....and they have pressure behind them 24/7....and the fish don't spend a lot of time thinking about it...VBG
 

RivennHewn

Well-known member
Joined
Jun 4, 2011
Messages
10,370
Location
PNW
Don't even think of using anything besides a Sikkens or Sikaflex caulking.

Pain to work with, but will outlast any silicone product by years.
 

RivennHewn

Well-known member
Joined
Jun 4, 2011
Messages
10,370
Location
PNW
RivennHewn you should check out how frameless glass aquariums are made....and they have pressure behind them 24/7....and the fish don't spend a lot of time thinking about it...VBG[/QUOTE]


Constant temperture and no UV rays to deal with.

Caulking has to hold up to movement. How much movement in a fish tank?
 

Zeke

Well-known member
Joined
Aug 13, 2009
Messages
17,176
Location
Long Beach CA, the sewer by the sea.
How would you 'trim down' an extruded plastic frame?

Bigger question would be how to weather proof it.

I'm not a fan of relying on caulk to protect from water intrusion.

If it's a flush fin frame, you just get out your circular saw or planer.

Nail fin:

bv02315.jpg


Flush fin:

replacement%20window%20frame%20profile.bmp


And to make a block frame, just score and snap off the nail fin.
 
To avoid these ads, REGISTER NOW!
Top Bottom