To avoid these ads, REGISTER NOW!

A new playset for the kids

BD55

Well-known member
Joined
Aug 15, 2011
Messages
216
Location
Northern Utah
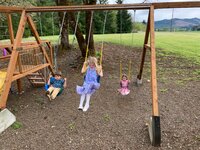
So I may have bit off more than I can chew but I couldn’t resist taking on another project 😆. We got our current playset after it had already had a good long run with previous owners and we’ve enjoyed it for almost 10 years but it’s now to the point where it’s not really safe. We looked around for a good replacement and it’s crazy how expensive the Lifetime ones and others aee and I haven’t been impressed with the materials Lifetime uses. Someone was selling 5” od 1/8” wall tubing in 35’ sticks so we decided to just make our own playset…

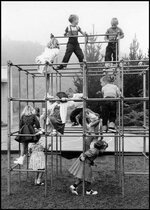
Here’s the idea - three levels with monkey bars on the right side and a slide and climbing wall on the left, and swings in the center.
IMG_3055.jpeg

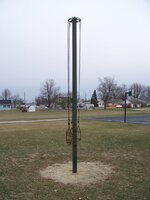
Had to lug the oxy acetylene rig to cut the sticks to a rough length.
IMG_3054.jpeg

IMG_3060.jpeg
So this would be a typical cross bar. I’d take a section of tube and weld it to the bar to make saddles for both ends then the saddles would bolt to the uprights. Thoughts? Is there a simpler way that would be just as secure/more secure?

Can I just cement the uprights into the ground or better to bolt them to cement posts?
 
To avoid these ads, REGISTER NOW!

Kaizen

Well-known member
Joined
Jan 9, 2015
Messages
6,948
Location
New England
I always use a larger base plate and use long anchor bolts set in the concrete. Easier to set them and then drill the plate to fit before welding to the post.
That certainly is adventureous. I'm assuming you are a great welder. Think i'd be putting a lighting rod on top of that tower
 

no704

Well-known member
Joined
Apr 27, 2016
Messages
5,215
I enjoy your enthusiasm on this project! It if any child gets even a paper cut in this woke clime you will probably get hard prison time
 

jives

Well-known member
Joined
Jan 4, 2013
Messages
2,807
Location
Central NY
Wow, that is quite a project. For me, such a project would be easily done in wood, albeit it would take a while. I cannot imagine turning those pipes into a playset. Just prep for paint would tire me. It may be too late, but used playsets are all over CL and FBM, sometimes free. Nevertheless, good luck and keep us in the loop.
 
OP
B

BD55

Well-known member
Joined
Aug 15, 2011
Messages
216
Location
Northern Utah
Wow, that is quite a project. For me, such a project would be easily done in wood, albeit it would take a while. I cannot imagine turning those pipes into a playset. Just prep for paint would tire me. It may be too late, but used playsets are all over CL and FBM, sometimes free. Nevertheless, good luck and keep us in the loop.
We looked for quite a while and just didn't like what's out there, and we haven't liked having wood because of the maintenance in order to keep from having splinters and looking nice as well as the wasps in our area seem to love wood structures, even when well stained/finished.

I'm with you on the paint prep - that's really going to be only drudgery on this. I love the design aspect and welding and building challenges with something like this but painting and everything associated with it is the worst.
 
OP
B

BD55

Well-known member
Joined
Aug 15, 2011
Messages
216
Location
Northern Utah
How old are your kids? And how old will they be when you finish this?
Lol - no kidding. Fortunately they are all young enough that maybe the youngest will get to appreciate it :LOL:. In actuality, I'm hopefully going to start cutting and welding starting this weekend.

I always use a larger base plate and use long anchor bolts set in the concrete. Easier to set them and then drill the plate to fit before welding to the post.
That certainly is adventureous. I'm assuming you are a great welder. Think i'd be putting a lighting rod on top of that tower
Thanks! My plan is to use 8" sonotube for the concrete bases and anchor bolts. Thoughts on anchor bolts during concrete vs tapcons/wedge anchors? Reason I ask is I have a ton of tapcons and wedge anchors already and an SDS drill, so achoring after the fact isn't an issue - just the question of whether that's a good idea for this application or not.

I'm not an amazing welder by any means, but since I'm doing this as an assembly I can weld up parts in the garage so I'll be TIG welding them since I'm more confident in that vs MIG from a penetration and quality of weld. Still need to test that out though; MIG might work great for this.
 

LXCam

ALLIANCE MEMBER
Joined
Apr 23, 2013
Messages
19,124
Location
AZ
Love it BD, this will be fun to watch. Personally I’d base plate the poles. It’ll make it easier to plum them up plus give you a little adjustability if needed. As for the rust, I’d just take off the surface rust then treat them with a rust converter like Jasco. I’ve done some large exterior plate projects doing this and with a good top coat lasted years without issue.
 
OP
B

BD55

Well-known member
Joined
Aug 15, 2011
Messages
216
Location
Northern Utah
I enjoy your enthusiasm on this project! It if any child gets even a paper cut in this woke clime you will probably get hard prison time

No Good Deed Shall go Unpunished.

Yeah, we debated about this a bit too - unfortunate that's the reality of society now. We're trying to buck that a bit, but at the same time we're not going to make it without railing. The kids have some much younger cousins that will also be using it, so we do have to consider small bodies and where they shouldn't be able to fit - because they will try :ROFLMAO:
 
OP
B

BD55

Well-known member
Joined
Aug 15, 2011
Messages
216
Location
Northern Utah
Love it BD, this will be fun to watch. Personally I’d base plate the poles. It’ll make it easier to plum them up plus give you a little adjustability if needed. As for the rust, I’d just take off the surface rust then treat them with a rust converter like Jasco. I’ve done some large exterior plate projects doing this and with a good top coat lasted years without issue.
Thanks!! That's a great point on being able to level/plumb with base plates. And thanks for the tip on Jasco - I've never heard of it but going that route for paint prep would save a ton of headaches and time.
 

Kaizen

Well-known member
Joined
Jan 9, 2015
Messages
6,948
Location
New England
Lol - no kidding. Fortunately they are all young enough that maybe the youngest will get to appreciate it :LOL:. In actuality, I'm hopefully going to start cutting and welding starting this weekend.


Thanks! My plan is to use 8" sonotube for the concrete bases and anchor bolts. Thoughts on anchor bolts during concrete vs tapcons/wedge anchors? Reason I ask is I have a ton of tapcons and wedge anchors already and an SDS drill, so achoring after the fact isn't an issue - just the question of whether that's a good idea for this application or not.

I'm not an amazing welder by any means, but since I'm doing this as an assembly I can weld up parts in the garage so I'll be TIG welding them since I'm more confident in that vs MIG from a penetration and quality of weld. Still need to test that out though; MIG might work great for this.
Just easier imo to push the L shaped anchor bolt into wet concrete 12" down. I like to make a rebar cage for inside the sono tube and secure the bolts to it before pouring concrete. I also have an sds and tons of anchors but for new concrete I would not use. Mig or stick is what you want for that rusty metal. Tig will take longer and be more finicky. Think about building it so it could be unbolted and sold/moved easily in a couple years.
 

ptabatcher

Well-known member
Joined
Jun 26, 2021
Messages
182
Location
NE Ohio
Can’t wait to see how this turns out.

My parent’s build a giant “swing set” in the backyard out of wood in the 80’s. It was two stories tall. Bottom was a sandbox with a giant tractor tire. The top was half covered with an A-frame style room on one side and then an open platform with slide on the other half. Stairs with a landing to get up. It also had two swings and then a cantilever that alternated between a rope or rings. I don’t think anyone hurt themselves on the swing set. God knows my friends and I gave it our best shot by climbing all over that thing, on the roof, across the top, etc….

It ended up being a hang out spot for a bunch of kids in the neighborhood well beyond the time my sister’s and I used it. I think it lasted a good 20+ years before my parent’s finally tore it down.
 

Bert_

Well-known member
Joined
Dec 24, 2016
Messages
9,721
Location
NW Iowa
I remember when I was young. Ours was a cable between two pine trees, the swings were rope down from the cable with round baler belt for the seat.
 

IMCA38

Well-known member
Joined
Sep 21, 2007
Messages
999
Location
Bennet, NE
No Good Deed Shall go Unpunished.
I marvel at these modern playground structures and everything they do to make them safe. I‘m Now convinced that our parents and maybe our grandparents hated us and wanted to thin the herd.
Our elementary school had two extremely high, all metal skin blistering slides, an all metal maypole swing complete with heavy chains and steel pipe handles, and the circle of death merry-go-round. In addition, our town park had a big set of metal monkey bars set atop concrete.
Despite all of this, the only serious injury I can remember was when a boy a couple grades below us got hurt on the see-saw (we called it a teeter-totter). His partner suddenly vacated the other end, leaving poor Junior to crash to the ground. Unfortunately he had his leg kind of curled under the seat and the impact fractured his leg.
I was able to find pics of similar pieces.
 

Attachments

  • IMG_2045.jpeg
    IMG_2045.jpeg
    228.1 KB · Views: 85
  • IMG_2042.jpeg
    IMG_2042.jpeg
    207.6 KB · Views: 89
  • IMG_2044.jpeg
    IMG_2044.jpeg
    24.2 KB · Views: 93
  • IMG_2046.jpeg
    IMG_2046.jpeg
    77.2 KB · Views: 127

Oregon rock crusher

Well-known member
Joined
Jun 28, 2016
Messages
1,907
Location
West of Salem
Nice design BD55. Only thing I might suggest is that 8' between legs is pretty tight for three swings. It is plenty until you get kids screwing around and swinging out of their lane. Collisions can be pretty big deals. I just used treated wood for a similar set a couple years ago and now that the grandkids are getting older took my four swing in 12' down to three after watching several near misses. The pic was when I still had four seats and the kids found ways to misuse the thing even with only three swinging..... Ed.
 

Attachments

  • IMG_6414.jpg
    IMG_6414.jpg
    1.5 MB · Views: 127

CraigStu

Well-known member
Joined
May 22, 2014
Messages
4,030
Location
Blacksburg, Va
When you look at supports for traffic lights etc you see studs sticking up out of the concrete. The pole has a base plate on the bottom w/ holes. Nuts are run down the studs. Pole w/ baseplate placed on top of the nuts and another set of nuts run down on top of the plate. I 'think' but am not certain, that the studs are buried in the concrete before it sets. I see 2 advantages to this. The top surface of the concrete is fairly uncritical as far as level is concerned. The pole can be adjusted to vertical by adjusting the nuts until it is right. Decades ago when I first saw this I thought dang I'd rather pull the base plate down to the concrete. But it has been many decades now and the technique obviously has worked out.
 

rharman

Well-known member
Joined
Apr 22, 2012
Messages
8,813
Location
SoCal
When you look at supports for traffic lights etc you see studs sticking up out of the concrete. The pole has a base plate on the bottom w/ holes. Nuts are run down the studs. Pole w/ baseplate placed on top of the nuts and another set of nuts run down on top of the plate. I 'think' but am not certain, that the studs are buried in the concrete before it sets. I see 2 advantages to this. The top surface of the concrete is fairly uncritical as far as level is concerned. The pole can be adjusted to vertical by adjusting the nuts until it is right. Decades ago when I first saw this I thought dang I'd rather pull the base plate down to the concrete. But it has been many decades now and the technique obviously has worked out.
With studs or bolts, you may want to think about some rubberized or similar protector around/over the base. Someone taking a tumble doesn't need the potential to land on some piece of hardware sticking out of the ground.
 
To avoid these ads, REGISTER NOW!

gmcgeo

Well-known member
Joined
Mar 11, 2019
Messages
3,701
Amazing project.

Something this beefy you would think permits are involved :ROFLMAO:
 
OP
B

BD55

Well-known member
Joined
Aug 15, 2011
Messages
216
Location
Northern Utah
Nice design BD55. Only thing I might suggest is that 8' between legs is pretty tight for three swings. It is plenty until you get kids screwing around and swinging out of their lane. Collisions can be pretty big deals. I just used treated wood for a similar set a couple years ago and now that the grandkids are getting older took my four swing in 12' down to three after watching several near misses. The pic was when I still had four seats and the kids found ways to misuse the thing even with only three swinging..... Ed.
Good point on the 8'. Seems a little small now that I'm thinking about it... I'm wondering if that was a measurement I sent one of my kids to grab off the old set. I'll have to take a closer look at that.
Amazing project.

Something this beefy you would think permits are involved :ROFLMAO:

Thanks. And Shhhhhhh ;)
 

fourjeepin

Well-known member
Joined
Feb 12, 2011
Messages
3,658
Location
Atlanta, GA
I would have the concrete stop at least a few inches below grade. This would make sure no little ones hit that exposed column of concrete and you (or the next owner) could cut the metal posts and leave the concrete when it is time for this masterpiece to go live elsewhere.
 
OP
B

BD55

Well-known member
Joined
Aug 15, 2011
Messages
216
Location
Northern Utah
Kids and I got all the tubes cut to length and got all 9 of the 4’ crossbars coping done. I realized on the model that I’d need to do another cope so the crossbars don’t interfere at the corners. I need to make jigs of some sort to align stuff while I tack everything together; hoping this week to tack a couple crossbars and check their dry fit with a vertical.
IMG_3300.jpeg
 
OP
B

BD55

Well-known member
Joined
Aug 15, 2011
Messages
216
Location
Northern Utah
Did some corner test fits and got some saddles printed to make it easier to hold the tubes for tacking them and also get the standoff distance for the end plates.

Fitup seems decent but I definitely over compensated for the corner interference. There’s about a 1/4” gap there.IMG_3306.jpeg
IMG_3305.jpeg
IMG_3304.jpeg
And the saddles look like they printed fine. I didn’t get a chance to pull them off the build plate before heading to work.
temp.png
IMG_3309.jpeg
 
OP
B

BD55

Well-known member
Joined
Aug 15, 2011
Messages
216
Location
Northern Utah
First welds in. Tack welded with MIG. TIG for the actual welds. Around 160 amps, 1/8” filler rod. Definitely need to be more aggressive with adding filler. This weld was a little sunken. IMG_3311.jpeg
 

nadogail

Well-known member
Joined
Jan 23, 2009
Messages
31,954
Location
Coronado, CA
For Out Door Welding I prefer 7014. It runs fine on my Hobart StickMate and I don’t have to keep the rods in an oven.
 
OP
B

BD55

Well-known member
Joined
Aug 15, 2011
Messages
216
Location
Northern Utah
Right now the plan is to drill holes in the saddles for 7/16-14 bolts that will thread into nuts welded to the uprights (drill an oversize hole in the upright that fits the nut corner-to-corner diameter then TIG weld in place).

The concern I'm having is welding the nuts to the uprights and if that's an issue. Looking in a few places, it sounds like that's a no-no to weld nuts/bolts in structural applications, but I'd be TIG welding the nuts in place to minimize heat input, and even with Grade 2 nuts/bolts I'd have plenty of strength.

I looked into riv nuts to get around having to weld nuts in place (and would be faster too), but it sounds like they don't like being installed in curved surfaces.

Are there other solutions or will welding in place be fine? I'd assume there's more risk welding a grade 8 nut in place vs grade 2 due to the metallurgy difference.
 
To avoid these ads, REGISTER NOW!
Top Bottom