
ianguilly
Well-known member
Let me just get this out of the way i have a soft spot for older snap on boxes. I've owned dozens and love to buy and flip them. I always see guys on here wondering how to make that older box look decent and new again, and I recently acquired a new side box this weekend and thought id show you the process I typically do on all my boxes that don't need a repaint.
A few weeks ago I'm looking at my local facebook marketplace which i browse several times a day to see what deals are out there. I've been on the lookout for a matching side box for my 1989 KR660 and Kr690 box for a little extra room. I finally came across what I identified as a late 90s KRL291 side box ( basically the newer version of the Kr290 which is what originally was paired with my box). I messaged the guy confirmed the dimensions and the condition ( I hate repainting boxes since its such a chore) and offered $250, he said he'd think about it. A couple weeks go by and I'd see the side box was still for sale but not sweating too much, finally this week I got the notification he dropped the price. I confirmed the availability still and went to pick it up. here what it looked like when I first saw it.

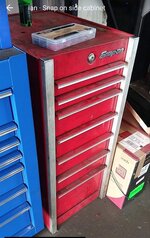
I wasn't detoured by the condition of the box, I've cleaned up worse. the box had spent most of its life in a tire shop and it showed. I quickly onced it over and we loaded it up and home I went.
Here were more close ups of it after I got it home.


So my work was cut out for me, I started out by gutting everything off and out of the box, emblems,all trim and liners.

All the components laid out ready to clean and polish

I have a ton of random toolbox odds and end parts acquired over the years and just happened to have some new trim caps in stock to replace to old ones.

Pop all the slides off

Ready for wash

So now its time for the scrub down. I use a generic degreaser let it soak for about a minute and used a power scrubber to really get the grime loose, and then pressure wash.

And then let air dry
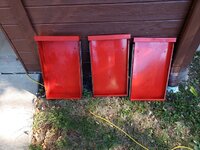

While everything was drying I turned my attention to the slides. I learned from this site years ago about diesel to clean the slides and have used that trick since. Here is my homemade PVC slide cleaner/soaker.
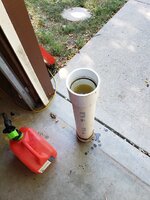
I typically soak the slides for around 2 minutes then do a light scrub and blow them out with air.


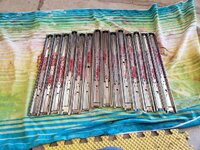
After a brief dry I lube them with transmission fluid, wipe off excessive lube and they're ready to go back in. all the slide were still in good condition so no warranty needed. I prefer to keep the accurides since those are the best slides ever made
The box and drawers were done by the time I was finished with he slides. I typically sand and polish all my toolboxes, the older paint usually cleans up great. Here's what the boxed looked like before all that.


Threw the slides back in real quick.

I use 3000 grit sandfoam on an electric sander/polisher

after that I move on to a 3M polishing system

How it looked after the compound

Then machine polish

and how it looked after.

The shine really comes out of these older boxes with enough elbow grease.
Next is the touch up process, I bought the red touch up paint a few years ago and it matches perfect and helps with rust not forming on the chips,

Heres an example of what the drawer looks like after touch up.
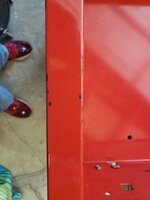

After the paint restoration it was time to polish the trim. Ive used this brasso stuff for awhile and like the results. I also use 0000 fine steel wool for extra scrubbing.

A before and after top is before bottom is after.

All the trim is now polished and new lock and key found and ready for reinstallation

Next up is liners and mats. the top mat was missing I found this rubber ribbed runner mat at Lowes for $6 and have a ton of extra for future projects


Most of the liners were in pretty decent condition and only needed a good cleaning, I always have a bunch of new liner material laying around ( HF or husky liners if what I typically use)
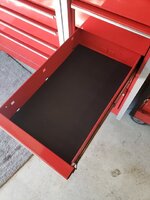
Now its time to throw it all back together, I cleaned the lock and roll latches and put new rivets in the side trim. Then put the trim back on the drawers via a rubber hammer, and the final walk around.


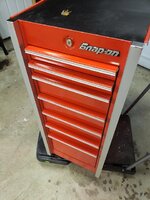

Here it is in its new home,


I'm very happy with how it turned out. Not too bad for a weekend worth of work. I always say I'm going to slow down with buying these since I currently have 10 toolboxes at home and 3 more at work, my girlfriend thinks I have a problem Anyway and questions on any steps I'm always open to give advise and try and help out.
A few weeks ago I'm looking at my local facebook marketplace which i browse several times a day to see what deals are out there. I've been on the lookout for a matching side box for my 1989 KR660 and Kr690 box for a little extra room. I finally came across what I identified as a late 90s KRL291 side box ( basically the newer version of the Kr290 which is what originally was paired with my box). I messaged the guy confirmed the dimensions and the condition ( I hate repainting boxes since its such a chore) and offered $250, he said he'd think about it. A couple weeks go by and I'd see the side box was still for sale but not sweating too much, finally this week I got the notification he dropped the price. I confirmed the availability still and went to pick it up. here what it looked like when I first saw it.
I wasn't detoured by the condition of the box, I've cleaned up worse. the box had spent most of its life in a tire shop and it showed. I quickly onced it over and we loaded it up and home I went.
Here were more close ups of it after I got it home.
So my work was cut out for me, I started out by gutting everything off and out of the box, emblems,all trim and liners.
All the components laid out ready to clean and polish
I have a ton of random toolbox odds and end parts acquired over the years and just happened to have some new trim caps in stock to replace to old ones.
Pop all the slides off
Ready for wash
So now its time for the scrub down. I use a generic degreaser let it soak for about a minute and used a power scrubber to really get the grime loose, and then pressure wash.
And then let air dry
While everything was drying I turned my attention to the slides. I learned from this site years ago about diesel to clean the slides and have used that trick since. Here is my homemade PVC slide cleaner/soaker.
I typically soak the slides for around 2 minutes then do a light scrub and blow them out with air.
After a brief dry I lube them with transmission fluid, wipe off excessive lube and they're ready to go back in. all the slide were still in good condition so no warranty needed. I prefer to keep the accurides since those are the best slides ever made
The box and drawers were done by the time I was finished with he slides. I typically sand and polish all my toolboxes, the older paint usually cleans up great. Here's what the boxed looked like before all that.
Threw the slides back in real quick.
I use 3000 grit sandfoam on an electric sander/polisher
after that I move on to a 3M polishing system
How it looked after the compound
Then machine polish
and how it looked after.
The shine really comes out of these older boxes with enough elbow grease.
Next is the touch up process, I bought the red touch up paint a few years ago and it matches perfect and helps with rust not forming on the chips,
Heres an example of what the drawer looks like after touch up.
After the paint restoration it was time to polish the trim. Ive used this brasso stuff for awhile and like the results. I also use 0000 fine steel wool for extra scrubbing.
A before and after top is before bottom is after.
All the trim is now polished and new lock and key found and ready for reinstallation
Next up is liners and mats. the top mat was missing I found this rubber ribbed runner mat at Lowes for $6 and have a ton of extra for future projects
Most of the liners were in pretty decent condition and only needed a good cleaning, I always have a bunch of new liner material laying around ( HF or husky liners if what I typically use)
Now its time to throw it all back together, I cleaned the lock and roll latches and put new rivets in the side trim. Then put the trim back on the drawers via a rubber hammer, and the final walk around.
Here it is in its new home,
I'm very happy with how it turned out. Not too bad for a weekend worth of work. I always say I'm going to slow down with buying these since I currently have 10 toolboxes at home and 3 more at work, my girlfriend thinks I have a problem
Anyway and questions on any steps I'm always open to give advise and try and help out.
