To avoid these ads, REGISTER NOW!

A Simple Solid Workbench

quadrcr87

Well-known member
Joined
Jul 5, 2013
Messages
1,036
Location
Travelers Rest, SC
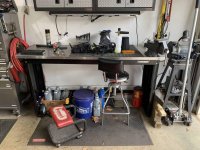
After 7 years of dealing with my wobbly crooked flimsy stamped steel Husky workbench I finally had enough. The bench top is just fine but the miserable excuse for a base needed to head to the dump. It served its purpose ok at first as an assembly and small task bench but once I added a vice and then moved it across the county twice it became almost unusable as it slowly collapsed.
IMG_6066.jpg
IMG_6067.jpg

An obvious sag in the top with little to no support
IMG_6086.jpg

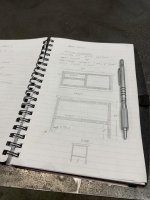
In an attempt to channel my inner sakurama I started with a fine mechanical pencil and a note pad. Let’s just say the sketches need some work...
IMG_6080.jpg

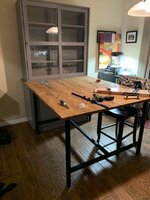
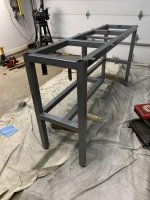
To support the 72x24 stainless wrapped wood top I settled on 2” 14 gauge steel tubing. I will maintain the 40” work height and similar overhangs to the original. I am adding a 12”x36” shelf with an aluminum top to store waste oil that previously collected on the floor. I also plan to build a wide shallow steel drawer.

I picked up 48’ of steel at my local supplier Steelcraft Fabricators
IMG_6069.jpg
My wife was nice enough to to help unload since I broke a rib on my dirt bike last weekend
IMG_6074.jpg

After planning my cut list I got to work with my Evolution saw. This thing continues to impress me from wood trim to steel with a simple blade change!
IMG_6081.jpg
Nice clean square cuts
c4baeb7d2da73d8f0c2e950446fe991b.jpg

3- 66”
4- 37”
6- 14.5”


Sent from my iPhone using Garage Journal
 

Attachments

  • IMG_6080.jpg
    IMG_6080.jpg
    80.6 KB · Views: 284
  • IMG_6066.jpg
    IMG_6066.jpg
    154.8 KB · Views: 373
  • IMG_6069.jpg
    IMG_6069.jpg
    151.8 KB · Views: 241
  • IMG_6067.jpg
    IMG_6067.jpg
    132.3 KB · Views: 302
  • IMG_6086.jpg
    IMG_6086.jpg
    69.4 KB · Views: 286
  • IMG_6074.jpg
    IMG_6074.jpg
    104.1 KB · Views: 230
  • IMG_6081.jpg
    IMG_6081.jpg
    89.5 KB · Views: 268
  • c4baeb7d2da73d8f0c2e950446fe991b.jpg
    c4baeb7d2da73d8f0c2e950446fe991b.jpg
    49.8 KB · Views: 8
Last edited:
To avoid these ads, REGISTER NOW!
OP
Q

quadrcr87

Well-known member
Joined
Jul 5, 2013
Messages
1,036
Location
Travelers Rest, SC
I pulled the bench off the wall to tear it apart and verify my back overhang to clear the foundation
IMG_6092.jpg

3.5” should work out perfect to eliminate the gap from the top to the wall
IMG_6083.jpg
Taking apart the old frame I realized just how badly it was bending. Every time a leg started to collapse I just kicked it back into place for 7 years!
IMG_6088.jpg

With my cuts done and measurements verified it was almost time to pull out the welder
IMG_6089.jpg

Other than the top the only other useful thing on the bench was the leveling feet. I cut up some 3/16” plate to cap the legs and welded on 3/8-16 nuts. I think 3/8 is pretty standard in case I want to upgrade the feet later.
IMG_6096.jpg
First time using these stronghand magnetic V pads and they worked great
IMG_6097.jpg
Not up to Zmotorsports standards but it will work. This project will be a great way to get some welding practice
IMG_6098.jpg


Sent from my iPhone using Garage Journal
 
OP
Q

quadrcr87

Well-known member
Joined
Jul 5, 2013
Messages
1,036
Location
Travelers Rest, SC
I got both end frames welded up and called it quits at midnight. I took the week off work to get some projects done so I’ll make some progress over the next few days.
IMG_6099.jpg
I have been playing with the settings on my Lincoln 140 and I think I finally got it burning right. I still feel like I am getting too much weld build up at the beginning of the bead but I think it’s all about technique. Any tips on how to get the bead to lay down more at the start of a weld? I have tried to progress slower at the start but it seems to just feed too much wire. If I try to start faster the weld is too cold and doesn’t burn in enough. One thing I am working on is adjusting the angle of the gun to direct the heat and puddle more precisely. I am using .025 wire with the heat set at C and wire feed at 5.5. I really wish I welded with fiber adjustments than A,B,C,D.
IMG_6100.jpg


Sent from my iPhone using Garage Journal
 
Last edited:
OP
Q

quadrcr87

Well-known member
Joined
Jul 5, 2013
Messages
1,036
Location
Travelers Rest, SC
I think you may have missed that I am running 0.025 wire. The machine calls for C and 5 but I did better at 5.5. Thanks for following along.

IMG_6101.jpg


Sent from my iPhone using Garage Journal
 
OP
Q

quadrcr87

Well-known member
Joined
Jul 5, 2013
Messages
1,036
Location
Travelers Rest, SC
Got out to the garage for a couple hours this morning before heading shopping with my wife. The legs are cleaned up and ready to weld to the top. I got the top tacked together and started finish welding. I’ll get back to it this afternoon.
IMG_6102.jpg

IMG_6103.jpg


Sent from my iPhone using Garage Journal
 

BlakeTheCarGuy

ALLIANCE MEMBER
Joined
Oct 10, 2018
Messages
9,298
Location
Roanoke Virginia
Great workbench. I personally have never had an issue with a wooden one except when it flooded and it floated across the basement lol.


Sent from my iPhone using Garage Journal
 

sberry

Banned
Joined
Jun 18, 2005
Messages
35,747
Location
Brethren, Michigan
Look at the gas type. I am sure I did that right. Thin, medium, thick. D 5.5 is wide open with that wire. I meant to post this earlier.
Ignore the chart for a bit. Remember, the chart is approx and I run D 5.5 on 16ga if you go fast enough. B 2.5 for body steel, C 3.5 for gaps 16ga, anything above that is wide open for that little machine.
 
Last edited:

sberry

Banned
Joined
Jun 18, 2005
Messages
35,747
Location
Brethren, Michigan
On that bench it should be D,, if it will burn off more than 5.5 turn it up a little. See if it burns 6 without stumbling. Where you get that machine. I think it's an old model.
 
Last edited:
OP
Q

quadrcr87

Well-known member
Joined
Jul 5, 2013
Messages
1,036
Location
Travelers Rest, SC
On that bench it should be D,, if it will burn off more than 5.5 turn it up a little. See if it burns 6 without stumbling. Where you get that machine. I think it's an old model.


I tried it on D but I was blowing through too much. I picked up the machine about 7 years ago brand new at a pawn shop. I just need to weld more and keep improving.


Sent from my iPhone using Garage Journal
 
OP
Q

quadrcr87

Well-known member
Joined
Jul 5, 2013
Messages
1,036
Location
Travelers Rest, SC
After the welds cooled I realized that the top support bars had pulled together from 18.5” to 18.25”. It didn’t take much with a bottle jack to get them spread to match the uprights.
IMG_6105.jpg

With some help from my wife to hold the uprights square I got them tacked in place.
IMG_6106.jpg
IMG_6107.jpg

It felt like a real workbench when I finally stood it up. I sure made a mess of the garage in the process but these past few days focused on this bench have been therapeutic.
IMG_6108.jpg
I ground the top welds flush in prep for the top install. The rest of the frame will show my mediocre welding skills in all their glory
IMG_6109.jpg
I also added the back brace to support the legs. Still planning on adding some type of gusset to the top to prevent the horrible sag of the old bench frame.... thinking maybe a “V” design? Everyone knows triangles are strong.
IMG_6110.jpg

Seeing this for the first time put a smile on my face.
IMG_6111.jpg


Sent from my iPhone using Garage Journal
 
Last edited:
OP
Q

quadrcr87

Well-known member
Joined
Jul 5, 2013
Messages
1,036
Location
Travelers Rest, SC
Now that the bench was in place I mocked up the shelf to confirm the 12” depth. The depth was perfect with plenty of room for the shop stool. The 1/8” aluminum should be plenty strong to store some oil
IMG_6113.jpg
The clearance for a shallow drawer is pretty tight but I desperately need the storage so I’ll deal with it. I may slant the front for a little extra knee clearance. I plan to throw some weight in there with hammers and clamps so the drawer slides are beefy.
IMG_6114.jpg
IMG_6123.jpg


Sent from my iPhone using Garage Journal
 
OP
Q

quadrcr87

Well-known member
Joined
Jul 5, 2013
Messages
1,036
Location
Travelers Rest, SC
Just before the clock struck 12 I got the shelf frame ready to weld on. First step tomorrow is the grind off the mill scale and weld it up. Then it’s on to some 3/16 rivets. Also planning to add some type of lip on the rear as a stop.
IMG_6116.jpg
IMG_6115.jpg

IMG_6118.jpg
Added a 2” notch to fit the corner
IMG_6120.jpg

The stool does not fully tuck under the bench but it’s plenty for me
IMG_6121.jpg
Even my ugly old oil change cart fits under the bench. It’s been around since 2005 when it was built as a TV stand for my college dorm room. Future project will be a steel cart enclosed with doors. It will be nice to build one that nests neatly under the bench.
IMG_6122.jpg


Sent from my iPhone using Garage Journal
 

sberry

Banned
Joined
Jun 18, 2005
Messages
35,747
Location
Brethren, Michigan
I built about 200, maybe more similar. I gang cut at the steel yard, pickup load every week. But, the top pic in your post 3 is similar but used angle for the cross. Had piece of 1/4 plate we could set up on the bench we made a jig on, could toss the pieces in and tack up. We made up as many leg ends as we needed with 1 of every v n other one shorter for an adjustment.
All built upside down, stand a leg assembly up, clamp x2 to flatten the plate a little and tack on, then clamp on the long softeners, tack up and add legs to the other end, then bottom shelf angles tried it all up. It was slick and my helper could assemble and finish one in 45 mins/hour, we went around and zing the edges with a sander.
All square cut, most of the weld hidden. Had the steel yard put 10 types a time on the saw. Benches were 2x3, 2x4, 2x5 and occasional 2x6. Could really hammer the tops on shear from a cut list I had ready, gang cut the bracing also.
 
Last edited:

sberry

Banned
Joined
Jun 18, 2005
Messages
35,747
Location
Brethren, Michigan
The benches were the easiest, there were hoppers, pallet racks and bunch of other brackets that were a bit more sophisticated but we came up with patterns for most of it. I should have had back up pics of the job, we lost some in a fire that I had collected would have been cool for forums.
 

duc916

Well-known member
Joined
Apr 18, 2013
Messages
284
For future builds to minimize the tube pulling when welding do not weld across the face of a tube. Weld the two sides that run parallel to tube.
 

Jayman17

Well-known member
Joined
Feb 6, 2017
Messages
3,793
Location
Seattle, Wa
I like your new bench, seems very stout. I like the SS top too, now use the hell out of it! I might be making something similar in the near future.

Jay
 

cnttxmdc

Well-known member
Joined
Oct 11, 2013
Messages
385
Location
Granbury, TX
You did a great job on this, and put a lot of effort into it. I loved my square tubing shop bench so much I made a desk for my study out of it, along with the frame for our dining room setup, and balcony railing. It’s such a clean, simple, and functional material.

9918790c7ec465b247a3bf2cb149e1ae.jpg
7848813cf98921237aef86458419c798.jpgaf77c932bae140521c80f794920b8f82.jpg.
 

Attachments

  • 7848813cf98921237aef86458419c798.jpg
    7848813cf98921237aef86458419c798.jpg
    32.7 KB · Views: 9
  • af77c932bae140521c80f794920b8f82.jpg
    af77c932bae140521c80f794920b8f82.jpg
    47.4 KB · Views: 9
OP
Q

quadrcr87

Well-known member
Joined
Jul 5, 2013
Messages
1,036
Location
Travelers Rest, SC
For future builds to minimize the tube pulling when welding do not weld across the face of a tube. Weld the two sides that run parallel to tube.


That’s a great tip and I hadn’t thought of it that way. I was thinking it would be easier to finish weld the top while it was up on my welding table. Next time I’ll weld the parallel edges and then finish weld it once it’s welding into the mating part to prevent warping.


Sent from my iPhone using Garage Journal
 
To avoid these ads, REGISTER NOW!
OP
Q

quadrcr87

Well-known member
Joined
Jul 5, 2013
Messages
1,036
Location
Travelers Rest, SC
It looks like a considerable upgrade, this thing will outlive you now. Good job and thanks for all the pictures.

Sent from my SM-G960W using The Garage Journal mobile app


Thanks I am really looking forward to working on a solid surface. Last winter I rebuild a dirt bike engine on the old bench and it was wobbling around the whole time. The worst was when I would put some leverage on something in the vise and the whole table would move and almost fall over! Speaking of vises... it might be time for an upgrade. The 6” Craftsman works but a Wilton would sure be nice.

Here is last winter’s project
IMG_4385.jpg

Sent from my iPhone using Garage Journal
 
Last edited:
OP
Q

quadrcr87

Well-known member
Joined
Jul 5, 2013
Messages
1,036
Location
Travelers Rest, SC
I like your new bench, seems very stout. I like the SS top too, now use the hell out of it! I might be making something similar in the near future.


Jay


Thanks! The top is what drew me to the Husky in the first place. It’s really easy to wipe off and keep clean. I do keep a rubber floor mat on it to protect it and keep projects from sliding around. You should defiantly build a bench. Yo just can’t find anything this solid for a decent price at a store.


Sent from my iPhone using Garage Journal
 
OP
Q

quadrcr87

Well-known member
Joined
Jul 5, 2013
Messages
1,036
Location
Travelers Rest, SC
You did a great job on this, and put a lot of effort into it. I loved my square tubing shop bench so much I made a desk for my study out of it, along with the frame for our dining room setup, and balcony railing. It’s such a clean, simple, and functional material.


Thanks for the kind words. It really is a nice material to work with especially as you are improving your skills. I plan to pick up some 1-1/2 and 1” tube for some future projects. I really enjoy notching and fitting round tube but the square is much easier to weld.

Your projects look great. I keep telling the wife I need to make a steel and wood coffee table and some end tables. Thinking steel frame with a nice grey stain on the wood.


Sent from my iPhone using Garage Journal
 
OP
Q

quadrcr87

Well-known member
Joined
Jul 5, 2013
Messages
1,036
Location
Travelers Rest, SC
I started the morning with a fun little project making a hose hanger. I was laying in bed last night thinking about how I wanted to do this and the idea of using an extra Gladiator bracket got stuck in me head. Turns out this one was the perfect size for the hose and was easy to separate from the bracket. The bonus is that I now have a left over bracket for the garage track that I can make something with.

Mocking it up
IMG_6125.jpg
The previous hose arrangement that was a hassle to use. I just added this airline drop last week and I could tell this wasn’t a long term solution
IMG_6127.jpg
I used a carbide in my die grinder to cut the tack welds from the backside. It worked pretty slick
IMG_6128.jpg
IMG_6129.jpg
The left over bracket just waiting for a good idea
IMG_6131.jpg
I really like this saw for cutting small plate pretty precise
IMG_6132.jpg

I also saw this as a good opportunity to put my Astro riv nut tool to use. I wanted the bracket removable in case the bench is located different in a future garage
IMG_6133.jpg

To be continued...... in 1 min


Sent from my iPhone using Garage Journal
 
OP
Q

quadrcr87

Well-known member
Joined
Jul 5, 2013
Messages
1,036
Location
Travelers Rest, SC
And we’re back. Now with a clear plan I laid out the 2” tall plate with the gladiator hook. I am always grabbing random washers to mark out a .5” radius for the corners.
IMG_6134.jpg

Ran a few beads and mounted it up. I’m really liking it. Having it removable will also make painting easier as I can tape off the rubber coating.
IMG_6135.jpg
Holds the 50’ hose with plenty of room
IMG_6136.jpg

Next up was mounting 14 tabs to attach the top to the frame. 14 may be overkill but it will help pull the slightly warped top into shape. It is also just particle board for spreading the load will help.
IMG_6137.jpg
I called my wife out to help me flip this thing around at least 5 times today. She is a saint for helping as I’m still recovering from a broken rib.
IMG_6142.jpg

I also got the shelf welded in and got the top fitted. I’ll wait to drill and rivet the aluminum until after paint.
IMG_6138.jpg

Next up onto the drawer build....


Sent from my iPhone using Garage Journal
 
OP
Q

quadrcr87

Well-known member
Joined
Jul 5, 2013
Messages
1,036
Location
Travelers Rest, SC
Now onto the start of the drawer build. I wasn’t looking forward to this as I already cut 180 inches of sheet metal with a 4-1/2” grinder and a cutting disk and I’m not done cutting yet. It’s a good thing I learned to cut straight at a young age.

Trying out a couple layouts to settle on the size of 32”x16.5”x3”. It may collapse with all this **** but there is only one way to find out.
View attachment 1
IMG_6146.jpg

Hoping to free up some space in the main toolbox
IMG_6147.jpg
IMG_6148.jpg

This 16 gauge cut really nice with a thin disk. The question remains is the sheet thick enough for the weight?
IMG_6149.jpg
Rocking full PPE including ear muffs
IMG_6151.jpg


Sent from my iPhone using Garage Journal
 

Attachments

  • IMG_6145.jpg
    IMG_6145.jpg
    106.1 KB · Views: 39
OP
Q

quadrcr87

Well-known member
Joined
Jul 5, 2013
Messages
1,036
Location
Travelers Rest, SC
Last step of the night was getting the slides tacked in place. I had to add a 1” tube to support the far end as the 2” piece was in the wrong spot.
IMG_6153.jpg
Unfortunately these 12” slides don’t give me full access to the 16” drawer but I can live with it.
IMG_6154.jpg

A nice clean pile of sheet ready to build a drawer tomorrow. Getting close to being ready to shoot some paint on this thing!
IMG_6152.jpg


Sent from my iPhone using Garage Journal
 

larry4406

Well-known member
Joined
Jan 27, 2006
Messages
18,966
Location
Northern Virginia
OP - Nice build and photos!

For future builds to minimize the tube pulling when welding do not weld across the face of a tube. Weld the two sides that run parallel to tube.

duc916 - I am having a hard time understanding this. Can you include a picture to better explain?
 
OP
Q

quadrcr87

Well-known member
Joined
Jul 5, 2013
Messages
1,036
Location
Travelers Rest, SC
Back In the garage this AM to build the drawer. Seemed like it took an eternity to fit the sheet metal parts and remove the mill scale. If there was an easy button for removing mill scale I would buy it. I finally settled on an 80 grit flapper wheel.

I used multiple welding magnets and verified with a square
IMG_6155.jpg

For any experienced fabricators that are laughing at the Irwin quick clamp or my technique don’t worry you are laughing with me and not at me.
IMG_6156.jpg

Got the drawer in place for a test fit. It’s just barely snug but it functions. The slides are still just tacked so I may spread them a 1/16” before final welding. The drawer front is just held in with magnets for now. Once I mount the slides to the drawer I’ll do a final measure and trim to give a nice even surround.
IMG_6157.jpg
IMG_6158.jpg
IMG_6159.jpg
IMG_6160.jpg

Off to the hardware store for some bolts....


Sent from my iPhone using Garage Journal
 

sberry

Banned
Joined
Jun 18, 2005
Messages
35,747
Location
Brethren, Michigan
This has nice craft work. I might have been tempted to simly scource som bolts I could drill clean thru the tubing just to eliminate some work or shim it up and weld it on a little. Its not a bad thing, just lots more parts.
Normally when doing this as I might have shown in other pics I put the tube right on the top and put the filler in between, all the miter goes away and the joints are all hidden.
 
OP
Q

quadrcr87

Well-known member
Joined
Jul 5, 2013
Messages
1,036
Location
Travelers Rest, SC
Nice looking bench and the quick clamp. Who cares, use what works and what you have. I've used pipe clamps before.


Thanks I appreciate that. I have been following along on your garage thread and you do some great work. I was laughing about the quick clamp because I charred it. It was the only light clamp I had that was just enough to hold the sheet joints tight!


Sent from my iPhone using Garage Journal
 
OP
Q

quadrcr87

Well-known member
Joined
Jul 5, 2013
Messages
1,036
Location
Travelers Rest, SC
I got a lot done today and we are nearing the finish line.

The trip to the hardware store yielded some Allen bolts to countersink into the drawer slides. I really don’t understand the designers thinking when these were designed. Even after countersinking I still have contact with the slide mechanism making the drawer rough. This was only the beginning of my drawer issues today.
IMG_6162.jpg
IMG_6163.jpg
Before
IMG_6164.jpg
After (later discovered still not enough)
IMG_6165.jpg
A big mess for a small welding table. I am really missing my bench surface. Soon it will be back and better than ever!
IMG_6168.jpg
Took a lot of playing with settings to get a decent weld on the drawer. Fortunately this was all ground flush.
IMG_6169.jpg
By the end I get a solid consistent weld. I stitch welded 4” at a time alternating locations
IMG_6171.jpg


Sent from my iPhone using Garage Journal
 
OP
Q

quadrcr87

Well-known member
Joined
Jul 5, 2013
Messages
1,036
Location
Travelers Rest, SC
While I was finishing the drawer I prepped the frame and got a coat of etching primer on it.
IMG_6172.jpg
IMG_6175.jpg

My wife and I were brainstorming a moto related drawer handle and came up with this from a YZ450. I drilled and tapped it for a 8-32 screw and used some aluminum tube as a stand off.
IMG_6173.jpg
IMG_6174.jpg

I sprayed the frame with Rustoleum Hammertone Grey
IMG_6178.jpg
IMG_6176.jpg
While watching the paint dry I drilled all 33 holes for the shelf rivets. In hindsight this may be a little overkill. 4” spacing just felt right.
IMG_6177.jpg
6f7abc494de70266412486b125ab0725.jpg


Sent from my iPhone using Garage Journal
 

Attachments

  • IMG_6172.jpg
    IMG_6172.jpg
    97.3 KB · Views: 39
  • IMG_6175.jpg
    IMG_6175.jpg
    98.6 KB · Views: 38
  • IMG_6173.jpg
    IMG_6173.jpg
    110.2 KB · Views: 47
  • IMG_6174.jpg
    IMG_6174.jpg
    89.7 KB · Views: 43
  • IMG_6178.jpg
    IMG_6178.jpg
    99.9 KB · Views: 40
  • IMG_6176.jpg
    IMG_6176.jpg
    61.5 KB · Views: 40
  • IMG_6177.jpg
    IMG_6177.jpg
    95.1 KB · Views: 37
  • 6f7abc494de70266412486b125ab0725.jpg
    6f7abc494de70266412486b125ab0725.jpg
    93.4 KB · Views: 5
OP
Q

quadrcr87

Well-known member
Joined
Jul 5, 2013
Messages
1,036
Location
Travelers Rest, SC
After the paint dried I started assembling starting with the drawer. This is where the mess started. Once tightened the screws bind with the slide and to top it off my angle iron drawer brackets moved in final welding. It was a struggle to get the drawer in place sacrificing some blood in the process. I’ll have to make some changes but the drawer does slide with some encouragement. The left side doesn’t sit flush with the face either. It goes all the way in and then moved out 1/8”
IMG_6181.jpg
IMG_6182.jpg
IMG_6183.jpg
IMG_6184.jpg
The shelf on the other hand turned out exactly as I planned
IMG_6191.jpg
The hose hanger put a smile on my face as well
IMG_6186.jpg
IMG_6187.jpg


Sent from my iPhone using Garage Journal
 
OP
Q

quadrcr87

Well-known member
Joined
Jul 5, 2013
Messages
1,036
Location
Travelers Rest, SC
In these last couple photos we can all pretend the bench is done and ignore the issues :)
IMG_6188.jpg
IMG_6189.jpg
IMG_6190.jpg
IMG_6192.jpg
Here is the remaining punch list:
-fix drawer slide screw issue (grind heads or deeper countersink)
-massage drawer brackets into alignment
- paint the rest of the drawer
- drill and rivet 29 more times
-screw the top to the base
-drill and mount the vice (1 bolt landed in the middle of tube)
-relay and have a beer


Sent from my iPhone using Garage Journal
 
Last edited:

csp

Well-known member
Joined
Mar 23, 2010
Messages
5,719
Location
Franktown, CO
OP - Nice build and photos!


duc916 - I am having a hard time understanding this. Can you include a picture to better explain?

I thinks he's talking about the joint where the end of a tube meets the face of the longer tube. The inside fillet weld.

This video gives a good example of that being the last bead to lay.

 
OP
Q

quadrcr87

Well-known member
Joined
Jul 5, 2013
Messages
1,036
Location
Travelers Rest, SC
I thinks he's talking about the joint where the end of a tube meets the face of the longer tube. The inside fillet weld.


This video gives a good example of that being the last bead to lay.


I could have used that video a few days ago. I’ll be doing some research and practice before the next project.


Sent from my iPhone using Garage Journal
 
To avoid these ads, REGISTER NOW!
Top Bottom