
You are using an out of date browser. It may not display this or other websites correctly.
You should upgrade or use an alternative browser.
You should upgrade or use an alternative browser.
A small starter garage?
- Thread starter mpire
- Start date
bunnyknuckles
Member
- Joined
- May 16, 2008
- Messages
- 5
How's it coming along?
Ok... its been a while but I have been busy.
First a couple of pix of the garage before. None of this stuff is mine, I took it while shopping for the house. This was one of the few houses I could afford with a 3 car garage and I couldn't be happier!
Talk about clutter!

And more...

So the first thing I did was get rid of all the open shelving. Just seemed cluttered. I gave away what I could, threw away the rest.

I went ahead and ran surround sound and mounted a TV and DVD player in the corner.
Then I started the floor. Epoxy is alot of work!
First acid etched, crack filler, hole patch, then primer coated.
Then gel coat and sanding to get it smooth.
Then hit it with two coats of epoxy.

Then it wasn't perfect, so did another gelcoat and sanding again.
Then 2 more coats of epoxy.
Then some of those accent chips...
Then 2 or three coats of urethane to make seal it all up.

It looks pretty good I think! Just don't look directly at the floor in the morning, it will blind you!

So after I did that I built up some cabinets out of 3/4 oak plywood and some doors I found at Lowe's. Solid as a rock.

I keep all my garden tools and stuff in the cabinets so I don't have stuff laying around.

I keep the lawn mower outside, it was dragging in dirt and I was tracking it into the house. Wife didn't like that. Now it lives outside.

Its just a small rubber-maid shed. Here it is open:

Finally a couple shots of the garage as it sits. I need to paint the garage, but I just haven't had time. Other projects. Mostly working on my cars. I keep the floors mopped and the garage is always clean, but I get very dirty. I have swapped a transmission, thats probably the biggest project so far. Done differential stuff, suspension, etc. No motor pulls yet.

Here you can see the TV, stereo, and the DVD. Its wired up for surround sound. Not sure why I need that, I never seem to watch TV in the garage.

Heres a shot of the rear surround speaker...

Another shot of the cabinets and the white-board where I break down larger projects into manageable bites. I try to do 30 minutes a night on projects until they are done. I get a lot more done than my neighbors.
I put in a couple extra detail lights for those times when you open the hood and it blocks the light. Thats not a problem anymore.

So thats about it. Next is to do some painting. I haven't figured out how you guys paint those pretty stripes. Every time I try to mask things off for painting the paint bleeds under the tape. Must be the texture, I don't know.
Updates when I get it painted.
First a couple of pix of the garage before. None of this stuff is mine, I took it while shopping for the house. This was one of the few houses I could afford with a 3 car garage and I couldn't be happier!
Talk about clutter!
And more...
So the first thing I did was get rid of all the open shelving. Just seemed cluttered. I gave away what I could, threw away the rest.
I went ahead and ran surround sound and mounted a TV and DVD player in the corner.
Then I started the floor. Epoxy is alot of work!
First acid etched, crack filler, hole patch, then primer coated.
Then gel coat and sanding to get it smooth.
Then hit it with two coats of epoxy.
Then it wasn't perfect, so did another gelcoat and sanding again.
Then 2 more coats of epoxy.
Then some of those accent chips...
Then 2 or three coats of urethane to make seal it all up.
It looks pretty good I think! Just don't look directly at the floor in the morning, it will blind you!
So after I did that I built up some cabinets out of 3/4 oak plywood and some doors I found at Lowe's. Solid as a rock.
I keep all my garden tools and stuff in the cabinets so I don't have stuff laying around.
I keep the lawn mower outside, it was dragging in dirt and I was tracking it into the house. Wife didn't like that. Now it lives outside.
Its just a small rubber-maid shed. Here it is open:
Finally a couple shots of the garage as it sits. I need to paint the garage, but I just haven't had time. Other projects. Mostly working on my cars. I keep the floors mopped and the garage is always clean, but I get very dirty. I have swapped a transmission, thats probably the biggest project so far. Done differential stuff, suspension, etc. No motor pulls yet.
Here you can see the TV, stereo, and the DVD. Its wired up for surround sound. Not sure why I need that, I never seem to watch TV in the garage.
Heres a shot of the rear surround speaker...
Another shot of the cabinets and the white-board where I break down larger projects into manageable bites. I try to do 30 minutes a night on projects until they are done. I get a lot more done than my neighbors.
I put in a couple extra detail lights for those times when you open the hood and it blocks the light. Thats not a problem anymore.
So thats about it. Next is to do some painting. I haven't figured out how you guys paint those pretty stripes. Every time I try to mask things off for painting the paint bleeds under the tape. Must be the texture, I don't know.
Updates when I get it painted.
Last edited:
Dead End Kid
New member
- Joined
- May 16, 2009
- Messages
- 2
Looks fantastic! The secret (semi) is that after you lay out the tape/stripping first paint the base color (looks like white in this case) around the tape first. this will bleed thru and seal the gaps, but as this is the same color that is already on the walls you don't see it. Follow up with your stripe color...
4StarCstms
Well-known member
Awesome!!!! What a place to work - You did a great job on the floor, it looks like all that work has paid off
AndrewBigA
Well-known member
i love how your floor came out. i would do the same thing in my shop but i dont have the time to do it. i would have to work outside for an entire week in order to do it right, unrushed & have it come out mint like yours! great job on the floor.
its easier to paint the stripe if you have someone helping you out & of course you should use a level. its better when theres 2 sets of eyes looking at the stripe thats being painted. if the paint is bleeding through, your not using a good enough tape with a good amount of stickyness. its bleeding because the tape isnt sticking 100% to the wall. in my shop i have cinderblocks which dont have a perfectly flat surface. i used 3M 3/4" masking tape first then used 2" to fill in the stripe. im pretty sure the stripe on my wall is 3" thick. i went a step further with the tape & used the lime green 3M masking tape to make sure the edges of the stripe were nice & sharp. the green tape has the best stickyness out of all the masking tapes that 3M produces.
let the stripe dry over night before you remove the masking tape very slowly. i grabbed one end of the tape & stood a few feet away from the wall. as i pulled it back, i slowly walked from one end of the room to the next.
my purple painted stipe is not perfect but its good enough for my eyes & im a picky person. there is hardly any paint that bled through. use your finger tips & try your best to make sure the tape sticks to all the little bumps & cracks in your cinder block & it should come out awsome!
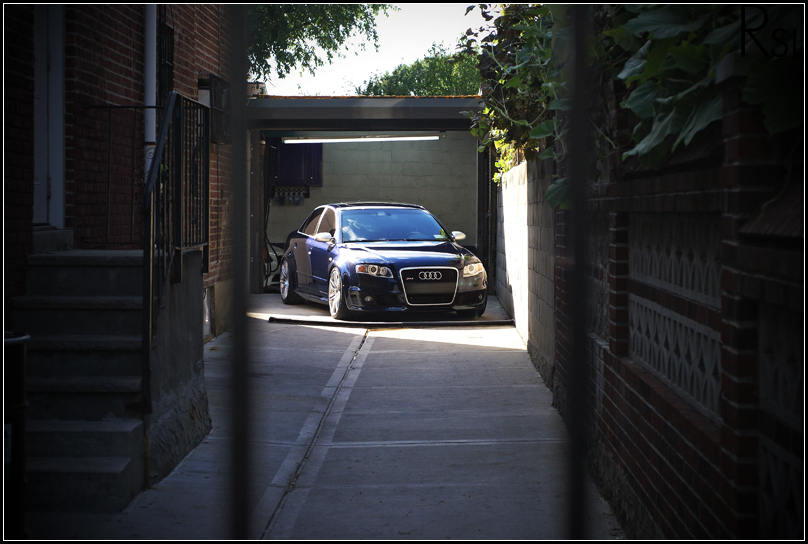
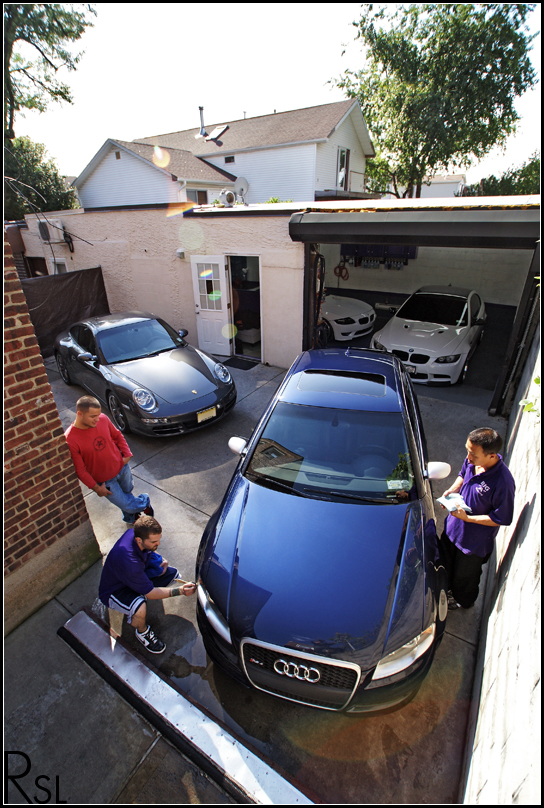
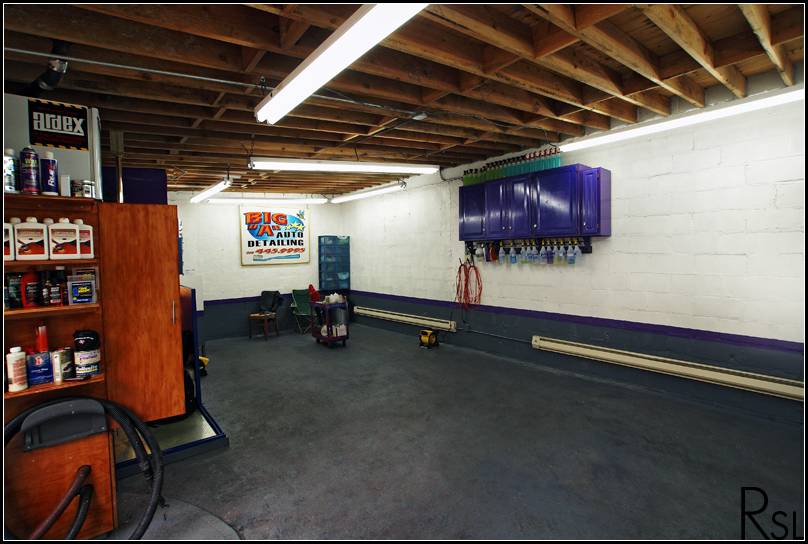
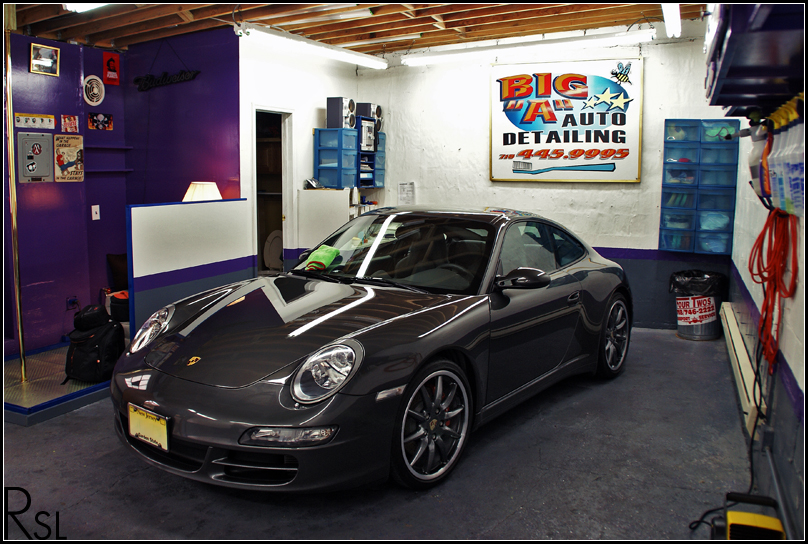
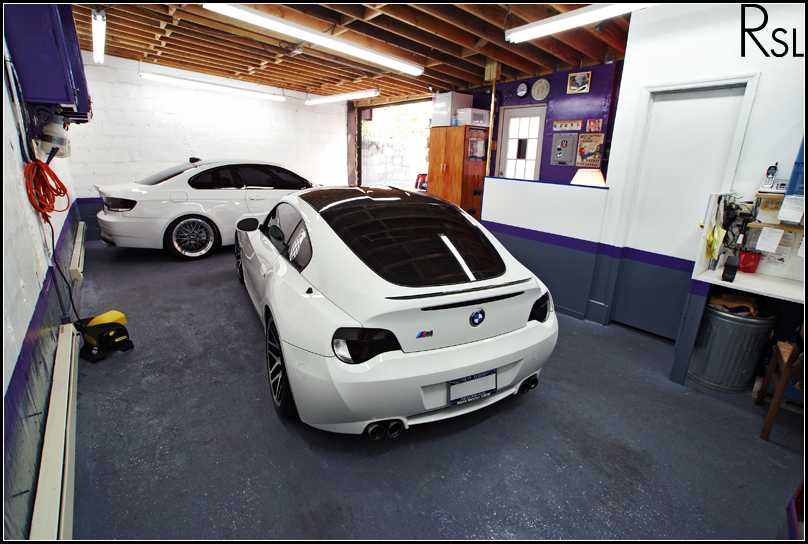
heres a few pics of my shop with my purple stripe that i love!

you can really get it perfect if your that **** & have some extra time on your hands. after your stripe is all tapped up & has the lime green 3M masking tape on the edges of the stripe, take some electrical tape & use that on the outline of the stripe. the electrical tape is even better because its so thin & flexible. you shouldnt have any paint bleeding through if you finish the taping with electrical tape.
sorry for the long post, just want to help out one of my GJ brothers.
=)
its easier to paint the stripe if you have someone helping you out & of course you should use a level. its better when theres 2 sets of eyes looking at the stripe thats being painted. if the paint is bleeding through, your not using a good enough tape with a good amount of stickyness. its bleeding because the tape isnt sticking 100% to the wall. in my shop i have cinderblocks which dont have a perfectly flat surface. i used 3M 3/4" masking tape first then used 2" to fill in the stripe. im pretty sure the stripe on my wall is 3" thick. i went a step further with the tape & used the lime green 3M masking tape to make sure the edges of the stripe were nice & sharp. the green tape has the best stickyness out of all the masking tapes that 3M produces.
let the stripe dry over night before you remove the masking tape very slowly. i grabbed one end of the tape & stood a few feet away from the wall. as i pulled it back, i slowly walked from one end of the room to the next.
my purple painted stipe is not perfect but its good enough for my eyes & im a picky person. there is hardly any paint that bled through. use your finger tips & try your best to make sure the tape sticks to all the little bumps & cracks in your cinder block & it should come out awsome!
heres a few pics of my shop with my purple stripe that i love!
you can really get it perfect if your that **** & have some extra time on your hands. after your stripe is all tapped up & has the lime green 3M masking tape on the edges of the stripe, take some electrical tape & use that on the outline of the stripe. the electrical tape is even better because its so thin & flexible. you shouldnt have any paint bleeding through if you finish the taping with electrical tape.
sorry for the long post, just want to help out one of my GJ brothers.
=)
Ok, I have the 3M blue tape with the orange label. I will pick up some green tape tomorrow when I get a new drain for the bathroom. The question is what do you do with the Electrical tape? Do you run it on top of the green tape? I figure I will just use the laser level to mark off the stripes.
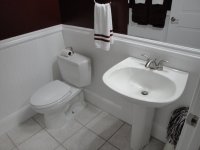
I just finished the bathroom next to the garage, though its not technically in the garage. I put up new doors, new door trim, wainscoting, crown molding, chair rail, new G-max Toto, new mirror, new towel hangers, etc. Finally got it all painted. I hate painting doors! Now I can move on to the garage for painting.
That new paint and primer in one stuff is awesome! I will probably go with a maroon stripe in the garage with a light grey on the bottom and semi-gloss white on the top.
Attachments


AndrewBigA
Well-known member
Ok, I have the 3M blue tape with the orange label. I will pick up some green tape tomorrow when I get a new drain for the bathroom. The question is what do you do with the Electrical tape? Do you run it on top of the green tape? I figure I will just use the laser level to mark off the stripes.
you use the black electrical tape for the edges of your stripes so yes it would go on top of the green 3m masking tape.
AndrewBigA
Well-known member
I am going to try that out this weekend and see how it well it works.
cool, good luck!
Dan0myte
Well-known member
mpire said:
This is my new windows background!!
Wouldn't one of these be better?
http://www.s54b32.com/S54/coupe2.JPG
http://www.s54b32.com/S54/coupe4.JPG
http://www.s54b32.com/S54/coupe2.JPG
http://www.s54b32.com/S54/coupe4.JPG
ironheadtom
Well-known member
Love the floor...is that stuff pretty durable ? Any chips from your ****** work?
My bathroom is pretty manly. Thats a toto Gmax. It can handle alot, I flushed a whole roll of toilet paper in testing. I am impressed for 1.6 gallons. Gojo is in the medicine cabinet next to it. Towels sport my college logos. As does the night light. There is a sink I put in the laundry room connected to the garage that I use for washing up. I built it custom and used the washer water and drain lines. Just put in a junction for the sink. I also had to fit my laser guided cat box in there too. Now I never have to clean the cat box. It cleans itself and flushes the waste down the drain. Worth its weight in gold!

The floor is 10 coats. I would say 3/8 to 1/4 inch of thickness. I broke a diff cover, snapped off a cooling fin when I slipped and the whole diff fell. It put a dent in the floor, but it didn't chip or crack. Can't explain that one, but I am obviously happy with the floor.

The floor is 10 coats. I would say 3/8 to 1/4 inch of thickness. I broke a diff cover, snapped off a cooling fin when I slipped and the whole diff fell. It put a dent in the floor, but it didn't chip or crack. Can't explain that one, but I am obviously happy with the floor.
Last edited:
i8tokyo
Well-known member
WWWWHAA!!!!! I want a M3 coupe bbbbbbbad!
The M3 is too heavy.WWWWHAA!!!!! I want a M3 coupe bbbbbbbad!
My car has the same motor though.
i8tokyo
Well-known member
looks sweet, I love the coupes. Yours looks great. love the color too.
DEV0
Active member
Estoril is indeed the best, of course I'm biased too. Good to see another Bimmerforums Z3 section transplant on here.
Dig the RKs.
Dig the RKs.
german oldschool
Active member
Great looking garage And the Dolby Surround is a must have in a garage I know that I also like the M Coupe unfortunately they are very rare here in germany.
Greets from germany
Daniel
And the Dolby Surround is a must have in a garage I know that I also like the M Coupe unfortunately they are very rare here in germany.Greets from germany
Daniel
OccupantRJ
Well-known member
My bathroom is pretty manly. Thats a toto Gmax. It can handle alot, I flushed a whole roll of toilet paper in testing. I am impressed for 1.6 gallons. Gojo is in the medicine cabinet next to it. Towels sport my college logos. As does the night light. There is a sink I put in the laundry room connected to the garage that I use for washing up. I built it custom and used the washer water and drain lines. Just put in a junction for the sink. I also had to fit my laser guided cat box in there too. Now I never have to clean the cat box. It cleans itself and flushes the waste down the drain. Worth its weight in gold!
I want to know more about the cat box!
The cat box? Its hooked up to the water and drain lines. When the cat uses the box, then a little arm picks up the cat **** and drops it into a hole, then purees it and flushes it down the drain. It uses plastic litter, and it has a cartridge for a sanitizing solution.
The biggest problem was that you had to buy the litter and the solution cartridges from the company. Well, that won't work. We modify everything. So if you can find an older one on Ebay or whatever, you can easily hack the cartridges to last forever by just refilling them. I use a pet cleaning solution from the pet store now. And as far as the litter, I just use injection molding pellets for molded plastic. Its super cheap stuff.
I gotta drag it out once every 6 months and hose it out and clean it up just in case, but I haven't had any problems really. Sure as hell beats having to scoop the litter box! I made a custom cabinet and put a large sink over it so I can wash up from working in the garage.
I haven't spent a dime on anything but hot water and electricity for the cat box in the last 4 years. I am sure thats cheaper than buying 1000s of pounds of litter. The only cat litter I use now is for soaking up oil spills.
More details at www.catgenie.com but the new 120s aren't hackable yet. I am sure someone is working on it.")
The biggest problem was that you had to buy the litter and the solution cartridges from the company. Well, that won't work. We modify everything. So if you can find an older one on Ebay or whatever, you can easily hack the cartridges to last forever by just refilling them. I use a pet cleaning solution from the pet store now. And as far as the litter, I just use injection molding pellets for molded plastic. Its super cheap stuff.
I gotta drag it out once every 6 months and hose it out and clean it up just in case, but I haven't had any problems really. Sure as hell beats having to scoop the litter box! I made a custom cabinet and put a large sink over it so I can wash up from working in the garage.
I haven't spent a dime on anything but hot water and electricity for the cat box in the last 4 years. I am sure thats cheaper than buying 1000s of pounds of litter. The only cat litter I use now is for soaking up oil spills.
More details at www.catgenie.com but the new 120s aren't hackable yet. I am sure someone is working on it.
A couple detail pix...
Here is the pic of the genie screw drive. I didn't know about the other openers at the time. This was the coolest one that Home Depot sold... But it woudln't fit right, so I had to make some mounting plates. Put a nice ogee on the edges. Will look good when I get to painting.

Here is the base I made for the compressor. Its leftover plywood from the cabinets filled with sand. Someone told me sand was a good vibration absorber. Thats sitting on an inch thick rubber mat that they use in weight rooms to protect the floor. Does a really good job of absorbing noise. Compressor is pretty quiet compared to being bolted to the floor.

Custom shelf for the stereo. Also, I took the cover off the DVD player and screwed that to the TV stand, then reattached the DVD player to the housing. Perfect fit.

Garage attic access. I finally got it trimmed. It needs paint too. I will be re-trimming the door with this trim. I have plenty left over from re-doing all the trim in the house.

Custom speaker shelf. Used some cheap L brackets. Turned out nice. Probably going to paint the speakers white and put some white speaker cloth on them. I like the "clean room" kinda feel.

Here is the pic of the genie screw drive. I didn't know about the other openers at the time. This was the coolest one that Home Depot sold... But it woudln't fit right, so I had to make some mounting plates. Put a nice ogee on the edges. Will look good when I get to painting.
Here is the base I made for the compressor. Its leftover plywood from the cabinets filled with sand. Someone told me sand was a good vibration absorber. Thats sitting on an inch thick rubber mat that they use in weight rooms to protect the floor. Does a really good job of absorbing noise. Compressor is pretty quiet compared to being bolted to the floor.
Custom shelf for the stereo. Also, I took the cover off the DVD player and screwed that to the TV stand, then reattached the DVD player to the housing. Perfect fit.
Garage attic access. I finally got it trimmed. It needs paint too. I will be re-trimming the door with this trim. I have plenty left over from re-doing all the trim in the house.
Custom speaker shelf. Used some cheap L brackets. Turned out nice. Probably going to paint the speakers white and put some white speaker cloth on them. I like the "clean room" kinda feel.