You are using an out of date browser. It may not display this or other websites correctly.
You should upgrade or use an alternative browser.
You should upgrade or use an alternative browser.
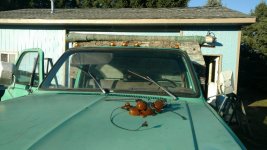
Between 705 & 1200 SQ/FT A trip back from the edge.
- Thread starter xtremek
- Start date
Workspaces between 705 and 1200 squarefeet.


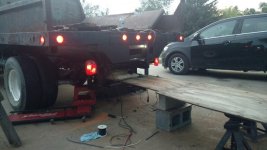
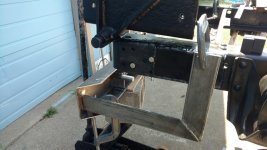
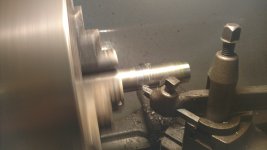
Finally figured out the speed on the new spool was too fast. I can’t tell you which is more fun, burning metal, or making chips. Anyway, the bumper is pretty much done. Next step is to drill the frame mounting holes for the bumper, weld the hitch to the bumper, and then bolt the whole assembly to the frame. Not looking forward to the last step, this thing is going to weigh a TON (ok, probably just 150-200#).
Attachments


Strouty
Well-known member
That is going to have some serious leverage on it, do you think those four angle irons will be enough?
racer-john
Well-known member
Now that Strouty has brought it up, I agree, it needs more support. An angle (of the same size) going diagonaly up from the bumper to the frame. A little mor coping of material, but better now than sorry later. ... and you are welding vertically on the frame, maybe add some fish plates for added strenghth.
That is going to have some serious leverage on it, do you think those four angle irons will be enough?
Considering what was there (swiss cheese) and the loads I had on it in that condition, I think I'm safe. But I'll watch it closely the first few loads. If it survives those loads, it'll survive anything.
........... and you are welding vertically on the frame, maybe add some fish plates for added strenghth.
No welds to the frame, 12 grade 8 1/2-13 bolts.
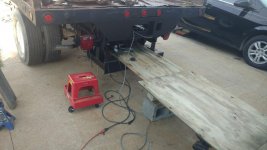
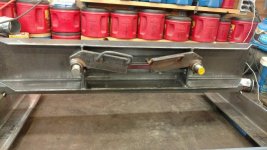
Things are getting close on the bumper/hitch. Pretty much everything is painted. I hope to be able assemble it, and put it on tomorrow. Cleaning up the hoist and the overload stops, then paint them. It’s getting close. I really want this done, I’ll be putting this thing to work soon, I hope.
Attachments


shortykorte
Well-known member
Paint!!!!!
What’s that spring for?
Sent from my iPhone using Garage Journal
What’s that spring for?
Sent from my iPhone using Garage Journal
rixtrix1
Well-known member
1st, thanks for your sentiments. It'll be my Dad, my daughter and I for most of the trip (20 hours one way). We'll pick up my son on his bike about half way there. So it should be a bit of fun.
All our other vehicles have 6 pin connectors, so I just leave the 6 pin adaptor on my 5'x10' trailer, but I want to be able to tow a gooseneck with the dump truck as well.
6 pin will be on the bumper/hitch, 7 pin will be back on the back face of the deck. And the plan is for the dump truck to be used to haul a gooseneck
Since this is strictly a work truck for my wife's future business, the name of this game is functional, durable, presentable, and CHEAP, in that order. This is my attempt at the last two. Now the Cabover, that's a completely different story.
Condolences, Kirk! One of my technician's (whose truck I maintain) Dad has a 46 Ford COE crewcab dually. With a Candy black cherry paint job, it's pretty sweet. I'll forward a pic if I can get one from him.
rixtrix1
Well-known member
Bumper/hitch looks great!
Paint!!!!!
What’s that spring for?
This is a goofy hitch. The spring cushions any shocks transmitted from the trailer to the truck, in either the forward or rearward direction.
Condolences, Kirk! One of my technician's (whose truck I maintain) Dad has a 46 Ford COE crewcab dually. With a Candy black cherry paint job, it's pretty sweet. I'll forward a pic if I can get one from him.
Thanks for the wishes. I'd love to see pics of the '46.
Bumper/hitch looks great!
I'll just be glad if the hitch and frame repairs hold up. I don't expect the paint to last very long, it's all rattle canned.
jon72vega
Well-known member
Kirk,
Good work on the bumper and hitch!
Good work on the bumper and hitch!
Strouty
Well-known member
I bet the spring will be nice, one of my trucks has an air bag to help cushion things, but it is for a pintle hitch, I have yet to hook it up.
Rattle can will probably hold up better than you think, just leave the truck in Florida for the winter.")
Rattle can will probably hold up better than you think, just leave the truck in Florida for the winter.
shortykorte
Well-known member
Yep leave it in Florida [emoji12]
Sent from my iPhone using Garage Journal
Sent from my iPhone using Garage Journal
Kirk,
Good work on the bumper and hitch!
Thank you sir.
I bet the spring will be nice, one of my trucks has an air bag to help cushion things, but it is for a pintle hitch, I have yet to hook it up.
Rattle can will probably hold up better than you think, just leave the truck in Florida for the winter.
I doubt I'll ever pull a load heavy enough for the spring to actually function. Partly because the most I ever pull is 2 yds of crushed concrete. And partly because the assembly is pretty rusted.
Yep leave it in Florida [emoji12]
Maye drop it off in Tallahassee? There could be a deal in there somewhere.
matt_i
Well-known member
Hate to be a critical voice but I'm also worried about the hitch restructuring. In a cantilever the max stress is at the root and that's where you reduced the vertical member's flat by about a factor of 3, just gauging from the side view of new and old.
Imo one has to be super careful with trailer hitches, the dynamic loads are high and the potential for people to get killed is equivalent. I wouldn't put any load frame on my vehicle that I didn't weld with a 7018 stick and got it just short of being hot enough to melt into a puddle on the floor.
In any case, admire your dedication so I don't want the post to come across as wrong.
Last edited:
Matt, I totally understand your concern. I hauled several loads with the old hitch, which was pretty much swiss cheese, so I figure I have to be better than what it a was. When the hitch is literally rusted completely through and it still functioned. I have to be in better condition than I was.
bimmer1980
Well-known member
Xtremek--
If I look at the "painted" picture of your hitch, you actually have two members on each side supporting the hitch, correct? Versus your "in-progress" shot of the hitch showing a fully cantilevered hitch.....
Also, it appears the "tongue" of the hitch is a spring loaded assembly that is to absorb some braking or acceleration loads... It appears these loads are spread over the triangulated inner support members of the hitch...... correct?
If I understand correctly, I think your loads and hitch design seem better than what may initially appear in your one shot.....?
Xtremek--
If I look at the "painted" picture of your hitch, you actually have two members on each side supporting the hitch, correct? Versus your "in-progress" shot of the hitch showing a fully cantilevered hitch.....
Also, it appears the "tongue" of the hitch is a spring loaded assembly that is to absorb some braking or acceleration loads... It appears these loads are spread over the triangulated inner support members of the hitch...... correct?
If I understand correctly, I think your loads and hitch design seem better than what may initially appear in your one shot.....?
Funny you should mention that. It struck me on the way home from shopping, is everyone just looking at the pic where I was lining everything up so I could place the rear supports? I think we're right, at least I hope so.
Strouty, Matt, Racer John, is that what you were looking at? Or do you still think my rebuild/design is that weak? There are 4 vertical members holding the hitch. They're 1/4" x 3" angle.
matt_i
Well-known member
I think I see it now...you added another leg.

Sorry I didn't fully grasp that concept.... my apologies! I think when you have a pic of the completed assembly from the side we'll all see that its OK.
Sorry I didn't fully grasp that concept....
my apologies! I think when you have a pic of the completed assembly from the side we'll all see that its OK.I think I see it now...you added another leg..............Sorry I didn't fully grasp that concept....
Matt, no need to apologize. A Kirkism, "Plan for the worst, hope for the best, and expect it'll usually end up in the middle somewhere". I'd rather you tell me my stuff is poop now, than be 200 miles from home and have the whole thing go bad. I didn't really alter the design much, just traded the vertical plate for 2 pieces of angle. I figure the angle will keep it more stable left to right, and I won't lose much vertically because the front corner is no longer relying on a weld, because it's 1 bent piece.
"Plan for the worst, hope for the best, and expect it'll usually end up in the middle somewhere".
We also have a similar phrase in Russia.
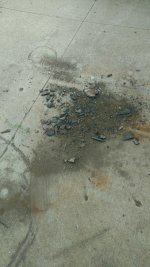
In the continuing sga of the '82 c30 dump truck.This pile is pretty much all that was left of the rear frame where the hitch mounted.
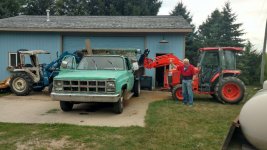
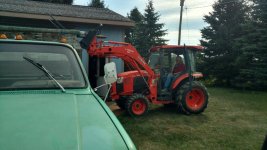
But the big news is that “The Eagle has Landed”. I borrowed a neighbor’s tractor, and asked another neighbor to bring his tractor down and help me plop the box on. Two hours later, it’s sitting in position. I’m trying to finish the wiring, but every time I think I’m done, I find something else not working and needs to be added (fix the fuel gauge, wipers, clearance lights, radio, volt gauge……need I go on). Once the wiring is done, I’ll finish the box install.
But the big news is that “The Eagle has Landed”. I borrowed a neighbor’s tractor, and asked another neighbor to bring his tractor down and help me plop the box on. Two hours later, it’s sitting in position. I’m trying to finish the wiring, but every time I think I’m done, I find something else not working and needs to be added (fix the fuel gauge, wipers, clearance lights, radio, volt gauge……need I go on). Once the wiring is done, I’ll finish the box install.
Attachments


Congrats on a big step forward, that's gotta feel good.
I can barely make baby steps, nothing that I need for mine is ever nearby and shipping is slooow. The stuff I ordered today will not arrive until the 17th. I ended up grinding this afternoon, which I hate to do in shorts and a thin shirt.
I can barely make baby steps, nothing that I need for mine is ever nearby and shipping is slooow. The stuff I ordered today will not arrive until the 17th. I ended up grinding this afternoon, which I hate to do in shorts and a thin shirt.
mybigwarwagon
Well-known member
The work list never ends. That is why a project vehicle is never done.
Good to see another 1720 doing work. Same machine different stickers. My Gertie is a Ford 1720. Great little tractors
Good to see another 1720 doing work. Same machine different stickers. My Gertie is a Ford 1720. Great little tractors
Congrats on a big step forward, that's gotta feel good. .....................nothing that I need for mine is ever nearby and shipping is slooow. The stuff I ordered today will not arrive until the 17th................
Thanks, Kev. It was an even bigger feeling of accomplishment getting the new brake controller to turn on. I'm really looking forward to seeing all of the box lights on. And I feel for you on having nothing nearby. We're very lucky. we live far enough out to be in the middle of nowhere, but close enough in for everything to be a reasonable trip.
The work list never ends. That is why a project vehicle is never done.
Good to see another 1720 doing work. Same machine different stickers. My Gertie is a Ford 1720. Great little tractors
This one will be done with its current step SOON. Box functioning, goose neck working, and all the electrical functioning properly. More will come later. And I agree, the little 1720 is a nice little tractor. THe gent in the Kubota owned it and a BIG white. Sold the 1720 to his neighbor across the street and traded in the White for the Kubota. It's good to have nice neighbors with cool toys.
jollygreengiant
Well-known member
Will you be doing anything to the cab and front end or leaving as is?
Will you be doing anything to the cab and front end or leaving as is?
JGG, I wasn't planning on it, but the end use for the truck is a for a business SWMBO wants to start. She asked the same question a few days ago, so it looks like I'll be doing panel replacement on it next summer. SIGH!!!!!
jollygreengiant
Well-known member
JGG, I wasn't planning on it, but the end use for the truck is a for a business SWMBO wants to start. She asked the same question a few days ago, so it looks like I'll be doing panel replacement on it next summer. SIGH!!!!!
Huh. You mean I'm not the only one who can't do a single project without it *********** beyond what you thought it would??

Are the panels as bad as the frame was?
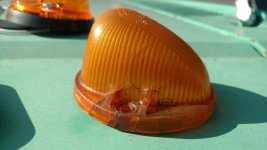
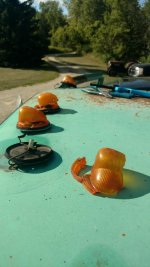
Does this picture of the driver's floor pan answer your question? There are no rockers, the doors aren't horrible, but the mirrors have pulled at least 4 holes in each side. Cab corners are gone. Hole up by left clearance light. Doors are $150 new, fenders are $90 new, cab corners are $20, rockers are $30 for inner and $30 for outer. Yep, I'll be looking for decent priced body parts this next year.
Attachments

Bob Heine
ALLIANCE MEMBER
Kirk, are you saying rust converter and rubber mats isn't enough?
jon72vega
Well-known member
Kirk,In the continuing sga of the '82 c30 dump truck.This pile is pretty much all that was left of the rear frame where the hitch mounted.
But the big news is that “The Eagle has Landed”. I borrowed a neighbor’s tractor, and asked another neighbor to bring his tractor down and help me plop the box on. Two hours later, it’s sitting in position. I’m trying to finish the wiring, but every time I think I’m done, I find something else not working and needs to be added (fix the fuel gauge, wipers, clearance lights, radio, volt gauge……need I go on). Once the wiring is done, I’ll finish the box install.
That's a milestone getting the box reinstalled.

I like your ingenious way of getting the box up in the air.
Next you'd better get on the wiring.


jollygreengiant
Well-known member
Does this picture of the driver's floor pan answer your question? There are no rockers, the doors aren't horrible, but the mirrors have pulled at least 4 holes in each side. Cab corners are gone. Hole up by left clearance light. Doors are $150 new, fenders are $90 new, cab corners are $20, rockers are $30 for inner and $30 for outer. Yep, I'll be looking for decent priced body parts this next year.
Well at least your prices for metal are pretty good. Looks like you have a lot of work ahead of you. Excited to see the outcome!
Kirk, are you saying rust converter and rubber mats isn't enough?
I'm not sure rust converter works on strainers. Maybe the stuff you paint on screens tha you can make a boat out of might.

Kirk,
That's a milestone getting the box reinstalled.
I like your ingenious way of getting the box up in the air.
Next you'd better get on the wiring.
Jon, I've been saving the wiring just for you. You're dropping by on Friday, right?
Well at least your prices for metal are pretty good. Looks like you have a lot of work ahead of you. Excited to see the outcome!
JGG, yep, the sheetmetal is really reasonable. I'd like to find complete doors, so I don't have to swap all the juts out. But once I get this usable and the '03 f-150 movable under its own power, everything will move to the back of the bus while I prep for the '52.
shortykorte
Well-known member
Cool, I didn’t realize it was an English dump truck, right side drive. Lol.
Screen and some as seen on TV should seal the floor nicely.
Sent from my iPhone using Garage Journal
Screen and some as seen on TV should seal the floor nicely.
Sent from my iPhone using Garage Journal
mybigwarwagon
Well-known member
Eh, that hole ain't that bad. Tell her to not wear stiletto heals while she is driving and it should be good.
Strouty
Well-known member
Since it is a dump truck, I would definitely just get a cab, I say that like it is easy.......
Looks good, functional is always a good thing, looks are nice, but functional is better. I say that to my GF all the time, she doesn't like me much.
Looks good, functional is always a good thing, looks are nice, but functional is better. I say that to my GF all the time, she doesn't like me much.
Eh, that hole ain't that bad. Tell her to not wear stiletto heals while she is driving and it should be good.
With my wife, it'd be more like tetanus. She's barefoot as much as possible.
Since it is a dump truck, I would definitely just get a cab, I say that like it is easy.......
Looks good, functional is always a good thing, looks are nice, but functional is better. I say that to my GF all the time, she doesn't like me much.
So if you disappear, we know you GF finally let you know exactly what she thought?