
Last fall I added a 100 amp sub-panel to my garage, which required upgrading my main panel & service to 200 amp. It took a lot of work and a lot of research on forums like this, so I thought I would try to give back with whatever I remember.
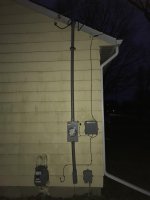
I suppose the most logical place to start is from where the power comes in from the power company. I used 2” grey PVC and 3 separate THHN wires, I believe they were 00 aka ”2-ought” copper. I used one clamp before the meter to hold my conduit up straight and screwed it straight through my siding into the sheathing. The screws I bought were actually too long, the last inch near the head was unthreaded and that was all I needed lol. I spoke a lot with my local inspector about a lot of things, he was a super helpful guy. One of those things was the weatherhead. Code is 12 ft I think, but the original from 1969 was only at 10 ft. It was positioned so that to get up to 12, I would have needed to go through my roof overhang. He didn’t make me do that because the house is up on a hill and the transformer is up pretty high as well.
The power company was a bit of a pain to work with because the guy assigned to my area was way overworked. But eventually I got it scheduled for them to come cut my power first thing; from there I had to work with the linesman and the inspector to get it hooked back up. I took a day off work for the final hook-up, and since the linesman didn’t show till 8:30 and I was supposed to be the first stop for my inspector, he gave me my “green sticker” at 10:30 even though I was not quite done with my main panel. The meter socket was provided by the power company at no charge, as was the linesman’s work.
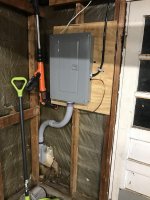
From the meter socket, I continued using 2” PVC into my main panel. Getting into the main panel from the meter was maybe the hardest part. I had some funny bends because I was putting my new 200 amp panel next to my old 100 amp panel, plus the sharp bend to get into the house. Wrestling that heavy wire was a huge pain and I ended up needing my wife’s help to push while I pulled the last bit so my conduit body would screw shut. My main panel had to be grounded to my gas line and to 2 ground rods at least 8 ft apart. Of course my second ground rod hit a giant rock so I had to jack it up with a floor jack and a pipe wrench.
Like I mentioned, I left my old 100 amp panel in place so I wouldn’t have to try and re-wire everything in one day. It is currently a sub-panel but I plan to move everything over and get rid of it before I sell the place. Separating the grounds and neutrals to make it a sub-panel was a lot harder than I planned. It occurred to me later I could have just added a ground bar and been done way faster, but I wound up disassembling basically the whole panel to separate the bars that came with it. That panel is wired with 2-2-2-4 Al SER cable I had left from my run to the garage. I didn’t have to change the grounding on the old panel.
The garage is detached, on the opposite side of the house from the panel, and about 8 ft of concrete away from the house. I couldn’t trench around the concrete because we have several large trees. So I used a circular saw and a masonry blade to cut through the thin patio concrete between the 2, and dug my trench as short as possible. I used 2” conduit there as well because I wanted that run to be easy and have room in case I wanted to run a new garage door opener or a data cable or whatever. I don’t think SER is the correct wire type for this application, but Menards had a piece on clearance after a return/miscut that was EXACTLY what I needed. I asked my inspector and he said he would allow it since it was a short run underground and I was a DIY guy. I believe the SE-U that would be correct has an insulated ground wire, mine is bare. I had initially bought 100 ft of 2-2-2-4 URD wire but I figured out that I would have to run it inside of conduit all the way across my house because it wasn’t wrapped into a cable, only twisted together. Buying that clearance cable only cost me an extra $20 over all the conduit I would have needed so it was a no-brainer once I got the green light from the inspector. That panel was grounded with a ground rod as well. The inspector checked from the weatherhead down through to both sub-panels, the rest I did not feel I needed to have the extra charges for.
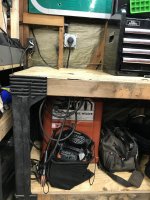
The sub-panel in the garage is 100 amps. Its purpose is primarily to run a Lincoln Tombstone so that has a 60 amp breaker. I didn’t buy enough of the 6-6-6-10 Romex cable I needed to wire the NEMA 14-50 that I wanted to back feed my generator (I know, that’s not how it’s how you’re supposed to do it, I make sure to turn off my main when I back feed). Since I was running low on my expensive Romex, I got creative in what I believe is a legitimate junction: I used a 6x6x4 junction box and split bolt connectors to make a “T” in the long run for my welder (NEMA 6-50) to add my generator plug. I didn’t split the longer run, just cut the insulation and added a short run from there. In order to do that, I needed to wrap the split bolt connectors in rubber tape then electrical tape.
Feel free to ask any questions. I hope this helps someone who’s looking to do a similar job.
I suppose the most logical place to start is from where the power comes in from the power company. I used 2” grey PVC and 3 separate THHN wires, I believe they were 00 aka ”2-ought” copper. I used one clamp before the meter to hold my conduit up straight and screwed it straight through my siding into the sheathing. The screws I bought were actually too long, the last inch near the head was unthreaded and that was all I needed lol. I spoke a lot with my local inspector about a lot of things, he was a super helpful guy. One of those things was the weatherhead. Code is 12 ft I think, but the original from 1969 was only at 10 ft. It was positioned so that to get up to 12, I would have needed to go through my roof overhang. He didn’t make me do that because the house is up on a hill and the transformer is up pretty high as well.
The power company was a bit of a pain to work with because the guy assigned to my area was way overworked. But eventually I got it scheduled for them to come cut my power first thing; from there I had to work with the linesman and the inspector to get it hooked back up. I took a day off work for the final hook-up, and since the linesman didn’t show till 8:30 and I was supposed to be the first stop for my inspector, he gave me my “green sticker” at 10:30 even though I was not quite done with my main panel. The meter socket was provided by the power company at no charge, as was the linesman’s work.
From the meter socket, I continued using 2” PVC into my main panel. Getting into the main panel from the meter was maybe the hardest part. I had some funny bends because I was putting my new 200 amp panel next to my old 100 amp panel, plus the sharp bend to get into the house. Wrestling that heavy wire was a huge pain and I ended up needing my wife’s help to push while I pulled the last bit so my conduit body would screw shut. My main panel had to be grounded to my gas line and to 2 ground rods at least 8 ft apart. Of course my second ground rod hit a giant rock so I had to jack it up with a floor jack and a pipe wrench.
Like I mentioned, I left my old 100 amp panel in place so I wouldn’t have to try and re-wire everything in one day. It is currently a sub-panel but I plan to move everything over and get rid of it before I sell the place. Separating the grounds and neutrals to make it a sub-panel was a lot harder than I planned. It occurred to me later I could have just added a ground bar and been done way faster, but I wound up disassembling basically the whole panel to separate the bars that came with it. That panel is wired with 2-2-2-4 Al SER cable I had left from my run to the garage. I didn’t have to change the grounding on the old panel.
The garage is detached, on the opposite side of the house from the panel, and about 8 ft of concrete away from the house. I couldn’t trench around the concrete because we have several large trees. So I used a circular saw and a masonry blade to cut through the thin patio concrete between the 2, and dug my trench as short as possible. I used 2” conduit there as well because I wanted that run to be easy and have room in case I wanted to run a new garage door opener or a data cable or whatever. I don’t think SER is the correct wire type for this application, but Menards had a piece on clearance after a return/miscut that was EXACTLY what I needed. I asked my inspector and he said he would allow it since it was a short run underground and I was a DIY guy. I believe the SE-U that would be correct has an insulated ground wire, mine is bare. I had initially bought 100 ft of 2-2-2-4 URD wire but I figured out that I would have to run it inside of conduit all the way across my house because it wasn’t wrapped into a cable, only twisted together. Buying that clearance cable only cost me an extra $20 over all the conduit I would have needed so it was a no-brainer once I got the green light from the inspector. That panel was grounded with a ground rod as well. The inspector checked from the weatherhead down through to both sub-panels, the rest I did not feel I needed to have the extra charges for.
The sub-panel in the garage is 100 amps. Its purpose is primarily to run a Lincoln Tombstone so that has a 60 amp breaker. I didn’t buy enough of the 6-6-6-10 Romex cable I needed to wire the NEMA 14-50 that I wanted to back feed my generator (I know, that’s not how it’s how you’re supposed to do it, I make sure to turn off my main when I back feed). Since I was running low on my expensive Romex, I got creative in what I believe is a legitimate junction: I used a 6x6x4 junction box and split bolt connectors to make a “T” in the long run for my welder (NEMA 6-50) to add my generator plug. I didn’t split the longer run, just cut the insulation and added a short run from there. In order to do that, I needed to wrap the split bolt connectors in rubber tape then electrical tape.
Feel free to ask any questions. I hope this helps someone who’s looking to do a similar job.
Attachments
-
 BA0352FA-44A7-42F4-8568-39589EFE3042.jpg49.1 KB · Views: 117
 -
 AAC15AC1-8A25-40ED-A8ED-C18296C34055.jpg134.4 KB · Views: 137
 -
 339F5FD9-5612-4A4F-A41E-C9EB3AEFD3CA.jpg109.5 KB · Views: 118
 -
 C6F5CCCC-E638-4927-897A-8FB4861C61A6.jpg126.2 KB · Views: 108
 -
 EEB7F7BC-9DCA-48AE-B24A-C8979AB2A7B4.jpg105.9 KB · Views: 125
 -
 DE6D296B-319C-4073-8969-020C062C6A52.jpg88.4 KB · Views: 121
 -
 DB00673E-4058-42A0-8A40-A7398CE73EC1.jpg118.9 KB · Views: 108