MushCreek
Well-known member
VCT- Vinyl Composite Tile. What we used to call asbestos tile. I just did my basement, and thought I'd share some reviews and tips. I won't do a full tutorial; there's plenty of those on the interwebs.
I bought my Armstrong tile at a big box store. With the glue, vinyl cove base, and a few tools I had to buy, I still came in under a buck a square foot over roughly 1000 square feet. VCT is tough and can be refinished (in a way). I worked in a machine shop with VCT floors that had been there over 30 years, with metal chips, forklift traffic, etc. The key is to seal it and wax it. Until it's sealed and waxed, the installation isn't complete. Then, whatever happens to it can be stripped off with the wax and refinished.
The product was quite good for $.76 a piece. It's supposed to be 'perfectly' square, but I noticed slight variations. Sometimes a piece just wouldn't quite fit the adjacent ones perfectly, but when you're standing up, you cant really see it. It had an annoying amount of manufacturing dust all over it. I dusted each piece off prior to installing, and had to make numerous trips over it with brooms, Swiffers, etc., to get the dust off of it prior to sealing and waxing. Whatever is on the floor when you wax it will be part of the floor until you strip it.
Prepping the floor was a lot of work. My basement has smooth, steel troweled concrete, but there was a lot of stuff on it. Crumbs of concrete from pouring the walls. Construction adhesive and adhesive foam from various stages of construction. Wood glue and paint drips from building and finishing my kitchen cabinets. Scraping 1000 square feet with a 4" scraper is a thankless job! Once scraped, it took a lot to get all of the dust and junk up. Once you start spreading glue, it's too late to clean the floor!
The glue I used was a Henry drying-type glue. You spread it on, let it dry a couple hours, then place the tile. I found out the hard way that once you set a tile in it, it's there for life. I destroyed two tiles that I had placed wrong. It took vigorous effort with a putty knife to remove the tile, and it came off in numerous pieces. I feel pretty good that I only scrapped two tiles out of 1000. The glue doesn't seem to ever fully dry, or it takes a long time. A week later, exposed glue is still tacky as hell. It cleans up with water until the color changes; then you have to use mineral spirits. Wear gloves! Don't touch anything you don't want to be permanently sticky. Floor, walls, clothes, skin, your ****; you get the idea. I'd like to see how a pro uses that glue. I had glue all over me in about 30 seconds. It gets all over the trowel handle, and as it dries, it sticks to the gloves.
It uses a very shallow notched trowel, and I wore one out doing half the floor. I went to a slightly deeper notch when I replaced it. I used cheap trowels as they wear out anyway. I did about 250 square feet each day, which was all I could physically handle. My back was killing me.
It's tricky getting started. You find out that walls aren't as straight as you thought. I made a line with a laser, and had at it. If the first few tiles are off even slightly, it gets worse and worse as you go along. Over 41' I was out less than 1/8", which I consider pretty darn good.
Once I got an area done, I rolled it. At first, I tried to use a laminate roller, crawling on my hands and knees and bearing down very hard with my shoulders. I think that's how I screwed up my back. You can buy a 100 lb. steel roller for $350, or rent one for $22 a day. At the pace I went, though, I'd have spent nearly $100 in rental, not to mention 8 round trips to the store. Instead, I built a poor man's roller, and it worked very well. I used a conveyor roller, built a box to hold weight, and made a handle out of 3/4" conduit. About $20 all in, and I can re-use the roller and concrete blocks for other projects. There's a picture below. With three 33 lb. blocks, I had plenty of weight, and I think the tile came out slightly flatter than using the laminate roller.
Got it all tiled, finally. I lost almost two weeks nursing my back. I cut the tile with a razor knife and a straight edge. It cuts easy, but wears blades out fast. I make some small, detailed cuts on my bandsaw. It cut easily, but is probably rough on the blade.
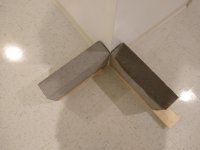
Two coats of sealer, three coats of wax, and I was ready for the vinyl cove base. I got it at the big box store, in 4' sections. I should have bought the 120' roll, but no one local had a color I liked, plus I needed 135'. What do you do with the remaining 105'? The product was rather poor. There were sizeable mismatches in size, up to 1/8", so where it butts together it's noticeable. At least it's only a basement. Color mismatch, too. The ends aren't cut perfectly square. Some of the pieces were filthy, coming out of a sealed carton. They had some dark marks that required mineral spirits to remove. The glue worked fine, and the only places that wanted to move were the outside corners. I did those by cutting a shallow groove in the backside so it would bend (sort of) around the corner in one piece. I used concrete blocks to hold it in place while it dried (picture below).
All in all, it came out pretty nice, at least for a basement. It looks like a hospital now! I'm going to set up a small workbench for fix-it type stuff so I don't always have to hike out to the shop. That, and our home gym equipment. In addition to the open area, I finished off a bedroom, bathroom, and large storage close in the basement. It's fully insulated, so it stays a decent temperature year-round without HVAC.
Any questions- fire away!
I bought my Armstrong tile at a big box store. With the glue, vinyl cove base, and a few tools I had to buy, I still came in under a buck a square foot over roughly 1000 square feet. VCT is tough and can be refinished (in a way). I worked in a machine shop with VCT floors that had been there over 30 years, with metal chips, forklift traffic, etc. The key is to seal it and wax it. Until it's sealed and waxed, the installation isn't complete. Then, whatever happens to it can be stripped off with the wax and refinished.
The product was quite good for $.76 a piece. It's supposed to be 'perfectly' square, but I noticed slight variations. Sometimes a piece just wouldn't quite fit the adjacent ones perfectly, but when you're standing up, you cant really see it. It had an annoying amount of manufacturing dust all over it. I dusted each piece off prior to installing, and had to make numerous trips over it with brooms, Swiffers, etc., to get the dust off of it prior to sealing and waxing. Whatever is on the floor when you wax it will be part of the floor until you strip it.
Prepping the floor was a lot of work. My basement has smooth, steel troweled concrete, but there was a lot of stuff on it. Crumbs of concrete from pouring the walls. Construction adhesive and adhesive foam from various stages of construction. Wood glue and paint drips from building and finishing my kitchen cabinets. Scraping 1000 square feet with a 4" scraper is a thankless job! Once scraped, it took a lot to get all of the dust and junk up. Once you start spreading glue, it's too late to clean the floor!
The glue I used was a Henry drying-type glue. You spread it on, let it dry a couple hours, then place the tile. I found out the hard way that once you set a tile in it, it's there for life. I destroyed two tiles that I had placed wrong. It took vigorous effort with a putty knife to remove the tile, and it came off in numerous pieces. I feel pretty good that I only scrapped two tiles out of 1000. The glue doesn't seem to ever fully dry, or it takes a long time. A week later, exposed glue is still tacky as hell. It cleans up with water until the color changes; then you have to use mineral spirits. Wear gloves! Don't touch anything you don't want to be permanently sticky. Floor, walls, clothes, skin, your ****; you get the idea. I'd like to see how a pro uses that glue. I had glue all over me in about 30 seconds. It gets all over the trowel handle, and as it dries, it sticks to the gloves.
It uses a very shallow notched trowel, and I wore one out doing half the floor. I went to a slightly deeper notch when I replaced it. I used cheap trowels as they wear out anyway. I did about 250 square feet each day, which was all I could physically handle. My back was killing me.
It's tricky getting started. You find out that walls aren't as straight as you thought. I made a line with a laser, and had at it. If the first few tiles are off even slightly, it gets worse and worse as you go along. Over 41' I was out less than 1/8", which I consider pretty darn good.
Once I got an area done, I rolled it. At first, I tried to use a laminate roller, crawling on my hands and knees and bearing down very hard with my shoulders. I think that's how I screwed up my back. You can buy a 100 lb. steel roller for $350, or rent one for $22 a day. At the pace I went, though, I'd have spent nearly $100 in rental, not to mention 8 round trips to the store. Instead, I built a poor man's roller, and it worked very well. I used a conveyor roller, built a box to hold weight, and made a handle out of 3/4" conduit. About $20 all in, and I can re-use the roller and concrete blocks for other projects. There's a picture below. With three 33 lb. blocks, I had plenty of weight, and I think the tile came out slightly flatter than using the laminate roller.
Got it all tiled, finally. I lost almost two weeks nursing my back. I cut the tile with a razor knife and a straight edge. It cuts easy, but wears blades out fast. I make some small, detailed cuts on my bandsaw. It cut easily, but is probably rough on the blade.
Two coats of sealer, three coats of wax, and I was ready for the vinyl cove base. I got it at the big box store, in 4' sections. I should have bought the 120' roll, but no one local had a color I liked, plus I needed 135'. What do you do with the remaining 105'? The product was rather poor. There were sizeable mismatches in size, up to 1/8", so where it butts together it's noticeable. At least it's only a basement. Color mismatch, too. The ends aren't cut perfectly square. Some of the pieces were filthy, coming out of a sealed carton. They had some dark marks that required mineral spirits to remove. The glue worked fine, and the only places that wanted to move were the outside corners. I did those by cutting a shallow groove in the backside so it would bend (sort of) around the corner in one piece. I used concrete blocks to hold it in place while it dried (picture below).
All in all, it came out pretty nice, at least for a basement. It looks like a hospital now! I'm going to set up a small workbench for fix-it type stuff so I don't always have to hike out to the shop. That, and our home gym equipment. In addition to the open area, I finished off a bedroom, bathroom, and large storage close in the basement. It's fully insulated, so it stays a decent temperature year-round without HVAC.
Any questions- fire away!