To avoid these ads, REGISTER NOW!

Advice on Jeep floor repair

Mr. Roboto

Well-known member
Joined
Dec 11, 2012
Messages
2,161
Location
New Hampshire
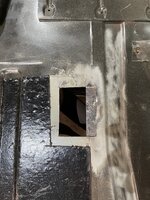
So I have a 1999 Jeep Cherokee that I just had someone install a new passenger floor pan in. It came out great, but took him forever, so I don't want to ask him to do this small patch as well. In preparation to POR15 the floor, I was wire wheeling the rest of the crust off the floor, when I exposed this hole in the trunk.

Can anyone offer advice on how to patch this up? I do have a welder, but I just bought it and I am really not very good yet. Could I just cut this hole back to a square, clean it up, and JB weld a small piece of steel on that is slightly larger to sit on top? I think I need to seam seal the panel as well. Where does the seam sealer go, in between the layers? On the perimeter? Both top and bottom?

Sorry if this seems like a silly question but I do not have much experience with metal/fab work, and just want to try and do this right/learn in the process.

D9FFC8FC-A1D6-4EFB-B6D0-3851CA3F5509.jpg
 
To avoid these ads, REGISTER NOW!

Spud McGee

Well-known member
Joined
Apr 11, 2022
Messages
405
The best place on the body to practice your welding is on the floors. They get covered up so it doesnt matter if they're ugly.
And that looks like just a flat patch of material would get the job done.

For body work, you want to stay on the lower power. A lot of body guys only use a 110v welder. Its easy to blast through sheet metal with a 220v. I've done my car with a harbor freight 220 and it came out fine. Car hasn't fallen apart yet.

And remember, a flapper wheel on a grinder will turn an ugly weld into a pretty one. You tack around the patch, spreading the heat around. Eventually you think you're done. Hit it with the flapper disc to clean it up. If you see any pin holes, tack those, then come back with the wheel. Rinse and repeat.

For this simple patch, I'd say do the ****-n-cutt method.
 
Last edited:

AldeanFan

Well-known member
Joined
Sep 9, 2014
Messages
2,589
Location
Niagara on the Lake
Make sure you cut out all the rust, the patch will always be a lot bigger than you first expect.

Floors are a great place to practice and learn bodywork.

For a floor and a first timer don’t get fancy and **** weld it, just make your patch to overlap about 1/4 to 1/2”.

Don’t run a continuous bead of weld when doing bodywork, that will heat up your metal and warp it. Do little tacks about an inch apart all the way around. Then go around again tacking next to the first welds. Take a break between rounds and let it cool down. Keep adding tacks until it’s all welded in.

It looks like the floor had a crossmember or brace underneath. Make sure to clean it up and weld your new floor patch to the brace.
It’s probably spot welded. You can replicate a spot weld by drilling a hole through just one of the two pieces and then welding in the hole.

After it’s all welded up use seam sealer around the patch to make sure it’s all sealed.
I prefer to spray primer first then seam sealer then paint the floor with rust paint.
 

lilredex

Well-known member
Joined
Apr 29, 2006
Messages
5,956
Location
Toronto
For that job, I'd cut it out clean, make an overlapping patch (3/4" per side) caulk it and screw it down with sheet metal screws. If the screws are long and bug you cut them off with a grinder. No need to weld that piece in. That will outlast the car.

Be careful with spraying flamable stuff on the interior. Think of a roll over and you are trapped and it catches on fire..........
 

white6589

Well-known member
Joined
Feb 27, 2011
Messages
351
Location
Maryland
Make sure you cut out all the rust, the patch will always be a lot bigger than you first expect.

Floors are a great place to practice and learn bodywork.

For a floor and a first timer don’t get fancy and **** weld it, just make your patch to overlap about 1/4 to 1/2”.

Don’t run a continuous bead of weld when doing bodywork, that will heat up your metal and warp it. Do little tacks about an inch apart all the way around. Then go around again tacking next to the first welds. Take a break between rounds and let it cool down. Keep adding tacks until it’s all welded in.

It looks like the floor had a crossmember or brace underneath. Make sure to clean it up and weld your new floor patch to the brace.
It’s probably spot welded. You can replicate a spot weld by drilling a hole through just one of the two pieces and then welding in the hole.

After it’s all welded up use seam sealer around the patch to make sure it’s all sealed.
I prefer to spray primer first then seam sealer then paint the floor with rust paint.

^^^^This^^^^

I would add:

Practice on small pieces of scrap metal of the same gauge before actually welding the patch. First to get your machine settings dialed in and then to practice your technique.
 

AldeanFan

Well-known member
Joined
Sep 9, 2014
Messages
2,589
Location
Niagara on the Lake
^^^^This^^^^

I would add:

Practice on small pieces of scrap metal of the same gauge before actually welding the patch. First to get your machine settings dialed in and then to practice your technique.
This is good advice.
However, be aware that sheet metal you buy will be a different mix of metals than what the car is made of. You can get your machine dialled in exactly right for the patch material on practice pieces but then when you weld to the actual car it will no longer be perfect.
 

AldeanFan

Well-known member
Joined
Sep 9, 2014
Messages
2,589
Location
Niagara on the Lake
One more thing,
Metal cannot be too clean for welding. Grind ALL the paint and rust off before trying to weld. Your patch material will likely have some type of coating on it so grind that too.
Flap disks are your friend here.
 
To avoid these ads, REGISTER NOW!
OP
M

Mr. Roboto

Well-known member
Joined
Dec 11, 2012
Messages
2,161
Location
New Hampshire
Thanks everyone for the great advice.

The **** joint method posted definitely intimidates me. The lap joint sounds like something I can do. Thanks @AldeanFan for the detailed explanation. I’ll definitely cut the area back much more than the photo. The support seen through the hole is the unibody rail. I’ll drill a hole there and spot weld as suggested.

You’re all right, the floor really is a perfect spot to practice welding. I just have a 110 flux core welder but I’m sure it will be sufficient.
 
OP
M

Mr. Roboto

Well-known member
Joined
Dec 11, 2012
Messages
2,161
Location
New Hampshire
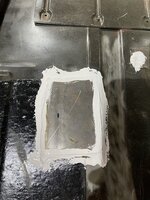
So I got cold feet on welding it. Not sure why but it is what it is haha. I ended up bonding a patch in with SEM panel bond epoxy, and then using SEM seam sealer around the perimeter. It turned out well enough for something that will be covered, and will do the trick.


85C22373-BC4C-4BE1-BAE8-D4A35CC9C43B.jpeg

I then hit the floor with a flap wheel, degreased, and treated with metal prep . Laying on the POR-15 today.

1B593AA9-2537-4DE2-A98C-106501811AF7.jpeg
 

NYBODYMAN

Well-known member
Joined
Sep 10, 2013
Messages
4,901
Location
NY
There is nothing wrong with this repair. In fact, it is definitely a more "encapsulating" repair in that it will be water tight. I would recommend that you clean up the underside and seam seal the patch from the bottom as well to prevent future corossion. Nice Job!
 

FrancisJ

Well-known member
Joined
Mar 18, 2015
Messages
93
Too late, but I'd do a template, then cut holes in the patch to plug (MIG) weld it to the underlying support, then tack (MIG) the patch around the perimeter. If you want to go faster, limit the MIG tacks to structurally important areas --- corners, middle/critical areas of patch panel runs, etc and then use the MIG Gun, Silicon Bronze wire and braze weld the remaining perimeter of the patch. Silicon Bronze brazing (used on newer cars) is not as strong, no where near the heat as regular MIG, but much faster than laying down 10s if not hundreds of tack welds to fill in the gaps. I have eight (8) restorations I'm in the middle of (60s, 70s and 80s vehicles) and use brazing along with MIG Tacks to close up gaps in panels (I often finish both sides of the gaps (from above and from underneath the vehicle to retain factory look).

You can TIG it also; however working the torch (and "bulky" cooling to the torch) and the wire in tight (underneath, overhead) automotive spaces can frequently be a problem -- MIG works better.
 
Last edited:
To avoid these ads, REGISTER NOW!
Top Bottom