To avoid these ads, REGISTER NOW!

Advice wanted on floor to wall trim

R68GTO

Well-known member
Joined
Dec 31, 2011
Messages
83
Location
Findlay, Ohio
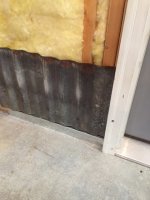
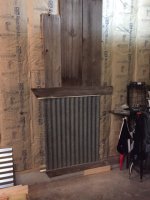
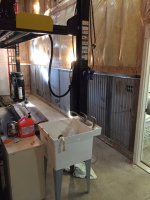
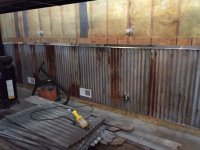
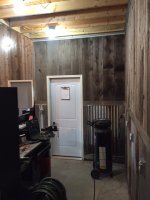
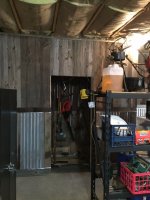
After a lot of searching I have finally acquired enough aged barn siding and tin to finish out the inside of my garage. The 1st photo is a mockup of what I have in mind. The z-mold is screwed to the sill plate. Am I better off to go all the way to the floor with the z-mold or leave the stem wall exposed? On my interior walls, the sill plate is right on the floor. The mockup in my photo has the z-mold reversed so the longer leg is against the floor. Eventually I would like to install a porcelain tile floor, should I have the z-mold tight to the floor or should I space it up so the tile slips underneath? If I go to the floor, should I caulk that joint to keep water off the sill plate? Should that tall leg of the z-mold have a backer board to support it? What do the GJ experts think?
 

Attachments

  • barn siding 2.jpg
    barn siding 2.jpg
    135.5 KB · Views: 345
  • barn siding 1.jpg
    barn siding 1.jpg
    136.6 KB · Views: 313
  • barn siding.jpg
    barn siding.jpg
    108.6 KB · Views: 294
To avoid these ads, REGISTER NOW!

Chris705

Well-known member
Joined
Nov 1, 2012
Messages
834
Location
The Finger Lakes of NY
Love the look you are creating. I'd like to see a base board (of used siding) on both exterior and interior walls. It would go nice with the horizontal trim capping your metal wainscot. Make it removable so when you place tile in the future you can scribe fit it back in place.
 

matt_i

Well-known member
Joined
Mar 14, 2008
Messages
10,730
Location
SE Michigan
my vote is to tile to the stud wall and then you can do the Z-flash to match. Reason is its hard to do a perfect tile job where everything comes out super clean. Along those lines its easy to get tile mortar or grout-stuff on the face of the Z-flash or even dent it back if its not fully supported in back.

It would make a lot of sense from a building perspective to do the tile first. However, with an eye on budget, I'd try to make the tin easily removable, maybe drywall screws would blend in (?)
 

TONE

Well-known member
Joined
Jun 5, 2006
Messages
1,866
I love the looks of the metal with the old wood. My concern would be it looking to busy with tile on the stem wall. I would run the metal down to the floor if you are certain you are finishing it. If not, run it the way you mocked it up.

Only hard part will be if you run the metal to the floor you will be cutting the bottom of the metal sheets on a slight angle. Meaning, your floor should slope downwards to the front of the garage. Stem wall goes from small to large as it gets to the front.
 
OP
R

R68GTO

Well-known member
Joined
Dec 31, 2011
Messages
83
Location
Findlay, Ohio
Love the look you are creating. I'd like to see a base board (of used siding) on both exterior and interior walls. It would go nice with the horizontal trim capping your metal wainscot. Make it removable so when you place tile in the future you can scribe fit it back in place.

I had the same thought with the baseboard idea but am concerned about it getting wet. I wash cars in that bay during the winter.

Only hard part will be if you run the metal to the floor you will be cutting the bottom of the metal sheets on a slight angle. Meaning, your floor should slope downwards to the front of the garage.

I had the builder pour my floor flat. I have a 4 post lift in the bay with the interior wall. The bay mentioned above has the floor sloped to a center drain so the stem wall is the same height.
 

Busted_Knuckles

Well-known member
Joined
Oct 9, 2009
Messages
2,613
Location
Northwest Illinois
For several reasons, Id keep the z-track / tin held off the floor as you show it mocked up. Whether or not you tile. To put it on the floor, in a working garage, bad idea.
 
OP
R

R68GTO

Well-known member
Joined
Dec 31, 2011
Messages
83
Location
Findlay, Ohio
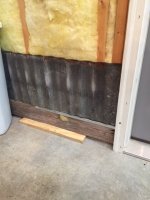
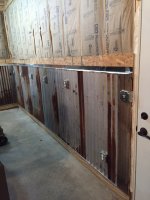
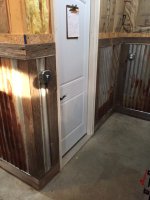
I made a few tweaks on the siding setup tonight. I moved the horizontal chair rail to rest directly on top of the z-mold and set the vertical siding right on top of the chair rail. I also mocked up installing a baseboard on the bottom with a 3/4" gap from the floor (2nd picture). I think I like the look of this setup best. The gap to the floor allows for surface water to stay off the baseboard and will allow me the space to drop the board from behind the z-mold if I ever do need to replace it or trim the height for floor tile. I'm thinking of just using Tapcon screws to anchor some 3/4 plywood furring strips to the stemwall to attach the baseboard. Anybody have any better ideas?
 

Attachments

  • barn siding 3.jpg
    barn siding 3.jpg
    124.5 KB · Views: 134
  • barn siding 4.jpg
    barn siding 4.jpg
    113.9 KB · Views: 112

Chris705

Well-known member
Joined
Nov 1, 2012
Messages
834
Location
The Finger Lakes of NY
It's a nice look! I think your attachment detail works. Maybe consider felt paper, sill seal or a slip sheet between plywd & block. Attach trim with short drywall screws, for their dark color?
 

OldNeons

Well-known member
Joined
Dec 27, 2011
Messages
462
Location
Midwest
We used an exterior grade trim as a base board (miratek or similar) 4/4 or 5/4 x 6" tall. We then bent flat galvanized sheet metal to wrap the board and flash up behind the corrugated metal about 4-6". Caulk it to the floor/tile. It looks/works great. Good luck
 
To avoid these ads, REGISTER NOW!
OP
R

R68GTO

Well-known member
Joined
Dec 31, 2011
Messages
83
Location
Findlay, Ohio
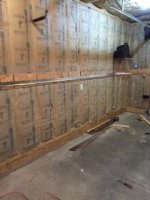
I have most of the furring strips installed and have all the z-mold for the top of the tin installed. Tomorrow I'll work on the z-mold for the bottom of the tin, then I can start hanging panels:thumbup:
 

Attachments

  • image1.jpg
    image1.jpg
    10.9 KB · Views: 87
OP
R

R68GTO

Well-known member
Joined
Dec 31, 2011
Messages
83
Location
Findlay, Ohio
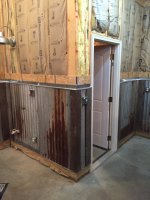
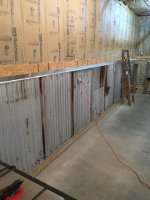
Got the tin hung on the 2 main side walls today. Tedious work to cut out for outlets and ducts, but all went well.
 

Attachments

  • IMG_1665.JPG
    IMG_1665.JPG
    136.5 KB · Views: 103
  • IMG_1667.JPG
    IMG_1667.JPG
    124.5 KB · Views: 78
OP
R

R68GTO

Well-known member
Joined
Dec 31, 2011
Messages
83
Location
Findlay, Ohio
It's been a while since I've had to work on the barn siding wall project. I changed my mind on how to do my outlets, so I ended up going back and re-cutting the outlet and switch openings to fit galvanized surface mount boxes. I just ended up screwing them to the studs so their depth covers all the corrugation depth changes. I think it turned out pretty good. At this point all the metal is hung except for the overhead door walls. I decided to do those last sine they will take a lot of fitting and trimming. Tomorrow I'm planning to hang the baseboard and horizontal chair rail board, things should really start shaping up then.
 

Attachments

  • IMG_1666.JPG
    IMG_1666.JPG
    120.7 KB · Views: 50
  • IMG_1770.JPG
    IMG_1770.JPG
    123.8 KB · Views: 55
  • IMG_1771.JPG
    IMG_1771.JPG
    126.9 KB · Views: 59
  • IMG_1772.JPG
    IMG_1772.JPG
    111 KB · Views: 59
  • IMG_1773.JPG
    IMG_1773.JPG
    123.8 KB · Views: 52
  • IMG_1775.JPG
    IMG_1775.JPG
    112.3 KB · Views: 55
OP
R

R68GTO

Well-known member
Joined
Dec 31, 2011
Messages
83
Location
Findlay, Ohio
More progress today....got the baseboard and chair rail boards up. Vertical wall boards are next! This phase should go pretty quick as it's just cut to length and nail it up.
I have not decided what to do with the ceiling yet. Thinking white metal for brightness, but not sure. I am pretty confident it will not be drywall. Should I install a J-mold at the top of the wall and **** my barn siding against the bottom of it or should I run my barn siding all the way to the top and add J-mold later?
 

Attachments

  • IMG_1782.JPG
    IMG_1782.JPG
    112.9 KB · Views: 26
  • IMG_1783.JPG
    IMG_1783.JPG
    118.5 KB · Views: 30
OP
R

R68GTO

Well-known member
Joined
Dec 31, 2011
Messages
83
Location
Findlay, Ohio
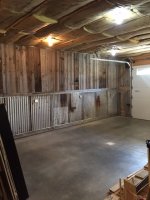
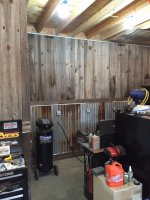
Update: Finished up all the walls except the overhead door wall. Pretty happy with the results.:rocker:
 

Attachments

  • IMG_1804.JPG
    IMG_1804.JPG
    121.2 KB · Views: 40
  • IMG_1803.JPG
    IMG_1803.JPG
    123.9 KB · Views: 44
  • IMG_1802.JPG
    IMG_1802.JPG
    129.9 KB · Views: 37
  • IMG_1801.JPG
    IMG_1801.JPG
    135.3 KB · Views: 36
  • IMG_1800.JPG
    IMG_1800.JPG
    109.1 KB · Views: 39
  • IMG_1799.JPG
    IMG_1799.JPG
    141.3 KB · Views: 39
  • IMG_1805.JPG
    IMG_1805.JPG
    126.3 KB · Views: 37
OP
R

R68GTO

Well-known member
Joined
Dec 31, 2011
Messages
83
Location
Findlay, Ohio
I have not completely decided, but am leaning strongly toward white metal. I am a little concerned that with darker walls, the garage will not be bright enough unless I brighten up the ceiling. I am still open to any ideas you guys might have.

Another question on my project.....I'm considering applying a clear coat to the siding to make it easier to clean without damaging the surface but not sure of the best sealer or how to do it. Any ideas on that?
 
To avoid these ads, REGISTER NOW!
Top Bottom