To avoid these ads, REGISTER NOW!

Ailing Hein Werner needs help

FrankFIII

Member
Joined
Nov 11, 2020
Messages
16
Location
Easthampton
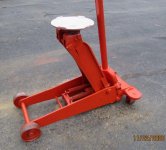
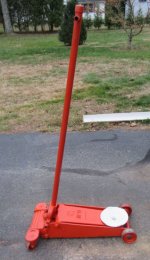
I recently acquired an old Hein Werner service jack. I don't know the model as the tag on the lift arm is missing where the 4 rivets are located. On the lift arm it is cast "H-W" and "1 1/2 ton" below that. I assume it is a WS. Is there another location on this jack where a model number can be stamped?
This jack has had a hard life. The wheels have not seen lube in ages and the lube holes were packed with grease so hard, I needed a twist drill to get them cleared. While it does go up when pumped, (assuming this is a WS and using a WS parts list) hydraulic oil was seeping out of the unit block at plug 28 located on the parts list. The unit was obviously been into multiple times as the slot on plug 28 was really rounded off and must have been tightened with an impact of some type. I managed to take it off and I think I found the cause of the leakage to be a missing seal #29 from the WS parts list. I was able to locate a replacement seal #29 but since it was not in there to start with, I can only assume the direction it is supposed to be installed. The seal is round and tapered much like a dog's water dish. I am thinking the wider part of the seal goes in the port first so it points to the bottom of the block with the narrow end towards plug #28. I can't understand how some people can let their machinery get this bad.
 
To avoid these ads, REGISTER NOW!

paulsomlo

Well-known member
Joined
Jul 16, 2013
Messages
3,866
Location
Northern Colorado
Yes, that's most likely a "WS".

The seal goes in open end first, closed end facing the plug, you're correct on that. You can also use some teflon plumber's tape on the plug, being careful not to get loose bits in the works. If you get both male and female threads clean enough, you can use a sealer, like loctite 518. They most likely used the impact, because they thought it would stop the leak.

By the way, welcome. And there's no lack of info here on that particular jack.
 
OP
F

FrankFIII

Member
Joined
Nov 11, 2020
Messages
16
Location
Easthampton
Thanks Paul! that's one problem down on this. I'll be working on the rest of it one piece at a time. I also got a new plug # 28 so if I can clean up the unit block enough, I'll throw some locktite 518 at it.
 

paulsomlo

Well-known member
Joined
Jul 16, 2013
Messages
3,866
Location
Northern Colorado
Some advice Frank - if you plan on rebuilding the hydraulics, tear it open and inspect before you buy a rebuild kit. That way, you avoid nasty surprises, like corroded cylinder walls, etc..
 

Roberts210

Well-known member
Joined
Dec 21, 2015
Messages
3,177
Location
Missouri
Does it look like this? Most difficult thing about rebuilding these is getting the tank nut offl

162359285.jpg


162541009.jpg
 
OP
F

FrankFIII

Member
Joined
Nov 11, 2020
Messages
16
Location
Easthampton
My major concert is the frame. Someone welded a 90 piece of 1/4" thick angle iron with punched holes on it as a "nose" along/between the front wheels. Maybe to keep the frame plates in line? Whoever did that should have opened a shoe shop as he was a real cobbler.
 
Last edited:
OP
F

FrankFIII

Member
Joined
Nov 11, 2020
Messages
16
Location
Easthampton
Not sure. Can anyone else see the pictures?
Frank, are you using a cell phone, or a computer?

I am using my home computer and work from home computer, but they are viewable now. My jack looks similar, the lift arm has an "HW" cast into it. it is painted "rattle can red" but where ever the paint is scratched I can see orange underneath. I found a picture online that looks like my jack, but this one has a tag on it and is rusty/orange.

CaptureHW.JPG

I was able to stop the oil leak at the plug with the new plug and seal. I also had difficulty getting to the oil fill plug. The ripple piece of metal would not budge. I found that the tag ends of the frame were bent, both to the right and bound up the plate. Using a square and a little persuasion everything by the handle is square again. What is the normal lift height of this jack?
I was wrong before. The guys that owned it before was not a cobbler, he was a shoemaker and could open an entire warehouse!
 
OP
F

FrankFIII

Member
Joined
Nov 11, 2020
Messages
16
Location
Easthampton
I'm getting a 12 1/2" lift, I think it needs some more oil. New find on this jack, on the cross pin or bridge (#14) is a pin #11 that is described in the parts list as a "rd head rivet" #11 - 19095. Does anyone know the diameter and length of this rivet? This jack has a piece of bent-over coat hanger in this spot. The use of a coat hanger allow the cross piece to rock between a loaded and unloaded state.
 
To avoid these ads, REGISTER NOW!

paulsomlo

Well-known member
Joined
Jul 16, 2013
Messages
3,866
Location
Northern Colorado
I'm getting a 12 1/2" lift, I think it needs some more oil. New find on this jack, on the cross pin or bridge (#14) is a pin #11 that is described in the parts list as a "rd head rivet" #11 - 19095. Does anyone know the diameter and length of this rivet? This jack has a piece of bent-over coat hanger in this spot. The use of a coat hanger allow the cross piece to rock between a loaded and unloaded state.

I have a bunch of leftover parts from my WS rebuild - if it's the part I think it is, it's 0.183" dia. (nominal 3/16"), and about 1 3/8" in length. Mine was just bent over to retain it, not sure if that was original or not. I didn't reuse it, I replaced it with a large cotter pin. Its only function is to retain the ram upon retraction. A #10 screw would probably do it.

I think the fill procedure is, with the hydraulics level, fill up to the bottom of the fill plug. Just checked mine, lift height is 20".

I'll link the drawing here, just so I don't have to keep going back to hcrcnow.com to see which parts you're referencing: https://www.hcrcnow.com/uploads/drawings/heinwerner_ws_floor_jack_1.5_ton.pdf
 
OP
F

FrankFIII

Member
Joined
Nov 11, 2020
Messages
16
Location
Easthampton
Thanks Paul! I filled it with oil and was able to get it up to 20.5". I was disassembling the front wheels and on each side there is a bushing that is retained to the front axle by the same rivet (callout # 30 - 19095). I removed it to get the axle out and while it is used, it has a 0.178" diameter and the length is 1.4" may be different since it was peened over. The round head has a diameter of 0.320" as best as I can tell as that is beat up too.
 

Roberts210

Well-known member
Joined
Dec 21, 2015
Messages
3,177
Location
Missouri
Thanks for posting the link to the schematic Paul. I hadn't seen that before, and I own 2 Hein Werner floor jacks and an H-W bottle jack.
 
OP
F

FrankFIII

Member
Joined
Nov 11, 2020
Messages
16
Location
Easthampton
I'm getting closer to the end on this HW. This one had one caster in the air about 3/16" on a flat cement surface. I've seen it mentioned on the forum in several spots. I loosened up the nuts on the pivot point on the lift arm just a tad, then did the same on both sides of the main block where they bolt through the frame. I then used the jack to put a little load on it, and while slightly loaded, tightened all the nuts and bolts I had just loosened. The load put all the casters on the floor and slop in the drilled holes on the frame allowed more than enough wiggle room to get the casters in the same plane. The pump roller (call out #8 - 23730) that is part of the handle assembly was worn flat on a couple sides and really no longer rolled. Took me some time to locate a NOS one online. Still waiting on that to come in.
 
OP
F

FrankFIII

Member
Joined
Nov 11, 2020
Messages
16
Location
Easthampton
Yes, I was able to fully lift, and hold, without any gradual dropping or oil spots on the garage floor, the back of my 2002 Tahoe loaded with 1/4 ton of sakrete and 250 pounds of landscaping rock. I did not want to leave it jacked up overnight as that would probably not be good for it, but I left it up in the air for about an hour to an hour and a half.
 
OP
F

FrankFIII

Member
Joined
Nov 11, 2020
Messages
16
Location
Easthampton
It was a success! I had the jack hold up the loaded Tahoe again overnight for 24 hours. There was no leak-down or oil spots under it when I released it this morning. When I have a chance I will take a picture of it and post it.
 
OP
F

FrankFIII

Member
Joined
Nov 11, 2020
Messages
16
Location
Easthampton
 

Attachments

  • Capture5.JPG
    Capture5.JPG
    143.3 KB · Views: 11
  • Capture4.jpg
    Capture4.jpg
    118 KB · Views: 11
  • Capture3.jpg
    Capture3.jpg
    124.3 KB · Views: 10
  • Capture2.JPG
    Capture2.JPG
    116.2 KB · Views: 12
  • Capture1.JPG
    Capture1.JPG
    67.8 KB · Views: 19
OP
F

FrankFIII

Member
Joined
Nov 11, 2020
Messages
16
Location
Easthampton
Thank you, I am looking forward to using it as well. Next job for the jack, put the snow tires on the car. I like to wait until the day after thanksgiving for that.
 
OP
F

FrankFIII

Member
Joined
Nov 11, 2020
Messages
16
Location
Easthampton
I started my Christmas shopping early and got something for my newly acquired HW WS floor jack. It is a saddle pad. This pad just drops right on top of the existing cast iron saddle and should allow me to safely jack without chipping away or gouging any finish on the body or frame.

Pad1.JPG Pad2.JPG

Pad3.JPG Pad4.jpg
 

waltinbatonrouge

Well-known member
Joined
Jan 30, 2010
Messages
71
Good morning! its been a while, but hope all is generally well with you guys..
Question for frank about the jackpad on his Oboy...as the saddle is a wee bit cup shaped, does this pad fit down into the saddle or it it just flat? I've replaced a couple of the flat ones after they crack in half lifting wifes Lexus on the side seam weld....
NOT lifting wife, she's not quite that heavy, oh oh, bats here comes the frying Pan!!! yeow!
 
To avoid these ads, REGISTER NOW!
Top Bottom