To avoid these ads, REGISTER NOW!

Air compressor - plumbing and Aftercooler

1967Chevelle

Well-known member
Joined
Jan 4, 2016
Messages
57
Location
NS
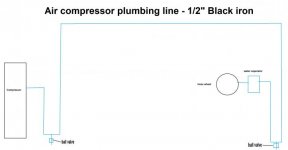
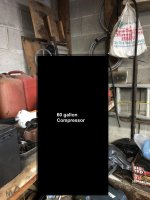
I have just purchased a brand New 60 Gallon Sanborn air compressor, I’m going to be using this compressor to paint automotive parts for my car restoration.

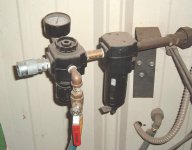
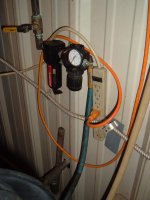
I need help planning out what is the best way to eliminate any moisture and water in the air lines, from the research I did it sounds like its best to install a aftercooler in-between the pump and tank with a water separator attached, and install drain valves in the air line plumbing system,

what do you guys think about this, will be using 1/2" black iron pipe? and thoughts about a aftercooler ?? any other suggestions?

Sanborn 60 Gallon air compressor
3.5 HP
Air Delivery @ 90 PSI: 11.5 CFM
Max Pressure Rating : 135 PSI

attachment.php

attachment.php

attachment.php

attachment.php
 

Attachments

  • compressor routing.jpg
    compressor routing.jpg
    17.4 KB · Views: 355
  • IMG_2536.jpg
    IMG_2536.jpg
    91.1 KB · Views: 27
  • IMG_2535.jpg
    IMG_2535.jpg
    131.9 KB · Views: 347
  • IMG_2534.jpg
    IMG_2534.jpg
    113 KB · Views: 347
  • IMG_2530.jpg
    IMG_2530.jpg
    148.2 KB · Views: 350
To avoid these ads, REGISTER NOW!

59 wagon man

Well-known member
Joined
Oct 25, 2010
Messages
1,589
Location
hollywood fla
instead of the loop outa the comp. feed into the bull of a tee and use the bottom of the tee as a drip, from the top of the tee run up to the ceiling and then pitch away from the compressor and drip the end of the main like you show but take the drop from the top as said in multiple other threads about piping
 

rayra

Well-known member
Joined
Dec 1, 2014
Messages
4,724
Location
Escaped from Los Angeles
i'm trying to eliminate any water in the line
That's what the top outlet out of the tank is for. Or the addition of a T adjacent with a second drain valve (besides the one already on the tank) on the down leg and the plumbing running up from the T. The water is shed at that first vertical run, zero need for a drop loop.

And where is the 'aftercooler' stuff coming from, second person in 24hrs to use the term. Haven't any of you guys ever vented a tank or pressurized can of anything? The drop in pressure make things cool rapidly. That's the core of what makes air conditioning systems work. It's why propane supplies and carburators freeze up.
What makes you think you need 'aftercooling'?
So who's promoting this 'aftercooler' idea? I'd like to read more about it.


Too, every bend you put in the pipe restricts your flow. It's as true for air as it is for water. Some basic fluid dynamics that any sprinkler designer ought to know. And it applies to air plumbing.
 
OP
1

1967Chevelle

Well-known member
Joined
Jan 4, 2016
Messages
57
Location
NS
instead of the loop outa the comp. feed into the bull of a tee and use the bottom of the tee as a drip, from the top of the tee run up to the ceiling and then pitch away from the compressor and drip the end of the main like you show but take the drop from the top as said in multiple other threads about piping

attachment.php


is a aftercooler required?
 

Attachments

  • compressor routing.jpg
    compressor routing.jpg
    17.4 KB · Views: 304

sberry

Banned
Joined
Jun 18, 2005
Messages
35,747
Location
Brethren, Michigan
It does add to resistance but it's so minor here it's irrelevent. In principle should have a valve at the comp as a disconnect. But I like the simplicity and the basic here, see how well this works,,, I bet not bad.
 
To avoid these ads, REGISTER NOW!

1redTA

Well-known member
Joined
May 17, 2006
Messages
730
Location
Pace FL
I believe from many of the treads on this board alone, using black pipe would be a mistake. I say this due to the chipping internals rusting etc etc
 

sberry

Banned
Joined
Jun 18, 2005
Messages
35,747
Location
Brethren, Michigan
You put a filter at the end. At least most of it, take your chances a little and make sur its relatively clean. I pulled a plumbers brush thru mine just to knock any loose down and after I put the disconnect valve on blasted it wide open. Maybe it does rust, I don't know, it works and is a great free passive air cooler. Vertical runs drop water, the idea is to keep any drops from being flung along further than they need to be if they are there. I got 2 or 3 where the filter is the drip collector, simply plumbed it on to the pipe straight in. The runs are so short in a common garage with a common compressor a couple extra turns in a 1/2 line is moot and it can help a little with flinging the water along.
I like the design the op has. Its not ultimately the simplest but its only a couple extra turns and not a dozen. its got longer vert to the hydrant which keeps it from being blown along at that point.
Effeciency and loss would be different with a class heavier tool and or 24/7 at 25 or 30 or more cfm. Also if it was causing a lack of power, at this point it will be in the secondary. Black pipe is closer to 5/8 than 1/2, 1/2 hose has half the loss of 3/8 at say,,,, 25 cfm, maybe 30, more as it goes up, the pipe is quite a bit bigger.
Wanna 1/2 the loss cut the hose in half, run the air gun on a 25 whip vs a 50 reel,,, 20#, changing the main 40 ft from 1/2 to 3/4 maybe a # depending on length etc, some minor adjustors, turns etc.
I got a couple spots I missed the ulitimate in design but I got to realize the circuit is only 2/3 loaded and provides plenty, 1 improved elbow isn't squat.
Yes, in this case 4 elbows.
 
Last edited:

ManOnTheCouch

Well-known member
Joined
Apr 23, 2018
Messages
130
I am finishing up on this in my shop. I used copper pipe after researching the alternatives. I’d never sweated copper before but it was pretty easy. It will keep the lines more clean than black pipe or galvanized.
 

sberry

Banned
Joined
Jun 18, 2005
Messages
35,747
Location
Brethren, Michigan
I re plumbed this scheme and used a whole bunch of extra fittings. I happened to have them ready made, right in the box, it made it come out perfect to the original filter location and mount.
If I was going to design it again from start would move it and plumb straight,,, but its irrelevant, was cheap and didn't leak.
The valve,,, on the pipe drop, everything after, the unions, *******, elbows, filter all of it disconnected when service valve is closed. In some garages, single hydrant, simple would buy the valve at tank but I have 3 different outlets on this circuit, a local is the way to do it.
 

Attachments

  • air 3.jpg
    air 3.jpg
    78.8 KB · Views: 29
  • air 4.jpg
    air 4.jpg
    71.1 KB · Views: 31

sberry

Banned
Joined
Jun 18, 2005
Messages
35,747
Location
Brethren, Michigan
This one is like the op is doing basic. One filter/reg to a reel which is good. It has a bunch of pipe and rise in a couple steps never collects a drop in the filter, no drip leg to it. I had revamped it a little, swiped and reconfigured a few parts and tapped the secondary off a gauge port I had used in its old setup and plugged a port I had a connector on. I plumbed it with what I had in hand, in hindsight could change a 1/4 elbow to a 3/8, would have improved the efficiency of the turn a fuzz. Its obsessive stuff I wont let beat me, gonna leave it alone at this point. The original had a connector and 2 valves, I remove the connect and a secondary valve and move the service valve in to a better location, most of the time I shut it off these days.
 

Attachments

  • air reggie.jpg
    air reggie.jpg
    75.2 KB · Views: 33
  • air reggy.jpg
    air reggy.jpg
    67.7 KB · Views: 34
  • air reg HD.JPG
    air reg HD.JPG
    35.2 KB · Views: 32
  • steamer hose new.jpg
    steamer hose new.jpg
    98.8 KB · Views: 30
  • steamer air.jpg
    steamer air.jpg
    97.3 KB · Views: 25
Last edited:
OP
1

1967Chevelle

Well-known member
Joined
Jan 4, 2016
Messages
57
Location
NS
I apricate all the replies,

The more that I think about it I would like to use Copper as its easier to assemble and Acts as a cooler, with my design what diameter would you guy's recommend 1/2? or 3/4" Copper?

Also I've updated my drawing,
attachment.php

I will be installing rubber isolators on the compressor to reduce noise, so I will need to install rubber line from the compressor to the hard copper line, I added a shut off valve right after the rubber line.

As my "primary" filter what do you guy's think about this one? do you think the this primary filter (25 micron) is too close to the compressor? (should I relocate) the water separator bowl is only 1.5 OZ

https://www.princessauto.com/en/detail/1-2-in-air-filter/A-p8624363e
attachment.php


As mentioned above, I will be installing a 1/2 in. Air Filter and disposable desiccant dryer (0.01-micron filter element )

https://www.princessauto.com/en/detail/1-2-in-air-filter-and-dryer/A-p8650400e
attachment.php


What are your thoughts? I would hate to buy all this and not work out as planned
 

Attachments

  • 8650400.jpg
    8650400.jpg
    89 KB · Views: 168
  • 8624363.jpg
    8624363.jpg
    50.5 KB · Views: 168
  • compressor routing.jpg
    compressor routing.jpg
    17.9 KB · Views: 181

sberry

Banned
Joined
Jun 18, 2005
Messages
35,747
Location
Brethren, Michigan
Shut off BEFORE rubber line. BEFORE.
Skip all that and go to Walmart or Home Depot for fil/reg,, Home Depot too, about 40$ and the 3/8 ported ones are sized right for this class of tool. Too big and the velocity is too slow and water doesn't fling out.
Copper is fine as is steel. 1/2 is good in a garage this size, less reduction to get to the eventual fitting size. I see that comes from PA, probably economical.
 
Last edited:

sberry

Banned
Joined
Jun 18, 2005
Messages
35,747
Location
Brethren, Michigan
Skip the equipment at the comp, only need it at the user end. Add a Drip to this, see how it works. Add a dec if needed, see how it works before adding everything ever invented on. Add after the fact,, if needed.
Next will be hose reel,,, if it is overhead a retractor on a swivel, if it's at user level I don't mind manual. There are a couple of them that it doesn't matter but the rapid reel style use a 100 reel for a 50 hose.
 

Attachments

  • air reggie.jpg
    air reggie.jpg
    75.2 KB · Views: 22
Last edited:
To avoid these ads, REGISTER NOW!
Top Bottom