To avoid these ads, REGISTER NOW!

Air Compressor Plumbing Questions

iiibdsiil

Well-known member
Joined
Jan 29, 2005
Messages
658
Location
Tampa, FL
I was looking at my compressor today trying to figure out how I am gonna plumb it in and run lines on the walls.

First off, my tank has this huge fitting on the side where I plug the hose into. (60 gallon Cambell Hausfield or whatever) It is probably an 1.5 inches, I am guessing, although probably smaller.

Now, when I go to plumb this thing in, I did a search here, seems copper is the best idea for my budget and skill level required. But, how do I connect the copper to the tank? Do I need the have a flex line running so that the vibrations don't run through my copper lines? Also, I am assuming that Home Depot or Lowes will have all the stuff I need to go from that 1.5 inch or whatever opening to the copper, back to what I need for the ends to put the quick connect coupler on?

What size copper should I run? 1/2" be adequate? Should I run larger? I want to be able to have enough air supply for the possibility for two people to run air tools at the same time.

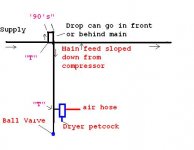
Anything else I should know or keep in mind? I am researching the way it needs to be plumbed, with the drops with the drains on the bottom, etc.

Thank you in advance.
 
To avoid these ads, REGISTER NOW!

chaotik

Member
Joined
Mar 6, 2005
Messages
11
Location
Plainfield, Illinois
You should be OK with 1/2" line, but you might want to consider 3/4" line. The more volume of air a pipe can hold, the slower it has to travel thru it to keep up with demand....the faster the air moves, the more heat it develops. As it cools, the moisture built up in the air from the heating will condense in the line. Might not be as big a deal if you are using just air tools. But I use mine for spray guns, and you want to keep any risk of adding moisture to the air at a minimum.

Good to see you are researching it....always have your drains at the bottoms of your drops, etc. Copper is very easy to do.....I have it in my garage...so much easier to cut and sweat it , then getting pipe cut, threaded, etc.

Also...if you do use a spray gun..make sure it has a dedicated line before your inline oiler for your air tool drops. Also...get the best airline filter you can afford (speedaire at www.grainger.com has alot of choices)

MIKE
 

OI812

Well-known member
Joined
Jan 8, 2005
Messages
202
That 1-1/2" fitting in the end of the tank is probably a bushing. You can probably unscrew that out of the tank and get the proper size bushing for your line.

I recommend 1" copper tubing. Every shop I have done for friends we have run at least 1" diameter tubing. The cost difference between 1/2" and 1" isn't that great. You don't want to starve yourself for volume or flow. There is also pressure loss due to friction in pipe and by jumping to the 1" you can overcome some of that. If you don't want to go with 1" then I would run 3/4" . Its really a matter of choice. Do use Type L at a minimum or Type K copper. Don't use Type M. Wall thickness on copper tube from thinnest to thickest goes M, L, K.

I would recommend a flexible connector and union at the tank. The flexible connector is something you will probably have to get at a contractors suppy store, I don't think HD would carry that. If you can't get one shoot me a PM and I will get you pricing on one.

IMO and what I have done for some people is we made up a setup that is point of use. What I am saying is the filter is on a quick disconnect and we just put the assembly on the outlet we are using. P.S. I install valves on every outlet above the dirt leg and house outlet. If you need a drawing I can post that to.
 
OP
I

iiibdsiil

Well-known member
Joined
Jan 29, 2005
Messages
658
Location
Tampa, FL
Thanks guys. I will go shopping when I am getting ready to do this, and will report back if I run into any problems.
 

avsfan733

Well-known member
Joined
Jan 22, 2005
Messages
65
Location
Rochester
our home shop should be getting a hidden compressor pretty soon. we are building a closet for it and are gonna sound proof it because its in the basement. so following this discussion and a few others around about different air compressor issues, i have come up with two rather odd questions:

1) my house has a dehumidifier in its hvac system (virginia gets a lot of 90/90's 90degree days with 90% humidity) does anyone sell somethign similar on a smaller scale that could be plumbed into some sort of formed intake for a compressor. I was considering just pulling air out of the system to the compressor because its in an underground area of the basement anyways.

2) how often are you draining your tanks for guys in similar enviroments...i was considering running a drain line from the drain **** to our sump and rigging up a little electronic valve and a relay just for the ease of not having to bother with it. I was thinking set it to empty once a week or so? just a little circuit with a timer and a pressure switch to see when the tanks completely empty...is this completely overkill?
 

OI812

Well-known member
Joined
Jan 8, 2005
Messages
202
avsfan733 said:
our home shop should be getting a hidden compressor pretty soon. we are building a closet for it and are gonna sound proof it because its in the basement. so following this discussion and a few others around about different air compressor issues, i have come up with two rather odd questions:

1) my house has a dehumidifier in its hvac system (virginia gets a lot of 90/90's 90degree days with 90% humidity) does anyone sell somethign similar on a smaller scale that could be plumbed into some sort of formed intake for a compressor. I was considering just pulling air out of the system to the compressor because its in an underground area of the basement anyways.


I don't know about the intake, but on the outlet side they do make dryers for the compressed air. Are you thinking that you want to stop the moisture from entering into the tank? Not sure that is totally possible.

avsfan733 said:
2) how often are you draining your tanks for guys in similar enviroments...i was considering running a drain line from the drain **** to our sump and rigging up a little electronic valve and a relay just for the ease of not having to bother with it. I was thinking set it to empty once a week or so? just a little circuit with a timer and a pressure switch to see when the tanks completely empty...is this completely overkill?

Did you consider possibly installing a automatic drain on the compressor tank. Water drains to it, and when the bowl gets so full it automatically dumps the moisture. No need to even shut the compressor down.
 

avsfan733

Well-known member
Joined
Jan 22, 2005
Messages
65
Location
Rochester
ya thats basically it an automatic drain didn't know they made those lol

I'm concerned about the amount of water that'll end up in our tank...i was thinking if i could just somehow seal the room so it only draws air from the ductwork but that doesn't seem very plausible and would prolly do bad thigns to heating/ac costs
 

Major Ramifications

Well-known member
Joined
Feb 28, 2005
Messages
4,673
Location
River Ridge, Louisiana
A short flexible line covered in braided stainless is recommended between tank and air lines. These shouldn't be too hard to find from Grainger or maybe McMaster or a local blasting supply company. Here's one:http://www.grainger.com/Grainger/productdetail.jsp?xi=xi&ItemId=1612838916&ccitem=
$34 for a 1" diameter x 1' long. Spend a few more dollars up front on 3/4" or 1" copper rather than the 1/2". You will be much happier in the long run. If you feel you must, then just use 1/2" for the drops, with a larger header around the shop. Be sure to have the drops rise up from the header, and include a ball valve at the bottom of each drop (below the tee where the quick connect attatches) to let the water out.
Refrigeration type dryers for compressed air work GREAT! Too expensive for me, but I love having them at work.
 

OI812

Well-known member
Joined
Jan 8, 2005
Messages
202
IMO grainger is a rip off, but I do have access to wholesale accounts.

Major Ram...

I am curious as to why you say rise up off the header. I always drop down from the header.

air drop picture

The reason I always go down is so that the moisture can't get trapped in the main or header. Is there a reason you go up?
 

Double Venom

Well-known member
Joined
Jan 31, 2005
Messages
96
Location
Pentwater, Mi
Lets see if this works;
pipe-layout-1.gif


You can put the 'automatic drain valve' right at the outlet of the compressor.
DV
 

Major Ramifications

Well-known member
Joined
Feb 28, 2005
Messages
4,673
Location
River Ridge, Louisiana
I was looking for a picture like the Sharpe one up there. I had always read to do it like that with the exception that the drops rise up a foot or so before coming down to get as much moisture as posssible to stay in the header, where it is drained off by the end-of-the-line valve. It is very humid down here in southeast Louisiana.
 
To avoid these ads, REGISTER NOW!

Double Venom

Well-known member
Joined
Jan 31, 2005
Messages
96
Location
Pentwater, Mi
Me too. I always put in an upside down 'U' for each drop. I'm suprised Sharpe doesn't
include that.

At the bottom of each drop I also put a horizontal 'T' in and get my air from the bottom of the 'T'. In other workds turn the 'T' sideways with the top of the feed soldered to the main feed line, then add about a foot to the bottom of the 'T' and place your ball drain valve. I actually have used out door faucets. I like the idea of the ball valve better though.
DV... Now that should be as clear as mud!
 

OI812

Well-known member
Joined
Jan 8, 2005
Messages
202
I don't personally agree with traping the moisture in the main, but hey to each his own.

So if you rise up off the main, and then drop back down are you still putting in a dirt leg? If the moisture is in the air similar to relative humidity, I don't see how it will come out of the air when it rises up. If you come out of the compressor and rise up won't that get rid of the moisture then? I'm just trying to understand the thinking or idea behind it. I have installed miles and miles of air lines and have yet to see a engineer spec it or draw that in as a detail on a print.

I not saying it is wrong, I just want to understand the idea.

Thanks.

Hey thanks DV for posting the GOOD picture, wish I could have found one like that.
 

Double Venom

Well-known member
Joined
Jan 31, 2005
Messages
96
Location
Pentwater, Mi
I knew that was clear as mud! :D This doesn't trap anything except in the down legs. I hope this helps...
 

Attachments

  • airline.JPG
    airline.JPG
    19.4 KB · Views: 243

Major Ramifications

Well-known member
Joined
Feb 28, 2005
Messages
4,673
Location
River Ridge, Louisiana
We are not trying to trap the water in the header, just keep it out of the drops. The water in the header will get let out of the "end-of-the-line" valve (the last valve in the diagram). The reason we put risers at each drop is that the cold metal pipe will condense water vapor as the compressed air travels through it. The compressor ***** in air, which contains water vapor. Some of it condenses as the compressed air contacts the cooler walls of the tank. This water is let out of the tank drain. As the air exits the tank, it still contains some water vapor, and the more cold pipe it contacts the more of this vapor becomes liquid. We want to keep this liquid out of the drops. And yes, each drop will have a drip leg, with a final drip leg at the end of the line.
I hope this is somewhat clear; and remember, the humidity down here is just ridiculous. I imagine that so many moisture precautions would not be necessary in a drier climate or in an industrial setting with a refrigerant-type dryer.
 

OI812

Well-known member
Joined
Jan 8, 2005
Messages
202
Major Ram and DV

I understand how you are piping it, just not sure "I" agree. I think the idea and the concept is good. The whole reason for the dirt leg is to get that dirt and moisture down there so it can be blown out.

Heck just by decreasing the orifice and increasing the velocity at the outlet you cool the air. So even though you come of the top like that just by increasing the velocity at the air outlet will cause you to get moisture again. The whole velocity thing is a physics law from high school if I remember correctly.

In a "perfect" world everything has pitch, grade, slope and it will drain. "Most" times the lines get trapped, or installed flat. The drain valve on the main is either inaccesable or just not used. People talk about get rust in there paint from black pipe, and I can see why that is happening when you try and keep the moisture in the main. If the moisture is in the dirt leg it can be easily removed.

I live in a very humid area to, not as bad as the south east, but we do have our 96% humidity days with 96 degrees. Just not as many as you.

I'm not saying I disagree with it, but I was always told to get your dirt and moisture to your dirt legs so it can be blown off easily.

By the way DV nice drawing, darn it I tried to do that so it could be posted and seen, and well it didn't work. I will have to get instructions from you.
 

OH-MAN

Well-known member
Joined
Jan 11, 2005
Messages
125
Location
sunny Az.
The only way to keep moisture out of the lines is to filter and dry the air before it gets to the mains. A filter system and a refrigerated dryer will take care of most non professional systems

BUT the dryers are not cheap.
 

nadogail

Well-known member
Joined
Jan 23, 2009
Messages
31,916
Location
Coronado, CA
I have a ball valve on my compressor tank drain. I open it with my foot to avoid having to bend over.

As I have advanced in age I keep looking for smarter ways to avoid working harder.
 

cannuck

Well-known member
Joined
Nov 30, 2021
Messages
4,600
Location
Rural SK
Major Ram's plan is literally to use the main as one "dirt leg" ahead of those on the drops. Will help get some out and the more you remove upstream the less you will deliver downstream. I am taking a few hints from how Class 8 (semis) do it. They have a "wet tank" right after the compressor that feeds a second "dry tank" (that isn't all that dry, but a lot less than the first) and then through a dryer that feeds the air brake system. In my current shop I have no dryer so drain the tank on every use and have drains only on the drops. Usually fairly dry here, so while not perfect by a long shot, it works for air tools and blow gun - but not dry and clean enough for painting. I do split up the systems with filter only to one outlet and other through oiler. Also, one hose for oiled air tools and the other for cleaning.

Now, with used tanks being fairly easy to find, that is what I have done for my next shop. Have a refrigerated dryer for the main screw with auto drain making it my "wet" tank, a second refrigerated dryer to a big main tank that will do 90% of everything then a branch circuit that will be used only when needed to a smaller tank for ultra dry stuff using a pair of automatically alternating dessicant columns (one dries while the other regenerates). Now, that is a bit on the extreme side, but this is for my permanent commercial shop. All bought used, low time, low buck.

For a much simpler version of home shop, I would suggest a fan cooled condensing line feeding the main (wet) tank and then send the air to a second "dry tank" before going up to the main distribution line. You might be surprised just how much it WILL remove. I have set up a few breathing/flushing air skids that use a 5 horse screw, a refrig dryer, wet tank and dessicant on the way out and can get constant low flow of -50 dew point air that way. I can usually get a couple gallons a DAY out of the wet tank in moderately dry places.
 
To avoid these ads, REGISTER NOW!
Top Bottom