To avoid these ads, REGISTER NOW!

Air compressor rebuild

MrKona

Active member
Joined
Dec 29, 2011
Messages
34
Hi Everyone,

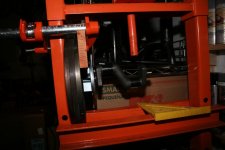
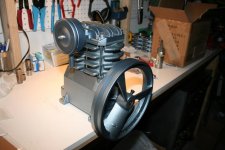
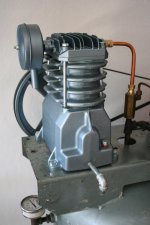
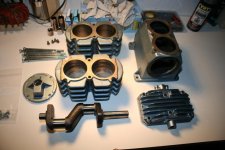
I have a Saylor Beall air compressor, but unfortunately, it's very small... model B-212, single piston, 1/2 HP motor. I need something a little bigger while staying within the limitations of my 115v wired garage. I was searching Craigslist and found a familiar looking pump for $25. I say familiar because I've seen versions of this older pump from Sears, Campbell Hauseld, Champion, Grainger, and probably a few others. I bought it from someone who had a couple of pumps in a storage unit. I soon deduced that it needed a rebuild. Since this is such a popular pump, I'm posting some pics of the rebuild in the hope that it might help someone else here.

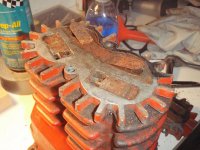
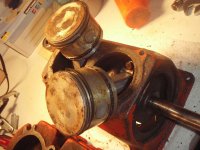
When I tore it apart the insides looked like it had been at the bottom of a lake for a few years. Pump as purchased.JPG
 

Attachments

  • Valves.JPG
    Valves.JPG
    124.6 KB · Views: 186
  • Pistons before.JPG
    Pistons before.JPG
    111.9 KB · Views: 185
  • Cylinders.JPG
    Cylinders.JPG
    118.9 KB · Views: 174
  • broken valve screw.jpg
    broken valve screw.jpg
    112.7 KB · Views: 175
To avoid these ads, REGISTER NOW!
OP
M

MrKona

Active member
Joined
Dec 29, 2011
Messages
34
You'll notice that the valves were rusted and one was broken. My intention was to simply clean up the cylinder head assembly and install new valves. Of course, while removing the last screw that holds the last valve, I broke the head off the screw. I tried drill it out but it was no use. Only choice was to buy a new head assembly from Campbell Hausfeld. The cylinder head assembly included new valves and gaskets. I also bought new rings and bearings. For reference, here is the parts list. Note that the B1316 needle bearing and retaining rings (for the wrist pins) did not fit this unit. Per the part diagram they would, but once I tried fitting them, realized they were the wrong parts.
 

Attachments

  • parts list.JPG
    parts list.JPG
    62.7 KB · Views: 128
OP
M

MrKona

Active member
Joined
Dec 29, 2011
Messages
34
I replaced the bronze bearings with needle bearings. For the record, the crankshaft needle bearings are identical 3/4" ID, 1"OD, 3/4" width. To replace the wrong bearing from CH, I bought a Koyo Torrington B-1212. http://www.amazon.com/gp/product/B006KT1DKQ/ref=oh_details_o07_s00_i00?ie=UTF8&psc=1

The flywheel side bearing is easy to remove, as you can simply press it out. The opposite side bearing is a dead end, so I used a pilot bearing removal tool and slide hammer I borrowed from AutoZone. Pulled it out like butter. The bearing tool is part number 27059.
 

Attachments

  • Bearings.jpg
    Bearings.jpg
    43.3 KB · Views: 108
OP
M

MrKona

Active member
Joined
Dec 29, 2011
Messages
34
Time to blast and paint parts! The blasting process was very slow, as I was using my little S-B compressor. Blast a little, walk away and let the pump catch up, come back and blast a little, repeat... I then applied high temp primer and paint. VHT high temp engine metallic paint, Titanium Silver Blue SP403.
 

Attachments

  • Blasted clean.jpg
    Blasted clean.jpg
    117.4 KB · Views: 139
  • Flywheel.jpg
    Flywheel.jpg
    84.4 KB · Views: 140
  • Painted.jpg
    Painted.jpg
    148 KB · Views: 144
OP
M

MrKona

Active member
Joined
Dec 29, 2011
Messages
34
Reassembly... I decided not to separate the pistons from connecting rods... no reason to. New piston rings, hardware, and the new cylinder head. The new cylinder head kit comes with gaskets and hardware. Only problem is that the long bolts were metric, whereas this old pump requires 5/16th, 6" bolts. I picked up new bolts at the local hardware store. You'll notice in one of the pictures that I have two cylinder pieces. That's right. Unfortunately, the cylinders on the part from the original compressor was too badly pitted from years in the lake. I picked up another used off Ebay in much better shape (this little compressor was getting more expensive then I anticipated).
 

Attachments

  • Pistons on.jpg
    Pistons on.jpg
    71.1 KB · Views: 144
  • Cylinder head #1.jpg
    Cylinder head #1.jpg
    83.7 KB · Views: 133
  • Crank in #2.jpg
    Crank in #2.jpg
    81.5 KB · Views: 127
  • Reassembly parts.jpg
    Reassembly parts.jpg
    81 KB · Views: 158
  • New rings.jpg
    New rings.jpg
    73.1 KB · Views: 134
OP
M

MrKona

Active member
Joined
Dec 29, 2011
Messages
34
To my dismay, when I first installed the crankshaft and spun the crank, I noticed that the shaft were the flywheel attaches had a wobble, easily seen by naked eye. :( 
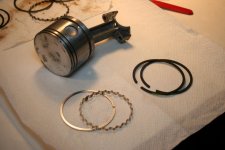
With the dial indicator, I measured the wobble at .03". With the flywheel installed, the wobble was really evident.

This is where my Harbor Freight 12 ton press saved the day. (this little press is kind of flimsy but has paid for itself many times over in my garage). I clamped the crankshaft/flywheel assembly to the frame of the press and then applied careful force to the crankshaft lobe. I remeasured the wobble and it was down to .0002". Good enough for me!
 

Attachments

  • Shaft straightening.jpg
    Shaft straightening.jpg
    62.5 KB · Views: 183
Last edited:
OP
M

MrKona

Active member
Joined
Dec 29, 2011
Messages
34
And finally installed! I bought a 3450 rpm Baldor 1.5hp motor which draws 12.5 amps at full load, and a 1.75" pulley. If my math is correct, this turns the pump at 604 rpm, within spec.

I bent 3/8" OD copper tubing from the pump to the switch/tank.

It was a fun project. This pump certainly fills the tank much faster than the Saylor Beall pump. I notice that it get's much hotter than the Saylor Beall. Whereas the SB head got warm, this pump gets hot, and the copper air pipe will burn if touched.

I'm on the search for a SB model D-412 pump or even a model 703 pump, both of which are rated for 1.5hp. If anyone has one laying around, please let me know. Hope this thread was entertaining.
 

Attachments

  • Pump completed on table.jpg
    Pump completed on table.jpg
    76.1 KB · Views: 159
  • Pump completed.jpg
    Pump completed.jpg
    65.7 KB · Views: 190
  • Pump completed #2.jpg
    Pump completed #2.jpg
    67.3 KB · Views: 178

Modifieddriver

Well-known member
Joined
May 29, 2009
Messages
820
Location
Moonville, South Carolina
Great thread. This gives me some inspiration to rebuild the similar pump on my Grainger Speedaire compressor that's been in service since the early 70's. It's starting to blow oil into the lines.

The piston ring set you purchased, was that price for one or both pistons? Kinda' pricey if it's just one.

If it wasn't for the fact that I bought this compressor new, I wouldn't do the rebuild. It's always been in a marginal area fulfilling my air requirement needs.
 

DekeT

Well-known member
Joined
Aug 12, 2011
Messages
2,234
Location
USA
Great thread. This gives me some inspiration to rebuild the similar pump on my Grainger Speedaire compressor that's been in service since the early 70's. It's starting to blow oil into the lines.

The piston ring set you purchased, was that price for one or both pistons? Kinda' pricey if it's just one.

If it wasn't for the fact that I bought this compressor new, I wouldn't do the rebuild. It's always been in a marginal area fulfilling my air requirement needs.

I rebuilt a SB 705 pump recently. The OEM ring set cost me $70+ for both pistons.
 

CNGsaves

Well-known member
Joined
Sep 26, 2012
Messages
13,233
Location
KS and OK
Great work on the compressor rebuild. It really turned out nice!!

I think I may have similar old pump. It's a "hand-me-down" that neighbor gave to me. However, I'm sure one of the reed valves are broke as it won't build pressure anymore.

How did you determine model of compressor and where did you purchase the rebuild parts?? Any other resources that I should pursue??
 
To avoid these ads, REGISTER NOW!
OP
M

MrKona

Active member
Joined
Dec 29, 2011
Messages
34
Great work on the compressor rebuild. It really turned out nice!!

I think I may have similar old pump. It's a "hand-me-down" that neighbor gave to me. However, I'm sure one of the reed valves are broke as it won't build pressure anymore.

How did you determine model of compressor and where did you purchase the rebuild parts?? Any other resources that I should pursue??

Thank you!

I determined the part number by perusing the internet and finding pumps that looked like mine. There are a couple places I found to buy replacement parts:

Campbell Hausfeld: Just go to this page and type in the part numbers I included in my earlier post:

http://www.chpower.com/advancedsearch/

Or Grainger at this link:

http://www.grainger.com/Grainger/wwg/seo/ecatalog/N-ae4Z1z0nbbg?BV_UseBVCookie=No

Or Master Tool Repair at this link:

http://www.mastertoolrepair.com/speedaire-2z499a-2z499b-2z630b-p-39994.html

I'm also attaching a document with the specs for these compressors. My compressor has 2 3/4" cylinders, comparable to 2Z499. I think someone else on this board had posted these specs awhile back - thank you to whomever that was.
 

Attachments

  • Speedaire compressor pump specs.jpg
    Speedaire compressor pump specs.jpg
    152.2 KB · Views: 122

ddookie

Member
Joined
Oct 14, 2012
Messages
7
My Campbell hausfeld pump is very similar to yours however mine uses 1/2"" copper tubing from the pump to the tank , you may consider using 1/2" tubing , BTW great job on the rebuild.
 

G_P

Well-known member
Joined
Jul 11, 2010
Messages
7,135
Location
Central CT
I would try to use 1/2" copper as well. Mine uses 1/2" and it still gets kinda hot.

Great job on the rebuild though!

Sent from my C5120 using Tapatalk 2
 

1950mercury

Well-known member
Joined
Mar 26, 2013
Messages
2,246
Location
metro detroit
I hope you used some red loctite on the vavle screws...that style pump is famous for the scrrws backing out and putting nice holes in the top of the pistons. What did you use to hone the cyl. Walls for the new rings?
 

kams1973

ALLIANCE MEMBER
Joined
Oct 3, 2010
Messages
1,572
Location
Amarillo, TX
I hope you used some red loctite on the vavle screws...that style pump is famous for the scrrws backing out and putting nice holes in the top of the pistons. What did you use to hone the cyl. Walls for the new rings?

He updated the pump w/ a newer style head and valve plate. I don't think he'll be having any issued with the common screw related failure.
 

kraneman

Member
Joined
Jun 16, 2013
Messages
20
On those older style pumps, that don't have the valve plate, I have used rivets in place of those destructive little screws. and they hold up nicely never had one become loose.
 

Lingus

Member
Joined
Mar 14, 2016
Messages
6
. Kona,

I registered here because I did a google search for rebuilding my compressor pump and found your rebuild info.

So I'm running into the same problem with the new head kit..... metric bolts. But here's my question. The kit comes with this big thick silver gasket and I don't know if I'm to use it or not. Directly under the head there is a rubber o-ring isolating the high side. I used no gasket here. Under the valve plate I used the green gasket.

Here's a photo of the the entire head kit. The gasket in question is in the lower left of the photo.

https://www.factoryaircompressorpar...-FOR-CAMPBELL-OLDER-VT-PUMPS-271281478034.jpg


Can you help? Thanks in advance.
 
To avoid these ads, REGISTER NOW!
Top Bottom