To avoid these ads, REGISTER NOW!

air drill rebuild - issues!

faiee

Well-known member
Joined
Sep 20, 2016
Messages
56
Hi, i have here with me a cp7300p air drill in which the vanes inside need replacing, just wondering if theres a special technique for removing the motor?
I have removed the gearbox from the drill and am left with the splined output from the motor inside the drill, unable to remove it.

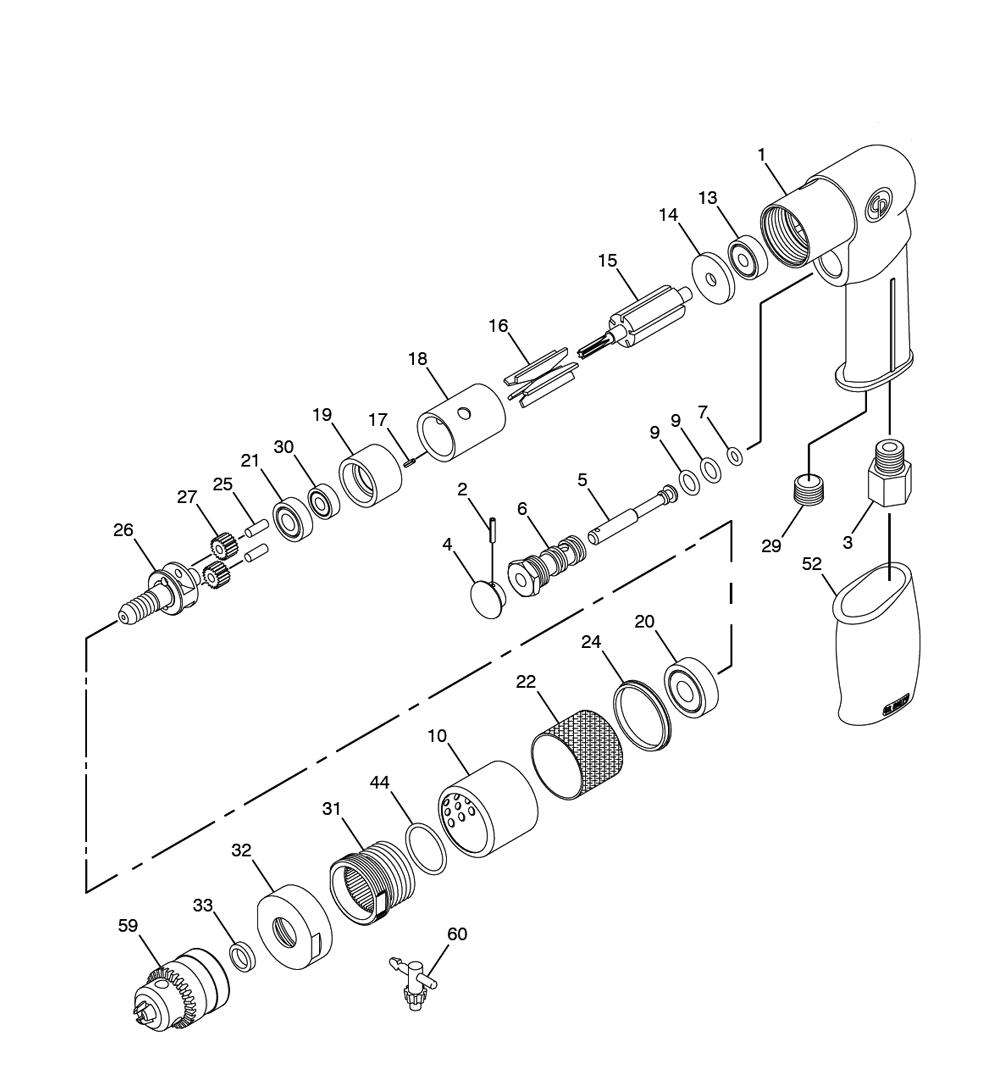
(19,17,18,16,15,14,13) remain inside the drill body.

Nav_FMDZDksuFuxEZF98pw7I7JOqmLtz940reU_UovUdXMJ2d7FyHtQNYutQDNTxIDqfmZ7qge4gXKCXEd-zeAANuBuGbgQH1AzE891O5LUGeqZmKhk_hfxH8JxzyTmKOse9hi15TX8o6oFdPsoLJw9mzzr7SOi0n19HGUNyrYaw-XAoJIOqfE0D69q9ou_IOzx0U3C8E_NxpzK2HjlO4O_8Jrh9kBgTY-qVdyYtkpuqeimFldstS7bLTZ95I1brZGvimezRKK-_tpcxpkT5Uf72f3IfFSZK9G9Cuiv-zeaeC-1SHE1F9QYDSy-iEFO-eWRYsr15IxDIEz_TmYqeFHDYHMsR2c_30bNfjBGDlkfBvW2aOpmanSGgGqmwpyK-BABW07hpoAGEutSnwi5MMlOQNpvH53DmN1r68YjPIqAtUJItqf3r9Zez1NIOWBWIqI04GUonIzrCiGygL8IJfKyaKQd84SUPMcCNCVAJU_mmyRRp9V3oRj2GepM1EX8YCrMk4trqSP0dnzkVaRtyribIupWO22p_Tq9BgXiVDGj9gP4Zt4T4AqodtCEslP5IbLfTSZvO3DQib5DsRVI-_dWBamJ37JFduBN_ZnusxRLe93m0l3psEOrgD---ab2k14xgIaHK5-Smp6nFq_ibnjpNDxxyYj-tn5_20IlarJS4zZK5bPQAJYoVjlmW0fG8c3ftasYTyrjsDCEtljtLt7HcZCoPnFhEEfuG7FHo961RrTcXdgoZrDzTCNcb=s0-l75-ft-l75-ft


Is there a special technique for removing it? Thanks
 
To avoid these ads, REGISTER NOW!

SGKent

Banned
Joined
Feb 12, 2010
Messages
1,959
Location
Citrus Heights CA
I Googled the model and found a drawing. If 13 is the bearing, I would wager both are pressed on, and that with rust and moisture they are on even more. I have never had one apart but my instinct tells me that a double nut gently together to spread the load, and a slap hammer behind it might pull the load. Also looks like part #11 should be on the motor still too. Surprised that #14 and all the other parts didn't separate from #42. The bearings show as $18 each at site I am on, and the vanes aren't even listed anymore. Many parts are NLA. Unless this has real sentimental value it might be time for a new drill. Sometimes you can find good used things like that on Ebay that still have life left. Shame more things aren't made for simple repairs.

Also - there are several different drawings of the same model number. If this one is it, make sure roll pin #17 isn't in there at 90 degrees holding it together. Part number #16 is available at this site for about $21 but not other parts. This may be a buy and see if it fits situation.

https://www.toolpartsdirect.com/chicago-pneumatic-cp7300-1-4-6-mm-compact-drill-8941073000.html

here is the other one I came across with the same model that I mentioned numbers on in the first part of this reply. https://www.ereplacementparts.com/c...00r-air-drill-parts-c-36298_36426_163674.html
 
Last edited:

joe_padavano

Well-known member
Joined
Feb 26, 2011
Messages
1,788
Location
Northern VA
Is this the picture you are failing to post?

CP7300-chicago-PB.png


While I have no experience with that model, I HAVE just recently run into this problem while rebuilding a nibbler that uses the same design air motor. The problem is that bearings 13 and 30 are pressed onto the armature shaft, which means that everything between them needs to come out as a module. Unfortunately, items 14, 18, and 19 have some assembly tolerance and will bind in the bore in the housing (item 1). I finally used a vice grip pliers on the splined end of the armature to get enough force to be able to pull the whole assembly out. Yeah, I bunged up the splines a little and needed to file them to fix that. In retrospect, it might have been smarter to tighten the drill chuck onto those splines and use that to pull it off. Unfortunately I didn't think of that in time.

Your second problem is that to access the vanes, you need to pull one of the two bearings off the armature. I ended up messing up one of the bearings and had to replace that as well. Be forewarned. And lastly, pay close attention to pin #17 when you pull it apart. I had to make a replacement from a nail after mine went AWOL. Good luck.
 
Last edited:

sberry

Banned
Joined
Jun 18, 2005
Messages
35,747
Location
Brethren, Michigan
Cool to take them apart, I am not inclined to put a bunch of new parts in a worn out body. Some free fix or cheap part I am all over it. A new one should last the avg home timer a lifetime. Air ratchets about the same way.
 

SGKent

Banned
Joined
Feb 12, 2010
Messages
1,959
Location
Citrus Heights CA
if you rebuild it, the bearings are less as the zz part numbers. The CP part numbers are $25 - $30 a piece. I do agree that the housing is just as likely to have wear as the vanes. But it is a $140 air drill so if you can find the parts at the right price..... . Considering some of the bearings come in 10 packs for really low prices as the zz part numbers, a bearing house may have better replacements at moderate prices. Nothing like replacing cheap bearings once a year.... .

Following SBerry's advice - a slap hammer behind the chuck screwed onto it might be better than nuts.

edit - the CP9790C appears to replace it. That model is $131 at Amazon. HF has their own model comparable to the CP9790C by "Chief" that is $69. Not sure how much you want to spend on that drill. Once you pull that assembly you may find the bearings have to be replaced. It may cost more in parts than to replace the drill.
 
Last edited:
OP
F

faiee

Well-known member
Joined
Sep 20, 2016
Messages
56
Yes that is the correct picture, thanks. I have got the assembly to move back and forth a bit with vise grips on the armature but it feels like there is a mechanical lock of some sort preventing the assy from coming out?
Drill was given to me hence trying to sort it out, if not it goes in the scrap bin

thanks for the advice i will have a crack and see what breaks
 
To avoid these ads, REGISTER NOW!

Reese

Well-known member
Joined
Nov 8, 2013
Messages
149
When I worked at a tool shop back in the day we would heat the housing with a propane torch and rap the front of the case with a plastic hammer to get the motor out as an assembly. You probably need to unscrew Item 13, it probably keeps the motor in the housing.

Once the motor is out you can use a brass hammer or drift on the end of the rotor to pop the bearing plates and bearings loose as an assembly. Finally you can remove the bearings from the plates.

We always honed the cylinder slightly with a brake cylinder hone before reassembly. You can reassemble the motor and re-install it as an assembly.

You need to inspect the motor plates and the ends of the rotor for galling. If they are galled you can chuck the rotor in a drill press and use sandpaper wrapped around a file to polish the rotor. If the plates are scuffed you can put the sandpaper flat on the drill press table and sand them slightly to clean them up. If the plates are coated and scuffed you probably need to replace them.

Impacts are worse for having housing wear. Drills and ratchets normally use a threaded gear case to put some pre-load on the motor, those housings normally don't wear significantly.
 

vssjim

ALLIANCE MEMBER
Joined
Aug 5, 2007
Messages
2,713
Location
McLean Va.
When I worked at a tool shop back in the day we would heat the housing with a propane torch and rap the front of the case with a plastic hammer to get the motor out as an assembly. You probably need to unscrew Item 13, it probably keeps the motor in the housing.

Once the motor is out you can use a brass hammer or drift on the end of the rotor to pop the bearing plates and bearings loose as an assembly. Finally you can remove the bearings from the plates.

We always honed the cylinder slightly with a brake cylinder hone before reassembly. You can reassemble the motor and re-install it as an assembly.

You need to inspect the motor plates and the ends of the rotor for galling. If they are galled you can chuck the rotor in a drill press and use sandpaper wrapped around a file to polish the rotor. If the plates are scuffed you can put the sandpaper flat on the drill press table and sand them slightly to clean them up. If the plates are coated and scuffed you probably need to replace them.

Impacts are worse for having housing wear. Drills and ratchets normally use a threaded gear case to put some pre-load on the motor, those housings normally don't wear significantly.

What he said, I rebuilt tools for a job also and the motors very if ever just fall out unless very well taken care of because they easily rust to the body.
 
OP
F

faiee

Well-known member
Joined
Sep 20, 2016
Messages
56
You probably need to unscrew Item 13, it probably keeps the motor in the housing.

Are you sure about no.13? that is a bearing in the body of the drill, not visible.
I've had the body quite hot with a heatgun and whacked it a bit with a dead blow, no bueno.

Definitely think there is a mechanical lock or something is jammed. The motor assy moves back and forth id say just over 1/4 inch in the body fairly freely then stops.
 
OP
F

faiee

Well-known member
Joined
Sep 20, 2016
Messages
56
motor assy removed, alignment pin damaged, allowing motor body to rotate freely. thanks
 
OP
F

faiee

Well-known member
Joined
Sep 20, 2016
Messages
56
Well, that should be an easy fix. I assume there was no trick to getting it out, just applying enough force?

No just armature in vise and tapping the body with a drift to draw it out.
The alignment pin had been damaged in operation, jumped out of the keyway in the body and got jammed 90 degrees out. Was catching on a raised bearing race hence not behind able to remove it by hand.

All disassembled now, new bearings, spring pin on order.

As the reduction gearbox is sealed off from the motor which is lubed with air oil what should I grease the planetary and ring gears with?
Tried grease 22 but it seems there is a bit too much resistance with that grease.
 
To avoid these ads, REGISTER NOW!
Top Bottom