To avoid these ads, REGISTER NOW!

air drops - up first?

bdog

Well-known member
Joined
Oct 17, 2007
Messages
227
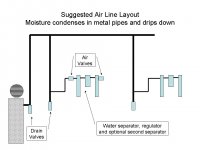
In doing my research I see that on a air system the air drops should come from the top of the main line and then drop down. What is the best way to go about doing this if everything is going to be flush mounted on a wall? Most the diagrams and pictures I see the main line is run in an attic or something like that and not all flush on a wall. I don't think you want the quick coupler just hanging in free air so I am pretty sure the drop needs to come back to the wall and be anchored.

You could offset either the main line or the drop so that they don't hit each other but this seems like a lot of 90s and restriction points. I guess alternatively you could use something like a 2x4 to mount the drops to.

Just curious how everyone was doing this or if it is even that critical to pull from the top of the line. Seems like it would be a lot easier install just T'ing out of the bottom.
 
To avoid these ads, REGISTER NOW!

DGC15

Well-known member
Joined
Nov 16, 2008
Messages
48
Location
Gatesville, TX
I use a 3/4" main line. Where I want a drop, I put in a 3/4 X 1/2 reducing tee. The use (2) 1/2 street elbows to come out of the top and 180' over. Screw in a 1/2 drop and use a 1/2 tee or cross at the bottom of the drop. Add a short ****** down below this with a drain valve. The drop will be off the wall by the diameter of the 3/4 main line if you arrange the street elbows to drop down beside the main line. Put a block between the drop and the wall and anchor the drop to it close to the outlet.
 

premierplayer

Well-known member
Joined
Jan 30, 2010
Messages
869
Location
Maryland, USA
I'm guessing condensation/water is the reason for the top exit?

Learn me something guys.

I just did a small system at work and gave it no consideration at all.
Installed a filter/drier/regulator right out of the compressor, then droped everything right out of the bottom of the main.
 

porschedude996TT

Well-known member
Joined
Oct 28, 2007
Messages
2,384
Location
Santa Maria, California
I installed 3/4" copper and ran the line low in the wall (12") and the outlets are about 36" above that. Each low line has a end of line low point drain. I figured that the water, if it does get into the line, would not travel up the outlet leg and the end of line can be drained.
 

Racecarl

Well-known member
Joined
Oct 25, 2008
Messages
474
Location
McCook, NE
Porschedude has it right. We built onto our shop at work and ran the air lines this way and we have NO water issures. The older part of the shop has the supply lines high and the drops low and we have NOTHING BUT water problems.
 

Vinko

Well-known member
Joined
Jul 7, 2008
Messages
5,829
Location
Los Angeles
There were a couple of threads discussing drops, but if some of you have photos, I'd appreciate seeing them. I've got my system near the ceiling. It's a huge job to change it out. But I've got enough room (about 10-12" from ceiling, I think) to do an up and over drop like (I think) DGC describes. By the way, DGC, you have any photos.
 

dude67

Well-known member
Joined
Feb 25, 2010
Messages
119
Make sure you install a low point to drain the condensation off. Make a tee and drop it down past supply from compressor with a valve to drain off.
 
To avoid these ads, REGISTER NOW!

bluesman2a

Well-known member
Joined
Aug 16, 2005
Messages
1,312
Location
Atlanta, Ga.
Mine is up high, but as you can see, I have a drip-leg on each service drop with a ball-valve to vent water.

DSCF0861.jpg


It's kind of hard to see it by the pics, but everything is sloped back to a drip-leg, with all outlets going UP. Also with my latest addition, there is about 20' of 3/4" copper all slanting back to the compressor/drain, so it tends to get real dry before even hitting the distribution system.
DSCF0862.jpg
 
OP
B

bdog

Well-known member
Joined
Oct 17, 2007
Messages
227
Ok, So you come down off the main first, and then go up as illustrated in Friartuck's post.

Hanging from the ceiling is not an option. I guess technically it is possible but ceiling is very tall and I would prefer to mount everything on the wall.
 

PurdueSD

Well-known member
Joined
Mar 25, 2006
Messages
1,577
Location
Indiana
No you come up with a T out of the main trunk. So you either have to offset the main trunk off the sidewall or your drop.

Your main trunk should also be pitched back towards your compressor, or better yet a drip-leg prior to reaching the compressor.
 

mad57

Well-known member
Joined
Jan 30, 2009
Messages
1,698
My buddys body shop uses those cheap toilet paper water sep and they work great for him.
 

MP&C

Well-known member
Joined
Oct 21, 2009
Messages
4,405
Location
Leonardtown, MD
I kept my main line lower on the wall. As the wall is set in from the block foundation, the air line is not too much of an obstruction for items set against the wall.


Picture185.jpg


All "drops" go straight up, so any moisture has a tendancy to stay put in the main line (gravity effect)


Picture058.jpg


The main line also drops about 1" every ten feet to promote drainage to the end, where this little jewel:


Picture060.jpg


.......automatically opens so I don't have to worry about draining it myself.


*********EDIT Per PM request, the pn of the automatic drain is McMaster Carr 9831K12, presently priced at about 169, (eight years ago when I installed it the price was about 125)

They have about 5 different varieties of Auto-drains, I chose this one for the wall-mount ease of installation. ;)

.
 
Last edited:

Andy Griffith

ALLIANCE MEMBER
Joined
Sep 2, 2009
Messages
1,367
Location
Western WA
I don't know if this is the correct way or not, but it's how I plumbed my shop years ago when first built.

Compressor is in a small shed outside on an exterior wall of the shop. I used heavy rubber hose to hook from the compressor to the copper pipe because the compressor dances around a bit when it is running, plus the rubber hose helps isolate the system from the vibrations of the compressor.
798458651_LrK9V-L.jpg


Comes through the wall here. Main manifold with pressure regulator and water trap is located here with petcock drain at the bottom down-leg stub.
798458754_MHwDm-M.jpg


I used super strut or unistrut for mounting to the wall. All the U-shaped drops were preassembled/soldered before mounting, then soldered to 12' sections of pipe. Then installed on wall with a minimum of soldering required after the pipe was mounted to the wall. In those cases I used some tin foil behind the pipe on the wall to keep the wall from being burned. There is a drop like this every 12' and they have regular female brass quick couplers.
798458686_xa5tb-L.jpg


Each horizontal run of pipe is sloped to drain. This is an example of the end of one run which happens to feed a hose reel. There is a down-leg which has a petcock drain to drain condensation as necessary.
798458723_hHtQb-L.jpg
 
OP
B

bdog

Well-known member
Joined
Oct 17, 2007
Messages
227
Thanks for the pics. Worked on it some today. Here is a pic of what I ended up doing.

The compressor is coming in form the right side of the picture. The line slopes about 5" every 25 feet (away from the compressor) and then rises up 5" where the drops are and then drops 5" on the 25' run to the next drop.

This may not be perfect but it seemed better than just a T coming out the bottom of the line or coming out the top and having to cross over with the pipes sticking out further from the wall.
 

Attachments

  • cp.jpg
    cp.jpg
    82.5 KB · Views: 107
Last edited:
To avoid these ads, REGISTER NOW!
Top Bottom