To avoid these ads, REGISTER NOW!

Airline Galley Bar Cart

cptn_zippy

Well-known member
Joined
May 31, 2013
Messages
365
Location
Denver, Colorado
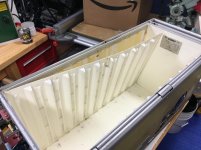
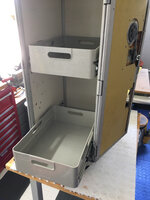
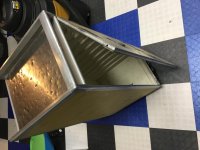
Starting a new project today...the goal is to clean this up and use it as a "bar cart". Anybody work on these things or have some thoughts? Going to power wash it tomorrow.

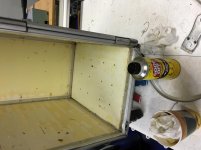
Wondering the best way to clean up the aluminum trim.

Will probably "sticker bomb" the yellow panels, and build a cutting board for the top, since it's so badly dented up.
 

Attachments

  • IMG_1604.jpg
    IMG_1604.jpg
    132.5 KB · Views: 409
  • IMG_1606.jpg
    IMG_1606.jpg
    141.7 KB · Views: 424
  • IMG_1605.jpg
    IMG_1605.jpg
    135.4 KB · Views: 375
To avoid these ads, REGISTER NOW!

cajunfirehawk

Well-known member
Joined
Nov 29, 2011
Messages
2,566
Location
Ms Gulf Coast
Cool project, looking at the bottom, one of those levers (assume red for stop) raise the cart on that center "stand" so it doesn't roll around, is that how that works?
 

tarbellb

Well-known member
Joined
Apr 17, 2011
Messages
5,757
Location
Oregon
Thats a rad little cart. You may want to experiment with different Scotchbrite pads, a little pricey but work very well. Or maybe Mr.Clean pads, both are light abrasives. . Remember anything harder then aluminum (most things in the abrasive world) will scratch/sand the piece.

For the panels, consider taping off and spraying them. Wouldnt be to much work and the results would be clean.

Find or build a nice wood top for that!

Man look at all those beautiful machined aluminum parts on the underside, killer score.
 

senlow

Well-known member
Joined
Apr 26, 2008
Messages
2,232
Location
Wheat Ridge, Colorado
That's a super cool little cart.

Always use the mildest cleaner that will do the job. I often begin with dish soap. If the aluminum is anodized, you should be very careful if you use abrasives. Anodize is a coating that protects the aluminum. It would be best not to damage any anodize. For raw aluminum, the finer Scotchbrite pads work great. Be sure to rub in one direction only so the sanding marks look good.

In case you don't know how to tell if aluminum is anodized, just check it with an ohm meter. Anodize is an insulator, so if you probe the surface the meter will show an open circuit on an anodized part.

Your cart is really nice. In my opinion, it deserves a top notch repaint on the yellow panels. I like the idea of placing a cutting board on top.

Please post more pics as you work on the cart.
 

dffay

Well-known member
Joined
Jul 9, 2015
Messages
434
There's a company called MotoArt that does those carts. I've seen them with sound systems built in too for deck parties. The stuff MotoArt does is rather brilliant. Pricey too.
 

TK-421

Well-known member
Joined
Dec 29, 2015
Messages
1,398
Location
Pflugerville, TX
I definitely think a butcher block top would look good. Maybe cut a slot into the butcher block, and the aluminum underneath, so you can have a small knife always at the ready for when you want to cut open a fresh lime? Don't know if there's a fancy word for that kind of slot or not, but thought it might make a nice little accent touch, depending on what kind of handle the knife would have.
 

jayoldschool

Well-known member
Joined
Apr 23, 2006
Messages
2,119
Location
Canada
I wouldn't sticker bomb it. I would paint in the colours of a vintage airliner. Pick a nice theme from the 30s-70s. Then, apply vinyl cut logos. Any sign shop can cut them for you once you find the image for the artwork.

Some examples, there's lots more:

30aca9d3d208d9ffc8aafadb084fc1c9.jpg
 
OP
C

cptn_zippy

Well-known member
Joined
May 31, 2013
Messages
365
Location
Denver, Colorado
Cool project, looking at the bottom, one of those levers (assume red for stop) raise the cart on that center "stand" so it doesn't roll around, is that how that works?

No, those metal "skids" are for something on the floor that the cart locks onto for takeoffs and landings. Not sure what pedal makes that work, but the red pedal activates the brakes, which locks the two larger casters in place, both from rotating and stops the wheel from rolling. It's an interestingly complicated mechanism. The blue pedal releases the brake. As much as I'd like to take it apart, I'm afraid that I'd struggle getting it back together.

Other than power washing it, nothing got done on it this weekend between sprinkler repairs and mother's day.

The cart is supposedly from American Airlines, and had 3 plastic trays with their logo, so maybe that's the way to go. As much as I like some patina, that "baby-s**t yellow" color has to go. :)

J
 
Last edited:
OP
C

cptn_zippy

Well-known member
Joined
May 31, 2013
Messages
365
Location
Denver, Colorado
So, a few updates. First the outside:

I've started cleaning up the outside panels and getting them ready for some new finish.

All the seams are caulked with silicone caulk, which is a pain to remove. I've been using a razor blade to score and scrape it off. I then use a wire brush to remove what I can down to the board, which is a laminate.

I'm not much of a painter, and don't really have good equipment to spray, and am also worried about not getting all the silicone off, thus having adhesion problems. Per the suggestion above, I figure sign vinyl might be the best way to get a freshened surface. Anybody have experience with it?

In the pix attached, you can see the door mechanism, and also the construction details. Unfortunately the latch is glued into the panel, so that won't be coming out.

J
 

Attachments

  • IMG_1612_1.jpg
    IMG_1612_1.jpg
    126.8 KB · Views: 101
  • IMG_1621.jpg
    IMG_1621.jpg
    143.3 KB · Views: 113
OP
C

cptn_zippy

Well-known member
Joined
May 31, 2013
Messages
365
Location
Denver, Colorado
Inside update:

I removed the plastic panels on the inside, they were attached with some terrific double sided tape...so sticky and smelly...it's gotta be some good industrial tape. I will try some adhesive remover now that the panels are off to see if I can get the tape remants off. A razor scraper was pretty much useless.

I'm thinking of doing the inside with Stik Wood. Seems like it would be easy, and they've got some snazzy metal trim for the exposed edge. At $5-10/sq ft, it's not cheap, but I don't need much and the install would be quick.
 

Attachments

  • IMG_1625.jpg
    IMG_1625.jpg
    135.7 KB · Views: 107
  • Screen Shot 2017-05-20 at 9.12.58 PM.jpg
    Screen Shot 2017-05-20 at 9.12.58 PM.jpg
    15.1 KB · Views: 38
Last edited:

davidhansen

Active member
Joined
Feb 10, 2016
Messages
44
Sorry, no helpful tips. I just wanted to say that's a really cool project I'm going to have to add to my list.
 
OP
C

cptn_zippy

Well-known member
Joined
May 31, 2013
Messages
365
Location
Denver, Colorado
Some more updates as I work through this...and it, like most projects, turn out to be more work that first anticipated. :shocking:

Anyhow...Stripping the adhesive was a chore, as one can imagine. The good news is that the side panels are a tough melamine finish, so once the adhesive is softened by the goof-off, you can scrape them with care. I went through 3 pints - could have bought a whole gallon for the same price. :dunno:

The badging is actually in pretty good shape. I thought I would have to fab up replacements (like Pupuhd did for his electric motor restorations) but I figured if I could get them off without damage, I'd reuse them. After removing the silicone sealant on the seam...(OMG, there's miles of that stuff on this cart) I took a thickish piece of copper sheet that I had in my "misc materials" drawer and filed an edge down to make a deep "blade" to slide under the metal labels without bending them, and it worked like a charm. I was able to pop them loose. I'll strip the old adhesive and put some thin double-sided tape on them and put them back in place.
 

Attachments

  • IMG_1633.jpg
    IMG_1633.jpg
    140.7 KB · Views: 64
  • IMG_1632.jpg
    IMG_1632.jpg
    129.6 KB · Views: 61
  • IMG_1627.jpg
    IMG_1627.jpg
    133.3 KB · Views: 53
Last edited:
OP
C

cptn_zippy

Well-known member
Joined
May 31, 2013
Messages
365
Location
Denver, Colorado
Almost ready to begin the reconstruction:

Just want to show off another thing and I'm done for the night.

I had a local metals supplier cut me a 3/8" steel plate to add some ballast to the bottom. The cart is surprisingly light, and I think it needed a little something to help keep it stable when one of the drawers is out. Added about 20lbs, I'm guessing, and will be covered with the wood. Cost was ~$30. More than I wanted to spend, but you know how these things go. Way to much $$ in this already, but it keeps me entertained.
 

Attachments

  • IMG_1647.jpg
    IMG_1647.jpg
    130.7 KB · Views: 74
OP
C

cptn_zippy

Well-known member
Joined
May 31, 2013
Messages
365
Location
Denver, Colorado
Newest update: I have finished the cart, but am posting the remaining pictures from the project. Here goes...
4359ff647d51610ee4f56701d47b2a92.jpg

Drawers with full-extension ball-bearing slides. I used Chicago screws to attach them. I also had to back up the slides with some 1/16" basswood to get the drawers to fit. That complicated the Stikwood installation somewhat, as you will see later.
 

Attachments

  • 4359ff647d51610ee4f56701d47b2a92.jpg
    4359ff647d51610ee4f56701d47b2a92.jpg
    587.5 KB · Views: 9
Last edited:
To avoid these ads, REGISTER NOW!
OP
C

cptn_zippy

Well-known member
Joined
May 31, 2013
Messages
365
Location
Denver, Colorado
068d9230d96904143177edee310370b7.jpg


Cleaned up the bottom with simple green and a toothbrush. Looks tons better. I cleaned up the casters with my ultrasonic cleaner and Purple Power. They're like new. One side of the "mounting foot" is missing in this photo because there was a broken screw that I had to extract.
 
Last edited:
OP
C

cptn_zippy

Well-known member
Joined
May 31, 2013
Messages
365
Location
Denver, Colorado
8e076e7fb7e7a6db115f850075f7377a.jpg


Bolted down the steel plate. The cart on its own is very light, it probably only weighs 20 pounds. I was concerned that when a drawer was open, it might cause the cart to tip, thus the reason for the ballast. The plate weighs about 20 pounds on its own.
 
Last edited:
OP
C

cptn_zippy

Well-known member
Joined
May 31, 2013
Messages
365
Location
Denver, Colorado
Next up was the Stikwood. Fun to work with...cut with the chop saw mostly, had to rip a few pieces with the table saw. I won't post too many shots, as it was a bit tedious, but you can't beat peel-n-stick. I tried to remove one piece because I didn't place it right, and wound up snapping it into pieces...the sticky tape is strong.

66461b9f17d301fdb914c87ffec0717b.jpg
 
Last edited:
OP
C

cptn_zippy

Well-known member
Joined
May 31, 2013
Messages
365
Location
Denver, Colorado
Finished, pretty much:

8f027cf036dea5ca4b8f634910af3f76.jpg


As you can see, I had to cut around where the slides were because if I'd placed them on top of the Stikwood, the drawers would not have fit.

You can also see my experimentation with the sign vinyl on the inside of the door. It was great for this application. More on that soon...
 
Last edited:
OP
C

cptn_zippy

Well-known member
Joined
May 31, 2013
Messages
365
Location
Denver, Colorado
Inside done, now to work on the exterior. I sanded the yellow sides and filled in the dings and dents with wood filler. I also scrubbed up the trim with a scotchbrite pad and some orange cleaner. I thought about painting and refinishing, but I decided that it needed a bit of patina so that it shows the hard life it lived in the air for so long.

a3a71c202e57447f9ac01e36de7414b4.jpg
 
Last edited:
OP
C

cptn_zippy

Well-known member
Joined
May 31, 2013
Messages
365
Location
Denver, Colorado
Next was the sign vinyl, Oracal from eBay. I chose the colors based on some that I had seen at a local coffee shop, and cut it up into various widths. Putting it on without wrinkles and bubbles was a bit of a challenge, but not too bad. I found that tacking it down in one spot and just lightly stretching it gave the best results. I pulled it away from the edges and used a small piece of flat wood to lay it down to the edge, since the panel is slightly recessed in the trim. Then the excess was cut away with a sharp razor blade.

676052c88f273b25a6fee1414cb3d921.jpg
 
Last edited:

jayoldschool

Well-known member
Joined
Apr 23, 2006
Messages
2,119
Location
Canada
You are doing a bad job of convincing me not to buy one of these things. Especially since I now have a vinyl cutter...
 
OP
C

cptn_zippy

Well-known member
Joined
May 31, 2013
Messages
365
Location
Denver, Colorado
Just know going in it's a lot of work. The cleaning and stripping of adhesive was by far the biggest consumer of time, and was nasty. It turned out great, but if someone offered to pay me to do another, I'd have to give it some serious thought.

J


Sent from my iPhone using Tapatalk
 

brittf

ALLIANCE MEMBER
Joined
Jun 19, 2014
Messages
91
I always wanted to see the bottom of one of these. Not sure that tipping it over in the aisle while in flight was a good way to do so though. :eyecrazy:


Britt
 
OP
C

cptn_zippy

Well-known member
Joined
May 31, 2013
Messages
365
Location
Denver, Colorado
One note on the labels/tags...in an earlier post I showed how I pulled them off. Used goof-off to get the sticky off. This tissue tape is what I used to re-secure them. Cool stuff, like double-sided tape, but super thin.

31c33c1e04cfa88f5a57f2a626e05d23.jpg
 
OP
C

cptn_zippy

Well-known member
Joined
May 31, 2013
Messages
365
Location
Denver, Colorado
Came a long way...
ba8b5d7aa4b2b33931e56301ad25e36e.jpg


And the final shots...
25082ef325136f40e68072e06ac09c0f.jpg


9f87dd30335fcd8a4e80d69539a74849.jpg


a0198740db386f784b29144ce4b2ec44.jpg


The top was just a cheap cutting board that I bought and cut down to fit. Just need to coat it with mineral oil. I also used some left over carbon fiber di-noc from another project on the anodized panels on the inside of the door, since they were beat to hell.

Overall, I'm pretty pleased with how it turned out.

J
 
Last edited:
To avoid these ads, REGISTER NOW!
Top Bottom