To avoid these ads, REGISTER NOW!

Allied jack seal replacement

threeputt

Well-known member
Joined
May 18, 2012
Messages
602
Location
Next to a very busy 4 lane
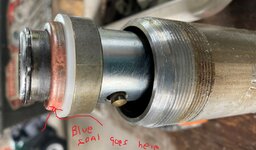
Website I bought the seal kit said I might have to do this

Model #HDJ2, Hydraulic Floor Jack 2 Ton​

Manufacturer: Allied

# 35 Dust Seal (On some versions, this wiper will not fit and the diameter must be made smaller by adjusting the heel outside diameter.
Of course the one sent is too big. Other than using my bench grinder to take some off this seal does anyone know what they are referring to ? It seems to be 1/8th inch larger than the place it goes.
I took a chance and bought the seal kit . I may end up trashing this old thing but wanted to give it a try first.
 
Last edited:
To avoid these ads, REGISTER NOW!

paulsomlo

Well-known member
Joined
Jul 16, 2013
Messages
3,874
Location
Northern Colorado
In the picture on the hcrcnow website, the heel is the part of the seal that it's sitting on, vs. the lip. The lip has much more flex than the heel, so reducing the heel diameter may allow the seal to fit. Grinding is the way to go on those - if you can, somehow fixture the seal with something round, chuck it in a drill, and use a belt grinder while the seal is turning, to get an even grind.
 
OP
T

threeputt

Well-known member
Joined
May 18, 2012
Messages
602
Location
Next to a very busy 4 lane
In the picture on the hcrcnow website, the heel is the part of the seal that it's sitting on, vs. the lip. The lip has much more flex than the heel, so reducing the heel diameter may allow the seal to fit. Grinding is the way to go on those - if you can, somehow fixture the seal with something round, chuck it in a drill, and use a belt grinder while the seal is turning, to get an even grind.
Thanks . I didn't mess with it yet as far as cutting it down yet. Good tip on the drill . I think I can make it work.
The o-ring below this seal took me 30 minutes to get in. What a pain. I am no hydraulic jack man but I am giving it a go.
I got to remove two more plugs and clean the junk out. The ports have balls in them so I will remove them in a small oil drain pan.

This jack was full of trash and I can see why it wouldn't go down and leak when raising it. May not do either when I get it back together. :)

The blue seal here that I am showing I assume will work even though its much thicker and larger, at least it looks like it. It may not matter on this one.

The threaded pipe was very hard to remove. Without my large vice I could never have gotten it removed. I used a large pipe wrench and had to use a 6 foot long cheater pipe. I give up a few times and then it finally broke loose.

I also checked the website good and the seal kit I ordered is the right one according to what they tell me.
Now after looking the picture I uploaded with blue seal installed I may have missed something. I wonder if the small white plastic one is number 7 and should go on last. That's not how it was. I got look more and see what I am missing here.
 

Attachments

  • blue seal.jpg
    blue seal.jpg
    194.4 KB · Views: 56
  • seal installed.jpg
    seal installed.jpg
    140.7 KB · Views: 42
  • Allied jack of mine.jpg
    Allied jack of mine.jpg
    241.1 KB · Views: 44
Last edited:
OP
T

threeputt

Well-known member
Joined
May 18, 2012
Messages
602
Location
Next to a very busy 4 lane
Here are the four new seals. Number one in this picture is the one I need to trim down so it will fit. Number 2 in this picture I installed. It was the one that was hard to get in . It is positioned below number one. Number three was the easy one. Not sure now where number four goes ? I have it stuck on there now with lip down but I don't think it is in the right place. There was nothing that looked like it in the picture I posted before this post. Maybe some one will see something that I need to do.
Here is the link where I downloaded the manual
 

Attachments

  • four new seals.jpg
    four new seals.jpg
    93.3 KB · Views: 28
Last edited:
OP
T

threeputt

Well-known member
Joined
May 18, 2012
Messages
602
Location
Next to a very busy 4 lane
I think it's in the right place, it's just upside down.
This is how I removed the old one. The gold colored on the right is how it came off . There was nothing left in it, just the metal part. I thought the lip went down on new blue one ? but I may be wrong. I will turn it around tomorrow. I will post back what it looks like turned around. You are saying the lip as shown here in picture goes up toward the snap ring ? I appreciate your help very much.
 

Attachments

  • seal replacement .jpg
    seal replacement .jpg
    147.8 KB · Views: 28
Last edited:
OP
T

threeputt

Well-known member
Joined
May 18, 2012
Messages
602
Location
Next to a very busy 4 lane
I think it's in the right place, it's just upside down.
So you think I leave number 7 in this picture where its at now and install the blue seal with lip up between 5 and 7 ? Maybe that seal had deteriorated ? Looking at the diagram on their website it shows number 4 a retainer, Ram-
number 5 a back up ring which I think would be the white plastic one marked number 5 here. Number 6 which is the blue cup seal that came in package would go between 5 and 7 and then snap ring ? Its late and I hope I haven't confused you but this would make more sense.
 

Attachments

  • missing .jpg
    missing .jpg
    86.5 KB · Views: 29
  • breakdown of parts of jack seals.jpg
    breakdown of parts of jack seals.jpg
    97.1 KB · Views: 39
OP
T

threeputt

Well-known member
Joined
May 18, 2012
Messages
602
Location
Next to a very busy 4 lane
Yep, lip towards the snap ring. I'm assuming that's the end of the ram that's closest to the hydraulic b
Do I leave the copper color number 7 in picture I showed or toss it. The manual shows a cup washer just before the snap ring and I assume that may be it ? Then put the new blue cup seal on with lip facing up toward to snap ring.
I will try an put everything on tomorrow and take a picture to see how it looks and what you think.. Again THANKS for the help.
 
Last edited:
OP
T

threeputt

Well-known member
Joined
May 18, 2012
Messages
602
Location
Next to a very busy 4 lane
Get rid of 7, keep 4 and 5, and install the blue cup with the lip closest to the snap ring

Get rid of 7, keep 4 and 5, and install the blue cup with the lip closest to the snap ring.
I did as you suggested. Looks good so far. I haven't messed with the other seal yet. Not sure exactly how I am going to shave off the right amount so it will fit.
You think I need to remove the two plugs and risk loosing the balls ? picture included on which one I am referring to. I guess it could have trash in those ports ?
Also would this power steering fluid work.
I paid a good bit for this last summer for my son's pontoon boat steering and we ended up not using it. I believe it would work but wanted to make sure. The jack may never work lol anyway.
Thanks for the help. Couldn't have got this far if not for you.
 

Attachments

  • Seal installed correct.jpg
    Seal installed correct.jpg
    214.6 KB · Views: 28
  • Plugs on my jack.jpg
    Plugs on my jack.jpg
    165.5 KB · Views: 22
  • Outboard power steering fluid.jpg
    Outboard power steering fluid.jpg
    108.5 KB · Views: 24
Last edited:

paulsomlo

Well-known member
Joined
Jul 16, 2013
Messages
3,874
Location
Northern Colorado
I'd say, don't remove the plug labeled #25 - that's the safety overload and it's set at the factory. The other plug, #19 is fair game, just be careful that you don't lose the parts and that you get them back in the right order. And when you thread the cylinder back into the hydraulic block, be careful not to put a flat spot in the cylinder wall. Some put a socket inside, maybe wrapped with tape to fit, I've seen using the end of the ram itself also. And you might try some sealant on the cylinder threads as it goes back in - Loctite 518 is suitable.

That's some fancy hydraulic fluid, probably OK to use. The cheap stuff from the auto parts store works fine, or plain old ATF.

I'm optimistic that it'll work when back together - there's not much to these things.
 
To avoid these ads, REGISTER NOW!
OP
T

threeputt

Well-known member
Joined
May 18, 2012
Messages
602
Location
Next to a very busy 4 lane
I'd say, don't remove the plug labeled #25 - that's the safety overload and it's set at the factory. The other plug, #19 is fair game, just be careful that you don't lose the parts and that you get them back in the right order. And when you thread the cylinder back into the hydraulic block, be careful not to put a flat spot in the cylinder wall. Some put a socket inside, maybe wrapped with tape to fit, I've seen using the end of the ram itself also. And you might try some sealant on the cylinder threads as it goes back in - Loctite 518 is suitable.

That's some fancy hydraulic fluid, probably OK to use. The cheap stuff from the auto parts store works fine, or plain old ATF.

I'm optimistic that it'll work when back together - there's not much to these things.
I
Should I have removed the cylinder ( 02 )from base (01) ? or just pull ram out and left cylinder in block ? I will just screw it back it good and tight and use lock-tight .
This jack would jack up . It just wouldn't come down when I twisted the handle.
The one seal that needs replacing had very little left on it. If I knew what I know now I would just toss this thing. After tearing into it I wonder how it worked at all but it would jack up.
The people I bought this seal kit from should say they just don't have one in stock instead of selling me this. Maybe things will look better this week. I really don't even need a jack right now. I may just buy a new one. I don't give up easy though. lol

Thanks again for the help. I will let you know if it works or ends up in the scrap yard lol
 
Last edited:

paulsomlo

Well-known member
Joined
Jul 16, 2013
Messages
3,874
Location
Northern Colorado
Well, it's not absolutely necessary to remove the cylinder, but it does make cleaning easier. Just be careful not to deform the cylinder when you tighten it. And don't give up now, you're almost home.
 
OP
T

threeputt

Well-known member
Joined
May 18, 2012
Messages
602
Location
Next to a very busy 4 lane
Well, it's not absolutely necessary to remove the cylinder, but it does make cleaning easier. Just be careful not to deform the cylinder when you tighten it. And don't give up now, you're almost home.
Thanks, as hard as it was to remove I may have already deformed it. I don't think it was meant to be removed. I haven't give up just yet . Again I thank you. I will keep you updated.
 
OP
T

threeputt

Well-known member
Joined
May 18, 2012
Messages
602
Location
Next to a very busy 4 lane
Well, it's not absolutely necessary to remove the cylinder, but it does make cleaning easier. Just be careful not to deform the cylinder when you tighten it. And don't give up now, you're almost home.
I got everything back together. Had to trim the small blue seal a lot to get it in base. According to the manual Its just a dust seal so really no big deal. Better than the one that wasn't in it lol :)
I didn't have time to put it back in the jack but maybe tomorrow or the next.
I will let you know if it works. THANKS again for your expert help.
 

Attachments

  • Floor jack completed.jpg
    Floor jack completed.jpg
    166.6 KB · Views: 30
OP
T

threeputt

Well-known member
Joined
May 18, 2012
Messages
602
Location
Next to a very busy 4 lane
Well, it's not absolutely necessary to remove the cylinder, but it does make cleaning easier. Just be careful not to deform the cylinder when you tighten it. And don't give up now, you're almost home.
I finally got it. Had trouble getting it to work the first time. When I would jack it up by pushing down on handle it would jack up and then when I pulled up on the handle to jack again it would go back down. Something I had wrong in the way it connected up to handle. I figured it out and now all is great. I really don't know what I did but it was something because it worked that this time lol
I really appreciate you taking the time to help me. I don't use it much but if I own something I want it to work in my shop. No leaks on my shop floor now which a nice. :)
 

Attachments

  • Jacked up.jpg
    Jacked up.jpg
    75.4 KB · Views: 25
Last edited:
OP
T

threeputt

Well-known member
Joined
May 18, 2012
Messages
602
Location
Next to a very busy 4 lane
I spoke too quick. Used it today and everything worked fine when I was jacking up a truck. I let it down later on and fluid came from somewhere and made a mess on my floor. Got to see if I can find where it came from. Might have overfilled it. I hope that's the problem.
 
Last edited:
OP
T

threeputt

Well-known member
Joined
May 18, 2012
Messages
602
Location
Next to a very busy 4 lane
Replaced an o-ring . Number 30 in diagram. I had one in my o-ring set. Wasn't in the $40 set I ordered which was really a waste of my money. I had an o-ring already that was the same as number 2 in this picture. Number 4 in the set is about all I needed. Anyway its working. Live and learn.


Attachments

  • four new seals.jpg
    four new seals.jpg
    93.3 KB · Views: 20

Monza Harry

Well-known member
Joined
Dec 29, 2018
Messages
1,433
Location
Windsor ON
I spoke too quick. ... Might have overfilled it. I hope that's the problem.
Bleeding some of these pumps/jacks can be a chore, I had my old one rebuilt and it never seemed right after, so I bought a replacement [Torin Big Red] looked almost identical to my original [GSC(?) brand from Sears around 1990ish, label is pretty hard to read now] nice after ~30 years to be able to buy a near match. The new one I bleed the system as called out in the instructions and it "expelled oil in protest, so two more times and still wouldn't lift with some lift weight. @#$%^& words were used here. Left the jack with the valve open for a week until I had time to return to it and it was better. Uhm? A couple of more bleeding sessions and a couple of bleeding sessions my own design* and "Voila" it worked! Only time that has happened to me. I'll tear the old one apart and investigate WTF is happening there and paint to match the new one/Shop colours as desired and add on colour to the new one. [Red/Black for both, matbe some silver/chrome to match fully IDK see if I have any money/time left(?) Glad that you had a "Victory" here! Harry
*With the handle end elevated to clear the air from the cylinder IIRC. It has been a while, Sorry
 

dhoman

New member
Joined
Jun 24, 2025
Messages
3
I think that I have this same jack. Where can i order parts for it. I broke a few teeth on the connecting rod release valve gear.
 

paulsomlo

Well-known member
Joined
Jul 16, 2013
Messages
3,874
Location
Northern Colorado
You can try Hydraulic Parts Supply in Sawyer KS, (620) 594-2247.

It seems that you would need to turn very little to release - can you rotate either gear 90 or 180 degrees to get to good teeth meshing?
 

dhoman

New member
Joined
Jun 24, 2025
Messages
3
You can try Hydraulic Parts Supply in Sawyer KS, (620) 594-2247.

It seems that you would need to turn very little to release - can you rotate either gear 90 or 180 degrees to get to good teeth meshing?
I am going to try to rotate the gear. And I'll try the KS place. Do you know of a place in CO? I'm located in COS.
 
To avoid these ads, REGISTER NOW!
Top Bottom