allthingsgiant
Member
- Joined
- Feb 11, 2023
- Messages
- 8
Overview:
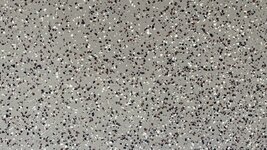
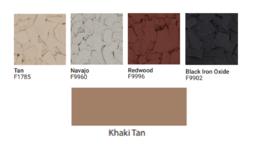
Just completed my 1500 sqft detached garage + 500 sqft garage epoxy finish. I used the ArmorPoxy 3-part system: two-part tan primer, two part khaki base coat, and the military-grade two-part urethane finish. You can see in the photos my 1/8" custom flake pattern, broadcast in a light/medium finish. I also used the non-skid additive. Happy with the supplies provided by ArmorPoxy. The only other items I needed for the pour were a couple 4" paint brushes, my drill, disposable gloves, a floor squeegee (to spread out the epoxy faster), some Solo cups, and some sacrificial shoes. Overall, it was a simple process in "painting" three coats over three days. The primer and second coats took about 3 hours per each 500sqft, and the topcoat about an hour. I did the 500 sqft garage first, then the 1500-sqft garage broken up over two sessions. I'm not sure if we're allowed to disclose cost here, but ArmorPoxy takes care of GarageJournal members . Overall I'm happy with the initial result --- while not perfect, it's mine. This is my second epoxy job --- I did a U-Coat-It garage about 6 years ago with similar results. This post is more of a reminder for me the next time I do a garage...
Preparation:
This was brand new concrete, roughly 1 year after being poured. I rented a bead blaster from my local rental shop for about $600 total and it took about 1/2 of a 50 lb bag of shot. It took me about 12 hours total over a weekend to do the whole job; it was a slow process as my blaster only had an 8" spray field. A floor magnet is a strong recommendation to pull up any loose beads; my shopvac wasn't strong enough to pick up all of it. Also, be sure you don't simply blow out the loose beads onto your driveway as they will cause rust spots. I also used a 4 1/2" grinding wheel attached to my Milwaukee grinder + dust shroud + shopvac to get into the corners where the bead blaster couldn't reach. Be sure to use an appropriate dust shroud and vacuum as it's extremely dusty.
Couple of lessons learned:
1) Vertical Walls: Do them first, and mix just two-three Solo cups of material at a time (in the proper ratio) since this is a slower process to paint the edges. Also, when broadcasting the flakes, broadcast flakes on the vertical walls first before laying down the sticky floor coat, as there will be a lot of flakes that accumulate in the corners and edges. You also want the vertical edges to remain sticky in order to accept the flake. In my first run I waited to broadcast flake until after my floor was laid, and some of my vertical walls were no longer sticky. Also, right after the flakes are broadcast, remove any painter's tape from the walls at this point since the epoxy gets thick/hard and has to be cut with a razor blade otherwise.
2) The primer coat barely covered 500 sqft of space (where the instructions say it covers ~600 sqft). The second coat does a better job in covering ~600 sqft, perhaps from the benefit of the primer coat. I had to leave my primer coat a little thin in some spots, but this didn't affect the final look.
3) Focus on the relief cuts, wall edges, and corners first as you do the floor. The roller can't get within about 1/2" - 1" of the wall. I recommend you 'paint' these relief cuts first with a small batch of epoxy and a paint brush, then do your bigger pour. Avoid pouring or squeegeeing the epoxy into the relief cuts, as the epoxy will pool - you'll have to brush it out with a paint brush.
4) The floor can get slippery, particularly during your primer and second coats. Your shoe spikes will slip and will cause marks. Ignore them until you are performing your final pass at each step. I made the mistake to continue to fix my marks as I went along, and I can see exactly where I did those touch-ups, especially during the flake broadcast.
5) The non-slip material definitely sinks to the bottom of the bucket quickly after you mix the topcoat. Once you pour the topcoat onto the floor, you'll see a lot of that material at the bottom of the bucket. What I did after my first pour was broadcast the non-slip 'sand' across the dry floor, and then applied the topcoat finish over it. I made sure to roll over the non-skid sand multiple times so it got fully saturated and went clear. You can see exactly when the material goes from white to clear. In some spots you need to 'scrub' the sand in order for it to get fully embedded into the topcoat. I see no visible difference with both applications.
6) Do not let any significant amount of epoxy to sit mixed in your bucket. The more epoxy standing together, the faster the exothermic reaction will take place. I left about 1" of second coat epoxy sit in the bucket to use toward the end of my pour--- to have just in case where I needed extra. Well, that epoxy cured hard after about 30 minutes. You can definitely tell when your epoxy is starting to cure. Initially the epoxy glides on like watered-down paint, and over time (after 30 minutes), you can really feel the epoxy go down more like molasses. After 45 minutes, all bets are off. Best to spread it out quickly with a squeegee, then roller it from there.
7) If doing more than 500 sqft at a time, or if you have a lot of corners / vertical walls, employ a friend to help you. I did all of this on my own, and I could have used the help to spread everything out faster. Mix only what you need at a time. I recommend using a Solo cup for measuring out only what you need. Use one Solo cup for the base + one Solo cup for the hardener. And only mix a Solo cup size at a time at either the 1:1 or 2:1 ratio depending which step you are on (in total you'll have either 2 or 3 Solo cups worth of material). Any more than that, and I wasn't able to lay all of it down before 45 minutes. A little goes a long way, and best not to waste any epoxy because it cured too quickly on you.
Just completed my 1500 sqft detached garage + 500 sqft garage epoxy finish. I used the ArmorPoxy 3-part system: two-part tan primer, two part khaki base coat, and the military-grade two-part urethane finish. You can see in the photos my 1/8" custom flake pattern, broadcast in a light/medium finish. I also used the non-skid additive. Happy with the supplies provided by ArmorPoxy. The only other items I needed for the pour were a couple 4" paint brushes, my drill, disposable gloves, a floor squeegee (to spread out the epoxy faster), some Solo cups, and some sacrificial shoes. Overall, it was a simple process in "painting" three coats over three days. The primer and second coats took about 3 hours per each 500sqft, and the topcoat about an hour. I did the 500 sqft garage first, then the 1500-sqft garage broken up over two sessions. I'm not sure if we're allowed to disclose cost here, but ArmorPoxy takes care of GarageJournal members
. Overall I'm happy with the initial result --- while not perfect, it's mine. This is my second epoxy job --- I did a U-Coat-It garage about 6 years ago with similar results. This post is more of a reminder for me the next time I do a garage...Preparation:
This was brand new concrete, roughly 1 year after being poured. I rented a bead blaster from my local rental shop for about $600 total and it took about 1/2 of a 50 lb bag of shot. It took me about 12 hours total over a weekend to do the whole job; it was a slow process as my blaster only had an 8" spray field. A floor magnet is a strong recommendation to pull up any loose beads; my shopvac wasn't strong enough to pick up all of it. Also, be sure you don't simply blow out the loose beads onto your driveway as they will cause rust spots. I also used a 4 1/2" grinding wheel attached to my Milwaukee grinder + dust shroud + shopvac to get into the corners where the bead blaster couldn't reach. Be sure to use an appropriate dust shroud and vacuum as it's extremely dusty.
Couple of lessons learned:
1) Vertical Walls: Do them first, and mix just two-three Solo cups of material at a time (in the proper ratio) since this is a slower process to paint the edges. Also, when broadcasting the flakes, broadcast flakes on the vertical walls first before laying down the sticky floor coat, as there will be a lot of flakes that accumulate in the corners and edges. You also want the vertical edges to remain sticky in order to accept the flake. In my first run I waited to broadcast flake until after my floor was laid, and some of my vertical walls were no longer sticky. Also, right after the flakes are broadcast, remove any painter's tape from the walls at this point since the epoxy gets thick/hard and has to be cut with a razor blade otherwise.
2) The primer coat barely covered 500 sqft of space (where the instructions say it covers ~600 sqft). The second coat does a better job in covering ~600 sqft, perhaps from the benefit of the primer coat. I had to leave my primer coat a little thin in some spots, but this didn't affect the final look.
3) Focus on the relief cuts, wall edges, and corners first as you do the floor. The roller can't get within about 1/2" - 1" of the wall. I recommend you 'paint' these relief cuts first with a small batch of epoxy and a paint brush, then do your bigger pour. Avoid pouring or squeegeeing the epoxy into the relief cuts, as the epoxy will pool - you'll have to brush it out with a paint brush.
4) The floor can get slippery, particularly during your primer and second coats. Your shoe spikes will slip and will cause marks. Ignore them until you are performing your final pass at each step. I made the mistake to continue to fix my marks as I went along, and I can see exactly where I did those touch-ups, especially during the flake broadcast.
5) The non-slip material definitely sinks to the bottom of the bucket quickly after you mix the topcoat. Once you pour the topcoat onto the floor, you'll see a lot of that material at the bottom of the bucket. What I did after my first pour was broadcast the non-slip 'sand' across the dry floor, and then applied the topcoat finish over it. I made sure to roll over the non-skid sand multiple times so it got fully saturated and went clear. You can see exactly when the material goes from white to clear. In some spots you need to 'scrub' the sand in order for it to get fully embedded into the topcoat. I see no visible difference with both applications.
6) Do not let any significant amount of epoxy to sit mixed in your bucket. The more epoxy standing together, the faster the exothermic reaction will take place. I left about 1" of second coat epoxy sit in the bucket to use toward the end of my pour--- to have just in case where I needed extra. Well, that epoxy cured hard after about 30 minutes. You can definitely tell when your epoxy is starting to cure. Initially the epoxy glides on like watered-down paint, and over time (after 30 minutes), you can really feel the epoxy go down more like molasses. After 45 minutes, all bets are off. Best to spread it out quickly with a squeegee, then roller it from there.
7) If doing more than 500 sqft at a time, or if you have a lot of corners / vertical walls, employ a friend to help you. I did all of this on my own, and I could have used the help to spread everything out faster. Mix only what you need at a time. I recommend using a Solo cup for measuring out only what you need. Use one Solo cup for the base + one Solo cup for the hardener. And only mix a Solo cup size at a time at either the 1:1 or 2:1 ratio depending which step you are on (in total you'll have either 2 or 3 Solo cups worth of material). Any more than that, and I wasn't able to lay all of it down before 45 minutes. A little goes a long way, and best not to waste any epoxy because it cured too quickly on you.