To avoid these ads, REGISTER NOW!

Alternative to finishing a drywall ceiling?

Tawn

Well-known member
Joined
Mar 2, 2011
Messages
310
Location
Maryland
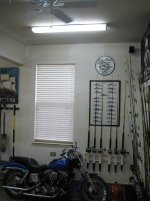
My garage has drywall that has been taped and mudded but not "finished". The walls I have already begun covering with cork tiles but I don't know what I am going to do with the ceiling. The ceiling has two ceiling fans and 8 surface mounted 4' fluorescent light fixtures on it.

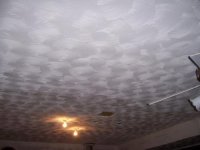
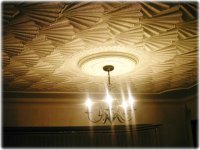
I have NO desire to sand-mud-sand it to a smooth, paintable surface and was hoping someone had an idea of an alternative. I am even toying with the idea of using tin ceiling tiles.

Anybody got a good idea they wouldn't mind sharing?

Thanks,
Tawn
 

Attachments

  • Garage 3.jpg
    Garage 3.jpg
    136.1 KB · Views: 157
  • Garage 1.jpg
    Garage 1.jpg
    142.4 KB · Views: 164
To avoid these ads, REGISTER NOW!

rasit

Well-known member
Joined
Sep 17, 2009
Messages
387
Location
SE Pennsylvania
I have nothing to suggest for the ceiling, there are endless possibilities and I'm sure others will chime in, but I am liking that shovelhead!!
 

Jimmy_B

Well-known member
Joined
Dec 24, 2011
Messages
381
Location
..........
I used taping mud to create a stucco kind of look in my basement. Saved a lot of time over trying to make it smooth.

100_1793.jpg
 

Kevin54

MEMBER EMERITUS
Joined
Jan 12, 2005
Messages
29,341
Location
Urbana, Ohio
Here is a pic of my wifes building. My drywall guy rolled it on. It looks like woodgrain. When I asked him how he did it, he showed me a roller that he used that has the texture on it. He thinned down some compound and went at it. Hopefully this shows up.
 

Attachments

  • DSCF2452.JPG
    DSCF2452.JPG
    112.7 KB · Views: 294

just1more

Well-known member
Joined
Jan 30, 2011
Messages
178
Tawn,
Could be a good time to learn how to tape and mud properly... you should not have to do any sanding between coats of mud. If you are sanding between, you are applying too much mud, or not applying it evenly. Excesive sanding takes time, wastes material, and worst, will "fuzz" the drywall paper.

Run the joint in three passes..first pass-center/applying the mud, then a pass on each side of center, using pressure to the outside edge of the knife (flex the blade with wrist pressure) The idea is to get a feathered edge on the drywall paper.

After this coat is dry, run the taping knife (like a scraper) over the previous coat to knock any small "goobers" of before the next coat.
It really is not that hard to do.

:thumbup:
 

Alchymist

Well-known member
Joined
Mar 1, 2009
Messages
4,423
Location
Central PA
Buy 2 wallpaper brushes - cut one in two about 3/8 of the way from one end. These are your "trowels. Apply drywall compound with a trowel, doing an area about 2-3 ft square at a time. Put it on about 1/16 thick.

Now take the full size brush and starting about 3 inches from a wall, stick the brush parallel to the wall and using one end as a pivot, swing the brush 180 degrees, holding it at an angle like a trowel. Move down 1/2 the brush length and repeat, overlapping the sweep. Step and repeat.

Use the smaller cutoff brushes to create a border along walls and fixtures by dragging in a straight line. The designs can be as plain or as simple as desired.
 

Attachments

  • drywall.jpg
    drywall.jpg
    18.8 KB · Views: 162
  • drywall2.jpg
    drywall2.jpg
    64.4 KB · Views: 137

DekeT

Well-known member
Joined
Aug 12, 2011
Messages
2,234
Location
USA
As Just1 said light coats applied correctly will require very little if any sanding at all.
 

bigbubba

Well-known member
Joined
Jul 12, 2010
Messages
2,884
Location
Poplar Bluff Mo
Buy 2 wallpaper brushes - cut one in two about 3/8 of the way from one end. These are your "trowels. Apply drywall compound with a trowel, doing an area about 2-3 ft square at a time. Put it on about 1/16 thick.

Now take the full size brush and starting about 3 inches from a wall, stick the brush parallel to the wall and using one end as a pivot, swing the brush 180 degrees, holding it at an angle like a trowel. Move down 1/2 the brush length and repeat, overlapping the sweep. Step and repeat.

Use the smaller cutoff brushes to create a border along walls and fixtures by dragging in a straight line. The designs can be as plain or as simple as desired.[/QUOT

This is what we did to my uncles ceiling.Looks great and was alot faster than smoothing it all out!
 
To avoid these ads, REGISTER NOW!

Kevin54

MEMBER EMERITUS
Joined
Jan 12, 2005
Messages
29,341
Location
Urbana, Ohio
My parents house had the fan pattern on their ceiling and the guy used a notched trowel to give the pattern.
 

kert

Well-known member
Joined
May 31, 2009
Messages
371
Location
Franklin, MI
This is a garage right? I think I'd knock of any high spots and paint it flat white and be done with it. I hate texture though.
 

Alchymist

Well-known member
Joined
Mar 1, 2009
Messages
4,423
Location
Central PA
My parents house had the fan pattern on their ceiling and the guy used a notched trowel to give the pattern.

Some do use a notched trowel, I personally don't like the square edges and v peaks it leaves. Using the wallpaper brushes gives it a more oil painting look. I have seen a few where tinted compound was applied in various colors to give a mural effect. Lot of work there though.
 

shopnut

Well-known member
Joined
Feb 22, 2006
Messages
4,237
Location
Florida
When the textured finish of our drywall patio ceiling started to flake off, I used vinyl soffit material to cover it up. Because it is so lightweight, I was able to screw it directly to the existing drywall. It worked so well in my workshop, I figured why not use it on the patio too.

Patio-Ceiling-01.JPG Patio-Ceiling-02.JPG Patio-Ceiling-03.JPG

Follow this link to see my collective information on using the vinyl soffit material:
ASYLUM Thread Reply#1014

Here's the way the shop looks with it:
960-Main-Bay-Panoramic-02.JPG
 

LennyTheLizard

Well-known member
Joined
Oct 25, 2010
Messages
325
Location
Southeast MO
As Just1 said light coats applied correctly will require very little if any sanding at all.

I've been hanging drywall for a long time, but not so much on the finishing aspect. I recently found this website though, and it made a lot of the concepts become more clear.

www.drywallschool.com

This guy has some really good pointers / pictures for how to do it right. It's a lot easier to check out his method with pictures. The other key besides light coats is don't try to rush it. Just follow one step at a time.
 

Kevin54

MEMBER EMERITUS
Joined
Jan 12, 2005
Messages
29,341
Location
Urbana, Ohio
Over at my Dentist office, they did the traditional stomping then knocked it down with a trowel. I like the looks of it. Our house has the traditional stomping done except for the Family Room, and it is popcorned. I absolutely hate the popcorn. But the guy I hired to stomp it to match the other came highly recommended. Huge mistake there. I came home from work and he had it stomped. It would have been better if I hired the town drunk to do it. He had the stomps overlapped, had some here, had some there, large areas he missed totally. I told him it was totally unacceptable, so he said he would come back the next day to finish and repair it. A bigger mistake yet. I fired him, kept my money and ran him off of the property. Well, when he thinned the compound he thinned it with paint. So it was going to be a huge job stripping it off. Then I had some medical problems pop up, so to hide the atrocious looks of the ceiling, I had it popcorned. Someday, I'll pull the complete ceiling down, add some new drywall, and just have a smooth ceiling
 

ddawg16

Well-known member
Joined
Jul 11, 2008
Messages
21,005
Location
S. California
The thinned down mud...roll it on method is a great way to go...easy....cheap....and easy to repair.

But I would use a semi-gloss paint....reflects light a bit better and the rough texture breaks up the light to defuse it better. I used High gloss exterior on my garage ceiling....I like it.
 

shannonw

Well-known member
Joined
Jun 18, 2010
Messages
660
Location
Florida
man, i like shopnuts idea, i might have to borrow that vinyl idea for similiar fl patio and the garage when i go to repaint it.
 

Kevin54

MEMBER EMERITUS
Joined
Jan 12, 2005
Messages
29,341
Location
Urbana, Ohio
One thing to remember with a textured ceiling.....someday it will have to be repaired for some reason and matched. The repair always shows up on texture. On smooth it doesn't
 
To avoid these ads, REGISTER NOW!
Top Bottom