glentre
Well-known member
At the suggestion from another member who is following my garage build and the selection of my cabinets, I am starting this thread to talk about an alternative source of garage cabinets that may be of interest to folks in the market for that kind of product.
Having owned a commercial architectural woodworking business for nearly twenty years, I am familiar with commercial custom cabinets. There have been significant advances in that industry in the last ten years to the point that most successful local shops are now fully automated and run with a minimum amount of skilled labor. Most folks are familiar with the computer kitchen design programs used in the big box stores where you sit down with the designer and select standard size cabinets and go home with plan and elevation drawings of your new kitchen. The commercial and kitchen cabinet shops now have programs that take that concept several steps further.
First, these programs are not designed for standard sized cabinets but allow you to build any width, depth or height cabinet you want subject only to common sense limitations. For example, the programs will allow you to design a 48" wide wall cabinet with a single door but that would be impractable as two 24" doors might be as wide as you would want to go. Once your design is finalized, the computer generates a sheet goods cut list, and a list of how much edge tape you will need, the exact number of hinges, shelf clips and pulls and assembly dowels required. In a matter of minutes, this allows the shop all the information it needs to quote a price for the job. The design is then directly downloaded to a computerized saw or cnc router which cuts the parts, drills the hinge, dowel and shelf clip holes, runs any dados required and generates a stick-on label for each part showing the job name, room and cabinet number and the exact width and length of that particular part.
The parts then go to an automated edge bander which applies the color and thickness of edging you want on your cabinets. Following this, the parts go to an automatic dowel insertion machine and then off to the assembly area. Instead of going to assembly, the finished parts can be loaded in your vehicle and off to your shop if you want to save money by assembling them yourself.
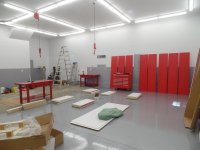
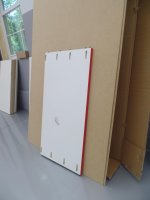
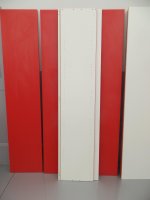
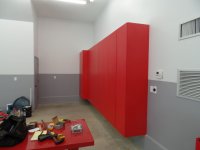
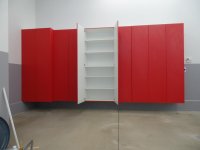
Attached are drawings of my cabinets. They are built with 3/4" white malamine panels and with red plastic laminate on all exterior surfaces. I will follow up in subsequent posts showing the assembly of the cabinets and the finished products when they are done.
For those interested in having cabinets built exactly as they want, the size they want, in the color they want and with the material they want (melamine panels, plywood, OSB, particleboard or any other sheet material ), then this approach might interest you. Your price levels will not be the cheapest but will be competitive with most mid-range metal cabinets on the market. Most cities of any size in the country have cabinet shops equiped with these tools. Either kitchen cabinet or commercial cabinet shops in your area can build your cabinets however you want. Some may even be willing to design your cabinets and furnish you with detailed cut lists, material requirements and part labels if you want to do everything yourself.
Glen
Note: I tried to upload the cabinet design sheets for my build but apparently, they are too large so I'll look into some other way to get them posted and follow up as soon as I can
Having owned a commercial architectural woodworking business for nearly twenty years, I am familiar with commercial custom cabinets. There have been significant advances in that industry in the last ten years to the point that most successful local shops are now fully automated and run with a minimum amount of skilled labor. Most folks are familiar with the computer kitchen design programs used in the big box stores where you sit down with the designer and select standard size cabinets and go home with plan and elevation drawings of your new kitchen. The commercial and kitchen cabinet shops now have programs that take that concept several steps further.
First, these programs are not designed for standard sized cabinets but allow you to build any width, depth or height cabinet you want subject only to common sense limitations. For example, the programs will allow you to design a 48" wide wall cabinet with a single door but that would be impractable as two 24" doors might be as wide as you would want to go. Once your design is finalized, the computer generates a sheet goods cut list, and a list of how much edge tape you will need, the exact number of hinges, shelf clips and pulls and assembly dowels required. In a matter of minutes, this allows the shop all the information it needs to quote a price for the job. The design is then directly downloaded to a computerized saw or cnc router which cuts the parts, drills the hinge, dowel and shelf clip holes, runs any dados required and generates a stick-on label for each part showing the job name, room and cabinet number and the exact width and length of that particular part.
The parts then go to an automated edge bander which applies the color and thickness of edging you want on your cabinets. Following this, the parts go to an automatic dowel insertion machine and then off to the assembly area. Instead of going to assembly, the finished parts can be loaded in your vehicle and off to your shop if you want to save money by assembling them yourself.
Attached are drawings of my cabinets. They are built with 3/4" white malamine panels and with red plastic laminate on all exterior surfaces. I will follow up in subsequent posts showing the assembly of the cabinets and the finished products when they are done.
For those interested in having cabinets built exactly as they want, the size they want, in the color they want and with the material they want (melamine panels, plywood, OSB, particleboard or any other sheet material ), then this approach might interest you. Your price levels will not be the cheapest but will be competitive with most mid-range metal cabinets on the market. Most cities of any size in the country have cabinet shops equiped with these tools. Either kitchen cabinet or commercial cabinet shops in your area can build your cabinets however you want. Some may even be willing to design your cabinets and furnish you with detailed cut lists, material requirements and part labels if you want to do everything yourself.
Glen
Note: I tried to upload the cabinet design sheets for my build but apparently, they are too large so I'll look into some other way to get them posted and follow up as soon as I can

") )
)