To avoid these ads, REGISTER NOW!

An ugly Plomb spinner rat

3baygarage

Well-known member
Joined
Sep 1, 2013
Messages
11,930
Location
SW Florida/from Buffalo,NY
Cranky O’Plomb was my next title choice, but that day came and went.

attachment.php


attachment.php


attachment.php


Brass washer and screw
attachment.php
 

Attachments

  • 8832A43A-6C15-44E0-9143-FF1CDB7135FA.jpg
    8832A43A-6C15-44E0-9143-FF1CDB7135FA.jpg
    149.6 KB · Views: 430
  • DDBF046A-9679-436F-B293-83C2AB35E548.jpg
    DDBF046A-9679-436F-B293-83C2AB35E548.jpg
    147.9 KB · Views: 427
  • 8E83B0C9-DC68-4E5A-A103-6884DC54CDD4.jpg
    8E83B0C9-DC68-4E5A-A103-6884DC54CDD4.jpg
    148 KB · Views: 426
  • 87AF06DD-7588-4F9A-AD1F-16B4756152DB.jpg
    87AF06DD-7588-4F9A-AD1F-16B4756152DB.jpg
    148.9 KB · Views: 433
To avoid these ads, REGISTER NOW!
OP
3

3baygarage

Well-known member
Joined
Sep 1, 2013
Messages
11,930
Location
SW Florida/from Buffalo,NY
That’s where it’s soaking now. I’ll post the results.

First I wanted to try and remove the wood knob. It wouldn’t spin and wouldn’t budge. I began by cleaning the gunk out of the thin gap where it meets the metal with a tiny screwdriver. A little more elbow grease and it slowly started to budge. There was old dry grease on the shaft.

attachment.php


attachment.php


attachment.php


attachment.php
 

Attachments

  • 440BD028-A356-4838-8537-146BE058279B.jpg
    440BD028-A356-4838-8537-146BE058279B.jpg
    147.4 KB · Views: 410
  • D75C7291-1309-41B6-A103-EDF4ECEB84F7.jpg
    D75C7291-1309-41B6-A103-EDF4ECEB84F7.jpg
    149.1 KB · Views: 407
  • 73C93D85-EE93-45D4-8FA2-6A3B22DDAE45.jpg
    73C93D85-EE93-45D4-8FA2-6A3B22DDAE45.jpg
    150.1 KB · Views: 407
  • 3D0385D1-EC5A-4A3E-AB8C-37E1F86D2869.jpg
    3D0385D1-EC5A-4A3E-AB8C-37E1F86D2869.jpg
    125.1 KB · Views: 414

48RON54

Well-known member
Joined
Dec 27, 2013
Messages
2,666
Location
Inland Empire, CA
Nice work so far. I really like it. I'm not the tool aficionado many on the board are. I've never seen one like that. Look forward to watching you clean it up/restore it.
 
OP
3

3baygarage

Well-known member
Joined
Sep 1, 2013
Messages
11,930
Location
SW Florida/from Buffalo,NY
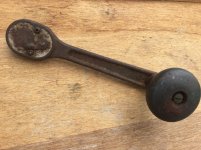
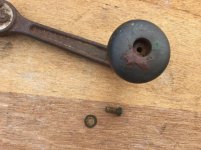
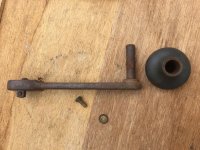
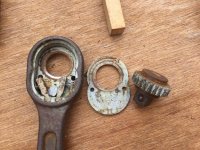
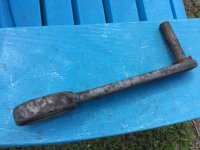
Not so bad on the inside. Actually, the lever and ratcheting action were working great.

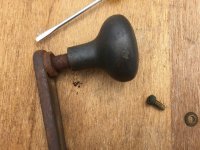
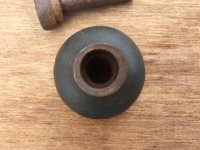
I ran into a little problem with the detent ball. It didn’t look bad other than the finish, but was frozen. A quick chomp with a pair of pliers freed it up, only it sunk in and got stuck.

Thought the spring behind the ball was toast, but no, that wasn’t the end. Applied some light oil to soak in around the ball, and I went to work on it with a 1/8 punch, using light rapid blows. The ball and spring came back to life! I repeated the process to make sure any debris in there was broken up.

attachment.php


attachment.php


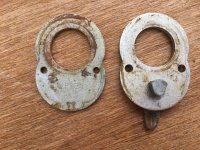
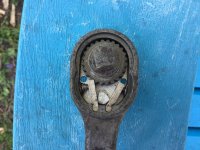
A flip of the cover plate revealed a WF-21 inside.

attachment.php


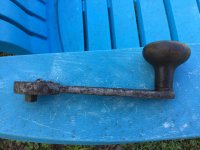
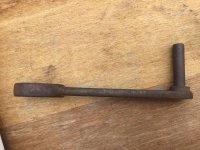
This is how it went into the vinegar. Most of the parts went in as well.

attachment.php


attachment.php
 

Attachments

  • A931824D-3A53-4DF8-A48C-71513DFC6B8C.jpg
    A931824D-3A53-4DF8-A48C-71513DFC6B8C.jpg
    152.9 KB · Views: 395
  • FE3C6D12-4BAA-4ED6-A505-1220E3166433.jpg
    FE3C6D12-4BAA-4ED6-A505-1220E3166433.jpg
    154.5 KB · Views: 387
  • 3487CDA9-F53E-4C47-93ED-590D1362BF01.jpg
    3487CDA9-F53E-4C47-93ED-590D1362BF01.jpg
    153.7 KB · Views: 392
  • 3CBAA4E3-37CD-4D3F-AC26-31E9F695C2D7.jpg
    3CBAA4E3-37CD-4D3F-AC26-31E9F695C2D7.jpg
    146.4 KB · Views: 381
  • 9C91D731-AC58-49FB-9476-B4089B3CC455.jpg
    9C91D731-AC58-49FB-9476-B4089B3CC455.jpg
    146.6 KB · Views: 383
Last edited:
OP
3

3baygarage

Well-known member
Joined
Sep 1, 2013
Messages
11,930
Location
SW Florida/from Buffalo,NY
Hey Ron. I appreciate your interest. At the same time I don’t want to get your hopes up too much. I’m not known for cleaning things up and making them pretty. Some guys here are amazing at that, they know the process for it.

After about an hour of soaking I took out the cover plates. Wasn’t sure if the vinegar would do anything to the plating. There was still a lot of rust. I hit them hard with steel wool and it worked very well.

attachment.php


attachment.php
 

Attachments

  • E17E787F-F5E6-484A-9B63-45497E3F1645.jpg
    E17E787F-F5E6-484A-9B63-45497E3F1645.jpg
    150.1 KB · Views: 371
  • 74DAD57F-144E-482F-815E-F1032C0D1EA3.jpg
    74DAD57F-144E-482F-815E-F1032C0D1EA3.jpg
    150.8 KB · Views: 369
OP
3

3baygarage

Well-known member
Joined
Sep 1, 2013
Messages
11,930
Location
SW Florida/from Buffalo,NY
This is where the disappointment sets in. :lol: 
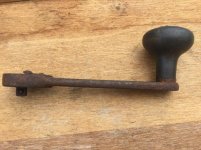
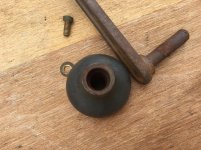
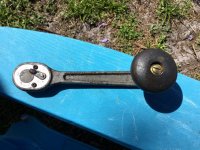
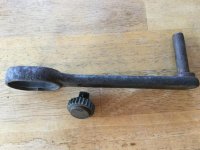
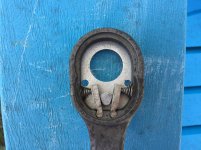
At about 2-1/2 hours I pulled the ratchet body out to take a look. This is it after a quick water scrub with a toothbrush, and soap for the greased shaft. I’m now realizing how rough the condition is.

Looks like there may be cadmium coating inside the head, and the vinegar could have removed some of that after seeing the before/after. A good wire wheel on the grinder or a sander would probably help smooth this thing out, but not with the cadmium coating commonly found on Plomb presenting a possible hazard.

Thinking maybe a good overnight soak is in order. There isn’t much cadmium left to wreck, so...Thoughts anyone?

Not trying to polish this thing up, it’s already at a functioning point which was my goal. It’s normally a cheap common ratchet and in this case the knob is what makes it special.

attachment.php


attachment.php
 

Attachments

  • 91F0A81D-780A-4C51-9A47-B287BDB09226.jpg
    91F0A81D-780A-4C51-9A47-B287BDB09226.jpg
    149.4 KB · Views: 367
  • 8C8BF35B-AC73-45AA-827F-BFDE6CBF93FC.jpg
    8C8BF35B-AC73-45AA-827F-BFDE6CBF93FC.jpg
    149.9 KB · Views: 363

Shelbylex

Well-known member
Joined
Jan 20, 2018
Messages
3,105
Location
MA
I would put in in Evaporust at this point.
I like the resurrection - do not stop!
 

J.C.

Well-known member
Joined
Mar 8, 2019
Messages
166
Location
Newcastle, AU
It's really quite good stuff, and it's re-usable quite a few times so for the $$$ you get a fair bit of use out of it.
 

Zrxrunner

Well-known member
Joined
Jan 14, 2018
Messages
520
Location
Eastern Iowa
I'm having decent luck letting the really heavy rust and rot soak in penetrating oil for a night or 2 to soften it up before going further with cleanup. Takes some time, but I'll bet you've already got a can or two of WD that quit spraying or the nozzles broke that you can dump on it! Lol. That's what I use my deflated cans up on.
 

Private Lugnutz

Well-known member
Joined
Mar 30, 2012
Messages
30,484
Location
The Authentic Jersey Shore
As you know, that is a hard to find version of WF-21, so it is worth the time and effort.
Interestingly, I don't think this is a wartime WF-21-S. Like the mysterious WF-21's and WF-38's we see with no markings or Proto markings etc, that seem to have been repurposing old stock or at least old dies for civilian customers, I think this might be something like that for Ma Bell or something similar. It doesn't have the "S" for special marking and they even turned it around. Maybe a PO put it on upside down, but still, no "S". It was forged with a provision for the crank. So it's not strictly a WF-21. But not sure when. Or maybe it is before they marked the with a -S? Or it's postwar and they just had a stockpile of old WF-21 face plates? Thoughts?

I'll bet you've already got a can or two of WD that quit spraying or the nozzles broke that you can dump on it! Lol. That's what I use my deflated cans up on.
Glad to hear I'm not the only one! I swear those bastards rig them to quit early. I am not kidding. Have you ever had a can, just one, that stopped spraying because it was empty? I haven't. There is ALWAYS something still swirling around in the bottom. And it is never a negligible amount. I spike them on the bottom and drain them into plastic nasal sprayers.
 
Last edited:

Zrxrunner

Well-known member
Joined
Jan 14, 2018
Messages
520
Location
Eastern Iowa
Not trying to hijack the thread, but one other thing I found with the half empty oil spray cans. If you have a air blower like the milton I have with a rubber nozzle, you can repressurize the can. take the plastic spray nozzle off, stick the rubber blower nozzle over the remaining nubbin on the can, hold tight and put some air to it. Should be able to get a good majority of the remaining oil out. Otherwise, revert back to the hole punch and dump trick to soak rusty ratchets.
 
OP
3

3baygarage

Well-known member
Joined
Sep 1, 2013
Messages
11,930
Location
SW Florida/from Buffalo,NY
I appreciate the cleaning comments guys. It did get tossed back in for another 22 hrs or so. The (white) vinegar was black from the start and needs replacing so that probably did not help. Will post results tomorrow. I seem to have misplaced the grease I planned on using.

Rubicon- I was going to post this in your thread on the Wf-21-S where I mentioned this version. Seen a handful of both in the past I think.

Lugz- it is strange how the ratchet is blank, but with all the blank Plombs out there it’s no surprise. The face plate spun around does raise the question of did they leave the factory that way. I don’t recall if I’ve ever seen a wood version on the sleeve rollers.
 
To avoid these ads, REGISTER NOW!

Private Lugnutz

Well-known member
Joined
Mar 30, 2012
Messages
30,484
Location
The Authentic Jersey Shore
Lugz- it is strange how the ratchet is blank, but with all the blank Plombs out there it’s no surprise. The face plate spun around does raise the question of did they leave the factory that way. I don’t recall if I’ve ever seen a wood version on the sleeve rollers.
I don't know enough about Plomb WF-21-S's to help. Wood handle question is a good one. Did they all have the same markings? I once had a very early version of a Plomb WF-8-S (the 1/4" dr version of the 9/32" dr ratchet) that was not marked "WF-8-S" like most versions. The "S" had been stamped, not forged, and it was stamped on the handle, not near the "WF-8" marking. Implying that was their first run, their first attempt at making a 1/4" ratchet out of their 9/32" ratchet, before they had a new die made. Maybe there's an "S" on your cranker somewhere else.

That doesn't explain no branding though.

My opinion is that it is an example of tools that were re-purposed (not for a US Army Air Corps contract) with residual WF- markings. This isn't the first time we've seen the face plate upside down, either. I am still leaning toward them re-using old dies for new customers and turning dead stock face plates upside down at the factory. But I could be wrong, obviously.
 
OP
3

3baygarage

Well-known member
Joined
Sep 1, 2013
Messages
11,930
Location
SW Florida/from Buffalo,NY
How it looks after the longer soak of almost a full day, followed by light scrubbing. Some change but not great. A lot of scaly rust left. Plenty of pitting.

attachment.php


attachment.php


attachment.php


attachment.php
 

Attachments

  • CEFAE963-3591-42CC-A383-B961C0B7D550.jpg
    CEFAE963-3591-42CC-A383-B961C0B7D550.jpg
    149.3 KB · Views: 170
  • C4701C18-C1EF-40B2-8F95-2ECD1D0EB8DE.jpg
    C4701C18-C1EF-40B2-8F95-2ECD1D0EB8DE.jpg
    149.5 KB · Views: 169
  • 1F535E78-6C82-41CC-81FD-79600F9B05A1.jpg
    1F535E78-6C82-41CC-81FD-79600F9B05A1.jpg
    149.4 KB · Views: 171
  • DD68C600-F41B-488E-8F2A-4FBB9D08283B.jpg
    DD68C600-F41B-488E-8F2A-4FBB9D08283B.jpg
    149.9 KB · Views: 174

Private Lugnutz

Well-known member
Joined
Mar 30, 2012
Messages
30,484
Location
The Authentic Jersey Shore
Yeah that thing is in the 'not restorable with non-invasive methods' category. Sometimes a fine grain sanding block with WD-40 or a dilute muriatic acid will take the black scaly box rot off or at least diminish it, but it's stubborn stuff. I almost never do it, but the only thing that I have found that really works on that (short of grinding, which I refuse to do) is bead blasting. I have done it twice. A set of Williams Superior DOE wrenches and a Billings & Spencer auto wrench. It even took some electric pencil marks off. In both cases I was refinishing with black enamel.
 
OP
3

3baygarage

Well-known member
Joined
Sep 1, 2013
Messages
11,930
Location
SW Florida/from Buffalo,NY
After lightly taking a carbon scraper to some of the high rust spots, then a little brass polish and rust blocker on the handle. Also cleaned up the screw and washer. Never polished brass before. It’s tricky to hold and scrub those little parts.

There is a natural lighter wood color showing through on the knob, so I don’t know if it’s dirty or came with a dark coat of something. I just wiped it down with a couple things.

attachment.php


attachment.php


attachment.php


attachment.php


attachment.php
 

Attachments

  • A44432B7-98C2-4354-AD9E-92E23FB8B6E1.jpg
    A44432B7-98C2-4354-AD9E-92E23FB8B6E1.jpg
    150.4 KB · Views: 169
  • 97C9535C-1D09-4AF4-A24D-A019747B7019.jpg
    97C9535C-1D09-4AF4-A24D-A019747B7019.jpg
    151.6 KB · Views: 165
  • 5B793218-B2D5-40F4-9396-9C0D152EACBD.jpg
    5B793218-B2D5-40F4-9396-9C0D152EACBD.jpg
    150.5 KB · Views: 8
  • 14D38DA0-1EC6-460D-B35E-869FE188253F.jpg
    14D38DA0-1EC6-460D-B35E-869FE188253F.jpg
    150.1 KB · Views: 171
  • 40685592-02D6-4C6F-9056-59580CDC9ED2.jpg
    40685592-02D6-4C6F-9056-59580CDC9ED2.jpg
    151.3 KB · Views: 165
OP
3

3baygarage

Well-known member
Joined
Sep 1, 2013
Messages
11,930
Location
SW Florida/from Buffalo,NY
Left out lubing the mechanism for now for the photos. Typically I throw light oil like 3 in 1 or equivalent in everything that isn’t still factory lubed, but I wanted to just put some bearing grease in this and can’t find it at the moment.


attachment.php


Pawl upside down
attachment.php


Pawl right side up. The lever on back is still upside down which is commonly seen on WF-21’s.
attachment.php


A little brown grease for the knob to ride on.
attachment.php
 

Attachments

  • F720186D-4810-4043-A415-0730EFF65A2C.jpg
    F720186D-4810-4043-A415-0730EFF65A2C.jpg
    152.8 KB · Views: 162
  • 5C2542A1-6FA6-4D09-87FC-295070C6209A.jpg
    5C2542A1-6FA6-4D09-87FC-295070C6209A.jpg
    152.1 KB · Views: 166
  • 86025174-0B29-4033-AA98-99FED12BD6E6.jpg
    86025174-0B29-4033-AA98-99FED12BD6E6.jpg
    153.2 KB · Views: 164
  • 8CD4EB1E-5A40-44DF-B401-69FFFC68C499.jpg
    8CD4EB1E-5A40-44DF-B401-69FFFC68C499.jpg
    151.4 KB · Views: 164
OP
3

3baygarage

Well-known member
Joined
Sep 1, 2013
Messages
11,930
Location
SW Florida/from Buffalo,NY
And, my sweaty rustoration.

I wouldn ‘t dare use the real word as some of you guys are probably crying right now. :lol::bounce::)

attachment.php


attachment.php


attachment.php


attachment.php


attachment.php
 

Attachments

  • 8DF55E31-EC9D-4413-8955-2E96CB25BD06.jpg
    8DF55E31-EC9D-4413-8955-2E96CB25BD06.jpg
    156 KB · Views: 172
  • FBA771D1-F639-461D-AB83-BE3C9BECB9A5.jpg
    FBA771D1-F639-461D-AB83-BE3C9BECB9A5.jpg
    149.7 KB · Views: 164
  • 720BF333-EE69-4499-9741-32CCA4DB1463.jpg
    720BF333-EE69-4499-9741-32CCA4DB1463.jpg
    150.3 KB · Views: 167
  • DF998AEC-F4A2-4486-92FC-A700507774C8.jpg
    DF998AEC-F4A2-4486-92FC-A700507774C8.jpg
    151.9 KB · Views: 171
  • 912E7512-D93F-4650-983C-ABE25D6AA051.jpg
    912E7512-D93F-4650-983C-ABE25D6AA051.jpg
    151.8 KB · Views: 171

r_olson_06

Well-known member
Joined
Feb 12, 2012
Messages
4,076
Location
SD
And, my sweaty rustoration.

I wouldn ‘t dare use the real word as some of you guys are probably crying right now. [emoji38]:bounce::)

attachment.php


attachment.php


attachment.php


attachment.php


attachment.php
Nice save. Also 2 Plomb plug sockets to boot. I never seen a Plomb spark plug socket in person yet.

Looking for the following Plomb Pebbles Wrenches 3061, 3070,
 

RubiconJK

Well-known member
Joined
May 15, 2016
Messages
1,380
Location
"I'm bad, I'm Nationwide"
And, my sweaty rustoration.
I wouldn ‘t dare use the real word as some of you guys are probably crying right now. :lol::bounce::)
Love it!

Safariknut's WF-21-S, linked here.

tin medic's WF-21-S, linked here.

And just for context, Bell System sleeve roller with modified Plomb WF-21 (not a WF-21-S) and second Proto WF-21, linked here.

Thanks Lugz. What I should have said is I've not seen another in person.
 
OP
3

3baygarage

Well-known member
Joined
Sep 1, 2013
Messages
11,930
Location
SW Florida/from Buffalo,NY
Well thanks guys. It looks a little better than it did. And everything works.


R, since you mentioned the plug sockets, both are 7/8” in 3/8 drive.

The shorter one is a grind off tool. Can still make out a faint P A and faint Plomb bob on the right. It also has a threaded hole in the side that I’ve seen before on others, but I never paid attention to part number or anything.

You would know better than me, but could they have been an earlier and later, or two different models? The tall one is a 2254.

The shorter one also has a ridge inside, giving the bore a slight step down.
 

Attachments

  • 8ABD5DF9-8132-490B-8634-9136A3416FC8.jpg
    8ABD5DF9-8132-490B-8634-9136A3416FC8.jpg
    126.2 KB · Views: 7
  • 3417A36B-61D7-4D0E-9B9A-98452A0F8A77.jpg
    3417A36B-61D7-4D0E-9B9A-98452A0F8A77.jpg
    125.9 KB · Views: 8
  • 8E44948A-6326-4C10-BF6C-1043F14DC5A4.jpg
    8E44948A-6326-4C10-BF6C-1043F14DC5A4.jpg
    130.7 KB · Views: 6
  • 1C1BD5A5-F014-4883-89D2-377E2CD69A12.jpg
    1C1BD5A5-F014-4883-89D2-377E2CD69A12.jpg
    133.8 KB · Views: 6
  • 6237CB16-2584-436C-B95D-5D7C35BCD229.jpg
    6237CB16-2584-436C-B95D-5D7C35BCD229.jpg
    111.1 KB · Views: 9
OP
3

3baygarage

Well-known member
Joined
Sep 1, 2013
Messages
11,930
Location
SW Florida/from Buffalo,NY
Another difference is the square end. The longer has the bulkier square, and it’s 3/4 vs 5/8.
 

Attachments

  • 52856C7F-2E11-41DE-9156-3818CEEDC5A0.jpg
    52856C7F-2E11-41DE-9156-3818CEEDC5A0.jpg
    100.2 KB · Views: 18
  • B4331E87-F466-417B-979C-7771CC88BBAB.jpg
    B4331E87-F466-417B-979C-7771CC88BBAB.jpg
    121.3 KB · Views: 17
  • 965DAA24-152E-470B-915E-EFFA3E09B42A.jpg
    965DAA24-152E-470B-915E-EFFA3E09B42A.jpg
    124.3 KB · Views: 19

Provincial

Well-known member
Joined
Sep 21, 2011
Messages
6,855
Location
Near Salem, OR
If I had to guess, the spark plug sockets are both for WWII-era aircraft spark plugs. The shorter one probably is for unshielded plugs that had an exposed insulator similar to automotive plugs. This would need less clearance than a radio shielded plug.

The longer socket is likely for radio shielded spark plugs. During that era there were several designs for the harness end of shielded plugs. Generally, as time went on, the length and thread size of the harness end of the plugs increased. By the end of WWII, it appears that it had standardized on a 3/4" hex nut.

Early on, the hex size for the base of the the 18mm threaded spark plugs was standardized at 7/8". The 3/4" square on the longer socket would match up with the hex nut size of later shielded plugs so the same open end wrench could be used on both the harness nut and the socket.

Pratt & Whitney commonly purchased these sockets from Plomb and Bonney, and perhaps others. These were marked PWA along with a part number.
 

Farmer J.

Well-known member
Joined
Sep 18, 2016
Messages
1,995
Location
UK, Cornwall/Hertfordshire.
If I had to guess, the spark plug sockets are both for WWII-era aircraft spark plugs. The shorter one probably is for unshielded plugs that had an exposed insulator similar to automotive plugs. This would need less clearance than a radio shielded plug.

The longer socket is likely for radio shielded spark plugs. During that era there were several designs for the harness end of shielded plugs. Generally, as time went on, the length and thread size of the harness end of the plugs increased. By the end of WWII, it appears that it had standardized on a 3/4" hex nut.

Early on, the hex size for the base of the the 18mm threaded spark plugs was standardized at 7/8". The 3/4" square on the longer socket would match up with the hex nut size of later shielded plugs so the same open end wrench could be used on both the harness nut and the socket.

Pratt & Whitney commonly purchased these sockets from Plomb and Bonney, and perhaps others. These were marked PWA along with a part number.

Thanks for sharing this Provincial, for years I wondered why my old spark plug sockets have a male hex on them and it's a different size to the plug hex..
 
To avoid these ads, REGISTER NOW!
Top Bottom