To avoid these ads, REGISTER NOW!

Anchor Bolt Template void in new slab

Cruster

Member
Joined
Jul 30, 2014
Messages
23
Hello Everyone,
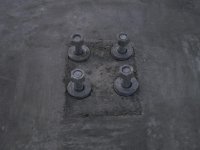
Been lurking around a while but this is my first post. Looking for some basic advice on my new 40x60 concrete slab. My concrete guy is first rate and the slab is awesome - looks like black marble after finish. He had not done a slab with anchor bolts of this type before and made the templates exactly the size of the steel column baseplates. When we removed the templates we ended up with about a 1/4 inch void around all the anchor bolts and buried the bottom nuts in the concrete. I need to make sure the steel columns are plumb and am afraid the voids will create an issue. What is the best way to fill the voids? I've looked at tons of suggestions and material but it's very varied. I attached a pic - which makes it look crude but it's not, except around the bolts. Any and all suggestions/advice would be appreciated. You can even make smartass comments if you want :D
 

Attachments

  • Slab and Anchor Bolts 002.jpg
    Slab and Anchor Bolts 002.jpg
    142.6 KB · Views: 118
To avoid these ads, REGISTER NOW!

s10xtremist

Well-known member
Joined
Aug 29, 2013
Messages
131
Location
State Capitol Raceway, LA
Unless that area is far from level, you can just set the column on it. You'll pull everything square and plumb with ropes/choker straps/come-alongs/ratchet straps after you have the girts and purlins bolted up and finger-tightened. Once all the iron is plumbed and squared, you hold it in place either with cables (if your building came with them) or the wall sheets (diaphragm braced). After all that, THEN you can cinch down all the nuts/anchors.
 
Last edited:
OP
C

Cruster

Member
Joined
Jul 30, 2014
Messages
23
Unless that area is far from level, you can just set the column on it. You'll pull everything square and plumb with ropes/choker straps/come-alongs/ratchet straps after you have the girts and purlins bolted up and finger-tightened. Once all the iron is plumbed and squared, you hold it in place either with cables (if your building came with them) or the wall sheets (diaphragm braced). After all that, THEN you can cinch down all the nuts/anchors.

Thanks s10 for your help - its level, checked it 4000 time during the pour but I was afraid the column plate, being the exact size of the void might sink down a bit to the top of the lower washers and be off when I got to the top of the structure. Maybe I'm overthinking this. I'm a woodworker, not a mason - if the angle is off at the bottom of the box, then when you get to the top, you are screwed.:eyecrazy: Wouldn't the steel need to be exactly level with the top of the slab???? For all columns?
 

s10xtremist

Well-known member
Joined
Aug 29, 2013
Messages
131
Location
State Capitol Raceway, LA
Thanks s10 for your help - its level, checked it 4000 time during the pour but I was afraid the column plate, being the exact size of the void might sink down a bit to the top of the lower washers and be off when I got to the top of the structure. Maybe I'm overthinking this. I'm a woodworker, not a mason - if the angle is off at the bottom of the box, then when you get to the top, you are screwed.:eyecrazy: Wouldn't the steel need to be exactly level with the top of the slab???? For all columns?

I, having a background in metal fabrication, was aiming for the precise numbers detailed on the building drawings. I soon realized I was wasting a lot of time and effort trying to do so. The holes in all the joining pieces of the red iron have much more play in them than what that little bit of height difference will ever show. Even if the column is not perfectly plumb when you set it on there, it doesn't matter. You don't tighten the nuts until you have the walls on it. Once it's all together and at that point, tightening the nuts on the base plates isn't gonna tilt the column one way or the other. If it makes you feel better about it, get some extra washers and stack them on the anchors to get it to the height of the finished floor. If you want to fill it in to make it smooth and increase the contact area, use what Scotty linked to.

I'll admit that it was a bit difficult for me to just "let it go" and press on so I could just make progress on the damned thing. Once I did, I saw that I was making it much more difficult than it should have been and slowing down the progress.
 
To avoid these ads, REGISTER NOW!

Chuck

Active member
Joined
Aug 30, 2005
Messages
42
Location
Smithfield, VA
Don't worry, this is actually a good thing!

On big commercial structures, the column base plates are actually set a bit above the concrete on a bed of grout. We leave a 1-2" gap under the baseplate, and install four nuts below it to level the column on. After the column is installed and leveled, you hand pack under the baseplate with non-shrink grout.

It's overkill for a garage, but certainly not a problem. If you don't have enough stud length for leveling nuts, you can level it on washers to get it the right height. Once it's where you want it, mix up a bit of grout and bed it in underneath. It'll be stronger than if it had been poured flush, and you'll never have an issue with it. :thumbup:

No need for a fancy patching compound, either. Non-shrink grout is best, but for something this size, you'd even be fine with masonry grout or mortar, as long as you can mix it stiff enough to pack and not flow.
 
Last edited:
OP
C

Cruster

Member
Joined
Jul 30, 2014
Messages
23
You guys are so awesome, thanks a bunch. I've been overworrying this since the pour two weeks ago. I knew there was quite a bit of wiggle room, but it's hard to just let it go...too much woodworker in me, I guess.

Thanks a bunch guys for your brains and expertise......you all definitely gave me some peace. Maybe I can return the favor someday.
 

Punchwood

Well-known member
Joined
Sep 7, 2013
Messages
332
Location
Western NY
Don't worry, this is actually a good thing!

On big commercial structures, the column base plates are actually set a bit above the concrete on a bed of grout. We leave a 1-2" gap under the baseplate, and install four nuts below it to level the column on. After the column is installed and leveled, you hand pack under the baseplate with non-shrink grout.

It's overkill for a garage, but certainly not a problem. If you don't have enough stud length for leveling nuts, you can level it on washers to get it the right height. Once it's where you want it, mix up a bit of grout and bed it in underneath. It'll be stronger than if it had been poured flush, and you'll never have an issue with it. :thumbup:

No need for a fancy patching compound, either. Non-shrink grout is best, but for something this size, you'd even be fine with masonry grout or mortar, as long as you can mix it stiff enough to pack and not flow.


Exactly. :thumbup:
 
To avoid these ads, REGISTER NOW!
Top Bottom