To avoid these ads, REGISTER NOW!

And now - for something completely different...maybe

One Hoss Shay

New member
Joined
Nov 1, 2016
Messages
3
Location
Madison, GA
Hello everyone.

I just found your forum and couldn't be happier. There are some really great posts in here.

The title of my post, hopefully most of you get the reference, is because most of what I have found is the poster showing his/her progress on their garage.

My situation is a little different an hopefully all you garage gurus can help me.

I am a novice handyman and as such, all my really good ideas come up after I have finished whatever it is I am working on. Or even worse, after I'm done, someone will come up to me and say, "You should have done such and such." Something which now is impossible to incorporate at this point in the job.

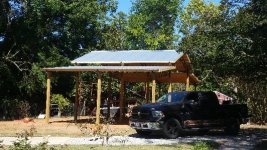
So anyway, I've just completed Stage 1 of a Pole Barn kit that I put up with the help of my brother-in-law and my wife's nephew and REALLY, REALLY, REALLY want to avoid any sense of "buyers" remorse. This is where the something "completely different" comes in.

Instead of completing a portion of the job and sending pictures of what I've done, I'd like to get your input on what and how things should be done and then keep a journal of what we, aka Garage Forum, has done.

This is the first time I've ever posted anything to a forum so I'll have to work out any kinks as we go.

The pictures I've uploaded show the day we put the posts up, the day we started the roof and the day we finished the roof.

We were only 1 3/4 inches out of square when we put the tin on. I thought that was pretty good for someone who never did this before.

Let me know if you guys are up for this. I'm really looking forward to this discussion and the growth of this thread.

 

Attachments

  • Poles Up A.jpg
    Poles Up A.jpg
    114 KB · Views: 284
  • Roof Start.jpg
    Roof Start.jpg
    61.5 KB · Views: 318
  • Roof On.jpg
    Roof On.jpg
    128.1 KB · Views: 316
To avoid these ads, REGISTER NOW!

Playwme

Well-known member
Joined
Sep 13, 2012
Messages
2,032
Location
The Lucky Country Down Under
Doesn't matter if it's your first or your 50th, there'a always something you'll wish you'd done differently.

With this kind of build the main thing to watch out for is the Spanish Inquisition. No-one expects that.
 

egnorant

Well-known member
Joined
May 2, 2012
Messages
1,805
Location
East Texas
You are describing the Learning Curve. It always happens even with the best advice and study. I last observed it with a brake job. Side one took 45 minutes...side 2 took 8 minutes!

Helped my brother build a privacy fence and then built mine faster, cheaper, stronger with better gates!

But at least you now have a roof! I had a muddy spot that I had to share with 3 brothers and a snapping turtle!

Bruce
 

Falcon67

Well-known member
Joined
Jun 11, 2009
Messages
18,371
Location
Merkel, TX
Doesn't matter if it's your first or your 50th, there'a always something you'll wish you'd done differently.

With this kind of build the main thing to watch out for is the Spanish Inquisition. No-one expects that.

This. The chief problem is 20-20 hindsight. 20-20 hindsight, and armchair Internet Engineers. The two main problems are 20-20 hindsight, armchair Internet Engineers and reviewing other peoples work. So your three main problems are 20-20 hindsight, armchair Internet Engineers, reviewing other peoples work - and actually using the space and see what might have worked better. Amongst your problems - I'll come back post again.
 

a52-830

Well-known member
Joined
May 28, 2016
Messages
4,644
Location
north of boston, massachusetts
well, to offer some advice . . . . .

first, decide on where, in general, you are going to want things to happen. i would suggest putting three garage doors in across the peak end, one in each bay. even if you dont want to be working on cars in all of them, having that big opening to get stuff in and out will be a huge win. consider putting one garage door in the middle of the back, too.

when you are laying things out, remember to allow space for things like open vehicle doors, open tool box drawers, and moving around them when they are open.

after you decide where, in general, things will go, consider lighting. are you going to have windows anywhere? doors with a 9X9 glass in the upper half? a lot of light is important. at this point, while they are more expensive, i would go with 4' LED fixtures hanging from the ceiling on chains. you can get them with cords attached, so that the wiring is easier. this allows you to put a grid of double gang boxes across the ceiling. when you are laying them out, consider this: put the switches near the people door. either label the switches, or, better yet, install them in the pattern reflecting what lights each switch will turn on. (but still label them.).

include some non-switched boxes in the ceiling. maybe single gang, so there is no confusion. consider running separate circuits for each of them. hang one of those retractable extension cord reels near them.

one nice thing about the LED lights is that they use not less electricity than conventional lights. if you decide you need more light in an area, you can just add more lights, using an outlet tap if you run out of receptacles in the box. consider flood lights for the front, so that when you are coming back late with that great haul, you can see what you are doing as you unload it.

run electricity everywhere. on the posts (try to put it on the sides where it will be most out of the way), along every wall, and between every door. try and get a lot of "home run" circuits. this will mean a lot of breakers, and a big panel, but you only pay for it once, and having electricity right where you want it, rather than tripping over cords everywhere will pay for it over and over.

when you run the conduit for electric, also run a spare, or two. the cost is not a lot, but extra pipes will allow you to run phone, internet, or TV out there (note that all those wires can run through the same pipe).

and, since i have spent time in georgia, dont forget fans . . . . .
 
OP
O

One Hoss Shay

New member
Joined
Nov 1, 2016
Messages
3
Location
Madison, GA
Thanks for all the responses. Had me ROFL. Some were really brilliant.

My first question is forum related. If I want to ask for more advice or give more info should I reply to my own post or each individual response?

Now down to business.
I would like to use the space as a work shop for both wood and vehicles. I also have lawn and garden equipment/tools to store and use. Oh and I need a place to store the pointy sticks.

I envision but am not married to the idea of breaking the building into 3 areas, Left/Right Lean-Tos and Middle, using the posts.

I need to have a concrete pad poured and know that concrete cracks. I also know that we can minimize and control cracks using isolation/construction joints. If I had a better understanding of this at the outset, I wouldn’t have chosen a design with interior posts.

Please give me some advice and or lessons learned regarding getting a good pad and how to minimize cracks, especially with regards to the interior posts.

Looking forward to your replies.
 
To avoid these ads, REGISTER NOW!

redmondjp

Well-known member
Joined
Nov 25, 2014
Messages
2,318
Location
Redmond, WA
In whatever area you are doing the woodworking, you will want that area completely air-tight from the rest of the space, or a really good vacuum system as a bare minimum.
 

Jlbc212

Well-known member
Joined
Dec 7, 2013
Messages
1,530
Location
Northeast MA
A couple of suggestions for the concrete pad. Start with a well compacted base of stone crusher waste material. Find a concrete contractor with reliable references that you can call and visit other jobs the contractor has done. Insist upon a minimum 4000 psi concrete mix. Be there the day the pour is made to insure that a minimum amount of water is added to the mix. Many contractors add too much water. It initially makes it easier for the contractor to spread, but excess water will weaken the strength of the concrete. Control joints are usually cut into the concrete the day after the pour. If you plan on installing a lift, keep the cuts away from the lift pad locations. After the cuts are made, lightly spray the concrete with water just to dampen the surface and then spread a layer of 4mil plastic over the concrete. Leave the plastic on the concrete for 30 days.
 

Falcon67

Well-known member
Joined
Jun 11, 2009
Messages
18,371
Location
Merkel, TX
First step IMHO is to find out what is done locally based on the type of soil you have in the area. Here we have expansive clay and I used the minimums specified in docs gleaned from the county seat inspection department for detached garages and outbuildings.
 

C_F

ALLIANCE MEMBER
Joined
Jan 21, 2005
Messages
9,675
Location
Utah...SNOW BLOWS!
My first question is forum related. If I want to ask for more advice or give more info should I reply to my own post or each individual response?

Either way, really. Think of it as if you quote someone's post & reply to that (like I did here), it's like you're speaking to them directly. If you reply without quoting anyone, then it's more like you're talking to everyone in general.

There's no real right or wrong way, just whichever you prefer. Although in some conversations, if you do quote & reply to someone, instead of posting in general, it helps eliminate confusion as to exactly who you are replying to.

Anyway, welcome to the GJ & thanks for showing off your build! :)
 

redmondjp

Well-known member
Joined
Nov 25, 2014
Messages
2,318
Location
Redmond, WA
First step IMHO is to find out what is done locally based on the type of soil you have in the area. Here we have expansive clay and I used the minimums specified in docs gleaned from the county seat inspection department for detached garages and outbuildings.

This is excellent advice! For my job, we built a facility north of Denver where they also have that type of soil - our foundation was on top of concrete piles that were 128 feet deep, with a 3 foot gap underneath so the soil could move up and down (had expansion joints/fittings on all of the buried utilities).

As a result of working on this project, I realized that I have this same issue at my house east of Seattle to a lesser extent, which causes the end of my house to rise upwards every fall when the ground gets saturated underneath the footing. The fireplace at the same end has its own footing poured inside the exterior wall foundation. The soil stays dryer inside, so the outside wall moves upward relative to the fireplace.

So a few years back, my wife and I are watching TV and we notice that the fireplace mantle seems to be tipped. Well, the very next night, everything fell right off the mantle onto the floor! The mantle was sitting on the fireplace bricks but glued to the exterior wall with construction adhesive, so when the outside wall raised up (by about 1/4" or so), it dumped everything off of the mantle.

I never would have believed this was even possible, if I hadn't seen it myself.

Sorry for the long story, but expansive clay will eventually destroy whatever you build on it, if you don't do it properly.
 

Falcon67

Well-known member
Joined
Jun 11, 2009
Messages
18,371
Location
Merkel, TX
>I never would have believed this was even possible, if I hadn't seen it myself.

LOL. The old building I used at the old house (not the new portion) had the gate latch on the corner, for the gate to go out to the driveway. Between rain and drought, that corner would move up/down 3 inches or so. I finally fixed that when I lifted and leveled the building, putting a 4x4 36" down in concrete to support that corner.

The new shop uses 12x12 perimeter footers, three cross beams (ditches with rebar) 12x12 and one longways down the middle 12x12. Average depth is 4" or better. So the total 24x40 slab weighs about 72,000 lbs. When it's dry, the man door will tend to bounce off the strike on the door frame. Still closes with a push, and there's no discernible change in the gap to the frame. Let it rain a little and the door closes easy. So with planning and engineering I've at least got it down to a couple of millimeters! Also, the slab formed the normal expected cracks in places and I've monitored those over the last 5 years. No changes noted, so by and large it's staying put.
 
OP
O

One Hoss Shay

New member
Joined
Nov 1, 2016
Messages
3
Location
Madison, GA
All the help and advice so far has been really great.
Now I'm ready to talk to some contractors to pour my concrete pad.
What types of questions do I need to ask to make sure they know what they are doing?
 

casmurbax

Well-known member
Joined
Sep 25, 2012
Messages
2,759
Location
Wilton, NY
Do you need a permit to build in your area?

I only ask because your municipality may tell you what you what the minimum psi, mix, reinforcement is required.

Are you going to put a lift in? That will also determine what type of mix/psi and to keep the steel reinforcements out of the lift locations.
 
To avoid these ads, REGISTER NOW!
Top Bottom