I recently did our garage at home. I spent a lot of time on green building advisor forums researching. If you Google "green building advisor insulate cathedral ceiling" that's basically what I did. We have attached 2-car.
Tools required:
Staple gun
Crown stapler or a small framing gun with short ring-shank nails
Some type of table saw or radial arm saw
Bandsaw is helpful but you can get by with oscillating tool or just risk your fingers on the table saw
Circular saw
Go buy:
1. a cheap roll of knock-off Tyvek
2. as much 2-by lumber you can from the culls pile at the orange store (home depot)
3. rafter baffles (I used the pink ones, they price out at my HD cheaper buying the 10-packs than the case price)
4. a roll of unfaced R-30
5. LOTS of 1/4" Staples for your staple gun
6. nails/staples for whatever nailer/stapler you choose to use
7. Good Stuff Pro Gun (with cleaner, etc.) and a case of Good Stuff gaps & cracks cans
8. 1/4" galvanized mesh screen (smaller mesh if you can find it)
9. several cases of beer
I used RAS to rip however with whatever tool you have (table saw/radial arm saw), cross-cut all the 8-foot sections of culls lumber into ~4' pieces to make them manageable. Next rip them down to 3/4" wide by 1-1/2" strips. (now you have a ton of 3/4 by 1-1/2 --essentially furring strips)
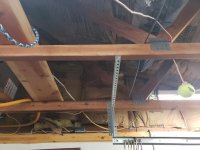
Get your *** up on a ladder and start stapling (crown stapler or short ring shank nails) the strips to the sides of your rafters --up against the bottom of your roof deck. This is where it gets time consuming. You'll get up there and realize that the roofing nails don't let you set your strips flush against the bottom of the roof deck. Push the strip up into the nail point then take a pencil and circle it (so you don't miss one). Then (I used a bandsaw) use a cutting tool to cut notches into the strips so they sit perfectly flush against the roof deck and you can staple/nail them to the sides of the rafters.
(Owens Corning pink rafter baffles are 1.5" (thick??) so this method worked for me well with the materials I chose to use)
Once you get strips running all the way up each side of every rafter, start installing your rafter baffles. (or install baffles first --doesn't matter) If they are cold, be a little gentle with them --they crack/break easy... But just shove them up in there, staple & get-er-done. Slide the edge of the rafter baffles all the way out to the shingles (outer edge of your top plates). That's important because you get extra R-value points for being able to insulate over your top plates. You want the baffles for air flow --but not to prevent insulating.
Cut down the 3/4" x 1-1/2" strips into (maybe ~6" long strips) and attach them vertically between the rafter strips and your top plates. This will make much more sense when you actually do it. It is time consuming and each individual strip needs to be measured and cut --no automation/production, everything is a one-off piece.
Insulate over your top plates with the R-30. Don't shove it down into the soffit box and don't worry about completely air sealing the soffit-box-to-rafter baffle interface, just put enough pink insulation in there that you think bugs, critters and air won't get through. Pack it about twice as dense as it would be in a wall.
Take your Tyvek and staple one side of it all the way up the strips you just nailed to your rafters. Pull the other side tight and staple it across the rafter bay.
There you go... The goal is to keep the underside of your roof deck the same as the outside ambient air (temp and humidity). You just created a 1.5" air gap all the way from your soffit boxes up to your ridge vent.
For my soffit vents --we had vinyl siding up back then so I took a circ saw and ripped 4" strips down the entire length of the house (bottom of soffit boxes). Then I stapled the 1/4" mesh across the strips and put up vented siding to cover my sins.
I believe Tyvek has an R-value of (about zero) 0.25 and the good (commercial stuff that you can't buy at HD/Lowes) Tyvek has an R-Value of 0.5. You won't get much insulation between the air gap and the garage --but your ice dams will be gone.
I dont' know where River Bend is... Google your climate zone and then Google how much insulation you need over the air gap. I'm in 4-5 (marine). I think I need R-39 or maybe R-49. Either way it would have been a stupid amount of pink stuff. I used 2" thick rigid foam insulation. Four layers so total of R-52 plus 1.5" air gap in 9.5 inches. If I were to do it over again it would have been cheaper to hire a company to come in and spray foam vs. buy the rigid foam strips. I have 2x6 rafters (19.2"OC) so 2x6= 5.5 actual... 1.5" air gap means I've got 4" to play with inside the rafter cavities. The rigid foam insulation I used is R-13 so rafter cavities got me up to R-26, then I ripped down more culls lumber into 2" strips and ran them perpendicular to the rafters. I used structural screws to attach those. So two strips (sealed with Great Stuff foam) going up rafter cavity then one strip across horizontally. I did 2-foot sections because it was easy to cut a 4x8 sheet in half the long way) Then I screwed in the final layer horizontally (so seams in the rigid foam were alternating) to get me up to R-52.
I needed to add more collar and rafter ties to support the weight because after all that I hung drywall. Check your local code, etc. get permits, blah blah...
What I did wasn't cheap but it still let me keep space up there to store a dangerous amount of car seats, gas tanks, trim/molding, headers/exhaust, etc. (that could come crashing down and kill me anytime it wants).
That's how to do it properly and keep a vaulted ceiling. Around the chimney just Google IBC notching and boring rules. Drill a couple holes up top by the chimney to let the air pass from one bay to the next and notch the foam insulation. Pretty easy/straightforward. Takes a LOT of time/effort but very worth doing.


 I'll be looking into this, will invest in a roof rake and will melt the snow off for now.