To avoid these ads, REGISTER NOW!

And so it begins, my garage build!

supernova

Well-known member
Joined
Mar 13, 2012
Messages
76
Hi all. I picked up my permit Friday, started Saturday by taking off the vinyl siding on the end of existing garage. Today I started digging, thanks to my Buddy from work who came and helped me! Got the overall area dug out, still have to level it out after I dig the footings, going with a monolithic slab.

IMAG0320.jpg


Here's what I'm starting with, the 20x12 my wife had when I moved in.

IMAG0325.jpg


Here's where I stopped for the day, notice the big ball of roots I have to get out. Right where the footing has to go of course!

IMAG0323.jpg


And here's a close up of the lovely root ball. Picture definitely doesn't do it justice, half of its still in the dirt.

That's all for now. This is my first time posting pics on here, hope they work. I'm gonna throw some pics up of when I jacked up the garage too soon. Unfortunately all I have pics of is the bracing.... More pictures this time for sure!

--Sent from my Inspire 4G using Tapatalk
 
Last edited:
To avoid these ads, REGISTER NOW!

3dkustoms

Well-known member
Joined
Feb 27, 2012
Messages
147
Location
VA
looks like that root is going to be fun, I hate having to deal with those they seem to be never ending. Good luck on the build
 

Thedoc14

Well-known member
Joined
Mar 4, 2012
Messages
259
Location
Melb, Australia
You might be able to hire a stump grinder ( thats what they are called here) It is like a giant saw blade on an arm that you lower into the stump of a tree. either that or start a little bonfire to soften it up for the kill.
 
OP
S

supernova

Well-known member
Joined
Mar 13, 2012
Messages
76
looks like that root is going to be fun, I hate having to deal with those they seem to be never ending. Good luck on the build

Yeah, I Cant wait to hack at it tomorrow, and thanks.


You might be able to hire a stump grinder ( thats what they are called here) It is like a giant saw blade on an arm that you lower into the stump of a tree. either that or start a little bonfire to soften it up for the kill.

I thought about the stumpgrinder, and fire. Since I like fire so much and its a lot cheaper, that's what I'm gonna try first. :D thanks for the thought.

--Sent from my Inspire 4G using Tapatalk
 
OP
S

supernova

Well-known member
Joined
Mar 13, 2012
Messages
76
Got the massive football out today, soaked it in charcoal lighter fluid, then put about 8lbs of burning charcoal on it before work last night. Got up today, took a couple or whacks at it with the axe and out it came. Pretty smooth digging after that. Realized my area tapers off quite a bit, did a little more digging than I needed to do on that end, oh well. Just have a little more digging to do in one corner of the footing trench, then I can go get some sand and start compacting it down. I'm ready for the digging to be done, I'm too old and too fat for it! Lol pictures later although its really just a file in the ground with a trench around it. Have to go to another Dr appt with my wife for our baby. Ultrasound day!

--Sent from my Inspire 4G using Tapatalk
 
OP
S

supernova

Well-known member
Joined
Mar 13, 2012
Messages
76
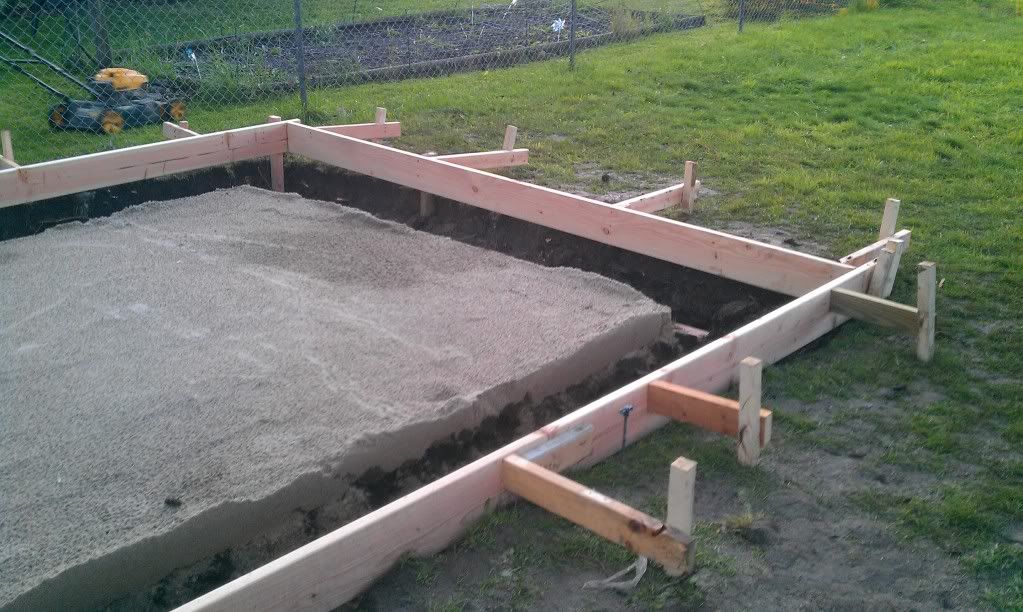
Got my footings dug out and trucked in 3 tons of sand 1 ton at a time. Formed up the pad area so i could get the sand all spread out & compacted in, that compactor was a pretty sweet machine! I soaked the sand quite a bit, ran it a couple of laps, resoaked it, and repeated that 4 times I think. Started raining as I was finishing up. Returned the compactor within my 2 hr rental window, came back and tamped the corners in by hand. Turned out pretty nice, and the rain helped compact it even more. Barring a lot of rain tomorrow, gonna form everything up & run my rebar & mesh. I also borrowed the Bosch hammer drill from work & drilled into the existing slab for my pins. Glad I didn't have to do that with my little hammer drill, would still be there on the first hole! Lol Can't wait to get this concrete in so I can start on the fun part of building it. Babies coming in about 5 weeks!!

IMAG0338.jpg


--Sent from my Inspire 4G using Tapatalk
 
OP
S

supernova

Well-known member
Joined
Mar 13, 2012
Messages
76
Its going to be a 12'x18' addition. Going to have 2 Windows and a 36" man door near the end, just haven't got the spot figured out yet. It's on my list of things to do today. I think I've changed my mind, and am going to do a course of block to meet code of 6" grade to sill instead of trying to form a "curb" for it, just decided that tonite. That ought to drive my wife nuts, I've only changed my mind a dozen times. Lol, as far as where everythings going, I don't have a clue yet. Thinking my bench & toolbox will go on the end wall, but nothings decided yet. I'll be asking for opinions from everybody here when I get to that point. :D

I was kind of wondering about turning the door around so it would swing out instead of in. Any tips to make that work a little better? I know it will be easier to break in, but I'm not real concerned about it, live in a small town and don't really have that problem in my neighborhood, but I just don't know about it....

--Sent from my Inspire 4G using Tapatalk
 

jimmie jam

Well-known member
Joined
Oct 16, 2005
Messages
490
Location
fort lauderdale, fl
Looks good. My suggestion to you is to make sure that you "overkill" on the epoxyed rebar into the existing slab/footing. This will help with seperation/cracking later on, FWIW. This is what I did with success.
 

Attachments

  • CIMG0642.jpg
    CIMG0642.jpg
    144.6 KB · Views: 83
OP
S

supernova

Well-known member
Joined
Mar 13, 2012
Messages
76
Thanks jimmie, that's some nice prep on yours! I drilled every 18" for my pins, maybe I'll go back and add some more. I got the form work up today, still have to remove some of the temporary bracing we put up and replace it stronger stuff. Thinking about pouring a little slab at the doorway too, keep the mud from splattering in when it rains hard.

IMAG0340.jpg


IMAG0341.jpg


Looking like I'm putting the man door where the tent stake is between the 2 braces. They were just temporary, gonna have to rebrace there, especially if I'm putting in a little slab.

I'm starting to feel like I'm getting somewhere finally. Weather permitting, I'll add my bracing tomorrow then put in my vapor barrier and rebar and remesh. Then inspection and concrete time. :thumbup:

--Sent from my Inspire 4G using Tapatalk
 
OP
S

supernova

Well-known member
Joined
Mar 13, 2012
Messages
76
After looking at the doors here at work (they all swing out) I see they drilled a set screw into the hinge pin on all three hinges, think that's what I'll do too, and ill grind a receiving slot on the pin for the set screw to test in. That'll save some inside wall space & floor space having the door swing out. Any thoughts on this? Maybe a long throw deadbolt too.

I have another question, I downloaded this picture from someone's thread (sorry I didn't name it with who's it is, if I figure out who's it is, I'll give credit where credit is due!) :eek: Can someone tell me the name of this kind of rafters design? And is it a bad idea for a 3/12 pitch roof? Snow load here in Iowa too much for it? The garage is only 12' wide with 7.5' high walls. I would like the additional ceiling height along the walls for some of the soffit cabinets I've seen on here ( once again, your name is escaping me, sorry....) Thanks for any help/thoughts/ideas.

Garageshellrafters2.jpg


--Sent from my Inspire 4G using Tapatalk
 
OP
S

supernova

Well-known member
Joined
Mar 13, 2012
Messages
76
Finally got the weather to cooperate with me & was able to get everything ready to be inspected for my concrete pour. I just need to tie down the remesh tomorrow and put in some more form bracing before the inspector shows up. Hope it all works out!

IMAG0343.jpg


Here's my little helper shoveling some of the 4 ton of sand I hauled in, loving every minute of helping me. & vice versa :)


IMAG0347.jpg


A corner showing how I ran my rebar, looks alright to me, but the inspector's the one that matters.

IMAG0348.jpg


An overall picture of it soon to be poured I hope! I forgot to take a picture of my rebar pins, maybe tomorrow if I remember. :banghead:

--Sent from my Inspire 4G using Tapatalk
 
OP
S

supernova

Well-known member
Joined
Mar 13, 2012
Messages
76
The inspector came today & signed off on my concrete forms, concrete truck is scheduled for 1:00 Wednesday, let's get this show on the road!! Wound up putting a little pad where the man doors going, can't wait to see it poured!

IMAG0356.jpg


IMAG0358.jpg


Here's a picture of my rebar pins.


--Sent from my Inspire 4G using Tapatalk
 
OP
S

supernova

Well-known member
Joined
Mar 13, 2012
Messages
76
I ordered 5 yards. Figured just under 4.5 before forming in the entry way pad.

--Sent from my Inspire 4G using Tapatalk
 
To avoid these ads, REGISTER NOW!

Kevin54

MEMBER EMERITUS
Joined
Jan 12, 2005
Messages
29,341
Location
Urbana, Ohio
Where are you located? Around here we normally put down some 57's to prevent some frost heave. I'm just looking where your man-door is going. I have one section of sidewalk going to my garage that I didn't get pinned and in the winter it will raise about 3/4" from the adjoining slab.

Looking forward to your build pics. Make sure you keep us updated!!!!
 
OP
S

supernova

Well-known member
Joined
Mar 13, 2012
Messages
76
Where are you located? Around here we normally put down some 57's to prevent some frost heave. I'm just looking where your man-door is going. I have one section of sidewalk going to my garage that I didn't get pinned and in the winter it will raise about 3/4" from the adjoining slab.

Looking forward to your build pics. Make sure you keep us updated!!!!

Hi Kevin, I'm in central Iowa. What are 57's? I have no clue what that is? I wondered if I needed to anchor the rebar down into the ground to kind of hold it down or not. I've been doing my best to take a lot of pictures, I cut a big hole in the back wall of the garage to bring the concrete through tomorrow, pictures to come in a little bit.

Your surgery's coming up isn't it? You'll certainly be in my prayers!

--Sent from my Inspire 4G using Tapatalk
 
OP
S

supernova

Well-known member
Joined
Mar 13, 2012
Messages
76
IMAG0362-1.jpg


Here's the hole I cut in the back wall to get the concrete back there. Original plan was to use my dads skid loader, but it doesn't fit under the trim on the garage, so I have 3 wheelbarrows & 2 concrete buggies, should go pretty quickly, only about 40' from curb to the pour. Then, after I got to work tonite, a buddy here said, take off the roll cage, then it'd fit through the garage....Duh, why the hell didn't my dad or I think of that.... Oh well, too late now. :banghead:

--Sent from my Inspire 4G using Tapatalk
 

Thedoc14

Well-known member
Joined
Mar 4, 2012
Messages
259
Location
Melb, Australia
The step you added, is ok, but your rebar should of travelled into your main slab by about a third of its length. Also a couple of bars on an angle at the corners 45deg to the corner.

If you get what I mean.

Otherwise have fun, make sure the family sign the slab and for luck burry a penny in the corner. lol

Nick.
 

Kevin54

MEMBER EMERITUS
Joined
Jan 12, 2005
Messages
29,341
Location
Urbana, Ohio
Hi Kevin, I'm in central Iowa. What are 57's? I have no clue what that is? I wondered if I needed to anchor the rebar down into the ground to kind of hold it down or not. I've been doing my best to take a lot of pictures, I cut a big hole in the back wall of the garage to bring the concrete through tomorrow, pictures to come in a little bit.

Your surgery's coming up isn't it? You'll certainly be in my prayers!

--Sent from my Inspire 4G using Tapatalk

57's are crushed stone about 3/4" in size. Normally we put that down before having concrete poured. It kind of keeps the ground from heaving in frost prone areas. Also you have sod under where the concrete slab to the mandoor is. You really don't want any sod or untamped soil under your new concrete. When it rots away it can leave voids
 
OP
S

supernova

Well-known member
Joined
Mar 13, 2012
Messages
76
57's are crushed stone about 3/4" in size. Normally we put that down before having concrete poured. It kind of keeps the ground from heaving in frost prone areas. Also you have sod under where the concrete slab to the mandoor is. You really don't want any sod or untamped soil under your new concrete. When it rots away it can leave voids

Yeah, the sod was cut out before the pour, I just ran out of time the night before. We use sand or 3/8 minus around here. I used sand under the slab, the step was just a last minute decision for extra concrete, you should see what I did with the rest of the extra. Lol. My step son has a metal shed with all of his outdoor toys (jeep power wheel, red wagon which is his trailer for his jeep, bike and other stuff, he's 4 & will tell you that's his shed!). He's got a pretty sweet approach to it now. :D

--Sent from my Inspire 4G using Tapatalk
 
OP
S

supernova

Well-known member
Joined
Mar 13, 2012
Messages
76
The concrete is in, I couldn't be happier, it looks great, and it went really smoothly! I had 2 of the 2 wheel wheelbarrows and my dad showed up with a power concrete buggy, made short easy work out of moving the concrete!

IMAG0380.jpg


Had 6 guys helping, and they made one hell of an awesome crew, don't know what I would've done without them!

IMAG0377.jpg

First load of many.

IMAG0384.jpg

This is me on my first load, look at my concentration. Lmao. Damn, the slope at the beginning of the driveway was a *****!

IMAG0390.jpg

My stepson's all boy, he loved the concrete truck. Had a really cool driver, blew the horn for him a couple of times when he left, could hear him giggling in the back yard. :D

IMAG0407.jpg

Halfway done putting in the crete. These guys screeted it so good, only had to do it once, & didn't even use the bull float! Just followed up with a nice fine broom.

My wife took so many pics for you guys I'm having a hard time picking which ones to put on here. This whole build was her idea, she's a keeper!!

IMAG0420.jpg


IMAG0435.jpg

Me applying the broom finish.
--Sent from my Inspire 4G using Tapatalk
 
OP
S

supernova

Well-known member
Joined
Mar 13, 2012
Messages
76
Love the DIY stuff. Keep up the great work and good luck!:thumbup:

Thanks red leader. I really like the challenge of all of this. Nothing like the satisfaction of standing there looking at something you've done!

--Sent from my Inspire 4G using Tapatalk
 

SiGmA_X

Well-known member
Joined
Aug 13, 2005
Messages
1,111
Location
Portland, OR
Looks good. How coarse is your broom finish? Never again will I do broom finish in some place I plan to work. We did it for the 4x15' lift slab we put in last summer, no fun.. Makes clean up worse.
 

Justanoldguy

Well-known member
Joined
Jun 1, 2008
Messages
3,673
Location
Atiamuri. Central North Island. New Zealand
I always use the bull float.
It brings up the slurry to the top and working it with the bull float tends to harden the surface of the finished floor.
Wouldn't even consider broom finish in a shed/garage as has been mentioned.

Good to see guys helping out.
 
OP
S

supernova

Well-known member
Joined
Mar 13, 2012
Messages
76
The broom finish is super fine. The guys helping me said it'd probably be knocked down in 6 months or so. This was my first real concrete project, so I listened to the guys that were helping me, and have done it many many times. I wasn't sure about brooming it either, but I didn't want it to be super slick when I'm maneuvering my motorcycle around in there with wet tires or anything, so it made sense and followed the sage's advice. Might make a little more dust for awhile, but I'm ok with that, better than the alternative of nothing. Plus, I can say I did this, and learned a lot in the process! Thanks guys for the thought.

--Sent from my Inspire 4G using Tapatalk
 

NUTTSGT

Super Moderator
Staff member
Joined
Sep 14, 2009
Messages
51,407
Location
Northern Central Ohio

I think I would have tried to cut out that cracked section and poured it after the floor was poured. That would have been a great spot to use up some extra concrete.


You need to hang onto that picture also. It's proof that the future child was around when you built the garage. :thumbup:
 
OP
S

supernova

Well-known member
Joined
Mar 13, 2012
Messages
76
I think I would have tried to cut out that cracked section and poured it after the floor was poured. That would have been a great spot to use up some extra concrete.


You need to hang onto that picture also. It's proof that the future child was around when you built the garage. :thumbup:

I would have liked to cut out the cracked section, but it runs all the way from the front to the back of the garage. With the time & money constraints, it just wasn't a possibility this time around. I'm planning on cleaning it out & filling it in and try to figure out something for it a little later on.

I have quite a few pics of her helping out (supposed to be on bedrest), cant wait for him to be here next month! :D

--Sent from my Inspire 4G using Tapatalk
 
To avoid these ads, REGISTER NOW!
Top Bottom