To avoid these ads, REGISTER NOW!

And the dream begins-

rlme36

Well-known member
Joined
Feb 17, 2008
Messages
331
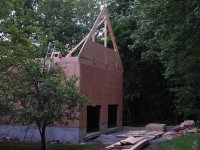
And the dream begins- 30x36 in the NE

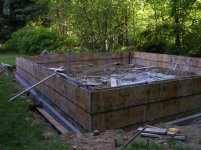
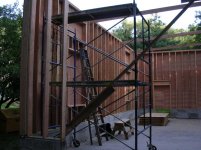
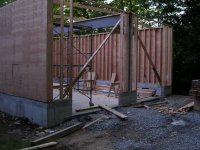
I have been around the forum awhile and have greatly benefited from the wealth of knowledge here and just wanted to share my current build that has taken many of the comments from the board to make happen.

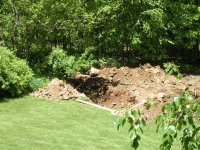
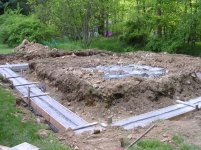
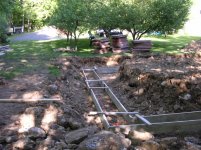
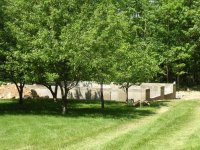
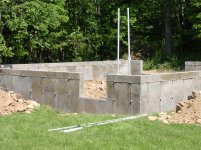
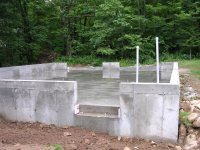
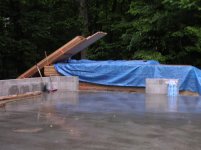
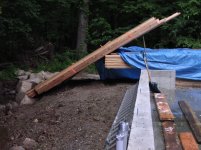
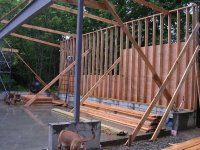
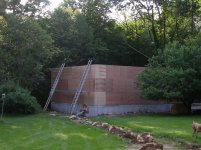
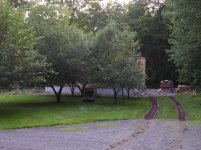
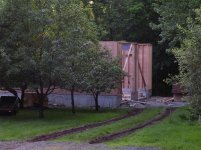
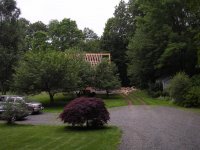
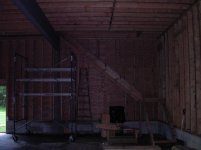
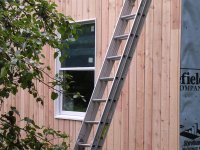
Here is a picture of where the 30x36 will be located as looking from the main house
 

Attachments

  • DSCN1581.jpg
    DSCN1581.jpg
    150.5 KB · Views: 315
Last edited:
To avoid these ads, REGISTER NOW!
OP
R

rlme36

Well-known member
Joined
Feb 17, 2008
Messages
331
Here are some excavation pics. It would appear that I have some mighty big potatos in the backyard.

The serious excavator was really needed and finished all the digging in one day.

The footers are dug and formed. Really lucked out with the weather this past week as it was sunny each day and fairly cool
 

Attachments

  • DSCN1591.jpg
    DSCN1591.jpg
    156.5 KB · Views: 261
  • DSCN1592.jpg
    DSCN1592.jpg
    159.6 KB · Views: 248
  • DSCN1594.jpg
    DSCN1594.jpg
    158.5 KB · Views: 361
Last edited:
OP
R

rlme36

Well-known member
Joined
Feb 17, 2008
Messages
331
Can't believe they were able to wheel the cement truck into such a tight corner near the building, but it did save me from having to pump it into place.

The third pic is of my rhodesian keeping an eye on everyone working.

Pics of the forms going up and the last couple show what will become the entrance of the garage after all my fruit trees, which really help to "hide" it.:bounce:
 

Attachments

  • DSCN1623.jpg
    DSCN1623.jpg
    157.9 KB · Views: 310
  • DSCN1618.jpg
    DSCN1618.jpg
    147.9 KB · Views: 284
  • DSCN1612.jpg
    DSCN1612.jpg
    151.3 KB · Views: 368
  • DSCN1606.jpg
    DSCN1606.jpg
    156 KB · Views: 324
  • DSCN1602.jpg
    DSCN1602.jpg
    149.2 KB · Views: 320
  • DSCN1601.jpg
    DSCN1601.jpg
    160.2 KB · Views: 294
  • DSCN1595.jpg
    DSCN1595.jpg
    155.4 KB · Views: 308
Last edited:
OP
R

rlme36

Well-known member
Joined
Feb 17, 2008
Messages
331
Now things are starting to come together.

The removed the forms today and I got to test my skill on what has to be the smallest little excavator on the planet to start trenching for the electrical.

I also think its unfair that my contractor has a much bigger toy to play with than I do. Mine looks absolutely silly compared to the big boy in the last picture.
 

Attachments

  • DSCN1634.jpg
    DSCN1634.jpg
    155.9 KB · Views: 263
  • DSCN1631.jpg
    DSCN1631.jpg
    153.3 KB · Views: 272
  • DSCN1630.jpg
    DSCN1630.jpg
    155.2 KB · Views: 284
  • DSCN1629.jpg
    DSCN1629.jpg
    154.1 KB · Views: 291
  • DSCN1638.jpg
    DSCN1638.jpg
    151.7 KB · Views: 493

ghnl

Well-known member
Joined
Mar 27, 2009
Messages
1,372
Location
Mebane, NC
I also think its unfair that my contractor has a much bigger toy to play with than I do. Mine looks absolutely silly compared to the big boy in the last picture.

Oh, I'll bet you can still get in some big trouble with it...!
 

TRTOOLSUPPLY

Well-known member
Joined
Apr 8, 2009
Messages
506
Looks really good so far!!!

Like Eric said that little bobcat 316 still makes a great "O SH@T" what did I just dig into machine!!!! Be There ,Done That!!!I.U.O.E.

Keep the pic's coming:thumbup:
 
OP
R

rlme36

Well-known member
Joined
Feb 17, 2008
Messages
331
Doesn't matter the size of the machine. My dad calls them pipeline detectors.

Well thankfully I was able to get it all finished up took about 8hrs all said and done with all the damn rocks. Here is what it ended up looking like along with the finished conduit piping installed.

The second pic is of a nice little retaining wall the excavator made for me with the really large potatoes. The digger is less than 10 feet from them to give you some perspective on the size.


The town was nice enough to spend 5 mins looking in the trench at various points and saying OK, you may now backfill today.
 

Attachments

  • DSCN1645.jpg
    DSCN1645.jpg
    154.9 KB · Views: 329
  • DSCN1651.jpg
    DSCN1651.jpg
    152 KB · Views: 335
  • DSCN1667.jpg
    DSCN1667.jpg
    148.8 KB · Views: 406
  • DSCN1670.jpg
    DSCN1670.jpg
    152.7 KB · Views: 402

TRTOOLSUPPLY

Well-known member
Joined
Apr 8, 2009
Messages
506
Hey rlme,
Is the "town" letting you back fill with the rock laden soil or do you have to use crushed stone like 11's?
Just curious because most commercial jobs I do they want "clean" fill.

Looking good so far!!!!!!
 

Tech Guy

Well-known member
Joined
Dec 17, 2008
Messages
828
Location
Ontario Canada
Up here you have to back fill with clean sand, lay a "caution-high voltage" plastic banner on top of sand and back fill again with sand then straight dirt. Nice job so far. Any layouts of how it will look like when complete ?
 
OP
R

rlme36

Well-known member
Joined
Feb 17, 2008
Messages
331
Up here you have to back fill with clean sand, lay a "caution-high voltage" plastic banner on top of sand and back fill again with sand then straight dirt. Nice job so far. Any layouts of how it will look like when complete ?

The trench was filled with 2-3 inches of sand. before conduit now I need to put in another 6 inches of sand to protect/cushion it, lay the plastic banner as you describe after that it needs to be "clean fill". so it will contain the some of the small rocks, but the big ones I'll have to find a home for.

As far as layouts I only have the plan drawings that aren't in format for me to post, but I'll work on that. The plan is for it to resemble a barn, cedar channel siding with classic overhang gable ends a few windows on the side that faces the house and (2) 9x9 doors. The interior will have a 14ft clear ceiling spanned by a steel beam.

The pex was finished up this past weekend, but I am getting a lose of pressure in the system due to a faulty schrader valve on the pressure test kit, figures. So I am hoping to reinstall another kit to pressurize it for the slab pour tomorrow and that it will hold the 65psi.
 
Last edited:

PurdueSD

Well-known member
Joined
Mar 25, 2006
Messages
1,577
Location
Indiana
I dug my footings and electrical trench with a bob cat like that. They are handy little suckers, too bad it had to go back to the rental place. Everytime i work on some stupid project outside i think how it would come in handy.

Place looks great so far. Looks like a really nice area!
 
OP
R

rlme36

Well-known member
Joined
Feb 17, 2008
Messages
331
Progress has been a little slow thanks to the rain, but the slab was finally poured this past tuesday and cured nicely with all the rain we have had in CT just about everyday since.

The forms you see in the garage door area are so they can pin the "apron" entrance ramp to the slab and put a piece of insulation between the two to create the thermal break from the slab.

The pex tubing is hard to see, but I have a haunch area with no tubing for the lift.

The overall slab thickness appears to be about an inch thicker, but that is fine with me:bounce:

The framers are going to arrive on Monday and the week's weather looks really good for the coming week.
 

Attachments

  • DSCN1707.jpg
    DSCN1707.jpg
    151.6 KB · Views: 374
  • DSCN1696.jpg
    DSCN1696.jpg
    144.2 KB · Views: 410
  • DSCN1685.jpg
    DSCN1685.jpg
    151 KB · Views: 410
  • DSCN1665.jpg
    DSCN1665.jpg
    152.1 KB · Views: 478
Last edited:
OP
R

rlme36

Well-known member
Joined
Feb 17, 2008
Messages
331
And the lord above said to the contractor let there be wood.

nothing better than coming home to see that your contractor has set up shop and received the order of lumber needed to make the new fun house
 

Attachments

  • DSCN1709.jpg
    DSCN1709.jpg
    136.4 KB · Views: 236
  • DSCN1710.jpg
    DSCN1710.jpg
    146.7 KB · Views: 204

Kevin54

MEMBER EMERITUS
Joined
Jan 12, 2005
Messages
29,341
Location
Urbana, Ohio
Well thankfully I was able to get it all finished up took about 8hrs all said and done with all the damn rocks.

I think your lucky. Around here we have to pay dearly for rocks like that. If I had half of whay you have I could finish up the pond project I have in mind. Anyways...looking great so far. :thumbup:
 
OP
R

rlme36

Well-known member
Joined
Feb 17, 2008
Messages
331
I think your lucky. Around here we have to pay dearly for rocks like that. If I had half of whay you have I could finish up the pond project I have in mind. Anyways...looking great so far. :thumbup:

Thanks, its really going to take shape today as the steel beam will be set for the span and then the walls etc can really start in ernst.

Unfortunately around here I have to bring in fill and topsoil since the ground it too rocky, such is life. You are more than welcome to stop by for a truck full of rock if you want
 
Last edited:
OP
R

rlme36

Well-known member
Joined
Feb 17, 2008
Messages
331
It really is the coolest thing to see in the making. The steel beam is in and one side of the building is up with partial sheathing.

I wish I was around to see that get put in. The last pic is of the my rhodesian doing what he does best, checking things out and making sure everyone is working or at least is giving him treats.
 

Attachments

  • DSCN1713.jpg
    DSCN1713.jpg
    147.8 KB · Views: 2,690
  • DSCN1714.jpg
    DSCN1714.jpg
    153 KB · Views: 345
  • DSCN1719.jpg
    DSCN1719.jpg
    153.8 KB · Views: 398
  • DSCN1718.jpg
    DSCN1718.jpg
    149.1 KB · Views: 391
Last edited:
To avoid these ads, REGISTER NOW!
OP
R

rlme36

Well-known member
Joined
Feb 17, 2008
Messages
331
So progress has been swift with the rain abating for today. Have all 4 walls up and 3 of them covered. The interior shots show the one wall with windows, there isn't anything to show scale but the windows are 3652 and the transoms above are 2ft

Concrete guy was back to do the door aprons and was nice to see he followed my instructions there is only the slightest of pitch to ensure that the low cars have no issues getting in. Downside is the concrete truck did quite a job on the lawn.

The last couple of pics are from half way down the driveway, can barely see the building is there, gotta love it.
 

Attachments

  • DSCN1733.jpg
    DSCN1733.jpg
    149.1 KB · Views: 219
  • DSCN1735.jpg
    DSCN1735.jpg
    142.8 KB · Views: 207
  • DSCN1737.jpg
    DSCN1737.jpg
    137.6 KB · Views: 223
  • DSCN1740.jpg
    DSCN1740.jpg
    146.8 KB · Views: 262
  • DSCN1749.jpg
    DSCN1749.jpg
    149.1 KB · Views: 229
  • DSCN1750.jpg
    DSCN1750.jpg
    149.3 KB · Views: 228
OP
R

rlme36

Well-known member
Joined
Feb 17, 2008
Messages
331
Great progress is still being made even though it seems to rain every freaking day, what is with this summer weather.

Anyway, here are some pics with the gable ends going up and the roof rafters. There is a pic of me in the upstairs window to show size. I am a little under 6 ft tall.

The following pics are of me standing in the downstairs portion of the building the lighting is rather poor though, but on the up side I am wearing my nicest pair of LL bean duck boots

The second to last pic is from the top of my driveway, the building is still nicely secluded behind the trees, although rather obvious that something is afoot back there.
 

Attachments

  • DSCN1783.jpg
    DSCN1783.jpg
    150.7 KB · Views: 296
  • DSCN1782.jpg
    DSCN1782.jpg
    147.3 KB · Views: 307
  • DSCN1779.jpg
    DSCN1779.jpg
    165.8 KB · Views: 387
  • DSCN1777.jpg
    DSCN1777.jpg
    143.8 KB · Views: 469
  • DSCN1772.jpg
    DSCN1772.jpg
    149.5 KB · Views: 300
  • DSCN1769.jpg
    DSCN1769.jpg
    147.2 KB · Views: 292
  • DSCN1757.jpg
    DSCN1757.jpg
    150.2 KB · Views: 283
Last edited:

rieferman

Well-known member
Joined
May 18, 2009
Messages
2,586
Location
Collegeville PA (30 min west of Philly)
The look on your face in the one pic seems to say "hell yeah, this is awesome".. and it is! I love that it's sort of off in it's own secluded area... I think that will really make it feel like you're going "someplace else" each time you go out there.
 
OP
R

rlme36

Well-known member
Joined
Feb 17, 2008
Messages
331
The look on your face in the one pic seems to say "hell yeah, this is awesome".. and it is! I love that it's sort of off in it's own secluded area... I think that will really make it feel like you're going "someplace else" each time you go out there.

The spot really is ideal on the property as it will keep prying eyes from seeing much with the bay doors facing the woods.

The windows were cut out today and they started the first course of roof sheathing. I need to snap a pic and post it.
 

Attachments

  • DSCN1797.jpg
    DSCN1797.jpg
    149.1 KB · Views: 185
  • DSCN1788.jpg
    DSCN1788.jpg
    137.6 KB · Views: 183
  • Copy of DSCN1794.jpg
    Copy of DSCN1794.jpg
    142.6 KB · Views: 250
  • Copy of DSCN1795.jpg
    Copy of DSCN1795.jpg
    148 KB · Views: 182
  • DSCN1786.jpg
    DSCN1786.jpg
    145.3 KB · Views: 201
Last edited:

babzog

Well-known member
Joined
Apr 20, 2009
Messages
2,117
Location
Eastern Ontario, Canada
It really is the coolest thing to see in the making. The steel beam is in...

attachment.php


Now that's the way ta do it - no center post! Keeps it nice and clean.

It always strikes me as funny how the builders put in these big honking massive beams, supported by only two tiny little posts. Can you support anything underneath that beam (ie: use it as a crane)?

The build looks great! Look forward to seeing more pics!
 
OP
R

rlme36

Well-known member
Joined
Feb 17, 2008
Messages
331
attachment.php


Now that's the way ta do it - no center post! Keeps it nice and clean.

It always strikes me as funny how the builders put in these big honking massive beams, supported by only two tiny little posts. Can you support anything underneath that beam (ie: use it as a crane)?

The build looks great! Look forward to seeing more pics!

Yeah, I thought that funny as well, but the 4x4 steel post holding that up is i believe 3/4 steel thickness all around. That puppy isn't going anywhere

I would have to confirm that, but the beam was designed to hold the second floor load with 20lbs per sqft, essentially to show that it was for storage use only and not living space. If I want to get it rated for living space I think I need to double up on the 2x12's or sub in laminated boards of appropriate thickness.

Total space is roughly 700 or so usable on the second floor, so I don't think an engine on a trolley would pose that big of an issue. Assuming the second floor isn't loaded up with stuff, but I could be wrong, so I'll check to see for sure.
 
Last edited:

babzog

Well-known member
Joined
Apr 20, 2009
Messages
2,117
Location
Eastern Ontario, Canada
Yeah, I thought that funny as well, but the 4x4 steel post holding that up is i believe 3/4 steel thickness all around. That puppy isn't going anywhere

Total space is roughly 700 or so usable on the second floor, so I don't think an engine on a trolley would pose that big of an issue. Assuming the second floor isn't loaded up with stuff, but I could be wrong, so I'll check to see for sure.

Oh, I wasn't suggesting the builder didn't know what he was doing, the contrasting sizes of the steel members just looks funny in the pic.

And what I was wondering, was if you could suspend something (like an engine) from that beam. It would make a great way to move stuff around (up/down, side to side anyway). Engine work, unloading trucks and trailers, etc.
 
OP
R

rlme36

Well-known member
Joined
Feb 17, 2008
Messages
331
Oh, I wasn't suggesting the builder didn't know what he was doing, the contrasting sizes of the steel members just looks funny in the pic.

And what I was wondering, was if you could suspend something (like an engine) from that beam. It would make a great way to move stuff around (up/down, side to side anyway). Engine work, unloading trucks and trailers, etc.

No worries, I didn't take it that way at all and that was what I was going to check out, if I could use a trolly to hoist engines and such from it.
 
OP
R

rlme36

Well-known member
Joined
Feb 17, 2008
Messages
331
It doesn't seem like much, but the details are starting to get done. The roof is entirely sheathed and the stairs have started to the 2nd floor. They only come out into the garage bay 8'9", which should still be plenty of room for my lift and still be able to close the door on what ever is on it.

The cross braces are all finished, I prefer the cross method as opposed to just using 12 by cut offs.

Shingles should be started tomorrow.
 

Attachments

  • DSCN1809.jpg
    DSCN1809.jpg
    148 KB · Views: 232
  • DSCN1807.jpg
    DSCN1807.jpg
    153.9 KB · Views: 216
  • DSCN1815.jpg
    DSCN1815.jpg
    152.5 KB · Views: 235
OP
R

rlme36

Well-known member
Joined
Feb 17, 2008
Messages
331
So the shingles took longer than I thought, but as an added bonus the windows are installed too.

I am really happy with the look of the transoms above the windows, helps break up the wall and will be a good source of light.

Ordered the garage doors went with the wayne dalton 5200 best price on an actual commercial grade door in my size with an R15 rating.
 

Attachments

  • DSCN1832.jpg
    DSCN1832.jpg
    130.4 KB · Views: 117
  • DSCN1831.jpg
    DSCN1831.jpg
    145.1 KB · Views: 132
  • DSCN1829.jpg
    DSCN1829.jpg
    148 KB · Views: 134
  • DSCN1823.jpg
    DSCN1823.jpg
    153.9 KB · Views: 137
OP
R

rlme36

Well-known member
Joined
Feb 17, 2008
Messages
331
Down to the last stretch. Got some of the siding up today, they finished up the soffits on the gables as well. Walking back there you get the great aroma of freshly cut cedar. I really have to get off the fence on what kind of stain to use on the siding.
 

Attachments

  • DSCN1841.jpg
    DSCN1841.jpg
    151.8 KB · Views: 124
  • DSCN1842.jpg
    DSCN1842.jpg
    142.1 KB · Views: 126
  • DSCN1843.jpg
    DSCN1843.jpg
    144.4 KB · Views: 119

T>D>C

Well-known member
Joined
Mar 23, 2008
Messages
56
Very nice. I see the building is 30 X 36, how high are the walls?

Good job.

T>D>C
 
OP
R

rlme36

Well-known member
Joined
Feb 17, 2008
Messages
331
Very nice. I see the building is 30 X 36, how high are the walls?

Good job.

T>D>C

The first floor is 14' to the rafters and ~12' to the bottom of the steel beam.

Oh and thanks, I am experimenting with stains today. Entirely too many color/tint choices even for oil stains.
 
To avoid these ads, REGISTER NOW!
Top Bottom