
You are using an out of date browser. It may not display this or other websites correctly.
You should upgrade or use an alternative browser.
You should upgrade or use an alternative browser.
And the dream begins-
- Thread starter rlme36
- Start date
nate379
Banned
Wow that's a pain!
Here we just fill with whatever was dug up. Don't need to have an inspection on it... don't need an inspection for much of anything actually.
Here we just fill with whatever was dug up. Don't need to have an inspection on it... don't need an inspection for much of anything actually.
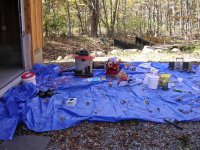
Up here you have to back fill with clean sand, lay a "caution-high voltage" plastic banner on top of sand and back fill again with sand then straight dirt. Nice job so far. Any layouts of how it will look like when complete ?
nate379
Banned
So did you frame the rafters 12" O.C.???
So did you frame the rafters 12" O.C.???
I think everything if I recall is 16" on center. all are aligned to transfer weight to the foundation properly if that is your question
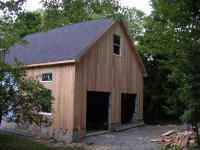
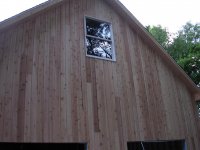
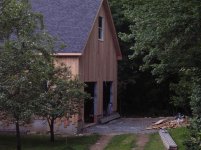
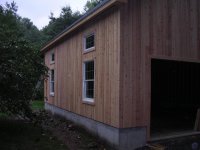
All sides are finished and the windows and doors are trimmed. I now need to cut down some 5/4 cedar stock to make some drip cap molding for the windows and doors.
Now would be an excellent time for the garage door guy to suddenly show up with oh I don't know, my garage doors maybe to help keep the rain out.
Now on to the interior stuff. Getting the elec rough in and working on my lighting and the epoxy flooring. just when I thought i was making good progress.
Attachments


So its been a while and I realize that there has been some progress made. All the electrical has been completed except for the typ of lights to use in the bays. All wire on 4 separate switches on 1 circuit for 2 switches.
Below are pics of me getting the floor done. I now have a couple of my new tool cabinets in from Lista and need to put them against the back wall by the rear entrance.
Next up is to get it insulated and plumb the heating for the slab
Below are pics of me getting the floor done. I now have a couple of my new tool cabinets in from Lista and need to put them against the back wall by the rear entrance.
Next up is to get it insulated and plumb the heating for the slab
Attachments


Last edited:
Motown 454
Well-known member
- Joined
- Sep 25, 2008
- Messages
- 1,359
I just read through the whole thread. Thats an awesome garage. Nice job on the floor too.
I just read through the whole thread. Thats an awesome garage. Nice job on the floor too.
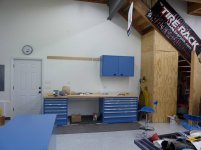
Thanks. Still trying to get the insulation figured out. I did get my cabinets and the benchtop installed. Pics below.
Attachments

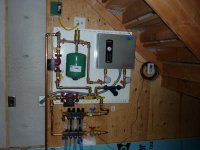
The latest update, includes the newly operating radiant floor heating system. It works really well and is super quiet which is pretty cool I have to say. The insulation was done in the summer, hung the insulweb netting myself to try and save a couple of bucks. I spray foamed each of the stud bays with a 1/2 bead to bond the sheathing to the studs and further stop air infiltration. The corners had the std box overlap that I filled completely with foam as I could not get any insulation in there due to the openings being to narrow.
The cellulose installer took about 3 days to dense pack the walls and the roof rafters. In the heat of the summer the 2nd floor was in the mid 70's with no a/c after the install, before it was an absolute sweat box and you could bare breathe up there, amazing what a little insulation can accomplish.
The cellulose installer took about 3 days to dense pack the walls and the roof rafters. In the heat of the summer the 2nd floor was in the mid 70's with no a/c after the install, before it was an absolute sweat box and you could bare breathe up there, amazing what a little insulation can accomplish.
Attachments
Last edited:
 Way to go w/ the steep roof pitch, really sets the building off.
Linda@Lista
Well-known member
Very nice rlme36! Hopefully one day I'll be able to own a home and build whatever I want. Right now, my fiancee will just have to settle with getting a nice toolbox from me 
Linda@Lista
Linda@Lista
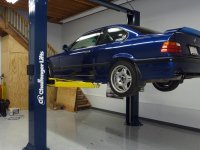
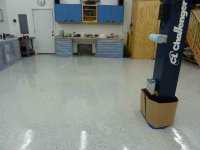
Things are coming along, sheetrock was done in the summer as well as painting. The new toy was installed yesterday. I went with a Challenger lift after a lot of research and knowing it was made in the US with quality parts. Now I just need to find the time to work on the cars.
Attachments
Last edited:
Beautiful garage!! And of course being a E36 M3 fan looks pretty clean...
thanks for the compliment. the car is dedicated to the track and I still love driving it, there is just something about the lines that i love
Red Leader
Well-known member
I'm ready to see that Walker Turner drill press
readytobuild
Active member
- Joined
- Nov 23, 2011
- Messages
- 29
if you don't mind me asking how much did the foundation set you back?
New cabinets finally arrived, one got damaged, hopefully the shipping company will do the right thing. Here are some pics of me setting up the french cleat for the cabinets. Decided to use some hard maple since the cabinets alone are 140lbs each, used a double cleat to hang them above the bench. Really like the look and that I am getting down the bottom of my list of things I want to get done.
Last edited:
Finished up the middle cabinet out of maple to house the stereo that lives in the garage. Its an old school HK integrated that I have an ipod attached to.
Attachments


Last edited:
JKagermeister
Member
- Joined
- Aug 1, 2011
- Messages
- 8
Nice work, love the wood siding. Looks like its been there forever.
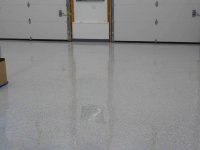
After much internal debate, I decided to add an additional coating of the the clear epoxy from Wolverine Flooring. I am amazed at the increase in gloss on the floor. Pictures were taken after the floor is totally dry. Kind of like the way the pictures are reflected in the floor.
I only coated the inner section of the floor that gets the most traffic, the out 2ft where the cabinets are didn't get an additional coating. Didn't really see the need, plus those cabinets are now full of stuff and are a pain in the a$$ to move
I only coated the inner section of the floor that gets the most traffic, the out 2ft where the cabinets are didn't get an additional coating. Didn't really see the need, plus those cabinets are now full of stuff and are a pain in the a$$ to move
Attachments


Last edited:
ersatzs2
Well-known member
Nice cabinets! Maybe we should start a 'Blue Lista' garage thread! Of course now you are committed to buying:
CoxReel, not Reelcraft
Miller, not Lincoln
Rotary/Bendpak, not Mohawk et al
(edit, oops just saw your challenger, hmm, I dunno, nice solution but is that shade quite right
Probably more I'm not recalling at moment! Seriously, the GJ lister from the Philippines with the minimalist vibe once commented that 'things look more orderly if they are the same color.'
They do hold a lot and what's nice is you can always get more in the same flavor. The miller is a gimme as its a great unit as is the cox stuff so I think works out for the best. You must have missed th Quincy 80 gallon hidden under the stairs ;-)
The lift shade matches the track car. And the light gray floor goes well with my new to me 993
The lift shade matches the track car. And the light gray floor goes well with my new to me 993
Dadofour
Well-known member
Re: And the dream begins- 30x36 in the NE
Wow.
Sent from my iPhone using Tapatalk
Wow.
Sent from my iPhone using Tapatalk