To avoid these ads, REGISTER NOW!

Another 4x8 Precision Plasma CNC Build

NWill

Well-known member
Joined
Oct 4, 2009
Messages
117
Location
Columbus, Ohio
I decided to take the plunge after researching for a few weeks. Much like everyone else, my first shipment was from Ron @ Precision Plasma.

Gear Reduction and hardware
View media item 62945
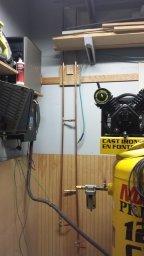
Z-Axis
View media item 62946
View media item 62947
Since I was 99% sure I was going to order a Torchmate, I picked up a Lincoln 180 MIG with some of the savings. I got it for $315 brand new in box :bounce:

View media item 62948
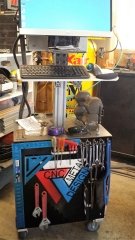
Big Brother
View media item 62949
I'll be ordering the rest of the parts today

I had ZERO intention of starting a thread until I was either 90% done or ran into some issues. I have so few pictures to offer my fellow GJ'ers, however, I have a few questions.

Paint or powder coat?
Which would you do for the gantry? The frame will be painted regardless. Implement paint from TSC?

Powermax 45 or 65?
I was set on the 45 until I saved a few bucks. I really doubt I would ever NEED a 65, but I don't need a CNC plasma either. I see so many people start small and end up with the 85. I would rather do it once. At this point I am leaning towards the 65.

What are my needs for the Powermax? I don't know yet, anything that looks fun to make :) I don't think this will require 1" plate but you never know.

Would it be worth picking up the HF Air Dryer? They seem to get pretty good reviews, even Jim Colt said they seemed to work pretty well. Can these be mounted anywhere? Like, say on the wall/ceiling above the compressor?

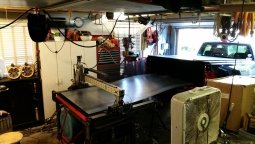
Anything you wish you did differently? I saw a few people complain about splashing so I am going with a 4" water table. Slats 1/2" below pan good enough? 1"?

That's all I can think of for now. I'm sure I will have many more questions as the build progresses.

Thanks!
 
Last edited:
To avoid these ads, REGISTER NOW!

ovrrdrive

Well-known member
Joined
Sep 13, 2015
Messages
642
Location
Central Florida
I went with the 65 mainly for the duty cycle. I plan to do some artwork cutting on mine and figured it would run more then 6 minutes at a time to cut which would put the 45 out of its duty cycle cutting at 45A. The 65 will run 100% at 45A. And just in case you do need to cut something thicker you'll be glad you have the extra power then too. The kit you want to buy is I believe the 83300. It comes with the hand and the machine torch in one box. It's almost like getting one of them for free.

Since I painted all of mine I've nicked the paint in about 30 places just finishing assembly. Powder will be a lot tougher but harder to touch up. It could be good or bad. If I had the option I probably would have gone with powder on mine. My plan is to finish everything and touch it up and try not to do any more damage after that. I'll let you know how that works out. lol

I have the HF dryer and so far no complaints but I'm not running my table yet either. It seems like it works when I do use it but only time will tell if it lasts a long time and if it dries the air enough for the plasma to be happy. I have a thread on here about mine. I have it next to the compressor hard plumbed into my small copper manifold.

Congrats on your decision to build your own. It's a really fun project but I have to admit I enjoyed building it way more than the hooking everything up part. The documents from candcnc are pretty confusing. All I really needed was a one sheet dummies how to guide showing everything hooked up together. Instead there are 2 or 3 versions out there for each system that go into amazing detail on them, but not so much how they hook to each other. Get the latest copies and go to town. Build hard, build right and build fast. The more you get done before the excitement wears off the better off you'll be.

I'm hopefully a few good solid days away from mine being complete. I just have to find the time and the initiative in the same day. lol
 
OP
N

NWill

Well-known member
Joined
Oct 4, 2009
Messages
117
Location
Columbus, Ohio
Yeah duty cycle is the main thing swaying me towards the PM65. That and they have a $200 rebate going on right now. I've been looking at the 83300 which would be $300 more considering the rebate. I'm not sure if it's for me. I guess I could always sell the hand torch if I dont ever use it. I'll have to think about that one.

I think I am going to get a quote on the gantry for powder coating. There is a guy local to me who has been doing a ton lately. He seems to have very good prices. Good luck with the paint touch-up!

Do you have a filter setup as well? I have a lot of reading to do on the subject....hence stupid question - does the air dryer replace the filters? I assume you'd typically have both in a good setup?

Agreed. It's like an erector set. Just bolting the gear reduction boxes together was great.

I'm going a different route from most people on the controller and software. I really wanted an all-in-one package. I know there are millions of people running Mach3/SheetCam and every question has probably been answered 100 times, but I don't want to have to point fingers at 3 different applications when something isn't working. For these reasons and others, I am going with the FlashCut controller/motors/software package. It isn't the cheapest, but I have enjoyed working with the demo software so far and seems to fit the bill.
 

ovrrdrive

Well-known member
Joined
Sep 13, 2015
Messages
642
Location
Central Florida
Since the PM65 is the only plasma cutter I have in the garage I figured I'd need to use it around the shop as well as in the CNC Table so having both torches was a must for me. If you have another plasma or don't see a need for one it might not be a big deal for you. I figured at the very least since I built a 5x5 table I'd need to rip sheets in half before I put them on the table. With a 20' extension cord and the 25' torch leads I can get halfway out the driveway with it. I use it constantly.

I do have a pressure gauge and an Motoguard M60 on the back of the plasma cutter. The dryer probably does filter the air but just in case anything is introduced downstream of it I wanted to filter it out. Plus it removes any oil or water that gets by the dryer too. Just in case it does. They're great filters and don't restrict the air hardly at all. Just be careful you don't over filter or restrict the air to it. I wanted it to be happy while it was cutting.

I haven't seen the flashcut stuff. I guess I'll have to check it out just to be familiar with it. At this point though my money is already spent. I went with the Command CNC Linux version of the software because they said that was the direction they were heading for the future. It seems pretty straightforward.
 
OP
N

NWill

Well-known member
Joined
Oct 4, 2009
Messages
117
Location
Columbus, Ohio
I have a LOTOS 5000 from back when they were $250 or whatever at NEWEGG. It actually works pretty well. I have a feeling it won't be seeing any love in the new future :)

Good to know. I recall reading about restriction too. Jim Colt chimed in and talked about it on a build thread somewhere.

I read too many stories about sending a board back, controller went bad, a motor was faulty, etc. I'm sure it isn't often, but I know I would get too bummed out on it and stall for months. If something goes wrong in Flashcut, they can login remotely and help find the problem. If I have to troubleshoot something I'm going to get lazy with it. Can't have that!

You don't see much about them on the web but seems they deal mostly in commercial stuff. They do a lot of milling retrofits as well. I guess if something goes wrong, I can inform others since I couldn't find much at all until I called them. Fingers crossed
 

kkroger

Well-known member
Joined
Apr 21, 2013
Messages
1,143
I have a Mill running Flashcut, unimpressed honestly... But it DOES work... I have my CNC Plasma Table running Mach3, prefer Mach3... Honestly...
 

Griff93

Well-known member
Joined
Jul 25, 2009
Messages
1,121
Location
Huntsville, AL
You'll want a hand torch to cut up the skeletons left over after cutting up a sheet. The cnc plasma table makes a great manual cut table as well when you need to just cut something by hand. We use our hand torch daily. I wouldn't have a cnc plasma table setup without having one.

Sheetcam is great. It's really user friendly and intuitive. Never had to point fingers at it. I've had zero issues from it that weren't me doing something wrong.
 
OP
N

NWill

Well-known member
Joined
Oct 4, 2009
Messages
117
Location
Columbus, Ohio
That's a good point on the skeletons. I do have a Lotos plasma as well as an oxy/acetyl torch. I'm going to order the hand torch anyway. I can always sell it and end up with the cheapest setup. I'm going with the 83300.

What consumables do you guys use the most? Anything I should stock up on?
 
OP
N

NWill

Well-known member
Joined
Oct 4, 2009
Messages
117
Location
Columbus, Ohio
I picked up a Kobalt compressor today. After wiring all day, I fired it up and it got to 60psi before blowing a hose. It was the damn auto drain kit from HF :rolleyes: So now my new compressor is worthless. Figures..

View media item 63069

The wall where the table is going. This is roughly how it was yesterday afternoon
View media item 56183
Yesterday evening
View media item 63068
This afternoon
View media item 63070
View media item 63071
The top left outlet will be for my computer monitor/TV

I ran the power through the attic for the Powermax. I am also adding another 50a outlet closer to the garage door in case I want to drag the mig out to the driveway.

The TV mount and a few cables will be here later this week. The Powermax 65 will be here tomorrow, along with all the motors and controller from Flashcut.

I should have everything I think I need by the end of the week :rocker:
 

Capstone

Well-known member
Joined
Aug 19, 2012
Messages
111
Location
Northern VA, DC Area
Just a couple of tips from someone who has been running a 4x4 homebuilt PPL gantry table for 2years now.

FIRST: If you haven't already, join Plasmaspider for tons of useful specific info related to CNC Plasma Hobbyists and SMB Owners

As for the space in your garage... and before you get too far down the road, here are some hopefully useful tips.

1. consider covering the walls near the table with some material to prevent damage from splashing water, sparks, dust, dirt and bangs and dings.
2. Make sure there's a GFI on the circuit for those wall mounted plugs
3. Install a separate earth ground that runs from your table, computer and gantry electronics to reduce EM issues between your PC and the Cutter and the rest of the electronics. This is not an electrical ground, or Plasma Cutter Ground.
4. Add an air dryer or DIY a dessicant and copper cooler setup to your compressor to dry out your air. Copper Cooler

5. I HIGHLY recommend you put your computer and monitor on a rolling cart of some kind. You're going to want to be able to look at both the monitor and the table during operation and move it out of the way while you move material around.
6. Dust, Dust and more dust... be prepared for a nice thin layer of black soot EVERYWHERE in your garage unless you take considered steps to drape off your table and either downdraft/filter the table or use a watertable. In my next space, I will plan to build basically a paintbooth for my table with an observation window of some kind.
7. Orient the table for loading and unloading. I highly recommend you put the table in a home garage directly in line with the door so you can unload sheets directly out the back of your vehicle. Truck Unloading


If I think of other stuff I'll let you know. If you have questions, let me know.
 

Attachments

  • Capstones_table2.jpg
    Capstones_table2.jpg
    42.6 KB · Views: 204
  • cart.jpg
    cart.jpg
    37.1 KB · Views: 158
  • material loading.jpg
    material loading.jpg
    42.5 KB · Views: 128
  • air_cooler.jpg
    air_cooler.jpg
    33 KB · Views: 112
Last edited:
OP
N

NWill

Well-known member
Joined
Oct 4, 2009
Messages
117
Location
Columbus, Ohio
Thanks Capstone, tons of good info there! I had thought about hanging some sheets of galvanized steel on the surrounding walls. Any reason that's a bad idea?

As for loading. I don't have the room to load it straight. I was thinking of a centipede sawhorse with a plywood top. Then mount a bunch of those $1 HF 360 degree roller ball casters. The idea would be to drag out of the truck onto the rollers, then push the sheet sideways onto the table. Thoughts?
 

Capstone

Well-known member
Joined
Aug 19, 2012
Messages
111
Location
Northern VA, DC Area
Galvanized, sure, or plexi, thin plywood, luan, hardboard, or even cheap paneling like you'd see in 1980's basements, anything is better than soft and mold prone drywall.

I had a similar idea about the rollers, anything thicker than 14g 4x8 sheets will be damn near impossible to manage solo without some air/hydraulic/winch type machinery help.

ceiling height is a real issue with any of these solutions.

I'm planning to get out of this space in 6-9mos, so most of my issues will dissipate with adequate space very quickly.

Good luck
 

Griff93

Well-known member
Joined
Jul 25, 2009
Messages
1,121
Location
Huntsville, AL
We use a mini skid steer with forks to load the table. Mainly because we already have it. We also use a tractor at times. Trying to load a piece of 1/4 by yourself isn't going to happen without some machinery. I really want to build a bridge crane in our shop, mainly for loading the plasma table. A jib crane would work if you were only loading the table. I've seen people talk about using an engine hoist to load their table. I haven't tried this myself but I could see it working ok if you got some horizontal plate clamps and made a lift bar. Seems like it could get really time consuming though depending on your setup.
 

Gamble

Well-known member
Joined
Oct 12, 2011
Messages
410
Location
CHITOWN
I have a Mill running Flashcut, unimpressed honestly... But it DOES work... I have my CNC Plasma Table running Mach3, prefer Mach3... Honestly...

What's wrong with the flashcut?
I went with flashcut controls on my torchmate. Some things took some getting used to but overall I couldn't be happier. Runs well and the software is pretty nice.

That being said I still favor my torchmate software since I had had it for 3 years and know how to work it really well.

One recommendation I would have for you is to spend the $250 on the lite torchmate software. Design your parts and your toolpaths all in that one software. So no need for sheetcam.
 
OP
N

NWill

Well-known member
Joined
Oct 4, 2009
Messages
117
Location
Columbus, Ohio
Got the table after tracking down a uhaul for 3 hours. We ended up having to load it on its side anyway since the uhaul opening is only 5ft wide. The ****** thing is I have a 5x10 but knew it wasn't wide enough. It would have worked fine since we had to turn it on its side anyway [emoji35]
7d36b38d47498cde082c7ae3b2210e18.jpg


I managed to get it off the trailer and into the garage myself. I'm waiting on some neighbors to get home to help with the water pan
4a1c14a49265289db1fb631da6fe4611.jpg


This showed up yesterday
38e936c208af5966693aabd7ed45dc9f.jpg


Next step will a ton of drilling, tapping, and tacking.
 

ovrrdrive

Well-known member
Joined
Sep 13, 2015
Messages
642
Location
Central Florida
Yeah it took me a while to get the dimensions through my head too... I finally realized my 5x5 table was actually a 7x7 table on the floor. They're bigger than you expect.

Looking good.
 
OP
N

NWill

Well-known member
Joined
Oct 4, 2009
Messages
117
Location
Columbus, Ohio
No kidding! This one is 121.5"x69" plus 4" cable track.

How did you guys keep the CRS rails straight? The manual says to use a straight edge or laser. My best straight edge is a decent 4ft level, won't be much help. I do have a few lasers but isn't a laser a little fat? Do you have to just catch the edge to make it a little more accurate? Any ideas?
 
Last edited:
To avoid these ads, REGISTER NOW!

ovrrdrive

Well-known member
Joined
Sep 13, 2015
Messages
642
Location
Central Florida
No kidding! This one is 121.5"x69" plus 4" cable track.

How did you guys keep the CRS rails straight? The manual (if you can call it that) says to use a straight edge or laser. My best straight edge is a decent 4ft level, won't be much help. I do have a few lasers but isn't a laser a little fat? Do you have to just catch the edge to make it a little more accurate? Any ideas?

I saw someone suggest using a string spaced off the side of the rail so I used that and it works pretty well. I stretched a piece of fishing line around the side and spaced it off with a few pencils (one on each end) and then measured the distance from the string to the side of the CRS along the rail. Mine were almost perfect. I had one spot that was out about a 16th that I got in line with a c clamp then tightened the bolts on it. I rolled the gantry down it first to let the bearings get the rails parallel.

Pretty sure I saw that in one of the threads on pirate.
 
OP
N

NWill

Well-known member
Joined
Oct 4, 2009
Messages
117
Location
Columbus, Ohio
I'll try a little bit of each and see which gives me the biggest/easiest to see error. It's about that time. Just finished drilling and tapping, ready to straighten her up

01ada19e76e4e8fac9671b8852127e01.jpg
 
OP
N

NWill

Well-known member
Joined
Oct 4, 2009
Messages
117
Location
Columbus, Ohio
Before
View media item 63223
After
View media item 63274
I still need to finish painting a few things and do some touch up.

Gear Reduction
View media item 63273
Velox Z
View media item 63275
View media item 63277
I also mounted the 32" TV for my computer monitor
View media item 63278

View media item 63279

It's coming along. I still need to mount the gear track and do a final assembly of the gear reduction boxes, adjust pinions, thread lock a few things, etc. I also need to adjust the gantry bearings. Hopefully I'll be running the wiring for everything in the next day or two and see what happens.
 

Trey T

Well-known member
Joined
Aug 3, 2011
Messages
3,749
Location
Houston, TX
very cool project. I'm curious how difficult is it to put together one. Are there kits out there that you can buy and put together (the CNC stuff that's drive or get driven on) or you have to piece everything together?
 

ovrrdrive

Well-known member
Joined
Sep 13, 2015
Messages
642
Location
Central Florida
Love the 32" monitor... That's a great idea.

I just noticed your hard stops are a little short. Where they are now it looks like your gantry can go flying off the edge. You might want to consider extending them. I'll see if I have a pic handy of mine.
 

Attachments

  • 20160525_212215.jpg
    20160525_212215.jpg
    143.4 KB · Views: 87
OP
N

NWill

Well-known member
Joined
Oct 4, 2009
Messages
117
Location
Columbus, Ohio
very cool project. I'm curious how difficult is it to put together one. Are there kits out there that you can buy and put together (the CNC stuff that's drive or get driven on) or you have to piece everything together?

It's a little of both. For mine, I pieced together different kits. The gantry from Precision Plasma requires welding but its fairly straight foward. The electronics package is another kit that should be mostly plug and play. You are required to build your table too. My buddy works at a fab shop near me. I asked them for a quote on the steel and they gave me a quote for the whole thing. It was a great price so I said go ahead. I didn't want to deal with building a square frame on my driveway and I really don't have the room to do it. Plus, they ordered the steel on a Friday, cut it up on Monday, and finished it by Tuesday afternoon. I picked it up Wednesday. I'd still be trying to square up my HF bandsaw to make the first cut.

Love the 32" monitor... That's a great idea.

I just noticed your hard stops are a little short. Where they are now it looks like your gantry can go flying off the edge. You might want to consider extending them. I'll see if I have a pic handy of mine.

Thanks! I knew I wanted a larger viewing area since I'd be farther than normal. And it was $100..

I picked up a $200 refurb PC as well. I bought a 120GB SSD, reloaded Windows7 onto it, and upgraded the RAM from 8gb to 16gb. I wanted to turn the PC off every night but I dont want to wait for it to start up every time I want to use it or just browse GJ from the garage. Boot time went from a few minutes to about 10 seconds!

And the hard stops, blame the fab company :lol: I need to redo those as well.
 
OP
N

NWill

Well-known member
Joined
Oct 4, 2009
Messages
117
Location
Columbus, Ohio
The gantry comes with 72" lengths of gear track. These need to be welded together for the length of your X-axis. I wasn't looking forward to it but it was pretty easy. I mainly didn't feel comfortable with my MIG since I've only had it for a week. But I didn't feel like rolling my TIG out to the driveway so I just went for it. 074cfd420c18168972c49a45b5be8238.jpg

These get placed under the CRS rails on both sides. A 60" piece gets placed on the gantry crossmember. I didn't even see this in the instructions but I assume you just line it up with the gear on the reduction box.
 

Capstone

Well-known member
Joined
Aug 19, 2012
Messages
111
Location
Northern VA, DC Area
MWill, good progress. It's probably too late for the extensions on your rails. It's never too late to add a magnetic torch attachment. It's pretty much a must-have IMO. Just changing consumables is a reason enough. Also, safety measures are pretty important. Also, get DropBox or use some other cloud storage service so you can work inside on designs and then come out to the table and bring up the same design for cutting. Thanks for sharing
 
Last edited:
OP
N

NWill

Well-known member
Joined
Oct 4, 2009
Messages
117
Location
Columbus, Ohio
Thanks Capstone. I have a magnetic attachment on the Velox. No worries there. My PCs are all on my home network. I can just drag and drop to a shared folder similar to Dropbox. I'll probably set up another cloud based service as well since my Dropbox is full. That way I can access them wherever if need be.

I got the pieces of gear track welded, sanded, cleaned and taped. I'm going to give them a little more time with the clamps the flip them back over and put the gantry back on. Next up is the gear track on the gantry.

My goal by the end of the day is to make something move without me pushing and making noises. We'll see.
 
OP
N

NWill

Well-known member
Joined
Oct 4, 2009
Messages
117
Location
Columbus, Ohio
Getting Y-axis gear track ready. I set the Velox on the rail and looked to see where the gear would ride. Basically tape the gear track as close to the top as you can without getting onto the round corners. I clamped a staight edge for alignment.
6d4b66a382907bf639319de2681a1e3e.jpg

I didn't think about this when I was painting. Will the adhesive stick OK to paint? I may just go ahead and hit it with a flap wheel and touch up later.
 

ovrrdrive

Well-known member
Joined
Sep 13, 2015
Messages
642
Location
Central Florida
My buddy works at a fab shop near me. I asked them for a quote on the steel and they gave me a quote for the whole thing. It was a great price so I said go ahead. I didn't want to deal with building a square frame on my driveway and I really don't have the room to do it. Plus, they ordered the steel on a Friday, cut it up on Monday, and finished it by Tuesday afternoon. I picked it up Wednesday. I'd still be trying to square up my HF bandsaw to make the first cut.

Oh you cheated!!! lol


I didn't think about this when I was painting. Will the adhesive stick OK to paint? I may just go ahead and hit it with a flap wheel and touch up later.

I stuck mine on the paint. I just degreased it with a quick acetone wipe followed up with some alcohol and stuck it on. It's pinched between the gantry and the steel so I'd be shocked if it ever moved.
 
OP
N

NWill

Well-known member
Joined
Oct 4, 2009
Messages
117
Location
Columbus, Ohio
Oh you cheated!!! lol


I stuck mine on the paint. I just degreased it with a quick acetone wipe followed up with some alcohol and stuck it on. It's pinched between the gantry and the steel so I'd be shocked if it ever moved.

:D It was a few hundred extra for them to build the frame and water table.

I ended up doing the same thing with the gear track. I don't think it's going anywhere.
 
OP
N

NWill

Well-known member
Joined
Oct 4, 2009
Messages
117
Location
Columbus, Ohio
Well its all wired up. I tested the Z first since it's not hooked up to anything. It was spinning fine. Then I hooked up the Y and it looked like it was trying to move but just stalled out. Then I went back to the Z and it's making noise but not spinning. I'll try restarting everthing..
 
OP
N

NWill

Well-known member
Joined
Oct 4, 2009
Messages
117
Location
Columbus, Ohio
I got the standard software 6.0 with THC. I couldn't justify the curve text and shape library. It was pretty damn cool but it's an extra $800 for the pro. I can always upgrade a la carte. So far I'm a fan of Flashcut. I love that's it's USB, all in one, and can run on any Windows.

When I couldn't get anything to move yesterday, all it took was a 2 minute phone call to Flashcut and I was doing dry runs.
 
To avoid these ads, REGISTER NOW!
Top Bottom