To avoid these ads, REGISTER NOW!

Another Craftsman 150 Drill Press restore

blawson327

Member
Joined
Nov 21, 2022
Messages
12
Location
PA
I stumbled upon 11b and Frank's posts and the huge amount of information on these presses a few months ago and have been looking for a press ever since! I managed to pick one up a couple weeks ago.
There were a few things missing that weren't apparent from the photos, but all in all its in good shape. Luckily, between ebay and 11b, I managed to pick up all the missing parts.

I started my tear down today, and in my excitement didn't get any complete before photos, will have to see if I can dig any up from the ad.
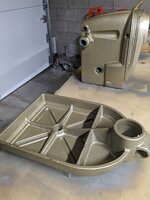
Most everything came apart as expected without any major issues or headaches. The column is still stuck in the base, but I gave it a generous dose of PB blaster to hopefully free it up.

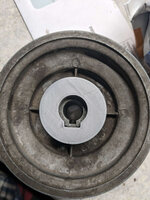
The only surprise that I ran into today is the motor pulley. I found a crack in the key slot. It doesn't go through the whole pulley, I'm hoping maybe some jb weld or similar will patch that up...not sure how I want to handle that yet though...

More to come as i go through the process


Edit: Having problems getting my photos to attach, will get them uploaded soonPXL_20230101_203044259-min.jpgPXL_20230101_203047352-min.jpgPXL_20221228_162747089-min.jpgPXL_20230101_203222008-min.jpg
pxl_20230101_203058125-min-jpg.1798636
 

Attachments

  • Screenshot_20221219-131927~2.png
    Screenshot_20221219-131927~2.png
    1.4 MB · Views: 50
  • PXL_20230101_203058125-min.jpg
    PXL_20230101_203058125-min.jpg
    571.4 KB · Views: 332
Last edited:
To avoid these ads, REGISTER NOW!

Packard V8

Well-known member
Joined
Mar 16, 2009
Messages
7,380
Location
Spokane, WA
Yes, the cracked pulley is your most important fix. Just putting JB Weld on the outside won't do much. I've reinforced them with a screw-type hose clamp, which works better than unsupported JB Weld.

My best fix, which benefits from having a lathe, but could be done by hand with some patience. I made a steel sleeve with the ID of the OD of round body of the shaft bore extension, hacksawed a slot in the sleeve to match the width of the keyway protrusion, pressed it on, turned the OD to just touch the crack in the keyway protrusion, then made another steel sleeve with that ID and pressed it on; ten times as strong and only an hour's play on the lathe.

jack vines
 
OP
B

blawson327

Member
Joined
Nov 21, 2022
Messages
12
Location
PA
jack, i thought the same thing about the jb weld not doing much good. Unfortunately I dont have a lathe to make a sleeve, but that gave me an idea. I have a 3d printer and mocked up a test sleeve using the dimensions from my pulley. No clue if this will be strong enough though.
 

Attachments

  • drill press v1.png
    drill press v1.png
    52.5 KB · Views: 31

sparkness

Well-known member
Joined
Nov 29, 2013
Messages
131
Location
Long Island, NY
I agree with Packard V8 make a couple rings press em on and use some JB Weld
 

Attachments

  • drive pulley.jpg
    drive pulley.jpg
    66.7 KB · Views: 47
OP
B

blawson327

Member
Joined
Nov 21, 2022
Messages
12
Location
PA
I was able to get the column out of the base yesterday after giving the blaster time to soak in.

For the pulley, I'll probably try and find a new one to have incase, but I went through a few iterations of the 3d printed sleeve. I got one to finally fit well enough to press on and squeeze the crack together. I'm actually pretty surprised how well it fits and how tight and strong it seems to be.

I have another one printing now cause I noticed that i didnt have all the grooves in the bottom deep enough to seat as far back as I'd like. I also set the infill % higher to hopefully give it some more strength.
 

Attachments

  • PXL_20230103_123635430 (1).jpg
    PXL_20230103_123635430 (1).jpg
    744.5 KB · Views: 50

FrankLee

Well-known member
Joined
Sep 13, 2010
Messages
3,601
Location
seMI, 48317
Very nice!
If you are still concerned about the strength of the sleeve, you could print it so it fits snugly inside a short metal sleeve... conduit, copper or similar.

What is the OD of your sleeve?
 
OP
B

blawson327

Member
Joined
Nov 21, 2022
Messages
12
Location
PA
Very nice!
If you are still concerned about the strength of the sleeve, you could print it so it fits snugly inside a short metal sleeve... conduit, copper or similar.

What is the OD of your sleeve?

Thats not a bad idea. OD is 50mm/roughly 2", but I could make that whatever I want to fit some common sized pipe at the hardware store.
 

Packard V8

Well-known member
Joined
Mar 16, 2009
Messages
7,380
Location
Spokane, WA
Many paths to the same watering hole, but 3D printing parts is one most old guys can't follow. Great idea.

As far as just buying a replacement fifty-year-old used part, maybe it's not yet cracked, but guaranteed to still be of the same weak design. Probably his repair is stronger.

jack vines
 

mrom

New member
Joined
Jan 3, 2023
Messages
3
I just acquired a very nice 150 part #103.24511. I'm missing the top cover and need to replace piece where the speed selector sets to pivot side to side. Can anyone help me find the oweners/parts manual and these parts for now?

Mark
 
To avoid these ads, REGISTER NOW!

FrankLee

Well-known member
Joined
Sep 13, 2010
Messages
3,601
Location
seMI, 48317
I just acquired a very nice 150 part #103.24511. I'm missing the top cover and need to replace piece where the speed selector sets to pivot side to side. Can anyone help me find the oweners/parts manual and these parts for now?

Mark

Welcome Mark.

Here is the owners manual. http://vintagemachinery.org/pubs/222/24404.pdf

This model did come equipped with a top cover.

I don't understand the rest of your comment. Do you have a Vari-Slo perhaps? Please provide some pictures or use the part numbers in the owners manual for further assistance.

Also, please update your profile with your general location.
 

mrom

New member
Joined
Jan 3, 2023
Messages
3
Hi Frank,
My 150 has the Vari-Slo Speed Control. The part that is broken is toward the front of the head casting between the spindle pully and front of casting. I can't seem to attach the illustration I found in 11b's posting of the 1958 Sears Fall Winter Catalog page 1479. It describes this option in section D. Have you seen a parts breakdown that shows this?
Photo attached. 16728478286894107111131908315772.jpg
 

FrankLee

Well-known member
Joined
Sep 13, 2010
Messages
3,601
Location
seMI, 48317
Ok. That makes more sense to me.

Unfortunately, it could be difficult to find just that part. Your best bet will be to have that aluminum part welded.

You can remove the entire assembly until you get a solution. The original paint on the head casting looks very good!
 
OP
B

blawson327

Member
Joined
Nov 21, 2022
Messages
12
Location
PA
Bit of progress this weekend, got the chuck disassembled and some parts soaking in simple green.
Going to take some time cycling the big parts through about 6.5 gallons.

Soaked the column in Citric acid over night and setup the redneck lathe and got the column all polished up. It's not perfect, some pitting left over toward the base, but overall looks pretty good to my eye.
 

Attachments

  • PXL_20230108_170903999.jpg
    PXL_20230108_170903999.jpg
    835.6 KB · Views: 61

y'sguy

Well-known member
Joined
May 1, 2010
Messages
1,325
Location
Tulsa, Oklahoma
Your redneck lathe looks almost the same as my make and model of my redneck lathe. It worked great albeit quite sketchy. I used 320 sandpaper on a block. I wasn't sure how much I would use this tool, but now I can't get by without it. I blame Frank Lee!
 

Attachments

  • IMG_6419.jpg
    IMG_6419.jpg
    894.3 KB · Views: 54
OP
B

blawson327

Member
Joined
Nov 21, 2022
Messages
12
Location
PA
Got a bit done throughout the past week or so.
Got the new bearings on the spindle pulley, new bearings on the quill. Greased the chuck and pressed it back together.
Did my best to polish it by spinning it in a hand drill. Figure I'll work on it some more when it's reassembled, but it looks good as is anyway.

Found some time to get the castings primed, and lucked out on some warmer weather today and got started on the paint. They are drying right now and will either go back down and flip and get the remaining sides of them tonight or tomorrow.
 

Attachments

  • PXL_20230119_232932464.jpg
    PXL_20230119_232932464.jpg
    572.8 KB · Views: 39
  • PXL_20230119_233035294 (1).jpg
    PXL_20230119_233035294 (1).jpg
    605.1 KB · Views: 44
OP
B

blawson327

Member
Joined
Nov 21, 2022
Messages
12
Location
PA
More painting done. Since I'm not very creative and I liked 11b's color scheme so much, I went with it.

I can probably begin reassembly tomorrow once the paint cures.
 

Attachments

  • PXL_20230122_160330016 (1).jpg
    PXL_20230122_160330016 (1).jpg
    670.2 KB · Views: 34
  • PXL_20230122_160327274 (1).jpg
    PXL_20230122_160327274 (1).jpg
    791.3 KB · Views: 43
OP
B

blawson327

Member
Joined
Nov 21, 2022
Messages
12
Location
PA
All together and working! I haven't torn into the motor yet cause I wanted run the drill press after rebuild.

Going to start into the motor this week.
 

Attachments

  • PXL_20230124_002332484.jpg
    PXL_20230124_002332484.jpg
    669.1 KB · Views: 30
  • PXL_20230124_002337953.jpg
    PXL_20230124_002337953.jpg
    740.4 KB · Views: 31

bugzilla46310

Well-known member
Joined
Feb 4, 2023
Messages
147
Location
Demotte, IN
Read many of the Craftsman drill posts and cannot find what specific years/model/reason for the gold drill presses vs the grey. Looking for expert feedback!
 

FrankLee

Well-known member
Joined
Sep 13, 2010
Messages
3,601
Location
seMI, 48317
King-Seeley (103), Emerson Electric (113), Packard Electric (115) and perhaps other manufactureres started using Power Bronze paint on Craftsman machines in 1956. The last reference I could find of Power Bronze paint was in the '63 catalog for a motor/belt powered grinder arbor. Not all machines in the catalogs listed paint colors.

I believe the 1957 Craftsman 100 was the first Power Bronze drill press. I'm not sure when Power Bronze ended on drill presses, but I believe King-Seeley started using the darker gray in the early '60s.
 
To avoid these ads, REGISTER NOW!
Top Bottom