I discovered this forum while searching for info on this DP before I decided to pick it up. Forum is awesome. Lots of ideas and cool tools. Serial Number on the DP is 103.24531. Curious to know when it was made. At least narrowing it down some. I don't believe that the motor is original. It runs great just lacking a belt. I'm sure I'll have other questions but for now how do I disassemble the motor to clean/paint it. It is nasty. At least 1/4 inch of grime and grease everywhere. I removed the four bolts and stopped there before I got over my head. There are rubber bushings? where it mounts to the motor plate that are pretty worn. Info on replacements? Thanks in advance

You are using an out of date browser. It may not display this or other websites correctly.
You should upgrade or use an alternative browser.
You should upgrade or use an alternative browser.
Another Craftsman 150 Series DP
- Thread starter wiwest
- Start date
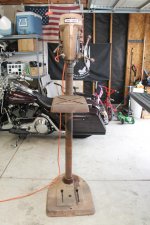


With that power bronze paint its late 50's I believe. The 150 came out around 1958, it was a 100 before that. Decent looking drill press, couple of small divots in the table. The motor is 3/4 hp, photo is fuzzy what is the RPM? The motor pulley is wrong should be a 4 sheave unit to match the spindle.
With that power bronze paint its late 50's I believe. The 150 came out around 1958, it was a 100 before that. Decent looking drill press, couple of small divots in the table. The motor is 3/4 hp, photo is fuzzy what is the RPM? The motor pulley is wrong should be a 4 sheave unit to match the spindle.
I new the spindle was wrong just from the research I did on this site.
Attachments
Welcome to GJ.
Nice pickup of crowntop Craftsman drill press.
What did you pay for it ?? Was it a CL find, garage sale, estate sale, or other??
Picked it up on craigslist. $175, not exactly the best deal from what I've read from here but it was what I wanted. I'm a weekend warrior and decide a few months back that I wanted a drill press. After looking at all the normal places for one I realized it would have to be a bench top model and probably foreign made for what I was willing to pay for one. I'm happy with what I paid though. Concerned about the lowest speed though, I know the power is there but I think the speed will be too high for metal cutting.
After seeing all the cool tools on here I'll definitely be keeping an eye out for other vintage stuff.
The motor could be original, motors were an option back then and were usually moved from machine to machine as needed. It's definitely period correct. Nice find!
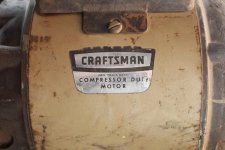
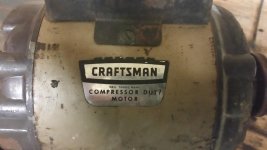
Good to know, thanks. "Compressor motor" is written on it.
Hankoh
Well-known member
Nice drill press. I ended up buying two similar Craftsman models (an 80 and a 100) on the cheap (missing parts that I am gradually finding).
Slow speeds is a problem with these - Sears made a couple of slow speed attachments which occasionally come up on eBay but can be pricey. It is also possible to fairly easily fabricate your own (a shaft mounts in the top of the post with a set of pulleys and you use two small belts). I think I have seen instructions/examples either here on GJ and/or on youtube. Also, if you have or find a 1725 rpm motor instead of a 3450 that will obviously cut the speed in half (not sure what speed motor you have now)
Motor dis-assembly is also fairly easy; once the bolts are out you have to carefully pry off the ends. They can be a bit hard to get loose; there are bearings between the shaft and the end caps. Also, one end cap has a starter switch for the starting capacitor and windings - you have to be careful with that. There are youtube videos about motor dis-assembly and cleanup also. Replacement bearings by the way are inexpensive and easily available (Graingers for example).
Enjoy the drill press!
Good to know, thanks. "Compressor motor" is written on it.
It says "compressor DUTY motor", meaning its rated for fans, pumps and compressors which require a higher torque rating than standard motors. It's not necessarily wrong for a drill press but as mentioned, it probably does have sleeve bearings instead of roller bearings that would be most optimal. The speed is correct, the pulley as you know is not.
454ragtop
Well-known member
I doubt that motor has sleeve bearings, usually seen on lower HP motors. Looks like the prior owner was trying to slow it down, hence the small motor pulley.
Jim
Jim
Another rescue of a nice 150!
If you haven't discovered www.VintageMachinery.org yet, There are tons of pictures and info.
Here is a copy of your owner's manual:
http://www.vintagemachinery.org/pubs/222/1519.pdf
I has came up on a few of my searches. I'll check it out. Thanks for the manual!
(not sure what speed motor you have now)
Motor dis-assembly is also fairly easy; once the bolts are out you have to carefully pry off the ends. They can be a bit hard to get loose; there are bearings between the shaft and the end caps. Also, one end cap has a starter switch for the starting capacitor and windings - you have to be careful with that. There are youtube videos about motor dis-assembly and cleanup also. Replacement bearings by the way are inexpensive and easily available (Graingers for example).
Enjoy the drill press!
It has a 1750 motor on it now. The "ends" you're talking about are the rubber boot looking things? Thats what I figured but i wanted to check in with you guys first. They are very worn and cracking in some areas. I'll check out youtude for sure, thanks.
After removing the pulley, before you attempt to disassemble the motor, power it up and use some sandpaper to clean the pulley shaft. 300-600 grit would be good. This will prevent the rusty shaft from marring the sleeve bearing while removing the side cover. I believe this is a single-ended shaft motor.
Be very careful when handling the motor parts during disassembly. The insulation on the internal wiring of these old motors can get very brittle. I was lucky on mine and only had one short piece of wire to replace. The black wire on the left in picture.

I started researching replacements for the motor-mount bushings but never completed. I believe Graingers has some replacements, but I'm not sure if they have this one.
How are you going to use the drill press? Wood or metal?


I'll run it with the pulley that came with it for now. So those circular motor mounts just slide off? They look like they do but they're pretty beat up. I'll see what I can dig up in the net. Any idea what they're actually called?
I the press will be used mostly for metal. I'm building a Honda CB750 bobber. Mostly for speed holes, etc.
It says "compressor DUTY motor", meaning its rated for fans, pumps and compressors which require a higher torque rating than standard motors. It's not necessarily wrong for a drill press but as mentioned, it probably does have sleeve bearings instead of roller bearings that would be most optimal. The speed is correct, the pulley as you know is not.
I'm new so why would roller bearings be better? Longer motor life?
Thanks for the help fellas, I'll post some picks on the process. I dont have an abrasive blaster yet so the stripping has mostly been dome with an abrasive wheel on an angle grinder. Question about the snap ring to get the spindle out? ANybody reccommend one that will reach it? Or some other trick to get to it.
CouchSpring
Well-known member
It's impossible to keep a sleeve bearing oiled when in the vertical
position. check out the file posted by tiggi
position. check out the file posted by tiggi
It's impossible to keep a sleeve bearing oiled when in the vertical
position. check out the file posted by tiggi
So oil by hand often?
It sounds like you are describing the spindle pulley assembly; part #72 in the exploded view in your owner's guide.
To remove it, first remove the two screws from the outside of the head frame on opposite sides of the pulley. These are parts #58.
Then, the pulley assembly should just pull out from the top. If it does not pull out easily, insert a long wooden dowel or furring strip (12"-16") into the quill opening from the bottom and tap out the pulley with a hammer.
The outer snap ring #5 can then be removed from the top side with needle nose pliers. The outer snap ring is only used to bottom-out the lower spindle pulley bearing.
The inner snap ring, #4 stays on the pulley assembly during removal.
Depending on the condition of those screws, they may not back out or the screwdriver slot may strip out. If they are the original screws, they should snap while hammering out the pulley without damaging the pulley.
My preference is to replace those slotted screws with cap screws and a liberal amount of anti-seize.
Awesome, thanks for the help. I'll give it a go this weekend.
Couple of shots so far. Done with an abrasive wheel on the angle grinder. And a bunch of steel/brass wheels on the corded hand drill. Happy so far, no idea how to clean the head unit though. Table is pretty gouged in spots.
Attachments

Your motor shows up in the 1963 catalog as a General Purpose motor and is sleeve bearing. It is rated to operate in any position. Catalog number was 99 M 19659K
Good to know, its going to get a lot of use. Thanks
Those are called motor mounting rings. Have you had any luck finding replacements yet? I tried to gently pry mine off, but gave up because I didn't want to ruin them.
I'm in the same boat. I did a couple quick searches last night but all I'm coming up with is grainger. Mine have a metal ring where they meet the mount, even if graingers were the same specs I dont think they'd work. I llok some more this weekend. If I find anything I'll be sure to post.
Hankoh
Well-known member
It has a 1750 motor on it now. The "ends" you're talking about are the rubber boot looking things? Thats what I figured but i wanted to check in with you guys first. They are very worn and cracking in some areas. I'll check out youtude for sure, thanks.
The ends I was referring to are the metal end caps of the motor that the bolts holding it together go through. One of these will have the starting switch attached to it and wires from that switch to the coils.
I'm in the same boat. I did a couple quick searches last night but all I'm coming up with is grainger. Mine have a metal ring where they meet the mount, even if graingers were the same specs I dont think they'd work. I llok some more this weekend. If I find anything I'll be sure to post.
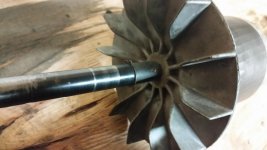
To get the motor mounts off the shaft, you'll need to remove the pulley first, then clean up the shaft real good and apply some penetrating fluid, then you'll need a bearing separator and a 2 or 3 jaw puller like pictured below.


To get the motor mounts off the shaft, you'll need to remove the pulley first, then clean up the shaft real good and apply some penetrating fluid, then you'll need a bearing separator and a 2 or 3 jaw puller like pictured below.
Is it something you would recommend doing. They are worn but fully intact. on the fence now. Pulled the quill today and although there isn't any play in them the bearings are rough. Replacements?
Alright guys I'm stuck already (I knew is was coming). I have disassembled, painted but not going to be able to pick up replacement bearings until next week. I've been attempting to reassemble the motor for the last two hours. I did not take notes or document the the washer and circlip for the shaft on both ends of the motor. Now, for the life of me, I cant figure out how its suppose to reassemble. I left the circlips on the shaft, the other pic shows what I'm working with: 2 washers with notches in them, two rubber washers and two plastic washers. According to the exploded view for sears I'm missing more washers. Everything that came of the motor was placed in a plastic bag during disassembly/cleaning. This is all that's left. The motor was smooth as butter prior to disassembly. Please help
Attachments


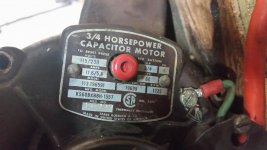
Your PM said 1/2 HP. Is this the 113.19659 3/4 hp motor?
Check this diagram for a 1HP. It has just the three parts; #5, #6, and #7:
http://vintagemachinery.org/pubs/222/1561.[/QUOTE] Sorry your right it is the 3/4 hp motor
454ragtop
Well-known member
Might ask over at OWWM.org, someone over there has probably had one of those motors apart. Any chance the problem isn't those washers/spacers, but something else like the centrifugal switch or end bell alignment?
Good luck, Jim
Good luck, Jim
Might ask over at OWWM.org, someone over there has probably had one of those motors apart. Any chance the problem isn't those washers/spacers, but something else like the centrifugal switch or end bell alignment?
Good luck, Jim
Seriously wish you would have posted this couple hours ago! It wasn't anything you mentioned but it wasnt the spacers and washers either. After splitting the ends and resoldering some of the loose wires a wire was catching/rubbing from underneath. Took it back apart and arranged the wires out of the way and boom, smooth once again. Should have took a step back an hour in and probably would have figured it out. That's how we learn right? Thanks for all the help so far! I'll post some pics a little later.
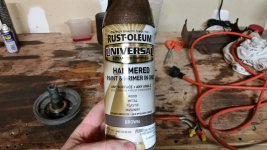
Heres a pic of the finished product. No perfect but it'll last. I'm a big fan of rustoleum. When I saw this fancy hammered style paint I jumped at it. From what I can tell it carries a bigger variety of hammered colors and the spray nozzle it a trigger type. After using it I would not recommend it though. The trigger assembly leaks like crazy and ends up being more of a mess. Stick with the regular and save a couple bucks per can. Next question what kind of contraption to I need to remove this bearing? A regular jaw puller doesn't look like it would work.
Attachments


Those pulleys are brittle so be careful. QUOTE]
I might be wrong but the way the jaw pullers work they wouldn't touch the pully correct? They grab the outside of the bearing and pull it off towards the end of the shaft.
Those pulleys are brittle so be careful. QUOTE]
I might be wrong but the way the jaw pullers work they wouldn't touch the pully correct? They grab the outside of the bearing and pull it off towards the end of the shaft.
Correct, but what I was thinking is to be careful trying to pry the bearing with a screwdrivers or something.
Correct, but what I was thinking is to be careful trying to pry the bearing with a screwdrivers or something.
I thought about it but with the fight the other one gave me I knew there was no way. They have been replaced before though because the eye holes of the snap ring have been sheared off. Good times.
bmw57isetta
Well-known member
Put the pulley in the freezer for 30-45 minutes and see if it doesn't contract enough so you can ease it off by hand. A little lube, Gibbs Penetrant or WD-40, might help too. Ditto when you install your new bearings if need be.
It's not impossible task, you just have to be creative. Do you have a welder?
Yes, Hobart 140 with gas. Ive already purchased one but id like to be able to make my own in a few sizes.
Put the pulley in the freezer for 30-45 minutes and see if it doesn't contract enough so you can ease it off by hand. A little lube, Gibbs Penetrant or WD-40, might help too. Ditto when you install your new bearings if need be.
Puller wont be here till friday so I'll give this a try for sure, thanks.