Hey guys, I've done alot of research on insulating metal buildings (carport style) but still undecided and don't want to make the wrong move and insulate wrong. So I'm building a 30x40x12 with vertical roof and most likely horizontal siding. Legs will be every 4' and will have 1 14x10 garage door on the eve end with a few windows and man door. I'm probaly going with foam board in the roof and sides. I found a supplier with 4x8 sheets of 2" EPS board with a radiant barrier on each side for 24 bucks a sheet. I also plan to ply wood or something equal to the walls and leave the ceiling insulation exposed with 1x's securing the insulation from falling. I'm located in west Tennessee, I will most definitely heat the shop in the winter while.im using the shop and may even cool in the summer. Does anyone have first hand experience with this insulation in similar climate and situation? What are your thoughts?


You are using an out of date browser. It may not display this or other websites correctly.
You should upgrade or use an alternative browser.
You should upgrade or use an alternative browser.
Another metal building insulation question..
- Thread starter blastan21
- Start date
doyle
New member
I just had a carport style shop built, has vertical wall and roof panels. It cos about $2,000 more than horizontal walls but is a much better design because it has more bracing and can with stand a higher snow load, you would be a lot more satisfied. I am going to build wooed stud walls then have it foam insulated then install plywood . Complete foam job is only going to cost $3,500
And that's foam board? Depending on the day that's basically my plan..but some days I feel richer than I actually am and I say I'm going to spray foam itI just had a carport style shop built, has vertical wall and roof panels. It cos about $2,000 more than horizontal walls but is a much better design because it has more bracing and can with stand a higher snow load, you would be a lot more satisfied. I am going to build wooed stud walls then have it foam insulated then install plywood . Complete foam job is only going to cost $3,500
OP, Not sure about your particular building but I have a 30x36 Carolina Carports garage with Vertical Roof and Walls along with two roll ups, 1 Ped door, and 6 windows. My Vertical tubing is 2.25" square and I have been looking to the same insulation you have been and was going to go with 2" but then the more reading I did the more I noticed people saying you need to have a .5" or so Air gap between the foam board and the exterior sheets as it creates a Thermal Bridge. Which will also allow any moisture that does maybe get into the walls to actually dry out instead of having the 2" insulation shoved all the way to the exterior sheeting. Now with that said technically you would still have .25" plus the ribs in the sheeting of air gab but I don't know if that would be enough. I was thinking about doing 1" thick since its almost $10 cheaper a board.
I would be interested to see what other people have to say when it comes using 2" and only having a .25" or so air gap. Would love to see some responses from people that have buildings insulated like this, since we both are in the same boat when it comes to insulating our buildings.
I would be interested to see what other people have to say when it comes using 2" and only having a .25" or so air gap. Would love to see some responses from people that have buildings insulated like this, since we both are in the same boat when it comes to insulating our buildings.
The double foil EPS is the way to go. Just confirm with the building designer you will have 48" between the post so you can tuck fit the EPS in there easily otherwise you'll be cutting it to fit. I learned this the hardway, as mine were 5ft apart so I spent alot of time cutting and taping. For plywood I ran furring strips across secured to the legs. Then screwed the plywood to that. I only went up 8ft no need to go higher. Maybe next year I'll work on getting some board up on the ceiling if the budget allows. I didn't leave an air space between the siding and EPS. No issues but there is still some airpockets from the stamping of the siding and the space between wood and EPS
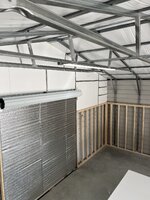
I’ve been working on my new building lately. It’s 30x50x12 with a 12’ lean to shelter. I read all I could find, both here and the internet in general. I framed the inside with 2x4 stud walls 8’ high. The plan is to run my electrical as in a stick built, saving money on conduit and making life simpler. I will cover the lower wall with horizontal OSB and a few pegboard sheets here and there. My building has 4’ spacing.
R19 Kraft faced fiberglass insulation will be installed after the wiring rough in. For the 4’ above the studded wall I think I have found a solution that fits my needs. I’m installing 2” foam board with the reflective coating towards the outside wall on the face of the metal post framework. That leaves a 2 1/4” air gap between the foam board and metal wall.
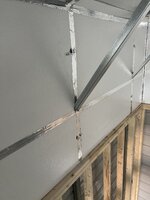
I started on the gable end on the back wall. How was I going to attach it? The bottom would sit on the top plate for my studded wall but I didn’t trust contact cement to hold it up. (I did have insulation in the roof when the builders put the building up)
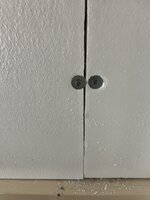
My solution was to attach the board with 3” tek screws and fender washers, sealing the seams with tape. I have pics to follow. I only used a minimal amount. After all, there is no load and they are sitting on the top plate. The spacing of the tubing was funky because of the rear roll up door. I cut the foam to be joined together at the center of the tubing. Just like sheet rocking a wooden studded wall.
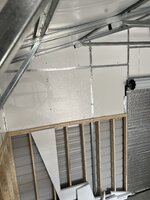
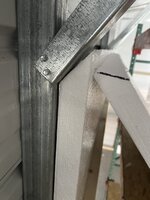
Then the supposedly simple 4’ on the sides got complicated. While looking at the angled braces against the wall I was momentarily stumped. My first thought was to remove them one or two at the time, install the 4x8 sheets horizontally and drive on. But wait! How would I fasten the after the foam board was on the surface.
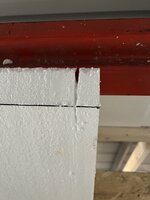
The best solution for insulating was to minimize notches, gaps and openings. A picture is worth 1000 words. I cut my 4x8 sheets into 4x4 squares. I then measured from the top of the top plate to the bottom of the brace. It measured 18”. I used a jig saw and cut the bottom 18” off at a 45 degree angle to match the angle of the braces. I sat the bottom part of the board on the top plate and put one screw at each side. For the top portion I sat the board inside the bracing next to the wall and used a kitchen knife to slot for the side of the bracing u-channel.
I‘m happy with the method. I taped the seams and added about 3” at the top to enclose the gap between the metal rafter tubing.
R19 Kraft faced fiberglass insulation will be installed after the wiring rough in. For the 4’ above the studded wall I think I have found a solution that fits my needs. I’m installing 2” foam board with the reflective coating towards the outside wall on the face of the metal post framework. That leaves a 2 1/4” air gap between the foam board and metal wall.
I started on the gable end on the back wall. How was I going to attach it? The bottom would sit on the top plate for my studded wall but I didn’t trust contact cement to hold it up. (I did have insulation in the roof when the builders put the building up)
My solution was to attach the board with 3” tek screws and fender washers, sealing the seams with tape. I have pics to follow. I only used a minimal amount. After all, there is no load and they are sitting on the top plate. The spacing of the tubing was funky because of the rear roll up door. I cut the foam to be joined together at the center of the tubing. Just like sheet rocking a wooden studded wall.
Then the supposedly simple 4’ on the sides got complicated. While looking at the angled braces against the wall I was momentarily stumped. My first thought was to remove them one or two at the time, install the 4x8 sheets horizontally and drive on. But wait! How would I fasten the after the foam board was on the surface.
The best solution for insulating was to minimize notches, gaps and openings. A picture is worth 1000 words. I cut my 4x8 sheets into 4x4 squares. I then measured from the top of the top plate to the bottom of the brace. It measured 18”. I used a jig saw and cut the bottom 18” off at a 45 degree angle to match the angle of the braces. I sat the bottom part of the board on the top plate and put one screw at each side. For the top portion I sat the board inside the bracing next to the wall and used a kitchen knife to slot for the side of the bracing u-channel.
I‘m happy with the method. I taped the seams and added about 3” at the top to enclose the gap between the metal rafter tubing.
Attachments
-
 IMG_0586.jpeg893.5 KB · Views: 42
 -
 IMG_0585.jpeg849.1 KB · Views: 43
 -
 IMG_0587.jpeg1 MB · Views: 44
 -
 IMG_0583.jpeg667.9 KB · Views: 42
 -
 IMG_0582.jpeg800.8 KB · Views: 39
 -
 IMG_0581.jpeg557 KB · Views: 40
 -
 IMG_0580.jpeg585.1 KB · Views: 37
 -
 IMG_0579.jpeg406.3 KB · Views: 36
 -
 IMG_0578.jpeg649.8 KB · Views: 35
 -
 IMG_0577.jpeg746 KB · Views: 39
Insulation and sealing fiberglass mesh has a long life and requires less maintenance and repairs. Also, this type of insulation has the ability to control humidity and can prevent the growth of fungus and decay. Insulation mesh in industrial and commercial structures can improve the performance of the structure, reduce energy costs and increase the useful life of the structure. Considering the unique features of this material, it can be said that fiberglass mesh is an excellent solution for insulation. توری فایبرگلاس عایق کاری و آب بندی