To avoid these ads, REGISTER NOW!

Another welding table build

schurtjl

Well-known member
Joined
Jan 24, 2016
Messages
147
Location
Oregon
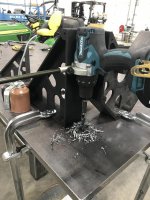
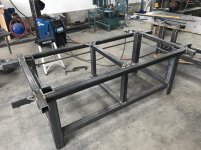
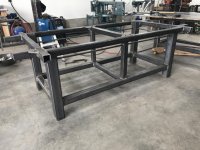
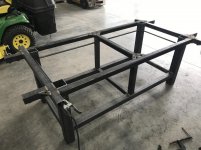
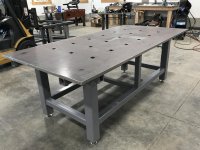
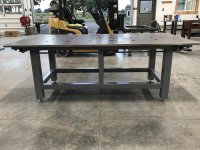
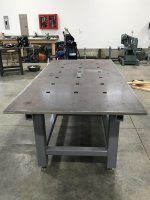
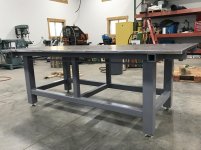
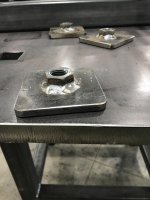
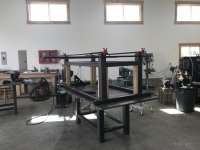
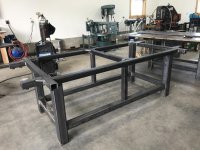
Finally got around to building a welding table. I’m slowly outfitting my shop with metal working tools, and figured it’d be good welding practice to make a few tables. Learned how to weld many years ago on the farm when I was a kid, but haven’t had a shop or welder until now. If it looks familiar, it’s because I utilized many of Dr. Clydes ideas from his tables and he was gracious enough to send me some pdf’s of the most recent table he’s building. I procured some 1” grade 50 plate from a local business that was shutting down. Enough for this 4’x8’ table, as well as a 42”x60” table, and a couple smaller ones. 4” tubing 3/16” wall for the legs, 3” tubing 3/16” wall for the lower and 2-1/2” tubing 1/4” wall for upper supports. 2-1/2” tubing 3/16” wall on the ends so I can slide in 2” tubing with a vise attached.
 

Attachments

  • 1C8EF262-7C6D-48D5-9BD2-4CBE886F5966.jpg
    1C8EF262-7C6D-48D5-9BD2-4CBE886F5966.jpg
    81.8 KB · Views: 123
  • F586B035-3BB6-478E-A378-D74400F477DA.jpg
    F586B035-3BB6-478E-A378-D74400F477DA.jpg
    77.8 KB · Views: 117
  • 9CE8717E-93F4-412D-B3C7-D7E3AA55E4BA.jpg
    9CE8717E-93F4-412D-B3C7-D7E3AA55E4BA.jpg
    152.1 KB · Views: 117
  • 54E67F3C-983C-42FA-861B-38DAF3A9E1CD.jpg
    54E67F3C-983C-42FA-861B-38DAF3A9E1CD.jpg
    129.1 KB · Views: 115
  • 05818587-0375-488E-91DA-E0D691F6AEFA.jpg
    05818587-0375-488E-91DA-E0D691F6AEFA.jpg
    150.3 KB · Views: 115
  • D3640709-9025-463D-880D-D52D02C4E16D.jpg
    D3640709-9025-463D-880D-D52D02C4E16D.jpg
    152.3 KB · Views: 126
  • CBE94691-724E-454D-A369-F1EDF9A546F9.jpg
    CBE94691-724E-454D-A369-F1EDF9A546F9.jpg
    150.9 KB · Views: 125
Last edited:
To avoid these ads, REGISTER NOW!
OP
S

schurtjl

Well-known member
Joined
Jan 24, 2016
Messages
147
Location
Oregon
Utilized the 1” plate for a flat surface to build the frame on. Used 3/4” rod for clamp hangers. Drilled and tapped 8 holes in the plate that’ll be used to secure the plate to the frame. No mag drill yet, so I used a couple Fireball jigs to guide my drill straight. Will shim as needed to level it out. Used the 3/4”-10 leveling feet from McMaster Carr (yet another thing poached from Dr. Clyde).
 

Attachments

  • B546A7D2-1588-4F9F-BCC1-9B9408155786.jpg
    B546A7D2-1588-4F9F-BCC1-9B9408155786.jpg
    115 KB · Views: 113
  • 81530F2E-7149-48D3-8659-76231E76DA0C.jpg
    81530F2E-7149-48D3-8659-76231E76DA0C.jpg
    154.1 KB · Views: 83
  • F2C10926-A5FB-4B22-AAE4-FCFC51603115.jpg
    F2C10926-A5FB-4B22-AAE4-FCFC51603115.jpg
    151.7 KB · Views: 85
  • 56294AD7-E342-4818-84E8-6DB43C06953B.jpg
    56294AD7-E342-4818-84E8-6DB43C06953B.jpg
    149.9 KB · Views: 90
OP
S

schurtjl

Well-known member
Joined
Jan 24, 2016
Messages
147
Location
Oregon
Primed with spray can Rustoleum primer, then top coated with spray can Rustoleum Machine grey.
 

Attachments

  • BB591E9F-E119-4CEA-BF67-76E071D500D5.jpg
    BB591E9F-E119-4CEA-BF67-76E071D500D5.jpg
    155.4 KB · Views: 73
  • C2EB5ACA-2E8C-4C90-B7A1-CB5E6B0010B4.jpg
    C2EB5ACA-2E8C-4C90-B7A1-CB5E6B0010B4.jpg
    158.1 KB · Views: 67
OP
S

schurtjl

Well-known member
Joined
Jan 24, 2016
Messages
147
Location
Oregon
Used the forklift and a chain through several of the holes in the plate, and gently set it on top of the frame. Luckily all the holes lined up, so it was secured with 5/8”-11 bolts. I have some expanded metal that at some point I’ll probably place on the lower frame.
 

Attachments

  • 6BA26B2C-E3AC-4272-A61E-AF9A653BF1E6.jpg
    6BA26B2C-E3AC-4272-A61E-AF9A653BF1E6.jpg
    150.1 KB · Views: 146
  • B3EB5748-C7A8-4D4B-AFFB-8A3A54920335.jpg
    B3EB5748-C7A8-4D4B-AFFB-8A3A54920335.jpg
    153.1 KB · Views: 104
  • D360EAC6-579A-4CB7-B6D2-1CDC12FFCF84.jpg
    D360EAC6-579A-4CB7-B6D2-1CDC12FFCF84.jpg
    84.8 KB · Views: 106
  • F4F0579F-33EB-45AB-B554-532AAF73D722.jpg
    F4F0579F-33EB-45AB-B554-532AAF73D722.jpg
    149.2 KB · Views: 108
Last edited:

matt_i

Well-known member
Joined
Mar 14, 2008
Messages
10,722
Location
SE Michigan
Great stuff, are the square holes something you had added or were they part of its "previous life"?

The forklift makes life so much easier when wrestling with heavy parts :cool:
 
OP
S

schurtjl

Well-known member
Joined
Jan 24, 2016
Messages
147
Location
Oregon
Great stuff, are the square holes something you had added or were they part of its "previous life"?

The forklift makes life so much easier when wrestling with heavy parts :cool:

The square holes were plasma cut on a 1’ grid. Another Dr. Clyde idea I borrowed. The square holes are the same size as holes on a platen table, so platen clamps can be used. My Stronghand 12.5” utility clamps work great with these holes as well.

I originally bought the forklift with the intention of flipping it after I used it to install the metal ceiling. Now I’m not sure how I could get by without it. I use it constantly.
 
To avoid these ads, REGISTER NOW!

icecactus

Well-known member
Joined
May 17, 2011
Messages
302
Looks great!

Why are your fireball squares black? Did you coat them with something?
 
To avoid these ads, REGISTER NOW!
Top Bottom