To avoid these ads, REGISTER NOW!

(Another) Wilton Vise Restoration Thread

WarrenP

Well-known member
Joined
Jul 8, 2013
Messages
50
Location
Toledo, OH
I've read a number of Wilton vise restoration threads, and I figure it's time to start mine. Not least because I seem to have encountered a fairly unique problem.

First the story:

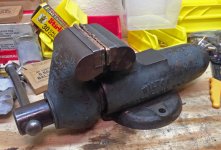
I spotted this 4" Wilton Bullet a couple weeks ago at the local antique mall. Balked a little at the $125 price tag, mostly because I didn't grasp just how amazing these vises are at the time. But it's been haunting me ever since.

And since becoming an avid reader of GJ, it's only been gnawing at me harder. Today I finally broke down and snagged it after work.

So far I've degreased it and cleaned it up a bit. All in all its cosmetic shape isn't so bad, but I definitely want to do a full restoration on it and make it something to be proud of.

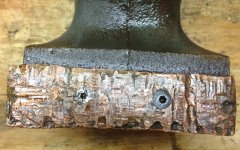
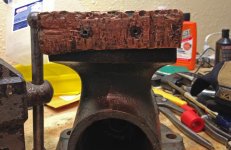
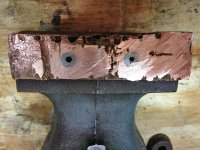
The only real negative is the shape the copper jaws are in, and here we come to my "unique" problem. You see, the hex bolts affixing the jaws to the vise itself have copper peened around and partially into them. Just as a quick test I tried to loosen one of them which only served to start twisting my (QUALITY!) Chinese-made Dewalt-branded 1/4" hex bit.

It is here that I start asking for your help, indulgent GJ readers. How in blazes do I get these jaws off?
 

Attachments

  • wilton-vise-on-tailgate.jpg
    wilton-vise-on-tailgate.jpg
    109.6 KB · Views: 73
  • wilton-vise-cleaned-up.jpg
    wilton-vise-cleaned-up.jpg
    102.5 KB · Views: 64
  • wilton-vise-jaws.jpg
    wilton-vise-jaws.jpg
    58.2 KB · Views: 74
  • wilton-vise-jaw-detail.jpg
    wilton-vise-jaw-detail.jpg
    104.8 KB · Views: 89
To avoid these ads, REGISTER NOW!

Duct Tape Man

Well-known member
Joined
Jul 13, 2013
Messages
994
Location
Shenandoah Valley, VA
Get a sanding attachment for your hand drill, or an air sander if you have a compressor and air line. Sand down the face of the copper until the faces of the screws are unobstructed. Then remove with an Allen bit, as you would normally.
 
OP
W

WarrenP

Well-known member
Joined
Jul 8, 2013
Messages
50
Location
Toledo, OH
I was hoping it would be something like that, rather than going straight to drilling out the screws, etc.

I'm guessing an angle grinder should work just as well?
 

KMScott

Well-known member
Joined
Feb 14, 2012
Messages
4,643
Location
Daufuskie Island, South Carolina
Those socket head screws look like flat heads, that means they are set in the copper pretty good. It might help after you disk sand down some of the copper then use a die grinder with a ball carbide burr and relieve some copper from the sides. Taking a punch the size of the screw head, and give a pretty heavy tap and that should relive the copper behind the screw head just a bit, then the screws should come out pretty easy. Do not use heat, copper expands more then the steel screws. Should not be to difficult to pull them jaws off. Looks like a 1/4 copper plate bolted to the original jaws. Let us know you did.
 
OP
W

WarrenP

Well-known member
Joined
Jul 8, 2013
Messages
50
Location
Toledo, OH
I don't have a die grinder. Would a Dremel with a carbide head plus some patience work to relieve the copper?
 
OP
W

WarrenP

Well-known member
Joined
Jul 8, 2013
Messages
50
Location
Toledo, OH
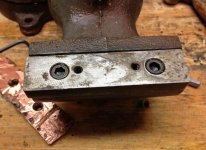
I also see what you mean now about the copper being bolted on to the original jaws. The screw heads are a little too far inboard to be factory, and they don't appear to be evenly spaced from the center.

Maybe the original jaws are still semi-usable.
 

KMScott

Well-known member
Joined
Feb 14, 2012
Messages
4,643
Location
Daufuskie Island, South Carolina
If you are interested in new jaws for your Wilton, I'd look here http://wiltonviseparts.net/
Great prices, great quality, made by a true craftsman.
She's gonna be a beauty!

Zoom

I don't have a die grinder. Would a Dremel with a carbide head plus some patience work to relieve the copper?

WarrenP, Yes a Dremel would work perfect, keep coolant on the burr so the copper does not load up and Zoomie you are to kind, Your custom American jaws are almost ready for serrations.
 
To avoid these ads, REGISTER NOW!
OP
W

WarrenP

Well-known member
Joined
Jul 8, 2013
Messages
50
Location
Toledo, OH
Thanks!

From a little research I'm gathering that beeswax would work as a coolant, and that a HSS bit will work fine for copper (rather than carbide). Does that sound right?
 

KMScott

Well-known member
Joined
Feb 14, 2012
Messages
4,643
Location
Daufuskie Island, South Carolina
Any burr you have would work if it is sharp, I spread a coat of tap oil with a small chip brush on non ferrous metal when I use burrs, seems to work for me. All my burrs are carbide. Bees wax would work to.
 
OP
W

WarrenP

Well-known member
Joined
Jul 8, 2013
Messages
50
Location
Toledo, OH
I'll be buying the burr and coolant today since I have neither right now. I'll probably go with cutting oil since I'll have other uses for it anyway.
 
OP
W

WarrenP

Well-known member
Joined
Jul 8, 2013
Messages
50
Location
Toledo, OH
Furthermore I'm reading that WD-40 works as a cutting lube for copper. Do you see any problems going that route?
 
OP
W

WarrenP

Well-known member
Joined
Jul 8, 2013
Messages
50
Location
Toledo, OH
Day 2

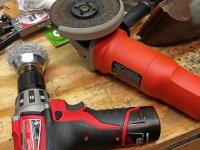
I went to work with my new angle grinder today, and also learned that a wire cup brush on a drill is next to useless.

With only a little grinding I was able to remove enough copper to get past the peened over bits and expose the full perimeter of the screws. I did a little relief work with the Dremel, but don't think it made any difference.

After a few taps with a punch on the screw as KMScott suggested, the first screw came loose.

The second screw's hole was pretty deformed, which took some work with the Dremel to clean up enough to get the allen wrench in with some help from my hammer. Once that was done, it too came out with little trouble.

Next is Round 2 with the other jaw, and after today's success I'm feeling confident that it'll go smoothly.

I also decided to stop screwing around and buy a couple weeks' supply of WD40. :lol_hitti

KMScott, your advice was invaluable. Thanks a ton for all your help! :beer:
 

Attachments

  • vise-round2.jpg
    vise-round2.jpg
    69.9 KB · Views: 23
  • vise-jaw-exposed.jpg
    vise-jaw-exposed.jpg
    76.6 KB · Views: 33
  • vise-jaw-screw1-loose.jpg
    vise-jaw-screw1-loose.jpg
    77.2 KB · Views: 26
  • vise-jaw-after-grinding.jpg
    vise-jaw-after-grinding.jpg
    89.8 KB · Views: 32
  • getting-serious.jpg
    getting-serious.jpg
    90.2 KB · Views: 17
  • wd40.jpg
    wd40.jpg
    92.2 KB · Views: 20
OP
W

WarrenP

Well-known member
Joined
Jul 8, 2013
Messages
50
Location
Toledo, OH
Yeah, it looks practically untouched. The only problem is it's too thin for the vise, only about 7/16ths thick. The iron on the dynamic jaw protrudes underneath it a bit.
 
To avoid these ads, REGISTER NOW!
Top Bottom