To avoid these ads, REGISTER NOW!

Another Wolverine Floor

Brickout

Well-known member
Joined
Feb 15, 2008
Messages
82
Location
Chicago Area
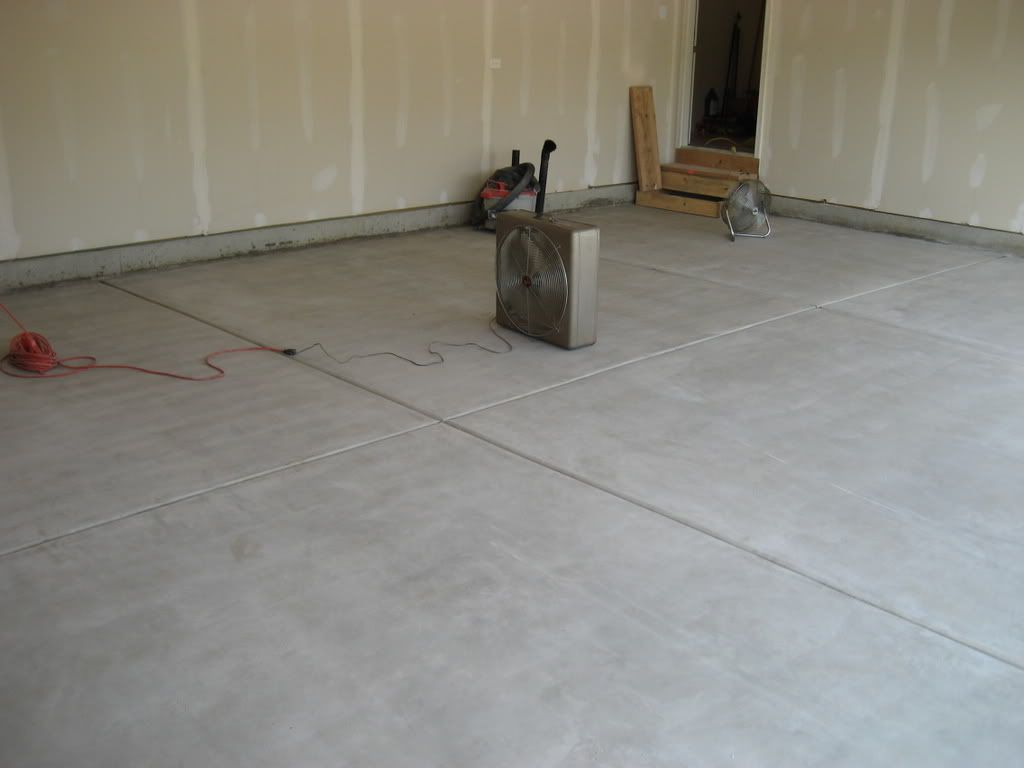
So I’m getting ready to coat my garage floor. It’s new construction, 90 days old, never been driven or parked on. We just closed on the house last week. My plan the whole time was to coat the floor before we moved in. You can see the build thread here.

After all of my research (thanks to Garage Journal) I decided to go with Wolverine coatings. Everyone that I’ve seen put Wolverine in their garage / shop has had fantastic results.

I decided to go with the Wolverine recommended heavy-duty coat for shops. I really wanted this floor to last and I wanted to do it right the first time.

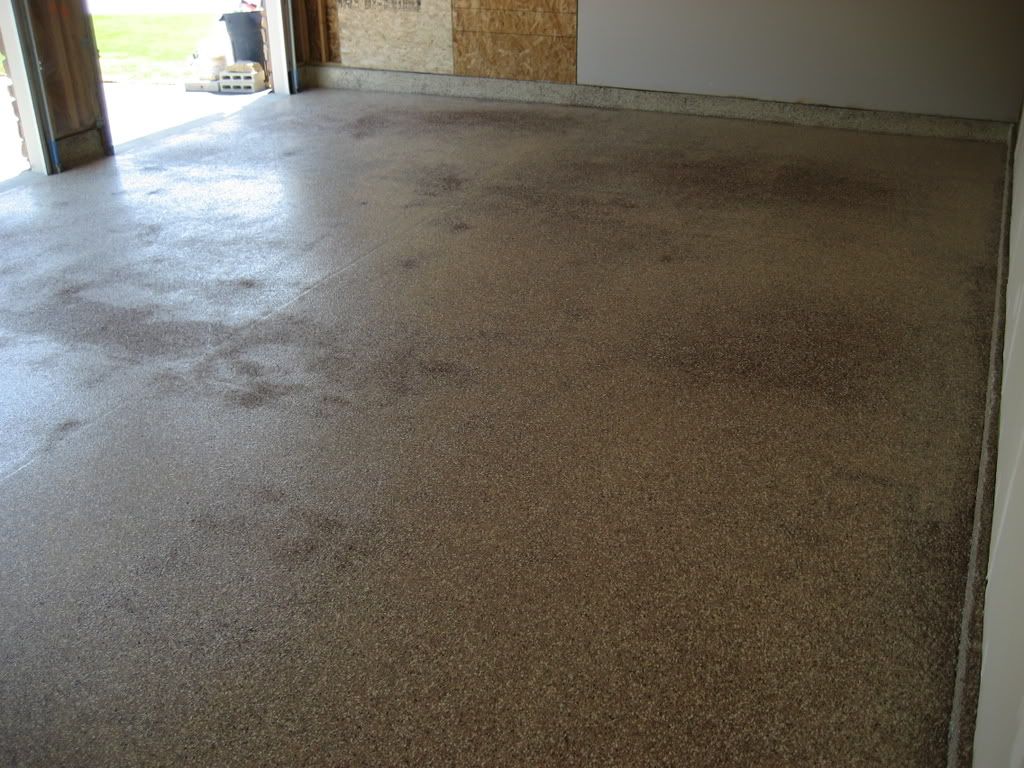
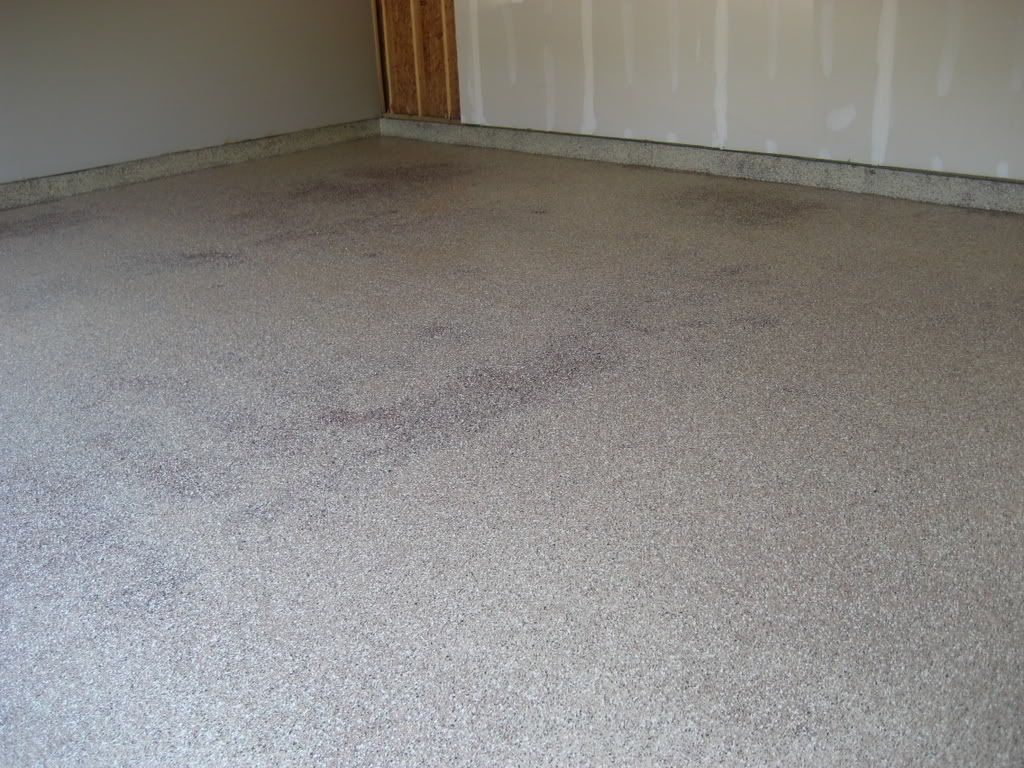
For the look I wanted something that matched the colors of the house. The base coat is sand beige. The color chips are a custom mix of cocoa, island tan, rust, butter cream and black. Hopefully it will look like this when it’s done.

floorsample.jpg


Size of garage: 30 x 20 - 600 Sq. Ft.
Expansion joint filler: IntegraFlex 1921 -1 gallon kit
Primer: BondTite 1101; 5 mil thick, 2.25 Gal.
Body coat: Liqua Tile 1184v; 12 mil thick, 4.5 Gal.
Color flakes: medium coverage; 0.075 Lbs per Sq. Ft. (45 Lbs.)
Clear coat: BondTite 1101; 5 mil thick, 2.25 Gal.

So started breaking down the numbers so I got my mixing ratios right. I’m planning on coating the floor in sections. Not sure if I should do it in 6, 4 or 3 sections. Take a look at the numbers and let me know what you think or if you see any mistakes.

Primer: BondTite 1101; 5 mil thick
2.25 Gal. = 288 oz.

Sections / 2 - Parts A (resin) / 1 Part B (Hardener)
6 = 48 oz. - 32 oz -16 oz
4 = 72 oz - 48 oz - 24 oz
3 = 96 oz - 64 oz - 32 oz

Body coat: Liqua Tile 1184v; 12 mil thick
4.5 Gal. = 576 oz.

Sections / 2 Parts A (resin) / 1 Part B (Hardener)
6 = 96 oz. - 64 oz - 32 oz
4 = 144 oz - 96 oz - 48 oz
3 = 192 oz - 128 oz - 64 oz

Color flakes: medium coverage
0.075 Lbs per Sq. Ft. (45 Lbs.)

Sections / Lbs. per section
6 / 7.5
4 / 11.25
3 / 15

Clear coat: BondTite 1101; 5 mil thick, 2.25 Gal.
Numbers are the same as the primer coat.
 
Last edited:
To avoid these ads, REGISTER NOW!
OP
B

Brickout

Well-known member
Joined
Feb 15, 2008
Messages
82
Location
Chicago Area
The schedule:
Saturday – Clean floor, surface grind, power wash.
I picked up some ZEP Driveway, Concrete & Masonry Cleaner Concentrate to clean the floor with. I’ll mix as directed, apply with a mop, scrub with a broom and rinse.

I found a place right down the street from the house that rents a walk behind concrete grinder for $60 a day plus $51 for the stones.

Finally, power-wash everything and let it dry.

Sunday – Fill expansion joints with IntegraFlex then BondTite primer coat (if everything is dry)
Monday – LiquaTile body coat and flakes.
Tuesday - BondTite clear coat

I’m hoping I can rope my Dad into helping me with the project. I figure if we take turns mixing and spreading it should go pretty fast.
 
Last edited:

tojan19

Well-known member
Joined
Jul 14, 2008
Messages
67
Let us know how the floor grinder and stones go. I heard from a few people on here to go with the diamond wheel and not stones. The 10" diamond wheel is crazy expensive. I'm looking to get a 7" angle grinder, dust hood, and a diamond wheel and do it by hand.

I'm doing a similar sized job (560sf). I only got 20# of flakes but thought from the pics on the Wolverine site that it would be heavier coverage than your pic. I was thinking of doing mine in 4 sections. I can only do half the garage a weekend since I have no place for my tools. I was wondering if it would be better to toss say 110-120% of the flakes on the first half since not all will stick and could be swept up and re used.
 
OP
B

Brickout

Well-known member
Joined
Feb 15, 2008
Messages
82
Location
Chicago Area
Yeah, the diamond route will kill the budget. So hopefully this will work.

Tools for the job:
Drill (for mixing)
Extension cords
Fans (to speed up drying)
Garden hose and nozzle
Mixers (3)
Buckets
Plastic cups
Measuring pails
Plastic drop cloth
Tape – duct and masking
Broom
Dust pan & hand broom
Hand grinder
Rollers
Roller extension pole
Roller pan
Brushes
Notched squeegee(s)
Scrapers
Disposable gloves
Floor squeegee
Spiked shoes
Shop-vac
Knee pads
Power-washer
Safty equipment – eyes, ears, nose/mouth
Tape measure
Calculator
Scale
Spatulas – cheap ones from dollar store
Paper shop towels
MEK
Garbage can


Am I missing anything?
 
OP
B

Brickout

Well-known member
Joined
Feb 15, 2008
Messages
82
Location
Chicago Area
I'm doing a similar sized job (560sf). I only got 20# of flakes but thought from the pics on the Wolverine site that it would be heavier coverage than your pic. I was thinking of doing mine in 4 sections. I can only do half the garage a weekend since I have no place for my tools. I was wondering if it would be better to toss say 110-120% of the flakes on the first half since not all will stick and could be swept up and re used.

20# / 560 Sq.Ft. = 0.0357 Lbs./Sq Ft

According to Wolverine that's a little below light coverage.
 

UnSub45

Active member
Joined
Feb 5, 2007
Messages
37
I rented an edco grinder with the stones and it did not do the job. I was in the same boat as you. I could not find a place to rent an edco with the diamonds, they all wanted you to buy them at $600+. I ended up having to buy the scarifier inserts for the edco and go over the floor a 2nd time. Those did the job but it took about 4 -5 hours to 500 sq ft.

Pass on the stones and keep looking for a place that rents the grinder with diamonds. I eventually came across a place that would have rented me the unit with the diamonds for less then I paid to rent the unit and buy the scarifiers.

I also did a Wolverine floor and I am very happy with the way it came out.
 

04 Navi

Well-known member
Joined
Jul 13, 2005
Messages
269
Location
PNW
600 sq. ft and you are going to do it in sections? Why? If you have a helper, they can cut in the corners while you do the main section. Sections to me, means stopping in between and I don't think that is a good idea.

Go for it, and if you can get two other people to help, then one can mix, the other cut it in and you spread. When the cutting in is done that person can then be a "floater" and help where needed.

For what it's worth, we (my wife and I) did not use sections, other than to gauge our usage, and just went for it. 1500 sq ft.

One other thing, the more you try to split up the product, the more chance you have of getting a bad mix, due to material sticking to the cans, etc, so try to mix full amounts.
 
OP
B

Brickout

Well-known member
Joined
Feb 15, 2008
Messages
82
Location
Chicago Area
Sound advice from everyone so far, thanks! :thumbup:

Looks like I'll be putting down the primer coat by myself on Sunday. I think I'll split it into four sections so I'm not trying to work with so much material at once.

Monday and Tuesday my Dad offered to help. So I'll split it in two, he'll mix and I'll apply.
 
OP
B

Brickout

Well-known member
Joined
Feb 15, 2008
Messages
82
Location
Chicago Area
For those of you shopping for paint rollers; check out www.thepaintstore.com. I tried to buy the 18" rollers and frame locally, it was far more expensive. Even with priority mail shipping it was still cheaper to order it on-line. Also, check out the paint mixers too.
 

Steve in Mi

Well-known member
Joined
Mar 13, 2007
Messages
1,042
Location
Mid Michigan
Seriously, is it even remotely possible to wash any concrete floor one day and apply sealer & primer the next?

Maybe you have a week or two between your Sat. and Sunday.
 
Last edited:
OP
B

Brickout

Well-known member
Joined
Feb 15, 2008
Messages
82
Location
Chicago Area
Seriously, is it even remotely possible to wash any concrete floor one day and apply sealer & primer the next?

Maybe you have a week or two between your Sat. and Sunday.

I know I'm being aggressive in my plan, but if it's dry it's going down. I figure if I clean and grind on Sat morning then wait till later in the day Sunday to prime I should be ok. I could also put it off till Monday as well, but that's it. We go on vacation on the 28th and move in on the 12th. In between is packing and such. So hopefully luck will be on my side.

Good news though, I found a place that rents the grinder with diamond inserts. $75 a day for the machine and $100 for the diamond inserts. Thanks guys for recommending that I keep looking.
 

AlphaGarage

Well-known member
Joined
Apr 16, 2008
Messages
1,298
Location
Every Garage, AnyTown, USA
The floor should not have any standing water and should be somewhat dry, but it does not need to be bone dry for the primer coat of BondTite 1101.

What squeegees do you have, and what notch sizes are they?

I'm partial to duct tape, although actually I like high quality Gaffers tape. Either way be certain to remove it while the epoxy is still a bit on the wet side of the equation. If it's too cured you might have trouble cleanly removing the tape.

Go over the instructions a time or two before you begin. Also before you begin, assemble all your materials need for the coating you're about to do. Have plenty of roller covers ready, use a piece of duct tape to pat the rollers and remove any loose fibers before you begin. Also put down some cardboard or drop cloth in your prep area so you're not tracking epoxy onto areas where you don't want it. Try keep the prep area, and all epoxy, out of direct sunlight. Keeping it all cool will extend the pot life. Have some MEK and rags handy in case of a spill.

If you're unfamiliar with the product it's probably a good idea to not mix a full 3 gallon kit for the first time, but I think you'll find that for most situations mixing just enough material for 125 sq ft sections is tedious and unnecessary. If you have a lot of cut-in or tricky perimeter to coat, small batches may be unavoidable, but otherwise small batches increase the odds of a mixing mistake since it's easy to measure incorrectly. Once you're past that first mix most people feel comfortable mixing larger quantities. And there's no doubt that mixing full batches (either 3 quart or 3 gallon kits) greatly decrease the chances of mixing improper amounts, which is one of the main mistakes made.

Whatever size batch you mix, be sure to thoroughly combine the two parts with a proper mixing paddle attached to a drill, do not use too high a speed or allow the paddle up out of the epoxy, you want to avoid mixing any air into the epoxy as that might result in bubbles in the mix.

In your case you have 2 x 3 quart kits and 1 x 3 gallon kit of the BondTite 1101. For the primer coat I'd divide your 600 sqft into 3 x 200 sqft area and use 3 qt mixed for each section.

First open the 3 gallon cans and carefully measure out 2 quarts of the part A resin and 1 quart of the part B hardener from the 3 gallon kit containers. Then put the lids on those cans and put them away for later use on the top coat. This way you'll do the pre-measuring first without any time pressures or other distractions. When you're ready to coat the first 200 sqft section mix those 2 qts part A & 1 qt Part B per instructions. As soon as it's thoroughly mixed pour it all out in a ribbon pattern on the section. DO NOT take the mixing container and set it upside down on the floor to drain out the last drop, often the material on the sides and bottom of the mixing container aren't completely mixed and they will not properly cure! Once the ribbon is poured, start to back roll. As soon as the material on a roller cover starts to stiffen, replace with a fresh roller.

Take your other 3 qt kits and do sec. 2 and then sec. 3.

By the time the primer coat is cured enough for you to walk on it without leaving an impression you're ready to recoat with the LiquaTile 1184. This coating goes on thicker, and has the added bonus of DecoFlakes. In your case I'd stick with the 3 x 200 sq ft areas. The DecoFlakes need to be broadcast as soon as the LiquaTile is applied, so divvy up the stash into 3 equal portions beforehand. It's also a good idea to try a few practice hands before the real thing.

BTW - We've just been able to significantly reduce the price of our DecoFlakes.

For the first section mix up both 3 qt kits, pour out the ribbon pattern, and backroll. As soon as your down rolling it all out over the section, broadcast those DecoFlakes. Keeping in mind that the primer coat is usually the most difficult coat, it's my guess that by this point you'll have the hang of the Wolverine epoxy and how easy and well it rolls out, so although you could mix half of the remaining 3 gallon kit, you'll probably find it easier to mix up the entire 3 gallon kit and do both remaining sections at one whack. And again, broadcast those DecoFlakes.

Wait for the LiquaTile to tack up enough that you can walk on it, then go over the area and scrape of any DecoFlakes that aren't lying flat. Sweep 'em up good.

Finally, mix the remaining BondTite 1101 (should have 1.5 gallons of resin, and .75 gallons of hardener available to mix) and lay down the clear top coat. Measure out and mix what you feel comfortable with, but I wouldn't be surprised if you did the entire coat in just 2 sections, or even all at once.
 
Last edited:
To avoid these ads, REGISTER NOW!
OP
B

Brickout

Well-known member
Joined
Feb 15, 2008
Messages
82
Location
Chicago Area
Fred, as usual...you're a fountain of information. Thanks for all your help so far.

I'm pretty sure I'm going to split the floor in three sections, just to be on the safe side.
 

drivinhard

Well-known member
Joined
Sep 9, 2007
Messages
98
Location
Braselton, GA
For the first section mix up both 3 qt kits, pour out the ribbon pattern, and backroll. As soon as your down rolling it all out over the section, broadcast those DecoFlakes....you'll probably find it easier to mix up the entire 3 gallon kit and do both remaining sections at one whack. And again, broadcast those DecoFlakes.

So you are saying when doing the main coat, and you have it broken up into sections, to lay down the main coat in a section, then broadcast that section w/ flakes, before moving on to laying down another section of main coat?

I was under the impression you'd roll the whole thing out, then throw the flakes (I realize you have to do it while it's wet).
 

Dave88LX

Well-known member
Joined
Nov 25, 2006
Messages
664
Location
York, PA
That's how I did it. I did the LiquaTile into 3 large 3-gallon sections. I divided my flakes up into 15 bags, and marked out a 3 x 5 grid on the walls, and used one full baggy of flake per each of the 15 sections to get the closest to even coverage I could get. Make sure you get spiked shoes, and walk around while you are spreading flakes, don't try and do it from one spot.
 

AlphaGarage

Well-known member
Joined
Apr 16, 2008
Messages
1,298
Location
Every Garage, AnyTown, USA
So you are saying when doing the main coat, and you have it broken up into sections, to lay down the main coat in a section, then broadcast that section w/ flakes, before moving on to laying down another section of main coat?

I was under the impression you'd roll the whole thing out, then throw the flakes (I realize you have to do it while it's wet).

Sorry I missed this question earlier...

Yes, if you are coating in sections then you want to broadcast in sections also. You need to get those flakes down as soon as you finish rolling out the epoxy.

The DecoFlakes don't just sit on top of the coating, the wet epoxy sort of "*****" them down a little. As the epoxy cures the DecoFlakes are sucked down less and less.

If you coat one section, then coat another, and go back to broadcast flakes there's a chance that the DecoFlakes will not be "sucked down" evenly, and that might be noticeable after it all cures.

As long as you maintain a 'wet edge' where the sections **** together, and broadcast flakes evenly as you go, the finished look should be seamless.
 
Last edited:
OP
B

Brickout

Well-known member
Joined
Feb 15, 2008
Messages
82
Location
Chicago Area
Some pic's.

Better late than never....

The grinder
0823081110.jpg

0823081110a.jpg


Post grind and power wash
0823081554.jpg

0823081554a.jpg

0823081554b.jpg

Garage005.jpg

Garage004.jpg

Garage003.jpg

Garage002.jpg

Garage001.jpg


The work area with all the materials set out.
Garage007.jpg

Garage006.jpg


Joints with integraflex
Garage009.jpg

Garage008.jpg


Inegraflex and first coat of BondTite
Garage012.jpg

Garage011.jpg

Garage010.jpg


Putting down the LiquaTile
Garage016.jpg

Garage015.jpg

Garage014.jpg

Garage013.jpg


Flakes pre scrape
Garage019.jpg

Garage021.jpg

Garage018.jpg

Garage017.jpg


Finished floor
Garage024.jpg

Garage023.jpg

Garage020.jpg
 

roger55

Well-known member
Joined
Mar 19, 2006
Messages
595
Location
Fort Collins, CO
Great pics!

I would be interested in a summation of your project as far as if it went exactly as expected or not and what advice you would give to someone contemplating doing their floor with Wolverine.
 

AlphaGarage

Well-known member
Joined
Apr 16, 2008
Messages
1,298
Location
Every Garage, AnyTown, USA
The finished floor looks pretty sharp - well worth the wait!

(BTW - Shelf life is stated as 12 months)

If you've got a large floor - those 18" rollers are the way to go. Not all stores carry them, but they're worth hunting down.

Nice pics!
 
To avoid these ads, REGISTER NOW!
Top Bottom