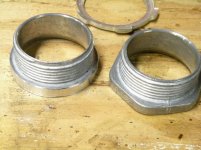
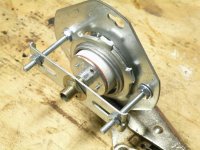
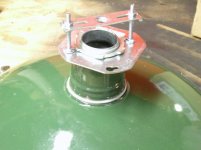
It ain't rocket science, but I thought some of you might like to see how I resurrected some old industrial light shades to be new-old lights for my '20s garage. I used off-the-shelf parts from HD, but with some adaptation. A 1 1/2" ferrule was just right to fit through the top opening, but the hex was too big to fit in deep enough to let the threads protrude. My cheapie lathe made short work of the aluminum fittings, cutting down to a cylinder and then turning a taper above it. No great precision required; I just eyeballed it. A locknut holds the shade onto a standard 4" octagon box cover through a 2" hole cut with a hole saw. A flat fixture bracket mounted on two 10-32 x 2 machine screws allows the depth of the socket in the shade to be adjusted. I wanted truss head screws, but settled for flatheads, then had to do the extra step of countersinking. The sockets are really great for this. They're porcelain and mount on the standard 1/8" IP threaded tubes you so often find in light fixtures. The backs are closed, so the connections are protected from the elements (and those pesky insects). And, they're very sturdy. I had to bend the tips of the fixture brackets down at the ends so they'd fit inside the octagon boxes. Normally, they would attach to the cover screws. I used 2 1/8" deep boxes to allow lots of socket depth adjustment. Putting it all together, I was able to put 23W CFL's in deep enough to get them above the rim, so the light isn't shining right in your eyes from across the room. The 44W CFL's I had wouldn't go that deep, but I found some others that have smaller diameter ballasts, and will go an additional 2" or so. I'm going to put 100W metal halides in four of them where I need a LOT of light; waiting on bulbs and ballasts now. So far, I'm really pleased - a big improvement over bare bulbs!

You are using an out of date browser. It may not display this or other websites correctly.
You should upgrade or use an alternative browser.
You should upgrade or use an alternative browser.
Antique Lights Live Again!
- Thread starter BFBOB
- Start date


Falcon67
Well-known member
Excellent trick. I'll remember that if I run across another shade. I got lucky and hit a complete one on eBay in great condition for $60. Your hack could put a lot of individual shades back to good use.
TejasBimmer
Well-known member
Very cool!
skyking
Well-known member
Tell us about that old building and bench.
Nice work on the light.
Duker
Well-known member
I love the vintage shop and that was a creative idea!
ddawg16
Well-known member
Tell us about that old building and bench.
Like.....Yea............
And nice job on those lights.....can you post a close up view?
I would also suggest using a hosting site for you pics....it's actually easier than uploading them to GJ....
Basically, you upload your pics to a hosting site like Photobucket. Once it's there, they have a quick link that references your photo....you paste that in your message....and the photo shows up full size so us old farts don't have to squint...
One of the other advantages is that you can also reference the photo in other posts real easy.
Here's a couple more pix. Photo hosting - just what I need, another username and password to deal with. On my screen, the photos show up about 8 1/2x11 - fill most of the screen. Uhhh... you do know to click on the small pix, riiiight?
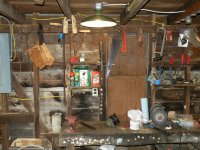
Anyway, the garage is nothing special, just a '20s outbuilding, stick built with oak sawn on the place and sided and roofed in galvanized steel. It's about 20 x 20, so six of these fixtures light it up nicely. The ceiling and rafters are so dark probably half the light never reached the floor or workbench before. As you can see, I mounted the boxes to the attic floor rather than be rafters because it's so low. The rafter bottoms are less than 7' off the floor.
I dislike the new wiring because it's so conspicuous. I'm going to paint the boxes dark green to go with the lights, and I'm seriously considering painting the wire dark brown. Would have been easier before installation, but I didn't realize how sore-thumb it would be.
Anyone know of a paint that won't turn into a gooey mess on PVC?
Attachments


ddawg16
Well-known member
Here's a couple more pix. Photo hosting - just what I need, another username and password to deal with. On my screen, the photos show up about 8 1/2x11 - fill most of the screen. Uhhh... you do know to click on the small pix, riiiight?
Yes...but it then adds 2 extra steps for each picture you want us to look at....
I would be willing to bet that I'm not the only one who tends to ignore posts when you have to jump through hoops to view the pics.
Yes...but it then adds 2 extra steps for each picture you want us to look at....
I would be willing to bet that I'm not the only one who tends to ignore posts when you have to jump through hoops to view the pics.
Just goes to show... maybe your view is different from mine-different Preferences settings, etc. All I have to do is click on a thumbnail, and the pix go close to full screen. Then a scroll arrow goes back and forth through the pictures. That's several notches shy of what I'd call "jumping through hoops". On the other hand, in some posts the pictures come up large without having to do anything. Sometimes, in fact, so large that the whole picture won't fit on my 20.4" screen and I have to scroll back and forth, up and down just to see it all. In some posts, even the text is too wide to fit on the screen. I find that annoying, but not enough so that I ignore posts that are interesting.
Oh, well, I guess that's why they make chocolate and vanilla.

I like what you did with the old reflectors. I've been looking at those barn lights a lot lately trying to comeup with ideas for my exterior lights.
BTW--I prefer the thumbnail pictures over the full-size photos embedded directly in the post. Makes it easier to select which pictures I want to take a closer look at and easier to see the messages. It especially makes the thread more tidy when others quote you--otherwise the thread ends up with duplicate after duplicate of the same oversized pictures contained in all the quotes.
BTW--I prefer the thumbnail pictures over the full-size photos embedded directly in the post. Makes it easier to select which pictures I want to take a closer look at and easier to see the messages. It especially makes the thread more tidy when others quote you--otherwise the thread ends up with duplicate after duplicate of the same oversized pictures contained in all the quotes.
Last edited: