To avoid these ads, REGISTER NOW!

Anvil Questions?

Thumper68

Well-known member
Joined
May 16, 2013
Messages
5,134
Location
Duluth MN
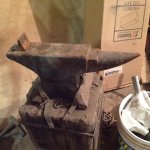
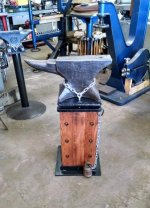
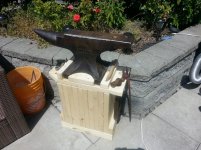
So after I had a incident last weekend with the log my anvil was on I decided that I needed a new stand. Here is what I built.


And my question is how would you mount the anvil to this, I would like it very sturdy so that I can move it around safely.


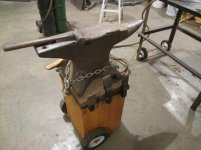
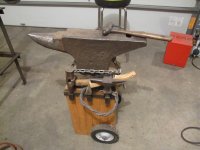
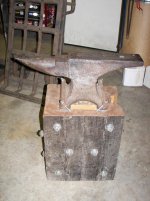
I also moved the plate that was attached to the old log that came with the anvil.

 
To avoid these ads, REGISTER NOW!
OP
T

Thumper68

Well-known member
Joined
May 16, 2013
Messages
5,134
Location
Duluth MN
If anyone is wondering, Yes it is solid 2x4's 40 of them held together with construction screws, pole barn screws threaded rod and steel straps.
 

drivesitfar

Well-known member
Joined
Oct 23, 2013
Messages
35,999
Location
Pacific Northwest
Thumper: you have a lot of metal skills so maybe making a couple straps out of 1 or 1.5 inch steel and bolting them to the sides that cover the toes of your anvil. BTW I love the name plate.

check out the anvil thread too to see some of the other anvils that might give you some idea.

http://www.garagejournal.com/forum/showthread.php?t=33788

are you going to stain or burn the wood to give it a little age look?
 

mitusa

Well-known member
Joined
Dec 24, 2011
Messages
1,991
Location
SW Oklahoma
The straps would be a good idea...I've seen that done.....I was wondering about tracing the outline of the bottom of the anvil onto the top of your stand and then using a router to drop it down a little. :dunno:
 

jumbojak

Well-known member
Joined
Jun 21, 2016
Messages
1,360
Location
Surry, VA
Plumbing straps. At least I think that's what they're called. Metal strip with holes down the middle. Glad to see you ran the lumber the right way in your stand.
 

BreeStephany

ALLIANCE MEMBER
Joined
May 19, 2012
Messages
849
Location
Oregon
When I mounted my anvil, I outlined the base on the block and then took a router and routed out the outline approximately an inch deep. I did the routing just inside the line of the outline so that it fit tight.

I was going to add some strapping or chain over the anvil to make sure that it would not come out, however, I made my block out an 20" x 28" x 30" block of solid maple which was a little green, so when it dried, it tightened up around the anvil base and doesn't need any strapping.

I wish I would have done some steel strapping around it (I've always wanted to wrap heated strap, rivet and then quench it) because once it dried, it developed a decent crack on one side but still works great.

My suggestion would be to route out the base a little small, put your anvil in and then secure it with two straps and you should be good to go.
 

drivesitfar

Well-known member
Joined
Oct 23, 2013
Messages
35,999
Location
Pacific Northwest
Mit: great idea and i think BREA took it one step farther that sounds AWESOME.

router and then strap, but i'd use 1/8 inch think steel and not the thinner plumbing straps with that 145 pound anvil.

great stuff everybody
 
OP
T

Thumper68

Well-known member
Joined
May 16, 2013
Messages
5,134
Location
Duluth MN
Thanks for the ideas!

I will see about routing it tomorrow and I think I have a good idea for the straps as well.

Drives I have been looking through the anvil thread a bit.
 
OP
T

Thumper68

Well-known member
Joined
May 16, 2013
Messages
5,134
Location
Duluth MN
When I mounted my anvil, I outlined the base on the block and then took a router and routed out the outline approximately an inch deep. I did the routing just inside the line of the outline so that it fit tight.

I was going to add some strapping or chain over the anvil to make sure that it would not come out, however, I made my block out an 20" x 28" x 30" block of solid maple which was a little green, so when it dried, it tightened up around the anvil base and doesn't need any strapping.

I wish I would have done some steel strapping around it (I've always wanted to wrap heated strap, rivet and then quench it) because once it dried, it developed a decent crack on one side but still works great.
My suggestion would be to route out the base a little small, put your anvil in and then secure it with two straps and you should be good to go.

This is exactly why I did not want a solid piece, the log it was on has cracks in it, I will have to get a few pics of how they dealt with that for you, it is really kind of cool.
 
OP
T

Thumper68

Well-known member
Joined
May 16, 2013
Messages
5,134
Location
Duluth MN
Plumbing straps. At least I think that's what they're called. Metal strip with holes down the middle. Glad to see you ran the lumber the right way in your stand.

I can't even think why anyone would not do it with the grain, it is much stronger that way.
 
OP
T

Thumper68

Well-known member
Joined
May 16, 2013
Messages
5,134
Location
Duluth MN
Thumper: you have a lot of metal skills so maybe making a couple straps out of 1 or 1.5 inch steel and bolting them to the sides that cover the toes of your anvil. BTW I love the name plate.

check out the anvil thread too to see some of the other anvils that might give you some idea.

http://www.garagejournal.com/forum/showthread.php?t=33788

are you going to stain or burn the wood to give it a little age look?[/QUOTE]

I thought about it and decided that I will let it age naturally, in a few years it should look better. I already have 5 or 6 hours into it.
 

drivesitfar

Well-known member
Joined
Oct 23, 2013
Messages
35,999
Location
Pacific Northwest
Thumper: i was looking in the anvil thread for some stands that have the heavy duty strapping and some hammer holders and didn't see the ones i've seen here on GJ before so they must be on the vise thread or a small thread. in any case i pulled up a few that might give you a couple ideas.

good luck
 

Attachments

  • image.jpg4_zpsjohkodtt.jpg
    image.jpg4_zpsjohkodtt.jpg
    122.1 KB · Views: 77
  • Mouse Hole stand 2.jpg
    Mouse Hole stand 2.jpg
    54 KB · Views: 90
  • IMG_0276.jpg
    IMG_0276.jpg
    133.8 KB · Views: 82
  • IMG_0275.jpg
    IMG_0275.jpg
    135.4 KB · Views: 81
  • imagejpg1_zps4d676b44.jpg
    imagejpg1_zps4d676b44.jpg
    123 KB · Views: 78
  • 100_0659.jpg
    100_0659.jpg
    143.4 KB · Views: 82
  • 4cb85d6f3581f2260e986c79a05a0802.jpg
    4cb85d6f3581f2260e986c79a05a0802.jpg
    56.1 KB · Views: 73

jumbojak

Well-known member
Joined
Jun 21, 2016
Messages
1,360
Location
Surry, VA
Mit: great idea and i think BREA took it one step farther that sounds AWESOME.

router and then strap, but i'd use 1/8 inch think steel and not the thinner plumbing straps with that 145 pound anvil.

great stuff everybody

You really don't need the strapping to be all that heavy duty. The weight of the anvil will keep it more or less on the stand. The straps just keep it from walking around while you're going medieval on a piece of hot iron! My anvil is a rectangular block on a put pose built tripod - not pretty but it gets the job done - but even without the fitted stand a few nails were enough to keep it upright in my old stump.
 

jumbojak

Well-known member
Joined
Jun 21, 2016
Messages
1,360
Location
Surry, VA
I can't even think why anyone would not do it with the grain, it is much stronger that way.

The rebound is what bothers me about stacked lumber stands. Every layer in the stack gives the stand a place to flex and rob you of the rebound you purchased that anvil for. A hardened striking surface makes an enormous difference. People come up with some... shall we say, odd stands for their anvils.
 
To avoid these ads, REGISTER NOW!

BreeStephany

ALLIANCE MEMBER
Joined
May 19, 2012
Messages
849
Location
Oregon
This is exactly why I did not want a solid piece, the log it was on has cracks in it, I will have to get a few pics of how they dealt with that for you, it is really kind of cool.

It was really hard to say no to a 36" diameter round of old growth maple. It looked great for the first year which is why I never banded it, and then grew a decent crack around the second year, by which time it was too late to band it.

Its been in its current condition for about a decade without issue, so at this point I don't really see a reason to band it.
 
OP
T

Thumper68

Well-known member
Joined
May 16, 2013
Messages
5,134
Location
Duluth MN
Thumper: i was looking in the anvil thread for some stands that have the heavy duty strapping and some hammer holders and didn't see the ones i've seen here on GJ before so they must be on the vise thread or a small thread. in any case i pulled up a few that might give you a couple ideas.

good luck

Thanks Drives, I have an idea in my head and I am going to run with it tomorrow. Pics will be added here when it's done.

You really don't need the strapping to be all that heavy duty. The weight of the anvil will keep it more or less on the stand. The straps just keep it from walking around while you're going medieval on a piece of hot iron! My anvil is a rectangular block on a put pose built tripod - not pretty but it gets the job done - but even without the fitted stand a few nails were enough to keep it upright in my old stump.

No big heavy straps are not needed, mine was held on its old base by 4 square cut nails, But I have an idea for something a bit more substantial, not because it is needed but because I think I want a certain look and I want to be able to roll it around with the hand truck and don't want it falling again 140 pounds hitting the floor scares the **** out of me.

The rebound is what bothers me about stacked lumber stands. Every layer in the stack gives the stand a place to flex and rob you of the rebound you purchased that anvil for. A hardened striking surface makes an enormous difference. People come up with some... shall we say, odd stands for their anvils.

I agree and have no idea why anyone would want that.

It was really hard to say no to a 36" diameter round of old growth maple. It looked great for the first year which is why I never banded it, and then grew a decent crack around the second year, by which time it was too late to band it.

Its been in its current condition for about a decade without issue, so at this point I don't really see a reason to band it.

I will get a few pics of what my old log had, they look perfect.
 

great white tj

Well-known member
Joined
Apr 12, 2009
Messages
545
Location
Ocala Fl.
If you ever feel the need to change from wood to something else take a look at this. I have 225lbs. of sand in the stand with the 178lbs anvil and may be 100lbs in the stand it self. it works great. All the side trays and hammer holders are just bolted on, this helps when I move it.
 

Attachments

  • P1010012 (3).jpg
    P1010012 (3).jpg
    137 KB · Views: 90
  • P1010017.jpg
    P1010017.jpg
    135.7 KB · Views: 78
OP
T

Thumper68

Well-known member
Joined
May 16, 2013
Messages
5,134
Location
Duluth MN
It was really hard to say no to a 36" diameter round of old growth maple. It looked great for the first year which is why I never banded it, and then grew a decent crack around the second year, by which time it was too late to band it.

Its been in its current condition for about a decade without issue, so at this point I don't really see a reason to band it.
Here are the pics I promised I really like the look of these staples that were forged to stabilize the cracks.


If you ever feel the need to change from wood to something else take a look at this. I have 225lbs. of sand in the stand with the 178lbs anvil and may be 100lbs in the stand it self. it works great. All the side trays and hammer holders are just bolted on, this helps when I move it.

Very nice stand, I think I will stick with wood for this anvil maybe if I score another one I will try your idea.

Here is what I came up with, I was thinking about a bolt with a cross bore to access the nut, but in the end went with a 4 inch lag screw. I fired up the forge to form the straps, I could have done it much faster with the torch but felt it was more fitting to use the forge.


jaker10

Well-known member
Joined
Sep 18, 2011
Messages
371
Location
Bartonvillle Illinois
Here is how I mounted my Trenton to a log. I used lag bolts, screwed them in with an impact, cut the head off and heated them up till red and bent over.
 

Attachments

  • DSC02919 (1024x768).jpg
    DSC02919 (1024x768).jpg
    71.4 KB · Views: 51
  • DSC02920 (1024x768).jpg
    DSC02920 (1024x768).jpg
    92.9 KB · Views: 51
  • DSC02921 (1024x768).jpg
    DSC02921 (1024x768).jpg
    94.8 KB · Views: 45
Last edited:

drivesitfar

Well-known member
Joined
Oct 23, 2013
Messages
35,999
Location
Pacific Northwest
Thumper: i like the method and especially the look. like JJ mentioned the plumbing straps might have worked just fine, but i do like the look you chose a LOT BETTER. also just curious how long the lag bolt is that you screwed in the stand to hold the straps down.

WELL DONE
 
OP
T

Thumper68

Well-known member
Joined
May 16, 2013
Messages
5,134
Location
Duluth MN
Thumper: i like the method and especially the look. like JJ mentioned the plumbing straps might have worked just fine, but i do like the look you chose a LOT BETTER. also just curious how long the lag bolt is that you screwed in the stand to hold the straps down.

WELL DONE

4 Or 4.5 inches, it was what I had on hand. I used some shorter threaded studs while forming the parts so I could use a nut to hold the strap while forming it around the anvil. I used the stud because I knew I was going to be removing it several times during the process and hammering it as well and didn't want to wallow out the hole to much.

I made a video of the process that will be coming out in the next few weeks sometime.
 

drivesitfar

Well-known member
Joined
Oct 23, 2013
Messages
35,999
Location
Pacific Northwest
Thumper: i wanted to bump up the thread so i can find it quicker once i get time to finish your COOL VIDEO. i watched some of it so far and love how you have your miter saw set up and your quick method of measuring for multiple cuts is AWESOME.

while i'm waiting to watch the rest is there anything you would have done different if you were to make another one?
 
OP
T

Thumper68

Well-known member
Joined
May 16, 2013
Messages
5,134
Location
Duluth MN
Thumper: i wanted to bump up the thread so i can find it quicker once i get time to finish your COOL VIDEO. i watched some of it so far and love how you have your miter saw set up and your quick method of measuring for multiple cuts is AWESOME.

while i'm waiting to watch the rest is there anything you would have done different if you were to make another one?

Thanks Drives.

I don't know if there is anything that I would do differently, there are a few things that I could do like joint and plane all the 2x4's for a tighter fit, wait until it was all assembled to drill for the threaded rod. But I don't think that it would have been worth it to do either of those things.
 

drivesitfar

Well-known member
Joined
Oct 23, 2013
Messages
35,999
Location
Pacific Northwest
Thumper: great job making the stand and mounting your anvil to it. WELL DONE :thumbup:

I really liked the way you set up your miter saw and the method for cutting pieces the same length is a keeper that i'll soon be using on several projects i'm about to do. thanks for sharing.

since you make so many videos have you seen Denwood's thread (Woody's) and his company makes some awesome time lapse equipment you might want to check out along with all his home improvement projects. his projects and stuff are great, but his attitude is even better if you have questions just ask on the thread or PM him.

http://www.garagejournal.com/forum/showthread.php?t=263351

also since i'm sort of on a safety kick would you please get yourself some better safety glasses or maybe a full face shield so the youngins watching can learn better than we were taught. i sympathize with you if you need to wear glasses cause i do a lot of work with my readers on now too and sometimes think they are my safety glasses. we only have 2 eyes so take care of them as best you can.

cheers and thanks again for taking the time to make the video and for sharing some of your skills.
 
OP
T

Thumper68

Well-known member
Joined
May 16, 2013
Messages
5,134
Location
Duluth MN
Thumper: great job making the stand and mounting your anvil to it. WELL DONE :thumbup:

I really liked the way you set up your miter saw and the method for cutting pieces the same length is a keeper that i'll soon be using on several projects i'm about to do. thanks for sharing.

since you make so many videos have you seen Denwood's thread (Woody's) and his company makes some awesome time lapse equipment you might want to check out along with all his home improvement projects. his projects and stuff are great, but his attitude is even better if you have questions just ask on the thread or PM him.

http://www.garagejournal.com/forum/showthread.php?t=263351

also since i'm sort of on a safety kick would you please get yourself some better safety glasses or maybe a full face shield so the youngins watching can learn better than we were taught. i sympathize with you if you need to wear glasses cause i do a lot of work with my readers on now too and sometimes think they are my safety glasses. we only have 2 eyes so take care of them as best you can.

cheers and thanks again for taking the time to make the video and for sharing some of your skills.

Drives thanks for the kudos. :thumbup:

It does not show on the video to well but the block I used as a stop for the miter saw is at an angle so that only a corner is contacting the wood being cut, this keeps saw dust from building out and changing the cut length.
Hope that helps some.

As far as the glasses go I do have a good pair of prescription safety glasses that I do wear most of the time, that day I seemed for have skipped them, but even my regular glasses have impact resistant polycarbonate lenses, just lacking the side shields.

Keep safe and have fun in the shop/garage.
 

Kenskip1

Well-known member
Joined
Dec 30, 2013
Messages
657
Location
Missouri
Sir As to mounting the anvil to the kindling box. Have a welder weld a quarter inch plate to the anvil, then drill holes in the plate and bolt it to the kindling pile.Is a truss optional as well as a trip to the chiropractor on this task?Ken
 
To avoid these ads, REGISTER NOW!
Top Bottom